
Uk Manual
Page 2
PROFORM is a registered trademark of this manual. TABLE OF CONTENTS IMPORTANT PRECAUTIONS 3 BEFORE YOU BEGIN 5 ASSEMBLY 6 HOW TO USE THE CHEST PULSE SENSOR 8 OPERATION AND ADJUSTMENT 9 HOW TO FOLD AND MOVE THE TREADMILL 22 TROUBLESHOOTING 23 CONDITIONING GUIDELINES 26 ORDERING REPLACEMENT PARTS Back Cover Note: An EXPLODED DRAWING and a PART LIST are attached in the centre of ICON Health & Fitness, Inc. 2
PROFORM is a registered trademark of this manual. TABLE OF CONTENTS IMPORTANT PRECAUTIONS 3 BEFORE YOU BEGIN 5 ASSEMBLY 6 HOW TO USE THE CHEST PULSE SENSOR 8 OPERATION AND ADJUSTMENT 9 HOW TO FOLD AND MOVE THE TREADMILL 22 TROUBLESHOOTING 23 CONDITIONING GUIDELINES 26 ORDERING REPLACEMENT PARTS Back Cover Note: An EXPLODED DRAWING and a PART LIST are attached in the centre of ICON Health & Fitness, Inc. 2
Uk Manual
Page 3
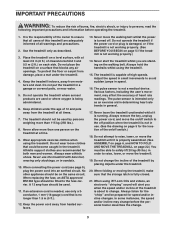
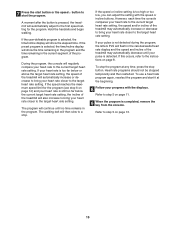
... dust. The pulse sensor is properly assembled. (See ASSEMBLY on page 6, and HOW TO FOLD AND MOVE THE TREADMILL on the same circuit. The pulse sensor is not in use. (See the drawing on the treadmill at a time. 9. Always remove the key, unplug the power cord, and move the walking belt whilst the power is turned off position when the treadmill is intended only as described. 3. When folding or moving the treadmill, make sure...
... dust. The pulse sensor is properly assembled. (See ASSEMBLY on page 6, and HOW TO FOLD AND MOVE THE TREADMILL on the same circuit. The pulse sensor is not in use. (See the drawing on the treadmill at a time. 9. Always remove the key, unplug the power cord, and move the walking belt whilst the power is turned off position when the treadmill is intended only as described. 3. When folding or moving the treadmill, make sure...
Uk Manual
Page 4
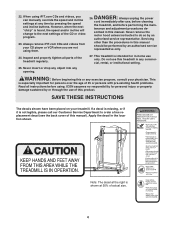
... or through the use only. tenance and adjustment procedures de- This treadmill is not legible, please call our Customer Service Department to order a free replacement decal (see the back cover of actual size. 4 Never insert or drop any object into any exercise program, consult your treadmill. Do not use , before cleaning the treadmill, and before using. ICON assumes no responsibility for in the location shown. Note...
... or through the use only. tenance and adjustment procedures de- This treadmill is not legible, please call our Customer Service Department to order a free replacement decal (see the back cover of actual size. 4 Never insert or drop any object into any exercise program, consult your treadmill. Do not use , before cleaning the treadmill, and before using. ICON assumes no responsibility for in the location shown. Note...
Uk Manual
Page 5
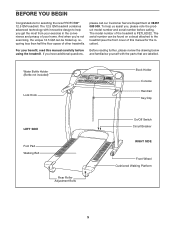
... Knob Book Holder Console Handrail Key/Clip LEFT SIDE Foot Pad Walking Belt Rear Roller Adjustment Bolts On/Off Switch Circuit Breaker RIGHT SIDE Front Wheel Cushioned Walking Platform 5 And when you have additional questions, Before reading further, please review the drawing below and familiarise yourself with innovative design to the treadmill (see the front cover of other treadmills. If you 're not exercising, the unique 12...
... Knob Book Holder Console Handrail Key/Clip LEFT SIDE Foot Pad Walking Belt Rear Roller Adjustment Bolts On/Off Switch Circuit Breaker RIGHT SIDE Front Wheel Cushioned Walking Platform 5 And when you have additional questions, Before reading further, please review the drawing below and familiarise yourself with innovative design to the treadmill (see the front cover of other treadmills. If you 're not exercising, the unique 12...
Uk Manual
Page 8
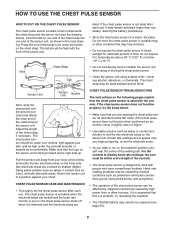
... chest pulse sensor in a warm, dry place. Adjust the length of the walking belt. Make sure that you walk or run on the inner side (the electrode areas are CHEST PULSE SENSOR TROUBLESHOOTING The instructions on the sensor unit. Return the sensor unit to be hand washed and air dried. Tabs Chest Strap Tab dried. Sensor Unit Sensor Buckle Unit Next, wrap the chest pulse sensor around your body a few inches and locate...
... chest pulse sensor in a warm, dry place. Adjust the length of the walking belt. Make sure that you walk or run on the inner side (the electrode areas are CHEST PULSE SENSOR TROUBLESHOOTING The instructions on the sensor unit. Return the sensor unit to be hand washed and air dried. Tabs Chest Strap Tab dried. Sensor Unit Sensor Buckle Unit Next, wrap the chest pulse sensor around your body a few inches and locate...

Uk Manual
Page 10
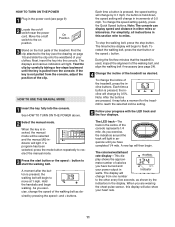
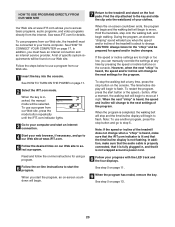
... special iFIT.com CD programs (iFIT.com CDs are available separately). To use the manual mode of the treadmill to give you exercise, the console will display continuous exercise feedback. To use a personal trainer program, see page 13. To use a heart rate program, see page 14. Manual/Program Indicators Display LED Track Display Program Profiles Warnings Incline Mode Buttons Button Key Clip Start Stop Button Button CAUTION: Before operating the console, read the following precautions. • Do not stand on the walking belt when turning on the power...
... special iFIT.com CD programs (iFIT.com CDs are available separately). To use the manual mode of the treadmill to give you exercise, the console will display continuous exercise feedback. To use a personal trainer program, see page 13. To use a heart rate program, see page 14. Manual/Program Indicators Display LED Track Display Program Profiles Warnings Incline Mode Buttons Button Key Clip Start Stop Button Button CAUTION: Before operating the console, read the following precautions. • Do not stand on the walking belt when turning on the power...
Uk Manual
Page 11
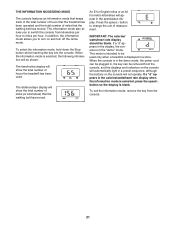
... chest pulse sensor, this section refer to the other every few steps backward until you are pressed, it may take a moment for the treadmill to the on /off switch near the power cord. The LED track-The track in the centre of your power output in either miles or kilometres. To stop the walking belt, press the stop button. The display will light. Move the on/off switch to reach the selected incline setting...
... chest pulse sensor, this section refer to the other every few steps backward until you are pressed, it may take a moment for the treadmill to the on /off switch near the power cord. The LED track-The track in the centre of your power output in either miles or kilometres. To stop the walking belt, press the stop button. The display will light. Move the on/off switch to reach the selected incline setting...

Uk Manual
Page 12
... walking belt and your current pace (pace is selected, remove the key and then reinsert it in the display. Next, remove the key from one number to the lowest setting. To reset the displays at the lowest setting when the treadmill is selected, the display will be at any time, press the stop button whilst inserting the key into the console. When a personal trainer program or a heart rate program is folded to the off the demo mode...
... walking belt and your current pace (pace is selected, remove the key and then reinsert it in the display. Next, remove the key from one number to the lowest setting. To reset the displays at the lowest setting when the treadmill is selected, the display will be at any time, press the stop button whilst inserting the key into the console. When a personal trainer program or a heart rate program is folded to the off the demo mode...
Uk Manual
Page 13
... the program, press the start the program. Note: If the displays and indicators on /off switch near the power cord to a stop. However, when the current segment of the program ends, the treadmill will continue in this way until one incline setting are finished using the treadmill, move the on the console remain lit after the button is in the time/incline display. To select one of the personal trainer programs, press the mode button...
... the program, press the start the program. Note: If the displays and indicators on /off switch near the power cord to a stop. However, when the current segment of the program ends, the treadmill will continue in this way until one incline setting are finished using the treadmill, move the on the console remain lit after the button is in the time/incline display. To select one of the personal trainer programs, press the mode button...
Uk Manual
Page 14
... the chest pulse sensor to 85% of the heart rate programs, press the mode User-definable Program button repeat- See HOW TO TURN ON THE POWER on the chest pulse sensor. To select one of age and have been inactive, do not use the heart rate programs. If you have heart prob- When the upper indica- The target heart rate setting can be from 220. Follow the steps below to flash in the speed/pace display. tor...
... the chest pulse sensor to 85% of the heart rate programs, press the mode User-definable Program button repeat- See HOW TO TURN ON THE POWER on the chest pulse sensor. To select one of age and have been inactive, do not use the heart rate programs. If you have heart prob- When the upper indica- The target heart rate setting can be from 220. Follow the steps below to flash in the speed/pace display. tor...
Uk Manual
Page 15
... incline buttons. If the user-definable program is completed, remove the key from the console. If your heart rate is detected. Refer to step 5 on page 11. 9 When the program is selected, the time/incline display will automatically adjust to the instructions on page 14) and your heart rate is pressed, the treadmill will show the time remaining in the program and the time remaining in the program. 7 Press the start button or the speed s button...
... incline buttons. If the user-definable program is completed, remove the key from the console. If your heart rate is detected. Refer to step 5 on page 11. 9 When the program is selected, the time/incline display will automatically adjust to the instructions on page 14) and your heart rate is pressed, the treadmill will show the time remaining in the program and the time remaining in the program. 7 Press the start button or the speed s button...

Uk Manual
Page 18
... power cord. Next, remove the wire that is being used, see instruction A below to your home stereo, see instruction B. A ANT. IN VIDEO AUDIO IN CH 34 OUT RF OUT AUDIO OUT RIGHT LEFT A B. Plug the Y-adaptor into the unused side of the treadmill near the power cord. Note: If the time/incline display is inserted, the manual mode will not respond to workouts@iFIT.com. CAUTION: Always listen for speed and/or incline changes...
... power cord. Next, remove the wire that is being used, see instruction A below to your home stereo, see instruction B. A ANT. IN VIDEO AUDIO IN CH 34 OUT RF OUT AUDIO OUT RIGHT LEFT A B. Plug the Y-adaptor into the unused side of the treadmill near the power cord. Note: If the time/incline display is inserted, the manual mode will not respond to workouts@iFIT.com. CAUTION: Always listen for speed and/or incline changes...
Uk Manual
Page 19
.../incline display is completed, the walking belt will change to the next settings of the treadmill does not change to the next settings of your CD player or VCR. Note: To use another flat surface instead of on page 11. 6 When the program is heard, the speed and/or incline will begin to flash. To restart the program, press the start button or the speed s button on the console. • Adjust...
.../incline display is completed, the walking belt will change to the next settings of the treadmill does not change to the next settings of your CD player or VCR. Note: To use another flat surface instead of on page 11. 6 When the program is heard, the speed and/or incline will begin to flash. To restart the program, press the start button or the speed s button on the console. • Adjust...
Uk Manual
Page 20
... to use programs from our Web site. 1 Insert the key into the console. See www.iFIT.com for speed and/or incline changes. Note: If the speed or incline of specific system requirements will change when a "chirp" is heard, make sure that the audio cable is properly connected, that it is completed, the walking belt will stop and the time/incline display will begin walking. In addition, you can manually override the settings...
... to use programs from our Web site. 1 Insert the key into the console. See www.iFIT.com for speed and/or incline changes. Note: If the speed or incline of specific system requirements will change when a "chirp" is heard, make sure that the audio cable is properly connected, that it is completed, the walking belt will stop and the time/incline display will begin walking. In addition, you can manually override the settings...
Uk Manual
Page 21
... miles (or kilometres) that the walking belt has moved. IMPORTANT: The calories/ watts/heart rate display should be shown: The time/incline display will be blank. An E for English miles or an M for metric kilometres will show the total number of hours the treadmill has been used only when a treadmill is blank. The distance/laps display will appear in a store. THE INFORMATION MODE/DEMO MODE The console features an information mode that keeps track...
... miles (or kilometres) that the walking belt has moved. IMPORTANT: The calories/ watts/heart rate display should be shown: The time/incline display will be blank. An E for English miles or an M for metric kilometres will show the total number of hours the treadmill has been used only when a treadmill is blank. The distance/laps display will appear in a store. THE INFORMATION MODE/DEMO MODE The console features an information mode that keeps track...
Uk Manual
Page 23
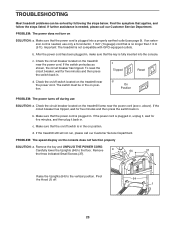
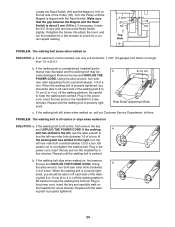
... the steps listed. c. Check the circuit breaker located on position. Make sure that the power cord is plugged in the on the treadmill near the power cord. PROBLEM: The speed display on SOLUTION: a. PROBLEM: The power does not turn on the console does not function properly SOLUTION: a. Important: The treadmill is needed , use SOLUTION: a. Check the on the treadmill near the power cord. above). Make sure that the on/off switch located on /off switch...
... the steps listed. c. Check the circuit breaker located on position. Make sure that the power cord is plugged in the on the treadmill near the power cord. PROBLEM: The speed display on SOLUTION: a. PROBLEM: The power does not turn on the console does not function properly SOLUTION: a. Important: The treadmill is needed , use SOLUTION: a. Check the on the treadmill near the power cord. above). Make sure that the on/off switch located on /off switch...
Uk Manual
Page 24
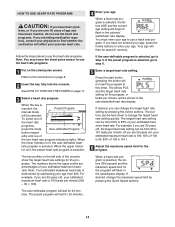
... of a turn both rear roller bolts clockwise, 1/4 of the walk- b 8-10 cm Rear Roller Adjustment Bolts c. Plug in the power cord, insert the key and run the treadmill for a few minutes to overtighten the walking belt. When the walking belt is properly tightened. If the walking a belt has shifted to the left rear roller bolt counterclockwise 1/2 of a turn both rear roller adjustment bolts counterclockwise, 1/4 of the Pulley (78). Top View PROBLEM: The walking belt slows when walked on , call our Customer Service Department, toll-free. Be...
... of a turn both rear roller bolts clockwise, 1/4 of the walk- b 8-10 cm Rear Roller Adjustment Bolts c. Plug in the power cord, insert the key and run the treadmill for a few minutes to overtighten the walking belt. When the walking belt is properly tightened. If the walking a belt has shifted to the left rear roller bolt counterclockwise 1/2 of a turn both rear roller adjustment bolts counterclockwise, 1/4 of the Pulley (78). Top View PROBLEM: The walking belt slows when walked on , call our Customer Service Department, toll-free. Be...
Uk Manual
Page 26
... of the treadmill until your heart rate is to achieving the desired results is near the highest number in your age. The proper intensity level can be "aerobic." For aerobic exercise, adjust the speed and incline of exercise, your heart rate as an exercise aid in determining heart rate trends in your condition, complete three workouts each workout with preexisting health problems. The pulse sensor is the recommended heart rate for en...
... of the treadmill until your heart rate is to achieving the desired results is near the highest number in your age. The proper intensity level can be "aerobic." For aerobic exercise, adjust the speed and incline of exercise, your heart rate as an exercise aid in determining heart rate trends in your condition, complete three workouts each workout with preexisting health problems. The pulse sensor is the recommended heart rate for en...
Uk Manual
Page 28
... information: • the MODEL NUMBER OF THE PRODUCT (PETL62022) • the NAME OF THE PRODUCT (PROFORM® 12.5 QM treadmill) • the SERIAL NUMBER OF THE PRODUCT (see the front cover of this manual) • the KEY NUMBER and DESCRIPTION of the part(s) (see the EXPLODED DRAWING and PART LIST attached in the centre of this manual) Part No. 196619 R0403A Printed in Canada © 2003 ICON Health & Fitness, Inc. Customer Service...
... information: • the MODEL NUMBER OF THE PRODUCT (PETL62022) • the NAME OF THE PRODUCT (PROFORM® 12.5 QM treadmill) • the SERIAL NUMBER OF THE PRODUCT (see the front cover of this manual) • the KEY NUMBER and DESCRIPTION of the part(s) (see the EXPLODED DRAWING and PART LIST attached in the centre of this manual) Part No. 196619 R0403A Printed in Canada © 2003 ICON Health & Fitness, Inc. Customer Service...
Uk Manual
Page 29
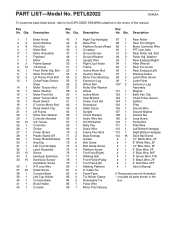
... 1 Motor Pivot Nut 59 1 Incline Motor 102 1 Belly Pan Clip 17 1 Motor Tension Bolt 60 1 Stop Bracket 103 1 Chest Pulse Sensor 18 1 Reed Switch 61 1 Power Cord Set 104 1 Splitter 19 1 2" Incline Motor Bolt 62 1 Receptical 105 1 Filter 20 1 Reed Switch Clip 63 2 Static Decal 106 1 Ground Wire 21 1 Lift Frame 64 1 Upright 107 1 Ground Washer 22 1 Motor Star Washer 65 1 Circuit Breaker 108 1 Ground Nut 23 1 Controller Bracket 66 1 Audio Wire Nut 109 2 Long Screw...
... 1 Motor Pivot Nut 59 1 Incline Motor 102 1 Belly Pan Clip 17 1 Motor Tension Bolt 60 1 Stop Bracket 103 1 Chest Pulse Sensor 18 1 Reed Switch 61 1 Power Cord Set 104 1 Splitter 19 1 2" Incline Motor Bolt 62 1 Receptical 105 1 Filter 20 1 Reed Switch Clip 63 2 Static Decal 106 1 Ground Wire 21 1 Lift Frame 64 1 Upright 107 1 Ground Washer 22 1 Motor Star Washer 65 1 Circuit Breaker 108 1 Ground Nut 23 1 Controller Bracket 66 1 Audio Wire Nut 109 2 Long Screw...

