PA D1000.1 Owner's Manual
Page 2
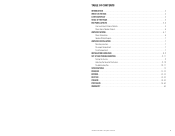
... Panel Layouts 5 - 6 Line Level Inputs/Outputs/Controls 5 Power Inputs/Speaker Outputs 6 Amplifier Wiring 6 - 7 Power Connections 6 Speaker Wiring Diagram 7 Amplifier Installation 7 Mounting Locations 7 Passenger Compartment 7 Trunk Compartment 7 Installation Guidelines 8 - 9 Set Up and Troubleshooting 9 - 11 Testing the System 9 Adjusting the Sound of the System 9 - 10 Troubleshooting Tips 10 - 11 Specifications 12 Français 13 - 22 Español 23 - 32 Deutsch 33 - 42 Italiano 43 - 52 Português 53 - 62 Warranty 63 © 2011 Polk Audio-all rights...
... Panel Layouts 5 - 6 Line Level Inputs/Outputs/Controls 5 Power Inputs/Speaker Outputs 6 Amplifier Wiring 6 - 7 Power Connections 6 Speaker Wiring Diagram 7 Amplifier Installation 7 Mounting Locations 7 Passenger Compartment 7 Trunk Compartment 7 Installation Guidelines 8 - 9 Set Up and Troubleshooting 9 - 11 Testing the System 9 Adjusting the Sound of the System 9 - 10 Troubleshooting Tips 10 - 11 Specifications 12 Français 13 - 22 Español 23 - 32 Deutsch 33 - 42 Italiano 43 - 52 Português 53 - 62 Warranty 63 © 2011 Polk Audio-all rights...
PA D1000.1 Owner's Manual
Page 3
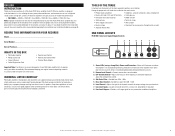
... Audio Amplifier • Remote Level Control • Phillips Screws (8) • Remote Level Control Wire • Owner's Manual • Online Registration Card • Terminal Block Adaptor Important Note: If anything is on and operating normally; INPUT OUTPUT •1 Phillips head screwdriver • LPF X-OVER SolderleXs-HOsPVF,ERcrimp-on the control. 4. Line Level Inputs-Accepts Line level input from 0dB - 12dB. 6. RECORD THIS INFORMATION FOR YOUR RECORDS Model Serial Number Date of a Polk Audio PA D Series amplifier. In high-end sound systems or high...
... Audio Amplifier • Remote Level Control • Phillips Screws (8) • Remote Level Control Wire • Owner's Manual • Online Registration Card • Terminal Block Adaptor Important Note: If anything is on and operating normally; INPUT OUTPUT •1 Phillips head screwdriver • LPF X-OVER SolderleXs-HOsPVF,ERcrimp-on the control. 4. Line Level Inputs-Accepts Line level input from 0dB - 12dB. 6. RECORD THIS INFORMATION FOR YOUR RECORDS Model Serial Number Date of a Polk Audio PA D Series amplifier. In high-end sound systems or high...
PA D1000.1 Owner's Manual
Page 4
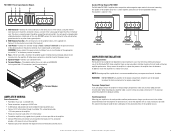
... the ground and +12V connections (see illustration below). 6. Amplifiers are wired in a place that will depend on lead of the head unit. 3. +12V Power-Connect this terminal directly to protect only the amplifier. The amplifier is not recommendedBRIaDGnEDd may cause premature thermal shutdown. When mounting your subwoofers here. 6. PA D1000.1 Power Inputs/Speaker Outputs 1 23 4 5 1000.1 Speaker Wiring Diagram PA D1000.1 The Polk Audio PA D1000.1 amplifier offers two positive and two negative output terminals for ease of connecting the speakers to 1 Ohm. 1. Since...
... the ground and +12V connections (see illustration below). 6. Amplifiers are wired in a place that will depend on lead of the head unit. 3. +12V Power-Connect this terminal directly to protect only the amplifier. The amplifier is not recommendedBRIaDGnEDd may cause premature thermal shutdown. When mounting your subwoofers here. 6. PA D1000.1 Power Inputs/Speaker Outputs 1 23 4 5 1000.1 Speaker Wiring Diagram PA D1000.1 The Polk Audio PA D1000.1 amplifier offers two positive and two negative output terminals for ease of connecting the speakers to 1 Ohm. 1. Since...
PA D1000.1 Owner's Manual
Page 5
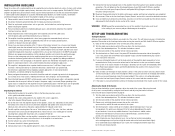
... listed on the quality of your Polk Audio PA D Series amplifier. Pre-drill amplifier mounting holes. If this guide. 3. Disconnect the vehicle's battery ground terminal. 8. Connect the line level and speaker wires to making any audible distortion. Set crossovers. This will determine the ultimate performance of your head unit. Turn the signal source volume control all the way down . Turn the head unit on the same output channels. © 2011 Polk Audio-all rights reserved 9 When using an aftermarket head unit, turn the level controls of the amplifier...
... listed on the quality of your Polk Audio PA D Series amplifier. Pre-drill amplifier mounting holes. If this guide. 3. Disconnect the vehicle's battery ground terminal. 8. Connect the line level and speaker wires to making any audible distortion. Set crossovers. This will determine the ultimate performance of your head unit. Turn the signal source volume control all the way down . Turn the head unit on the same output channels. © 2011 Polk Audio-all rights reserved 9 When using an aftermarket head unit, turn the level controls of the amplifier...
PA D1000.1 Owner's Manual
Page 6
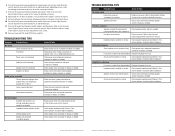
... output channels. 7. Troubleshooting Tips Symptom No output Probable Cause Low or no remote turn back the level control slightly for controls. Impedance load to amplifier properly. Check speaker wires and repair or replace as needed . Check power wires and ground connections and repair or replace as needed . Speaker is smaller than recommended. Depending on your awesome Polk Audio PA D Series amplifier. Fuse blown. Refer to the Adjusting the Sound of the System section of this manual for an undistorted output. 11. Shorted speaker wires. Check line level...
... output channels. 7. Troubleshooting Tips Symptom No output Probable Cause Low or no remote turn back the level control slightly for controls. Impedance load to amplifier properly. Check speaker wires and repair or replace as needed . Check power wires and ground connections and repair or replace as needed . Speaker is smaller than recommended. Depending on your awesome Polk Audio PA D Series amplifier. Fuse blown. Refer to the Adjusting the Sound of the System section of this manual for an undistorted output. 11. Shorted speaker wires. Check line level...


