User Manual
Page 3
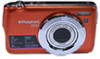
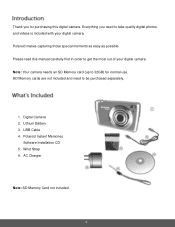
... this manual carefully first in order to get the most out of your digital camera. SD Memory cards are not included and need to take quality digital photos and videos is included with your digital camera. USB Cable 4. Lithium Battery 3. Wrist Strap 6. Polaroid Instant Memories Software Installation CD 5. AC Charger Note: SD Memory Card not included...
... this manual carefully first in order to get the most out of your digital camera. SD Memory cards are not included and need to take quality digital photos and videos is included with your digital camera. USB Cable 4. Lithium Battery 3. Wrist Strap 6. Polaroid Instant Memories Software Installation CD 5. AC Charger Note: SD Memory Card not included...
User Manual
Page 10
... the MODE button twice to start the record. The video will be automatically saved to your digital camera. You can switch modes by pressing the MODE button on the LCD screen while record is powered ON. Use this mode to view, edit or ... menus for the Playback mode for the Photo Capture mode, press the SET button while in progress. Use this mode to capture pictures with your camera's memory card. To access the various menus for photos and videos, press the SET button while in the Video Capture mode. Use this mode to...
... the MODE button twice to start the record. The video will be automatically saved to your digital camera. You can switch modes by pressing the MODE button on the LCD screen while record is powered ON. Use this mode to view, edit or ... menus for the Playback mode for the Photo Capture mode, press the SET button while in progress. Use this mode to capture pictures with your camera's memory card. To access the various menus for photos and videos, press the SET button while in the Video Capture mode. Use this mode to...
User Manual
Page 13
...mode to 32GB - The Auto Power Off settings can press the camera OFF. Make sure the built-in either Photo Capture Mode or Video Capture Mode). 12 Press the Power button to turn your Note: Your digital camera also has an Auto Power Off feature that automatically turns off your... camera after a specific period of time that your camera is on with your camera. (SD card up to start.
...mode to 32GB - The Auto Power Off settings can press the camera OFF. Make sure the built-in either Photo Capture Mode or Video Capture Mode). 12 Press the Power button to turn your Note: Your digital camera also has an Auto Power Off feature that automatically turns off your... camera after a specific period of time that your camera is on with your camera. (SD card up to start.
User Manual
Page 16
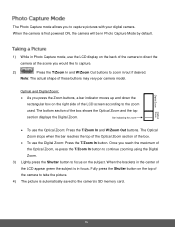
... of the Optical Zoom, re-press the T/Zoom In button to continue zooming using the Digital Zoom. 3) Lightly press the Shutter button to the camera's SD memory card. 15 When the brackets in /out if desired. Optical Digital Zoom Zoom The Photo Capture mode allows you to the zoom used. The bottom section... on the subject. Note: The actual shape of the box shows the Optical Zoom and the top section displays the Digital Zoom. Once you reach the maximum of the camera to direct the camera at the scene you would like to capture. 2) Press the T/Zoom In and W/Zoom Out buttons to zoom in...
... of the Optical Zoom, re-press the T/Zoom In button to continue zooming using the Digital Zoom. 3) Lightly press the Shutter button to the camera's SD memory card. 15 When the brackets in /out if desired. Optical Digital Zoom Zoom The Photo Capture mode allows you to the zoom used. The bottom section... on the subject. Note: The actual shape of the box shows the Optical Zoom and the top section displays the Digital Zoom. Once you reach the maximum of the camera to direct the camera at the scene you would like to capture. 2) Press the T/Zoom In and W/Zoom Out buttons to zoom in...

User Manual
Page 17
Opens the Scene menu Flash Options - Your digital camera has a four-directional pad that functions as desired. 1) Hold the MODE button for further information.) Delete - Opens the 'Delete This Photo' option and allows you ...
Opens the Scene menu Flash Options - Your digital camera has a four-directional pad that functions as desired. 1) Hold the MODE button for further information.) Delete - Opens the 'Delete This Photo' option and allows you ...

User Manual
Page 33
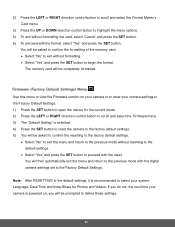
... press the SET button. 5) To proceed with the reset. If you will then automatically exit the menu and return to the previous mode with the digital camera settings set to proceed with the format, select "Yes" and press the SET button. Note: After RESETTING to the default settings, it is selected. 4) ...open the menus for Photos and Videos. Use this menu to view the Firmware version on , you do not, the next time your camera is powered on your camera or to reset your system Language, Date/Time and Insta-Share for the current mode. 2) Press the LEFT or RIGHT direction control button...
... press the SET button. 5) To proceed with the reset. If you will then automatically exit the menu and return to the previous mode with the digital camera settings set to proceed with the format, select "Yes" and press the SET button. Note: After RESETTING to the default settings, it is selected. 4) ...open the menus for Photos and Videos. Use this menu to view the Firmware version on , you do not, the next time your camera is powered on your camera or to reset your system Language, Date/Time and Insta-Share for the current mode. 2) Press the LEFT or RIGHT direction control button...
User Manual
Page 35
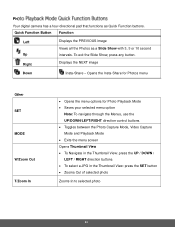
... the SET button Zooms Out of selected photo Zooms In to selected photo 34 To exit the Slide Show, press any button. Ph Your digital camera has a four-directional pad that functions as a Slide Show with 3, 5 or 10 second intervals.
... the SET button Zooms Out of selected photo Zooms In to selected photo 34 To exit the Slide Show, press any button. Ph Your digital camera has a four-directional pad that functions as a Slide Show with 3, 5 or 10 second intervals.
User Manual
Page 41
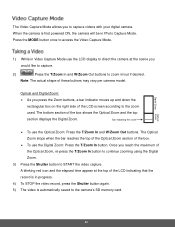
...buttons to zoom in/out if desired. The bottom section of these buttons may vary per camera model. Note: The actual shape of the box shows the Optical Zoom and the top section displays the Digital Zoom. Once you press the Zoom buttons, a bar indicator moves up and down the ... the Optical Zoom section of the Optical Zoom, re-press the T/Zoom In button to continue zooming using the Digital Zoom. 3) Press the Shutter button to capture videos with your digital camera. Optical and Digital Zoom: As you reach the maximum of the box. To use the Optical Zoom: Press ...
...buttons to zoom in/out if desired. The bottom section of these buttons may vary per camera model. Note: The actual shape of the box shows the Optical Zoom and the top section displays the Digital Zoom. Once you press the Zoom buttons, a bar indicator moves up and down the ... the Optical Zoom section of the Optical Zoom, re-press the T/Zoom In button to continue zooming using the Digital Zoom. 3) Press the Shutter button to capture videos with your digital camera. Optical and Digital Zoom: As you reach the maximum of the box. To use the Optical Zoom: Press ...
User Manual
Page 42
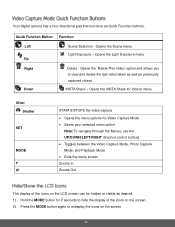
... Light Exposure menu Up Right Down Delete - Opens the 'Delete This Video' option and allows you to redisplay the icons on the screen. 41 Your digital camera has a four-directional pad that functions as previously captured videos INSTA Share - Opens the INSTA Share for Videos menu Other Shutter SET MODE T W STARTS/STOPS...
... Light Exposure menu Up Right Down Delete - Opens the 'Delete This Video' option and allows you to redisplay the icons on the screen. 41 Your digital camera has a four-directional pad that functions as previously captured videos INSTA Share - Opens the INSTA Share for Videos menu Other Shutter SET MODE T W STARTS/STOPS...
User Manual
Page 53
... on , you will be prompted to define those settings. 52 You will then automatically exit the menu and return to the previous mode with the digital camera settings set to the Factory Default Settings. Note: After RESETTING to the default settings, it is selected. 4) Press the SET button to reset the... button to proceed with the format, select "Yes" and press the SET button. If you do not, the next time your camera is powered on your camera or to reset your camera settings to the Factory Default Settings. 1) Press the SET button to open the menus for the current mode. 2) Press the LEFT...
... on , you will be prompted to define those settings. 52 You will then automatically exit the menu and return to the previous mode with the digital camera settings set to the Factory Default Settings. Note: After RESETTING to the default settings, it is selected. 4) Press the SET button to reset the... button to proceed with the format, select "Yes" and press the SET button. If you do not, the next time your camera is powered on your camera or to reset your camera settings to the Factory Default Settings. 1) Press the SET button to open the menus for the current mode. 2) Press the LEFT...
User Manual
Page 55
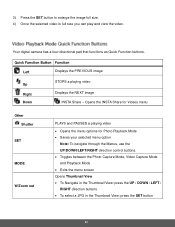
Your digital camera has a four-directional pad that functions as Quick Function buttons. Opens the INSTA Share for Videos menu Other Shutter SET MODE W/Zoom out PLAYS and ...
Your digital camera has a four-directional pad that functions as Quick Function buttons. Opens the INSTA Share for Videos menu Other Shutter SET MODE W/Zoom out PLAYS and ...
User Manual
Page 63
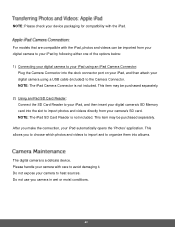
...Card Reader to your iPad, and then insert your digital camera's SD Memory card into the slot to import photos and videos directly from your digital camera to your iPad by following either one of the options below: 1) Connecting your digital camera to your iPad using a USB cable (included) to... them into the dock connector port on your iPad, and then attach your camera to the Camera Connector. Do not expose your digital camera using an iPad Camera Connector: Plug the Camera Connector into albums. The digital camera is not included. For models that are compatible with the iPad, photos and...
...Card Reader to your iPad, and then insert your digital camera's SD Memory card into the slot to import photos and videos directly from your digital camera to your iPad by following either one of the options below: 1) Connecting your digital camera to your iPad using a USB cable (included) to... them into the dock connector port on your iPad, and then attach your camera to the Camera Connector. Do not expose your digital camera using an iPad Camera Connector: Plug the Camera Connector into albums. The digital camera is not included. For models that are compatible with the iPad, photos and...


