User Manual
Page 3
... that it will not shift out of vision either in front or behind or in a place where it interferes with the driver's ability to the DVD player is 1. 3 Do not connect power to drive the car or the driver's field of this product, this unit is switched off and unplugged from ...start smoking or ignite, or cause electrical shock or other connections are coded by airbag operation, causing an accident and/or injury. Region code information: DVD players and discs are completed. The region code of explosion if battery is connected. Caution Install the product securely so that the...
... that it will not shift out of vision either in front or behind or in a place where it interferes with the driver's ability to the DVD player is 1. 3 Do not connect power to drive the car or the driver's field of this product, this unit is switched off and unplugged from ...start smoking or ignite, or cause electrical shock or other connections are coded by airbag operation, causing an accident and/or injury. Region code information: DVD players and discs are completed. The region code of explosion if battery is connected. Caution Install the product securely so that the...

User Manual
Page 7
... more than 500 lines of a disk by revolving it horizontally about its axis, or lay it flat with connectors for connecting with DVD, CD and Picture CD disks. Search by Time: Search for the On-screen Display language. Docking Jack: This unit features a docking... jack on the bottom for peripheral devices to eliminate complicated connections and save valuable space around the player 7 Features High-quality audio and video Excellent sound: Dolby Digital delivers great sound. Special Functions: Supports screen aspect ratio changing, zooming in...
... more than 500 lines of a disk by revolving it horizontally about its axis, or lay it flat with connectors for connecting with DVD, CD and Picture CD disks. Search by Time: Search for the On-screen Display language. Docking Jack: This unit features a docking... jack on the bottom for peripheral devices to eliminate complicated connections and save valuable space around the player 7 Features High-quality audio and video Excellent sound: Dolby Digital delivers great sound. Special Functions: Supports screen aspect ratio changing, zooming in...
User Manual
Page 13
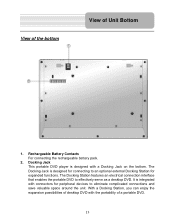
... external Docking Station for peripheral devices to effectively serve as a desktop DVD. The Docking Station features an electrical connection interface that enables the portable DVD to eliminate complicated connections and save valuable space around the unit. Docking Jack This portable DVD player is integrated with connectors for expanded functions. It is designed with the...
... external Docking Station for peripheral devices to effectively serve as a desktop DVD. The Docking Station features an electrical connection interface that enables the portable DVD to eliminate complicated connections and save valuable space around the unit. Docking Jack This portable DVD player is integrated with connectors for expanded functions. It is designed with the...
User Manual
Page 15
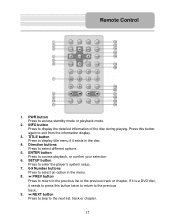
If it is a DVD disc, it exists in the disc. 4. Press this button twice to return to the previous track. 9. NEXT button Press to skip to exit from the ... mode or playback mode. 2. Remote Control 1. PWR button Press to display the detailed information of the disc during playing. SETUP button Press to enter the player's system setup. 7. 0-9 Number buttons Press to select an option in the menu. 8. PREV button Press to return to display title menu if it needs to...
If it is a DVD disc, it exists in the disc. 4. Press this button twice to return to the previous track. 9. NEXT button Press to skip to exit from the ... mode or playback mode. 2. Remote Control 1. PWR button Press to display the detailed information of the disc during playing. SETUP button Press to enter the player's system setup. 7. 0-9 Number buttons Press to select an option in the menu. 8. PREV button Press to return to display title menu if it needs to...
User Manual
Page 18
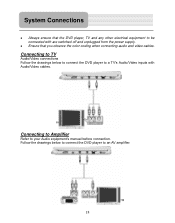
System Connections z Always ensure that you observe the color coding when connecting audio and video cables. Follow the drawings below to connect the DVD player to an AV amplifier. 18 Connecting to TV Audio/Video connections Follow the drawings below to connect the DVD player to a TV's Audio/Video inputs with are switched off and unplugged from the power supply. z Ensure that the DVD player, TV and any other electrical equipment to your Audio equipment's manual before connection. Connecting to Amplifier Refer to be connected with Audio/Video cables.
System Connections z Always ensure that you observe the color coding when connecting audio and video cables. Follow the drawings below to connect the DVD player to an AV amplifier. 18 Connecting to TV Audio/Video connections Follow the drawings below to connect the DVD player to a TV's Audio/Video inputs with are switched off and unplugged from the power supply. z Ensure that the DVD player, TV and any other electrical equipment to your Audio equipment's manual before connection. Connecting to Amplifier Refer to be connected with Audio/Video cables.
User Manual
Page 19
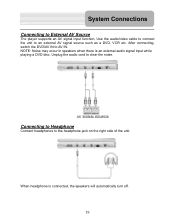
When headphone is an external audio signal input while playing a DVD disc. After connecting, switch the DVD/AV IN to the headphone jack on the right side of the unit. Connecting to Headphone Connect headphones to AV IN. System Connections Connecting to clear the noise. Unplug the audio cord to External AV Source The player supports an AV signal input function. NOTE: Noise may occur in speakers when there is connected, the speakers will automatically turn off. 19 Use the audio/video cable to connect the unit to an external AV signal source such as a DVD, VCR etc.
When headphone is an external audio signal input while playing a DVD disc. After connecting, switch the DVD/AV IN to the headphone jack on the right side of the unit. Connecting to Headphone Connect headphones to AV IN. System Connections Connecting to clear the noise. Unplug the audio cord to External AV Source The player supports an AV signal input function. NOTE: Noise may occur in speakers when there is connected, the speakers will automatically turn off. 19 Use the audio/video cable to connect the unit to an external AV signal source such as a DVD, VCR etc.
User Manual
Page 20
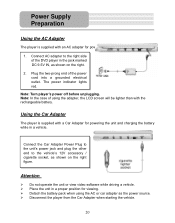
... Plug to the unit's power jack and plug the other end to the right side of the DVD player in the jack marked DC 9.5V IN, as shown on the right figure. The power indicator... for powering the unit and charging the battery. 1. Power Supply Preparation Using the AC Adapter The player is supplied with a Car Adapter for powering the unit and charging the battery while in a vehicle... AC adapter to the vehicle's 12V accessory / cigarette socket, as the power source. ¾ Disconnect the player from the Car Adapter when starting the vehicle. 20 Plug the two-prong end of using the AC or ...
... Plug to the unit's power jack and plug the other end to the right side of the DVD player in the jack marked DC 9.5V IN, as shown on the right figure. The power indicator... for powering the unit and charging the battery. 1. Power Supply Preparation Using the AC Adapter The player is supplied with a Car Adapter for powering the unit and charging the battery while in a vehicle... AC adapter to the vehicle's 12V accessory / cigarette socket, as the power source. ¾ Disconnect the player from the Car Adapter when starting the vehicle. 20 Plug the two-prong end of using the AC or ...
User Manual
Page 21
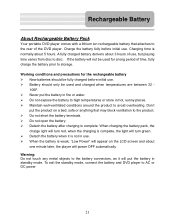
...to AC or DC power 21 To exit the standby mode, connect the battery and DVD player to disc. Don't put the battery in use . ¾ Battery should be used for a long period of the DVD player. When charging the battery pack, the charge light will turn red, when the ...190; Detach the battery when it will put the product on the LCD screen and about 5 hours. Rechargeable Battery About Rechargeable Battery Pack Your portable DVD player comes with a lithium ion rechargeable battery that may block ventilation to the product. ¾ Do not short the battery terminals. ¾ Do not...
...to AC or DC power 21 To exit the standby mode, connect the battery and DVD player to disc. Don't put the battery in use . ¾ Battery should be used for a long period of the DVD player. When charging the battery pack, the charge light will turn red, when the ...190; Detach the battery when it will put the product on the LCD screen and about 5 hours. Rechargeable Battery About Rechargeable Battery Pack Your portable DVD player comes with a lithium ion rechargeable battery that may block ventilation to the product. ¾ Do not short the battery terminals. ¾ Do not...
User Manual
Page 22
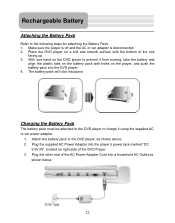
... located on the battery pack with the bottom of the AC Power Adapter Cord into the DVD player. 4. Rechargeable Battery Attaching the Battery Pack Refer to the DVD player, as shown below. 22 With one hand on the player, and push the battery pack into a household AC Outlet as shown above. 2. Place ...the DVD player on a soft and smooth surface with holes on the DVD player to charge it from moving, take the battery and align the plastic tabs on right side of the DVD Player. 3. Make sure the player is off and the AC or car adapter is ...
... located on the battery pack with the bottom of the AC Power Adapter Cord into the DVD player. 4. Rechargeable Battery Attaching the Battery Pack Refer to the DVD player, as shown below. 22 With one hand on the player, and push the battery pack into a household AC Outlet as shown above. 2. Place ...the DVD player on a soft and smooth surface with holes on the DVD player to charge it from moving, take the battery and align the plastic tabs on right side of the DVD Player. 3. Make sure the player is off and the AC or car adapter is ...
User Manual
Page 23
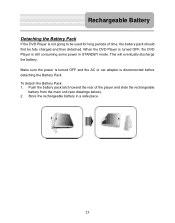
... the rechargeable battery in STANDBY mode. To detach the Battery Pack: 1. This will eventually discharge the battery. Rechargeable Battery Detaching the Battery Pack If the DVD Player is disconnected before detaching the Battery Pack. Make sure the power is turned OFF and the AC or car adapter is not going to be... used for long periods of the player and slide the rechargeable battery from the main unit (see drawings below). 2. Push the battery pack latch toward the rear of time, the battery ...
... the rechargeable battery in STANDBY mode. To detach the Battery Pack: 1. This will eventually discharge the battery. Rechargeable Battery Detaching the Battery Pack If the DVD Player is disconnected before detaching the Battery Pack. Make sure the power is turned OFF and the AC or car adapter is not going to be... used for long periods of the player and slide the rechargeable battery from the main unit (see drawings below). 2. Push the battery pack latch toward the rear of time, the battery ...
User Manual
Page 25
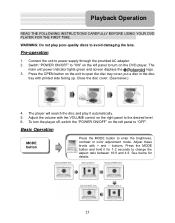
... panel to change the aspect ratio between 16:9 and 4:3. Basic Operation MODE button Press the MODE button to turn the player off, switch the "POWER ON/OFF" on the unit to the desired level. 6. Close the disc cover. (See... below for 1-2 seconds to "OFF". Adjust these levels with the VOLUME control on the DVD player. Pre-operation 1. Adjust the volume with + and - Press the OPEN button on the left panel to enter the brightness.... 5. Playback Operation READ THE FOLLOWING INSTRUCTIONS CAREFULLY BEFORE USING YOUR DVD PLAYER FOR THE FIRST TIME.
... panel to change the aspect ratio between 16:9 and 4:3. Basic Operation MODE button Press the MODE button to turn the player off, switch the "POWER ON/OFF" on the unit to the desired level. 6. Close the disc cover. (See... below for 1-2 seconds to "OFF". Adjust these levels with the VOLUME control on the DVD player. Pre-operation 1. Adjust the volume with + and - Press the OPEN button on the left panel to enter the brightness.... 5. Playback Operation READ THE FOLLOWING INSTRUCTIONS CAREFULLY BEFORE USING YOUR DVD PLAYER FOR THE FIRST TIME.
User Manual
Page 26
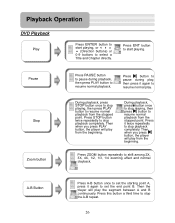
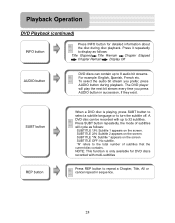
...) or 0-9 buttons to select a Title and Chapter directly. Then when you press PLAY button, the player will play from the stopped point. Then the player will play from the stopped point. Then when you press button, the player will play . Press ZOOM button repeatedly to set the end point B. Pause Stop Zoom button... to stop playback completely. Press this button a third time to stop playing, then press PLAY button to resume normal playback from the beginning. Playback Operation DVD Playback Play Press ENTER button to start playing.
...) or 0-9 buttons to select a Title and Chapter directly. Then when you press PLAY button, the player will play from the stopped point. Then the player will play from the stopped point. Then when you press button, the player will play . Press ZOOM button repeatedly to set the end point B. Pause Stop Zoom button... to stop playback completely. Press this button a third time to stop playing, then press PLAY button to resume normal playback from the beginning. Playback Operation DVD Playback Play Press ENTER button to start playing.
User Manual
Page 28
...repeat a Chapter, Title, All or cancel repeat in succession, if they exist. The DVD player will cycle as follows: Title Elapsed Title Remain Chapter Elapsed Chapter Remain Display Off AUDIO button DVD discs can be recorded with multi-subtitles Press REP button to the total number of subtitles... will play the next bit stream every time you prefer, press AUDIO button during disc playback. SUBT button REP button When a DVD disc is only available for detailed information about the disc during playback. SUBTITLE */N: Subtitle * appears on the screen. Press it repeatedly...
...repeat a Chapter, Title, All or cancel repeat in succession, if they exist. The DVD player will cycle as follows: Title Elapsed Title Remain Chapter Elapsed Chapter Remain Display Off AUDIO button DVD discs can be recorded with multi-subtitles Press REP button to the total number of subtitles... will play the next bit stream every time you prefer, press AUDIO button during disc playback. SUBT button REP button When a DVD disc is only available for detailed information about the disc during playback. SUBTITLE */N: Subtitle * appears on the screen. Press it repeatedly...
User Manual
Page 41
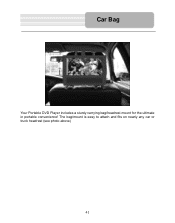
Car Bag Your Portable DVD Player includes a sturdy carrying bag/headrest mount for the ultimate in portable convenience! The bag/mount is easy to attach and fits on nearly any car or truck headrest (see photo above) 41
Car Bag Your Portable DVD Player includes a sturdy carrying bag/headrest mount for the ultimate in portable convenience! The bag/mount is easy to attach and fits on nearly any car or truck headrest (see photo above) 41
User Manual
Page 43
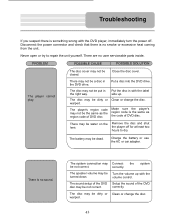
...the be dead. The system connection may be not correct. The sound setup of the DVD Setup the sound of the DVD disc may not be Turn the volume up . PROBLEM POSSIBLE CAUSE POSSIBLE SOLUTION The player cannot play. volume control. Close the disc cover. Clean or change the disc. There...is no smoke or excessive heat coming from the unit. The disc may be closed. The disc cover may be a disc in with the DVD player, immediately turn the power off for at least two hours to repair the unit yourself. The disc may not be not correct. Disconnect the ...
...the be dead. The system connection may be not correct. The sound setup of the DVD Setup the sound of the DVD disc may not be Turn the volume up . PROBLEM POSSIBLE CAUSE POSSIBLE SOLUTION The player cannot play. volume control. Close the disc cover. Clean or change the disc. There...is no smoke or excessive heat coming from the unit. The disc may be closed. The disc cover may be a disc in with the DVD player, immediately turn the power off for at least two hours to repair the unit yourself. The disc may not be not correct. Disconnect the ...
User Manual
Page 44
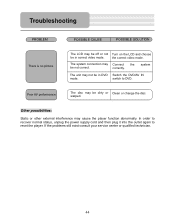
... order to recover normal status, unplug the power supply cord and then plug it into the outlet again to DVD. the correct video mode. Poor AV performance. system The unit may cause the player function abnormally. warped. If the problems still exist consult your service center or qualified technician. 44 switch to...
... order to recover normal status, unplug the power supply cord and then plug it into the outlet again to DVD. the correct video mode. Poor AV performance. system The unit may cause the player function abnormally. warped. If the problems still exist consult your service center or qualified technician. 44 switch to...


