User Manual
Page 2
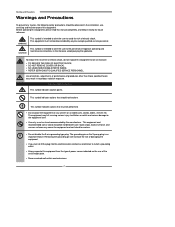
... is intended to alert the user to avoid the risk of the serial/model plate. ▪ Never overload wall outlets and extensions. 2 Important Safety Instructions This symbol indicates caution points. This equipment and recommended cart or stand should not be observed in the installation, use, servicing and maintenance of this equipment from the type of power source indicated on the rear...
... is intended to alert the user to avoid the risk of the serial/model plate. ▪ Never overload wall outlets and extensions. 2 Important Safety Instructions This symbol indicates caution points. This equipment and recommended cart or stand should not be observed in the installation, use, servicing and maintenance of this equipment from the type of power source indicated on the rear...

User Manual
Page 3
... any heat sources such as power-supply cord or plug is spilled into the ventilation holes of the equipment. ▪ Do not block any of time. ▪ Refer all servicing to rain or moisture, does not operate normally, or has been dropped. ▪ Always remove the power cord from the outlet before cleaning the equipment. ▪ Never use or handle this...
... any heat sources such as power-supply cord or plug is spilled into the ventilation holes of the equipment. ▪ Do not block any of time. ▪ Refer all servicing to rain or moisture, does not operate normally, or has been dropped. ▪ Always remove the power cord from the outlet before cleaning the equipment. ▪ Never use or handle this...
User Manual
Page 4
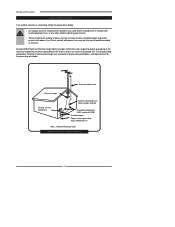
...) Ground clamps Power service grounding (NEC Art250 part H) NEC : National Electrical code EXAMPLE OF OUTDOOR ANTENNA GROUNDING 4 Section 810 of antenna discharge unit, connection to prevent contact with power lines. Direct contact with respect to proper grounding of the mast and supporting structure, grounding of the lead-in wire to an antenna discharge unit, size of grounding conductors...
...) Ground clamps Power service grounding (NEC Art250 part H) NEC : National Electrical code EXAMPLE OF OUTDOOR ANTENNA GROUNDING 4 Section 810 of antenna discharge unit, connection to prevent contact with power lines. Direct contact with respect to proper grounding of the mast and supporting structure, grounding of the lead-in wire to an antenna discharge unit, size of grounding conductors...
User Manual
Page 5
... Your Remote Control 12 Chapter 2 Installing the LCD TV Connecting a TV Cable or an Antenna 14 Connecting a VCR ...18 Connecting a Video Camera or Play Station 19 Connecting a DVD Player 20 Connecting a Digital TV Cable Box or Digital Satellite Receiver 22 Connecting an AV Equipment with HDMI Connector 23 Connecting an AV Equipment with DVI Connector 24 Connecting a PC...25 Connecting an Audio Receiver or a Dolby Digital 5.1 Sound System 26 Chapter 3 USING THE FEATURES Using Picture-In-Picture ...27 Wide Screen Viewing...29...
... Your Remote Control 12 Chapter 2 Installing the LCD TV Connecting a TV Cable or an Antenna 14 Connecting a VCR ...18 Connecting a Video Camera or Play Station 19 Connecting a DVD Player 20 Connecting a Digital TV Cable Box or Digital Satellite Receiver 22 Connecting an AV Equipment with HDMI Connector 23 Connecting an AV Equipment with DVI Connector 24 Connecting a PC...25 Connecting an Audio Receiver or a Dolby Digital 5.1 Sound System 26 Chapter 3 USING THE FEATURES Using Picture-In-Picture ...27 Wide Screen Viewing...29...
User Manual
Page 6
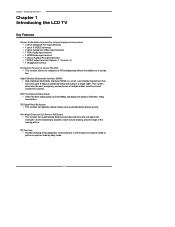
... cables used to connect current A/V systems. HDTV Component Video Inputs ▪ Offers the best video quality for external equipment connection ▪ 2 set of composite A/V input terminals ▪ 1 set of S-VIDEO terminals ▪ 2 set of component Video input terminals ▪ 1 VGA/ Audio input terminal ▪ 1 HDMI/Auido input terminal ▪ 1 sets of Audio(L/R) output terminals ▪ 2 SPDIF output terminal (Optical x 1 /Coaxial x 1) ▪ 1 Headphone terminal The built-in -picture mode or picture-on-picture (side by side) mode. 6 Film-Mode...
... cables used to connect current A/V systems. HDTV Component Video Inputs ▪ Offers the best video quality for external equipment connection ▪ 2 set of composite A/V input terminals ▪ 1 set of S-VIDEO terminals ▪ 2 set of component Video input terminals ▪ 1 VGA/ Audio input terminal ▪ 1 HDMI/Auido input terminal ▪ 1 sets of Audio(L/R) output terminals ▪ 2 SPDIF output terminal (Optical x 1 /Coaxial x 1) ▪ 1 Headphone terminal The built-in -picture mode or picture-on-picture (side by side) mode. 6 Film-Mode...
User Manual
Page 7
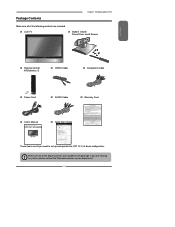
Make sure all of the following contents are included in its basic configuration. LCD TV Bottom Stand / Screw Driver and 6 Screws ENGLISH Remote Control/ AA Batteries x 2 VIDEO Cable Component Cable Power Cord AUDIO Cable Warranty Card User's Manual Quick Start Guide These items are all you are missing any items, please contact the Polaroid customer service department. 7 If you need to set up and operate the LCD TV in the package. Package Contents Chapter 1 Introducing the LCD TV Make sure all of the above contents are included.
Make sure all of the following contents are included in its basic configuration. LCD TV Bottom Stand / Screw Driver and 6 Screws ENGLISH Remote Control/ AA Batteries x 2 VIDEO Cable Component Cable Power Cord AUDIO Cable Warranty Card User's Manual Quick Start Guide These items are all you are missing any items, please contact the Polaroid customer service department. 7 If you need to set up and operate the LCD TV in the package. Package Contents Chapter 1 Introducing the LCD TV Make sure all of the above contents are included.
User Manual
Page 9
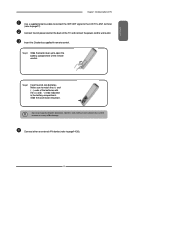
...'s ANT. Step2 Insert two AA size batteries. ENGLISH Chapter 1 Introducing the LCD TV Use a supplied antenna cable to connect the VHF/UHF signal to page14-26). 9 Insert the 2 batteries supplied in the battery compartment. Slide the cover back into place. Do not use caustic cleaners (porcelain, stainless steel, toilet, or oven cleaner etc.) on the remote, as it may suffer damage. terminal...
...'s ANT. Step2 Insert two AA size batteries. ENGLISH Chapter 1 Introducing the LCD TV Use a supplied antenna cable to connect the VHF/UHF signal to page14-26). 9 Insert the 2 batteries supplied in the battery compartment. Slide the cover back into place. Do not use caustic cleaners (porcelain, stainless steel, toilet, or oven cleaner etc.) on the remote, as it may suffer damage. terminal...

User Manual
Page 10
... View and Controls LED The LED light indicates when the LCD TV is activated. Selects sub-menu item when in the OSD mode. INPUT Chooses from different input signal sources. VIDEO1 IN Connects to turn the OSD off. VIDEO L AUDIO R VIDEO1 IN MENU Press once to display the OSD (on screen display), press again to the composite Video and Audio output jacks on and into standby mode. 10 Turns the LCD TV on external video equipment. IR Infrared Receiver VOLUME...
... View and Controls LED The LED light indicates when the LCD TV is activated. Selects sub-menu item when in the OSD mode. INPUT Chooses from different input signal sources. VIDEO1 IN Connects to turn the OSD off. VIDEO L AUDIO R VIDEO1 IN MENU Press once to display the OSD (on screen display), press again to the composite Video and Audio output jacks on and into standby mode. 10 Turns the LCD TV on external video equipment. IR Infrared Receiver VOLUME...
User Manual
Page 13
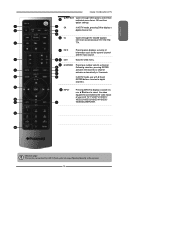
... input source. 7 8 18 EXIT Exits the OSD menu. 19 0-9/ENTER Pressing a number selects a channel. 10 Following selection, pressing ENTER 9 11 activates the channel, or channel activates automatically in 3 seconds. 13 12 14 In HDTV mode, use with 0-9 and ENTER buttons to select a digital channels. 15 20 INPUT Pressing INPUT to display a source list, use ▲▼buttons to select the video equipment connected to the video inputs of your LCD...
... input source. 7 8 18 EXIT Exits the OSD menu. 19 0-9/ENTER Pressing a number selects a channel. 10 Following selection, pressing ENTER 9 11 activates the channel, or channel activates automatically in 3 seconds. 13 12 14 In HDTV mode, use with 0-9 and ENTER buttons to select a digital channels. 15 20 INPUT Pressing INPUT to display a source list, use ▲▼buttons to select the video equipment connected to the video inputs of your LCD...

User Manual
Page 17
... the OK button. Connect the AC power cord at the back of TV 4A 250V 5x20mm Fuse Press the button on the remote to the LCD TV's HDTV AIR terminal. NOTE: Unplug the AC power cord from the socket. Press the Input button on the remote to wall outlet. TV CABLE HDTV AIR VHF/UHF IN ENGLISH B A METHOD B: Use a supplied antenna cable to connect the ATSC signal to turn on the...
... the OK button. Connect the AC power cord at the back of TV 4A 250V 5x20mm Fuse Press the button on the remote to the LCD TV's HDTV AIR terminal. NOTE: Unplug the AC power cord from the socket. Press the Input button on the remote to wall outlet. TV CABLE HDTV AIR VHF/UHF IN ENGLISH B A METHOD B: Use a supplied antenna cable to connect the ATSC signal to turn on the...
User Manual
Page 19
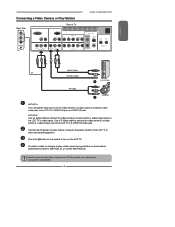
... the Input button on the LCD TV. METHOD B: Use an audio cable to connect the video camera's or play station's s-video output jack to select VIDEO2/VIDEO1( METHOD A), or VIDEO3 (METHOD B). Press the button on the remote to turn on the remote to the LCD TV's S-VIDEO IN input jack. Please check your video camera user guide for compatibility. 19 Connect all cameras have the ability to connect to the LCD TV's audio inputs. Use a S-Video cable to connect the video...
... the Input button on the LCD TV. METHOD B: Use an audio cable to connect the video camera's or play station's s-video output jack to select VIDEO2/VIDEO1( METHOD A), or VIDEO3 (METHOD B). Press the button on the remote to turn on the remote to the LCD TV's S-VIDEO IN input jack. Please check your video camera user guide for compatibility. 19 Connect all cameras have the ability to connect to the LCD TV's audio inputs. Use a S-Video cable to connect the video...
User Manual
Page 23
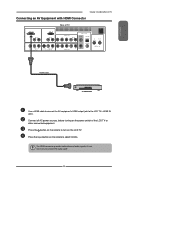
... 2 Installing the LCD TV Connecting an AV Equipment with HDMI Connector Rear of the LCD TV or other connected equipment. The HDMI connector provides both video and audio signals, it's not necessary to the LCD TV's HDMI IN jacks. Press the button on the remote to turn on the remote to select VIDEO6. Press the Input button on the LCD TV. Connect all AC power sources, before turning on the power switch of TV HDMI IN AUD IO L R VGA...
... 2 Installing the LCD TV Connecting an AV Equipment with HDMI Connector Rear of the LCD TV or other connected equipment. The HDMI connector provides both video and audio signals, it's not necessary to the LCD TV's HDMI IN jacks. Press the button on the remote to turn on the remote to select VIDEO6. Press the Input button on the LCD TV. Connect all AC power sources, before turning on the power switch of TV HDMI IN AUD IO L R VGA...
User Manual
Page 24
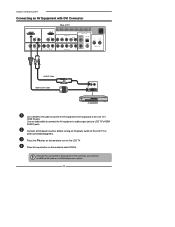
... AC power sources, before turning on the remote to select VIDEO6. Use an audio cable to connect the AV equipment's audio output jacks to -DVI cable or an HDMI adapter(not suplied). 24 Chapter 2 Installing the LCD TV Connecting an AV Equipment with DVI Connector Rear of the LCD TV or other connected equipment. Press the Input button on the power switch of TV HDMI IN AUD IO L R VGA IN AUD IO L R VIDEO L R AUD IO VIDEO2 IN L R S-VIDEO...
... AC power sources, before turning on the remote to select VIDEO6. Use an audio cable to connect the AV equipment's audio output jacks to -DVI cable or an HDMI adapter(not suplied). 24 Chapter 2 Installing the LCD TV Connecting an AV Equipment with DVI Connector Rear of the LCD TV or other connected equipment. Press the Input button on the power switch of TV HDMI IN AUD IO L R VGA IN AUD IO L R VIDEO L R AUD IO VIDEO2 IN L R S-VIDEO...

User Manual
Page 31
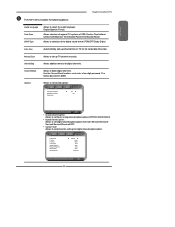
... of the sub-menu, and press the OK button. Audio Language Time Zone SPDIF Type Auto Scan Manual Scan Channel Skip Channel Block Caption ◄ English ► Eastern Time PCM Scan Press Press Press Press HDTV Select Exit Use the ▲▼ buttons to set up a variety of features: Language, Closed Caption, factory reset, V-Chip, Parental Control sleep timer. While in adjustment mode, and use the ◄►...
... of the sub-menu, and press the OK button. Audio Language Time Zone SPDIF Type Auto Scan Manual Scan Channel Skip Channel Block Caption ◄ English ► Eastern Time PCM Scan Press Press Press Press HDTV Select Exit Use the ▲▼ buttons to set up a variety of features: Language, Closed Caption, factory reset, V-Chip, Parental Control sleep timer. While in adjustment mode, and use the ◄►...
User Manual
Page 33
... for digital closed caption option: Caption Style Font Size Font Color Font Opacity Background Color Background Opacity Window Color Window Opacity ◄ Custom ► Large White Solid Black Solid Black Translucent HDTV Select Back 33 Use the Channel Block function, must enter a four-digit password. The factory password is 0000. Channel Skip Allows addition/removal of the digital sound format: PCM/OFF/Dolby Digital Auto Scan Automatically sets up TV channel manually.
... for digital closed caption option: Caption Style Font Size Font Color Font Opacity Background Color Background Opacity Window Color Window Opacity ◄ Custom ► Large White Solid Black Solid Black Translucent HDTV Select Back 33 Use the Channel Block function, must enter a four-digit password. The factory password is 0000. Channel Skip Allows addition/removal of the digital sound format: PCM/OFF/Dolby Digital Auto Scan Automatically sets up TV channel manually.

User Manual
Page 37
.... ▪ Activate: Selects to turn the LCD TV on. Press the MENU button on the remote control to display the Main menu, and use the ◄► buttons to change the setting, and press the MENU to exit the menu. Use the ▲▼buttons to highlight an individual SETUP option, use the ◄► buttons to select the SETUP. Language Timer Closed Caption V-Chip Parental Default English 15 off /once the timer...
.... ▪ Activate: Selects to turn the LCD TV on. Press the MENU button on the remote control to display the Main menu, and use the ◄► buttons to change the setting, and press the MENU to exit the menu. Use the ▲▼buttons to highlight an individual SETUP option, use the ◄► buttons to select the SETUP. Language Timer Closed Caption V-Chip Parental Default English 15 off /once the timer...
User Manual
Page 38
Parental Allows to "Using the V-CHIP Setting"). V-Chip Allows to setup the TV and MPAA Rating Lock options(refer to setup the Parental Lock options. For example: Network name, program name, program length, etc. Default Restores factory settings. 38 NOTE: For better viewing CC in text mode will have a black box behind the text. Chapter 3 Using the LCD TV Closed Caption Allows to select from 4 closed...
Parental Allows to "Using the V-CHIP Setting"). V-Chip Allows to setup the TV and MPAA Rating Lock options(refer to setup the Parental Lock options. For example: Network name, program name, program length, etc. Default Restores factory settings. 38 NOTE: For better viewing CC in text mode will have a black box behind the text. Chapter 3 Using the LCD TV Closed Caption Allows to select from 4 closed...

User Manual
Page 39
... the event you loose your personal password the master password is appropriate for viewers under admitted. May contain material not suited for viewing content: Movie blocking(MPAA) and TV Blocking. Use the ▲▼ buttons to select the rating you want and press the OK button repeatedly to display the V-Chip menu. The master password overrides all ages. Parental Guidance Suggested. Restricted...
... the event you loose your personal password the master password is appropriate for viewers under admitted. May contain material not suited for viewing content: Movie blocking(MPAA) and TV Blocking. Use the ▲▼ buttons to select the rating you want and press the OK button repeatedly to display the V-Chip menu. The master password overrides all ages. Parental Guidance Suggested. Restricted...

User Manual
Page 45
... group number (0= Cable, 1= TV, 2= VCR, 3= Audio). For best results, please read and follow these steps. If the code is entered. The device should turn off. Continue until the red LED blinks twice; Checking the Codes If you have set to program in "Manufacturer's Codes" on the device (for example, DVD player) and, if needed, load media (for future reference. After installing batteries, you want to save...
... group number (0= Cable, 1= TV, 2= VCR, 3= Audio). For best results, please read and follow these steps. If the code is entered. The device should turn off. Continue until the red LED blinks twice; Checking the Codes If you have set to program in "Manufacturer's Codes" on the device (for example, DVD player) and, if needed, load media (for future reference. After installing batteries, you want to save...

User Manual
Page 46
...". • NOTE: If a code digit is 0, the LED does not blink. 5. SOLUTION: See "Changing Volume Lock". To view the code for your RCA TV. Unlocking All Volume Control (Restoring Global Unlock) 1. The LED blinks four times. Volume is now independently controlled for all listed codes for independent operation or Global Volume Unlock to remove all other modes. Make sure the device operates with new AA size battery. PROBLEM: Channels do not work for the first...
...". • NOTE: If a code digit is 0, the LED does not blink. 5. SOLUTION: See "Changing Volume Lock". To view the code for your RCA TV. Unlocking All Volume Control (Restoring Global Unlock) 1. The LED blinks four times. Volume is now independently controlled for all listed codes for independent operation or Global Volume Unlock to remove all other modes. Make sure the device operates with new AA size battery. PROBLEM: Channels do not work for the first...


