Operation Manual
Page 3
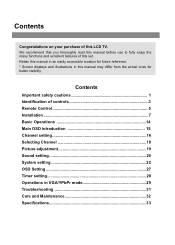
... excellent features of this LCD TV. Retain this manual may differ from the actual ones for future reference. * Screen displays and illustrations in VGA/YPbPr mode 29 Troubleshooting 31 Care and Maintenance 32 Specifications 33 Contents Congratulations on your purchase of this set. Contents Important safety cautions 1 Identification of controls 3 Remote Control 5 Installation 7 Basic Operations...
... excellent features of this LCD TV. Retain this manual may differ from the actual ones for future reference. * Screen displays and illustrations in VGA/YPbPr mode 29 Troubleshooting 31 Care and Maintenance 32 Specifications 33 Contents Congratulations on your purchase of this set. Contents Important safety cautions 1 Identification of controls 3 Remote Control 5 Installation 7 Basic Operations...
Operation Manual
Page 6
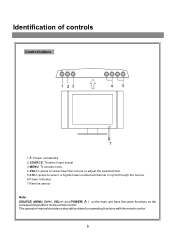
This operation manual provides a description based on the remote control. and POWER( ) on the main unit have the same functions as the corresponding buttons on operating functions with the remote control. 3 Identification of controls Control buttons 1 23 45 6 7 1. : Power on/standby 2.SOURCE: To select input signal 3.MENU: To access menu 4.VOL+/-:press to raise/lower the volume or adjust the selected item. 5.CH+/-:press to select a higher/lower numbered channel or cycle through the menus. 6.Power Indicator 7.Remote sensor Note: SOURCE, MENU, CH+/-, VOL+/-
This operation manual provides a description based on the remote control. and POWER( ) on the main unit have the same functions as the corresponding buttons on operating functions with the remote control. 3 Identification of controls Control buttons 1 23 45 6 7 1. : Power on/standby 2.SOURCE: To select input signal 3.MENU: To access menu 4.VOL+/-:press to raise/lower the volume or adjust the selected item. 5.CH+/-:press to select a higher/lower numbered channel or cycle through the menus. 6.Power Indicator 7.Remote sensor Note: SOURCE, MENU, CH+/-, VOL+/-
Operation Manual
Page 8
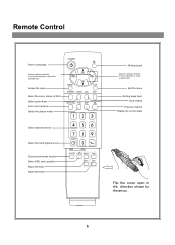
In the menu operation, adjust the selected item Access the menu Select the mono, stereo or SAP Select zoom mode Auto correct picture Switch the picture mode Direct channel selector Select the input signal source Sound preset mode selector Select OSD menu position Adjust the bass Adjust the treble Muting sound Channel up /down selector. Exit the menu Setting sleep timer Clock setting Previous channel Display the current state Flip the cover open in the direction shown by the arrow. 5 In menu operations, used to select item. Remote Control Power on/standby Volume up /down selector.
In the menu operation, adjust the selected item Access the menu Select the mono, stereo or SAP Select zoom mode Auto correct picture Switch the picture mode Direct channel selector Select the input signal source Sound preset mode selector Select OSD menu position Adjust the bass Adjust the treble Muting sound Channel up /down selector. Exit the menu Setting sleep timer Clock setting Previous channel Display the current state Flip the cover open in the direction shown by the arrow. 5 In menu operations, used to select item. Remote Control Power on/standby Volume up /down selector.
Operation Manual
Page 9
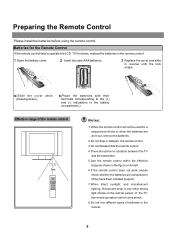
Batteries for the Remote Control If the remote control fails to operate the LCD TV functions, replace the batteries in the remote control. 1 Open the battery cover. 2 Insert two size-AAA batteries. 3 Replace the cover and slide in reverse until the lock snaps. Preparing the Remote Control Please install the batteries before using the remote control.
Batteries for the Remote Control If the remote control fails to operate the LCD TV functions, replace the batteries in the remote control. 1 Open the battery cover. 2 Insert two size-AAA batteries. 3 Replace the cover and slide in reverse until the lock snaps. Preparing the Remote Control Please install the batteries before using the remote control.
Operation Manual
Page 17
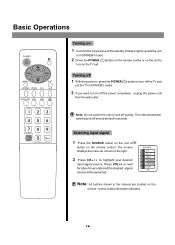
... be selected. CLK 2 If you want to turn off the TV and put the TV in STANDBY mode. SOURCE TV AV 1 AV 2 SVIDEO YPbPr/YCbCr VGA TV Note: All buttons shown in the manual are located on /off 1 With the power on the remote control. Turning off should at least 5 seconds. Selecting input signal 1... Press the SOURCE button on the unit or button on , press the POWER ( ) button to turn on the TV set. Basic Operations Turning on 1 Connect the AC power and ...
... be selected. CLK 2 If you want to turn off the TV and put the TV in STANDBY mode. SOURCE TV AV 1 AV 2 SVIDEO YPbPr/YCbCr VGA TV Note: All buttons shown in the manual are located on /off 1 With the power on the remote control. Turning off should at least 5 seconds. Selecting input signal 1... Press the SOURCE button on the unit or button on , press the POWER ( ) button to turn on the TV set. Basic Operations Turning on 1 Connect the AC power and ...
Operation Manual
Page 23
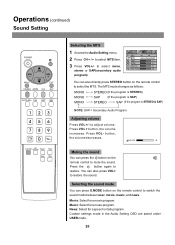
...for a speech or talk program. Adjusting volume Press VOL+/- News: Select for a movie program. You can also directly press STEREO button on the remote control to select the MTS. Operations (continued) Sound Setting Selecting the MTS 1 Access the Audio Setting menu. 2 Press CH5/6 to restore the sound... music, and news. volume 28 Muting the sound You can press S.MODE button on the remote control to restore. Selecting the sound mode You can press the button on the remote control to mute the sound. The MTS mode changes as follows: CLK MONO STEREO (If the ...
...for a speech or talk program. Adjusting volume Press VOL+/- News: Select for a movie program. You can also directly press STEREO button on the remote control to select the MTS. Operations (continued) Sound Setting Selecting the MTS 1 Access the Audio Setting menu. 2 Press CH5/6 to restore the sound... music, and news. volume 28 Muting the sound You can press S.MODE button on the remote control to restore. Selecting the sound mode You can press the button on the remote control to mute the sound. The MTS mode changes as follows: CLK MONO STEREO (If the ...
Operation Manual
Page 24
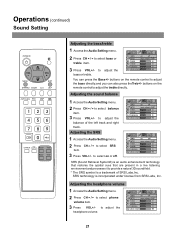
SRS on off MTS mono stereo SAP bass 0 treble 0 balance 0 phone volume 50 21 buttons on the remote control to adjust the treble directly. buttons on off MTS mono stereo SAP bass 0 treble 0 balance 0 phone volume 50 SRS (Sound Retrieval System®...SRS technology is a trademark of the left track and right track. to select SRS item. 3 Press VOL+/- Adjusting the SRS SRS on the CLK remote control to adjust the bass directly;and you can press the Bass+/- Adjusting the headphone volume 1 Access the Audio Setting menu. 2 Press CH5/6 to select ...
SRS on off MTS mono stereo SAP bass 0 treble 0 balance 0 phone volume 50 21 buttons on the remote control to adjust the treble directly. buttons on off MTS mono stereo SAP bass 0 treble 0 balance 0 phone volume 50 SRS (Sound Retrieval System®...SRS technology is a trademark of the left track and right track. to select SRS item. 3 Press VOL+/- Adjusting the SRS SRS on the CLK remote control to adjust the bass directly;and you can press the Bass+/- Adjusting the headphone volume 1 Access the Audio Setting menu. 2 Press CH5/6 to select ...
Operation Manual
Page 25
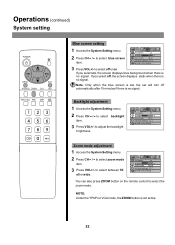
...menu. 2 Press CH5/6to select backlight item. 3 Press VOL+/- blue screen on backlight 6 zoom mode fill all ccd mode settings CC 1 parental control settings - - - - NOTE: Under the YPbPr or VGA mode, the ZOOM button is no signal. Operations (continued) System setting 耋晤&#... screen item. to select off automatically after 15 minutes if there is no signal. blue screen on the remote control to select between fill all ccd mode settings CC 1 parental control settings - - - - You can also press ZOOM button on backlight 6 zoom mode fill all or ...
...menu. 2 Press CH5/6to select backlight item. 3 Press VOL+/- blue screen on backlight 6 zoom mode fill all ccd mode settings CC 1 parental control settings - - - - NOTE: Under the YPbPr or VGA mode, the ZOOM button is no signal. Operations (continued) System setting 耋晤&#... screen item. to select off automatically after 15 minutes if there is no signal. blue screen on the remote control to select between fill all ccd mode settings CC 1 parental control settings - - - - You can also press ZOOM button on backlight 6 zoom mode fill all or ...
Operation Manual
Page 30
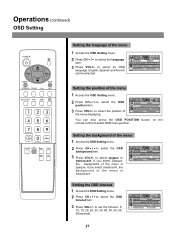
... VOL+/- If you select translucent, the background of the menu is opaque. English, Spanish and French can also press the OSD POSITION button on the remote control to select the language item. 3 Press VOL+/- language English OSD position OSD background opaque translucent OSD timeout 30 seconds You can be selected. Operations (continued...
... VOL+/- If you select translucent, the background of the menu is opaque. English, Spanish and French can also press the OSD POSITION button on the remote control to select the language item. 3 Press VOL+/- language English OSD position OSD background opaque translucent OSD timeout 30 seconds You can be selected. Operations (continued...
Operation Manual
Page 32
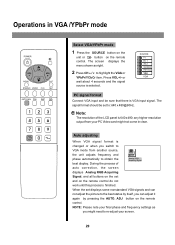
... not come in VGA /YPbPr mode Select VGA/YPbPr mode 1 Press the SOURCE button on the SOURCE unit or button on the remote TV control. any higher resolution output from another source, the unit adjusts frequency and phase automatically to re-adjust your final phase and frequency settings...best display. When the set and on the remote control. or VGA wait about 4 seconds and the signal source is 640 x 480; During the process of the LCD panel is selected. NOTE: Please note your screen. 29 ADJ button on the remote control do not work until this process is finished...
... not come in VGA /YPbPr mode Select VGA/YPbPr mode 1 Press the SOURCE button on the SOURCE unit or button on the remote TV control. any higher resolution output from another source, the unit adjusts frequency and phase automatically to re-adjust your final phase and frequency settings...best display. When the set and on the remote control. or VGA wait about 4 seconds and the signal source is 640 x 480; During the process of the LCD panel is selected. NOTE: Please note your screen. 29 ADJ button on the remote control do not work until this process is finished...
Operation Manual
Page 34
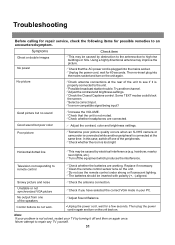
... too bright Horizontal dotted line !This may be caused by electrical interference (e.g. Control buttons do not work. =Unplug the power cord, wait for possible remedies to remote control !Check whether the batteries are connected. Then plug the power cord in your TV by obstruction to the antenna due to the unit. !Possible broadcast station...
... too bright Horizontal dotted line !This may be caused by electrical interference (e.g. Control buttons do not work. =Unplug the power cord, wait for possible remedies to remote control !Check whether the batteries are connected. Then plug the power cord in your TV by obstruction to the antenna due to the unit. !Possible broadcast station...
Operation Manual
Page 36
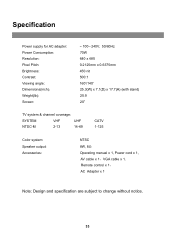
... nit 500:1 160o/140o 25.3(W) x 7.1(D) x 17.7(H) (with stand) 20.9 20" TV system & channel coverage: SYSTEM VHF UHF NTSC-M 2-13 14-69 CATV 1-125 Color system: Speaker output: Accessories: NTSC 8W, 8W Operating manual x 1, Power cord x 1, AV cable x 1,VGA cable x 1, Remote control x 1, AC Adapter x 1 Note: Design and specification are subject to change...
... nit 500:1 160o/140o 25.3(W) x 7.1(D) x 17.7(H) (with stand) 20.9 20" TV system & channel coverage: SYSTEM VHF UHF NTSC-M 2-13 14-69 CATV 1-125 Color system: Speaker output: Accessories: NTSC 8W, 8W Operating manual x 1, Power cord x 1, AV cable x 1,VGA cable x 1, Remote control x 1, AC Adapter x 1 Note: Design and specification are subject to change...


