User Manual
Page 3
... qualified service personnel only. NOTE: Before plugging the power cord into an AC outlet, make sure that all the connections have difficulty inserting the plug, turn it over and reinsert it. Don't perform any servicing other than that may be of sufficient magnitude to constitute a risk of electric to service manual...
... qualified service personnel only. NOTE: Before plugging the power cord into an AC outlet, make sure that all the connections have difficulty inserting the plug, turn it over and reinsert it. Don't perform any servicing other than that may be of sufficient magnitude to constitute a risk of electric to service manual...

User Manual
Page 8
... the channel last viewed. 4. LAST button In the TV mode, press to return to enter or exit the standby mode. 13. INFO button Press to turn on the screen. 8. button Press to select sleep time. 10. SLEEP button Press to increase or decrease the volume. 9. MTS button Press to select channel...
... the channel last viewed. 4. LAST button In the TV mode, press to return to enter or exit the standby mode. 13. INFO button Press to turn on the screen. 8. button Press to select sleep time. 10. SLEEP button Press to increase or decrease the volume. 9. MTS button Press to select channel...
User Manual
Page 10
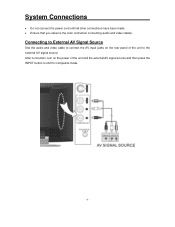
Connecting to External AV Signal Source Use the audio and video cable to connect the AV input jacks on the power of the unit to Composite mode. - 9 - After connection, turn on the rear panel of the unit and the external AV signal source and then press the INPUT button to shift to the external AV signal source. System Connections • Do not connect the power cord until all other connections have been made. • Ensure that you observe the color cord when connecting audio and video cables.
Connecting to External AV Signal Source Use the audio and video cable to connect the AV input jacks on the power of the unit to Composite mode. - 9 - After connection, turn on the rear panel of the unit and the external AV signal source and then press the INPUT button to shift to the external AV signal source. System Connections • Do not connect the power cord until all other connections have been made. • Ensure that you observe the color cord when connecting audio and video cables.
User Manual
Page 11
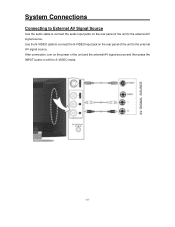
Use the S-VIDEO cable to connect the S-VIDEO input jack on the power of the unit and the external AV signal source and then press the INPUT button to shift to S-VIDEO mode. - 10 - After connection, turn on the rear panel of the unit to the external AV signal source. System Connections Connecting to External AV Signal Source Use the audio cable to connect the audio input jacks on the rear panel of the unit to the external AV signal source.
Use the S-VIDEO cable to connect the S-VIDEO input jack on the power of the unit and the external AV signal source and then press the INPUT button to shift to S-VIDEO mode. - 10 - After connection, turn on the rear panel of the unit to the external AV signal source. System Connections Connecting to External AV Signal Source Use the audio cable to connect the audio input jacks on the rear panel of the unit to the external AV signal source.
User Manual
Page 12
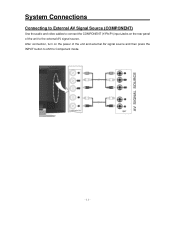
After connection, turn on the rear panel of the unit and external AV signal source and then press the INPUT button to shift to the external AV signal source. System Connections Connecting to External AV Signal Source (COMPONENT) Use the audio and video cables to connect the COMPONENT (Y/Pb/Pr) input Jacks on the power of the unit to Component mode. - 11 -
After connection, turn on the rear panel of the unit and external AV signal source and then press the INPUT button to shift to the external AV signal source. System Connections Connecting to External AV Signal Source (COMPONENT) Use the audio and video cables to connect the COMPONENT (Y/Pb/Pr) input Jacks on the power of the unit to Component mode. - 11 -
User Manual
Page 13
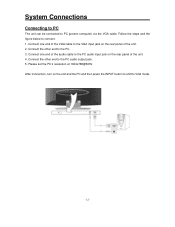
... other end to VGA mode. - 12 - Connect one end of the VGA cable to connect: 1. Please set the PC's resolution at 1024x768@60Hz After connection, turn on the rear panel of the unit. 4. Connect the other end to PC (person computer) via the VGA cable. Connect one end of the audio...
... other end to VGA mode. - 12 - Connect one end of the VGA cable to connect: 1. Please set the PC's resolution at 1024x768@60Hz After connection, turn on the rear panel of the unit. 4. Connect the other end to PC (person computer) via the VGA cable. Connect one end of the audio...

User Manual
Page 14
If the unit will not the used for a long time, disconnect the plug from the outlet. - 13 - System Connections Connecting the Power Cable Plug the two-prong end of the power cord to an AC100-240V outlet. If you have difficulty inserting the plug, turn it over and reinsert it.
If the unit will not the used for a long time, disconnect the plug from the outlet. - 13 - System Connections Connecting the Power Cable Plug the two-prong end of the power cord to an AC100-240V outlet. If you have difficulty inserting the plug, turn it over and reinsert it.

User Manual
Page 15
After connecting to the antenna, turn on the rear panel. When the unit is connected with external antenna, after selecting the TV channel number (refer to one or two number, press ... it will go on with CATV cable, after selecting the TV channel number including one number), press the ENT button to select channels: 1. After connection, turn on the unit, and go to the selected channel immediately. 2. For 100~125 channels: Press the number buttons to select channels XXX, and it will...
After connecting to the antenna, turn on the rear panel. When the unit is connected with external antenna, after selecting the TV channel number (refer to one or two number, press ... it will go on with CATV cable, after selecting the TV channel number including one number), press the ENT button to select channels: 1. After connection, turn on the unit, and go to the selected channel immediately. 2. For 100~125 channels: Press the number buttons to select channels XXX, and it will...

User Manual
Page 16
.... Press the MENU button to return to TV mode. Scheme Setup Press the ▲▼ button to select Scheme and press the OK button to turn on the power. 2. After connection, press the POWER button to enter. Press the MENU button to return to enter the setup menu, as shown on...
.... Press the MENU button to return to TV mode. Scheme Setup Press the ▲▼ button to select Scheme and press the OK button to turn on the power. 2. After connection, press the POWER button to enter. Press the MENU button to return to enter the setup menu, as shown on...
User Manual
Page 25
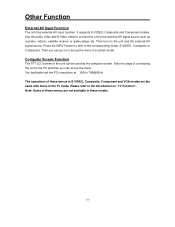
..., Composite, Component and VGA modes are not available in a certain mode. Other Function External AV Input Function The unit has external AV input function. Then turn on to the external AV signal source such as the computer screen.
..., Composite, Component and VGA modes are not available in a certain mode. Other Function External AV Input Function The unit has external AV input function. Then turn on to the external AV signal source such as the computer screen.
User Manual
Page 26
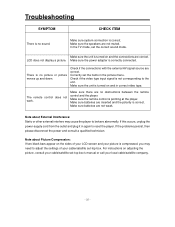
... ITEM There is correctly connected. Make sure the power adapter is no sound. There is not corresponding to adjust the settings of your picture is turned on and in again to behave abnormally. Check if the connections with the external AV signal source are not muted. Check if the video type... occurs, unplug the power-supply cord from the outlet and plug it in correct video type. Make sure batteries are inserted and the polarity is turned on adjusting the picture, consult your local cable/satellite company. - 25 - Correctly set -top box.
... ITEM There is correctly connected. Make sure the power adapter is no sound. There is not corresponding to adjust the settings of your picture is turned on and in again to behave abnormally. Check if the connections with the external AV signal source are not muted. Check if the video type... occurs, unplug the power-supply cord from the outlet and plug it in correct video type. Make sure batteries are inserted and the polarity is turned on adjusting the picture, consult your local cable/satellite company. - 25 - Correctly set -top box.


