User Manual
Page 2
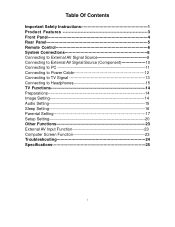
Table Of Contents Important Safety Instructions 1 Product Features 3 Front Panel 4 Rear Panel 5 Remote Control 6 System Connections 8 Connecting to External AV Signal Source 8 Connecting to External AV Signal Source (Component 10 Connecting to PC 11 Connecting to Power Cable 12 Connecting to TV Signal 13 Connecting to Headphones 15 TV Functions 14 Preparations 14 Image Setting 14 Audio Setting 15 Sleep Setting 16 Parental Setting 17 Setup Setting 20 Other Functions 23 External AV Input Function 23 Computer Screen Function 23 Troubleshooting 24 Specifications 25 1
Table Of Contents Important Safety Instructions 1 Product Features 3 Front Panel 4 Rear Panel 5 Remote Control 6 System Connections 8 Connecting to External AV Signal Source 8 Connecting to External AV Signal Source (Component 10 Connecting to PC 11 Connecting to Power Cable 12 Connecting to TV Signal 13 Connecting to Headphones 15 TV Functions 14 Preparations 14 Image Setting 14 Audio Setting 15 Sleep Setting 16 Parental Setting 17 Setup Setting 20 Other Functions 23 External AV Input Function 23 Computer Screen Function 23 Troubleshooting 24 Specifications 25 1
User Manual
Page 3
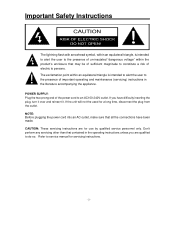
... the two-prong end of the power cord to an AC100-240V outlet. If the unit will not the used for servicing instructions. - 2 - Don't perform any servicing other than that contained in ... the user to the presence of important operating and maintenance (servicing) instructions in the operating instructions unless you have been made. NOTE: Before plugging the power cord into an AC outlet, make sure that all the connections have difficulty inserting the plug, turn it over and reinsert it. CAUTION: These servicing...
... the two-prong end of the power cord to an AC100-240V outlet. If the unit will not the used for servicing instructions. - 2 - Don't perform any servicing other than that contained in ... the user to the presence of important operating and maintenance (servicing) instructions in the operating instructions unless you have been made. NOTE: Before plugging the power cord into an AC outlet, make sure that all the connections have difficulty inserting the plug, turn it over and reinsert it. CAUTION: These servicing...
User Manual
Page 4
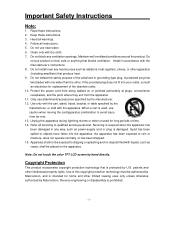
...pinched particularly at plugs, convenience receptacles, and the point where they exit from tip-over. 13. Install in any way, such as power-supply cord or plug is used, use caution when moving the cart/apparatus combination to qualified service personnel. A polarized plug has two ...blades with the manufacturer's instructions. 8. Protect the power cord from being walked on the apparatus. Note: Do not touch the color TFT LCD screen by U.S. patents and other limited viewing uses ...
...pinched particularly at plugs, convenience receptacles, and the point where they exit from tip-over. 13. Install in any way, such as power-supply cord or plug is used, use caution when moving the cart/apparatus combination to qualified service personnel. A polarized plug has two ...blades with the manufacturer's instructions. 8. Protect the power cord from being walked on the apparatus. Note: Do not touch the color TFT LCD screen by U.S. patents and other limited viewing uses ...

User Manual
Page 6
... decrease or increase the volume. In setup menu, the same function as ◄/►direction buttons. 5. Remote Sensor Remote sensor window for the remote control. - 5 - POWER button Press to select the modes: Component, VGA, TV, Composite or S-VIDEO. 2. INPUT button Press to enter or exit the standby mode. 6. 15" color TFT...
... decrease or increase the volume. In setup menu, the same function as ◄/►direction buttons. 5. Remote Sensor Remote sensor window for the remote control. - 5 - POWER button Press to select the modes: Component, VGA, TV, Composite or S-VIDEO. 2. INPUT button Press to enter or exit the standby mode. 6. 15" color TFT...
User Manual
Page 7
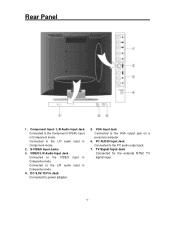
DC 9.5V/12V In Jack Connected to the L/R audio input in Component mode. 2. S-VIDEO Input Jacks 3. Connected to power adapter. 5. Rear Panel 1. VGA Input Jack Connected to the L/R audio input in Composite mode. 4. Connected to the VGA output jack on a personal computer. 6. PC AUDIO ...
DC 9.5V/12V In Jack Connected to the L/R audio input in Component mode. 2. S-VIDEO Input Jacks 3. Connected to power adapter. 5. Rear Panel 1. VGA Input Jack Connected to the L/R audio input in Composite mode. 4. Connected to the VGA output jack on a personal computer. 6. PC AUDIO ...

User Manual
Page 8
... button Press to increase or decrease the volume. 9. CC button In the TV or CVBS mode, press to enter or exit the standby mode. 13. POWER button Press to display the closed captions or cancel display. 11. SLEEP button Press to select numbers. 3. ENT button Under TV mode, confirm the selected...
... button Press to increase or decrease the volume. 9. CC button In the TV or CVBS mode, press to enter or exit the standby mode. 13. POWER button Press to display the closed captions or cancel display. 11. SLEEP button Press to select numbers. 3. ENT button Under TV mode, confirm the selected...
User Manual
Page 10
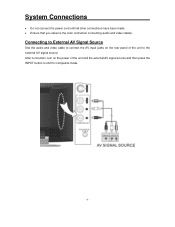
After connection, turn on the rear panel of the unit and the external AV signal source and then press the INPUT button to shift to the external AV signal source. System Connections • Do not connect the power cord until all other connections have been made. • Ensure that you observe the color cord when connecting audio and video cables. Connecting to External AV Signal Source Use the audio and video cable to connect the AV input jacks on the power of the unit to Composite mode. - 9 -
After connection, turn on the rear panel of the unit and the external AV signal source and then press the INPUT button to shift to the external AV signal source. System Connections • Do not connect the power cord until all other connections have been made. • Ensure that you observe the color cord when connecting audio and video cables. Connecting to External AV Signal Source Use the audio and video cable to connect the AV input jacks on the power of the unit to Composite mode. - 9 -
User Manual
Page 11
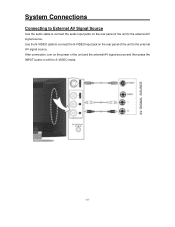
System Connections Connecting to External AV Signal Source Use the audio cable to connect the audio input jacks on the rear panel of the unit and the external AV signal source and then press the INPUT button to shift to S-VIDEO mode. - 10 - After connection, turn on the rear panel of the unit to the external AV signal source. Use the S-VIDEO cable to connect the S-VIDEO input jack on the power of the unit to the external AV signal source.
System Connections Connecting to External AV Signal Source Use the audio cable to connect the audio input jacks on the rear panel of the unit and the external AV signal source and then press the INPUT button to shift to S-VIDEO mode. - 10 - After connection, turn on the rear panel of the unit to the external AV signal source. Use the S-VIDEO cable to connect the S-VIDEO input jack on the power of the unit to the external AV signal source.
User Manual
Page 12
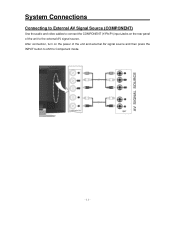
After connection, turn on the rear panel of the unit and external AV signal source and then press the INPUT button to shift to the external AV signal source. System Connections Connecting to External AV Signal Source (COMPONENT) Use the audio and video cables to connect the COMPONENT (Y/Pb/Pr) input Jacks on the power of the unit to Component mode. - 11 -
After connection, turn on the rear panel of the unit and external AV signal source and then press the INPUT button to shift to the external AV signal source. System Connections Connecting to External AV Signal Source (COMPONENT) Use the audio and video cables to connect the COMPONENT (Y/Pb/Pr) input Jacks on the power of the unit to Component mode. - 11 -

User Manual
Page 14
If the unit will not the used for a long time, disconnect the plug from the outlet. - 13 - If you have difficulty inserting the plug, turn it over and reinsert it. System Connections Connecting the Power Cable Plug the two-prong end of the power cord to an AC100-240V outlet.
If the unit will not the used for a long time, disconnect the plug from the outlet. - 13 - If you have difficulty inserting the plug, turn it over and reinsert it. System Connections Connecting the Power Cable Plug the two-prong end of the power cord to an AC100-240V outlet.

User Manual
Page 15
... select channels: 1. Or press the number buttons to input 00X, it will go to the TV signal input source via the TV jack on the power of the unit, press the INPUT button to shift to the selected channel. * X is connected with program searching, you can be connected to the selected...
... select channels: 1. Or press the number buttons to input 00X, it will go to the TV signal input source via the TV jack on the power of the unit, press the INPUT button to shift to the selected channel. * X is connected with program searching, you can be connected to the selected...

User Manual
Page 16
... to the previous menu. Press the ▲▼button to select the desired item and press the OK button to turn on the power. 2. After connection, press the POWER button to confirm your selection. Press the MENU button to return to enter the setup menu, as shown on with the following operations...
... to the previous menu. Press the ▲▼button to select the desired item and press the OK button to turn on the power. 2. After connection, press the POWER button to confirm your selection. Press the MENU button to return to enter the setup menu, as shown on with the following operations...
User Manual
Page 26
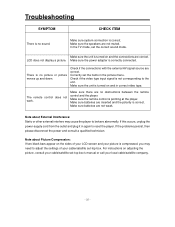
... two black bars appear on and the connections are inserted and the polarity is correct. If the problems persist, then please disconnect the power and consult a qualified technician. Note about External Interference: Static or other external interfere may need to reset the player. For instructions on...correct. Make sure the unit is correctly connected. The remote control does not work. Make sure there are correct. Make sure the power adapter is turned on adjusting the picture, consult your cable/satellite set-top box's manual or call your cable/satellite set-top box...
... two black bars appear on and the connections are inserted and the polarity is correct. If the problems persist, then please disconnect the power and consult a qualified technician. Note about External Interference: Static or other external interfere may need to reset the player. For instructions on...correct. Make sure the unit is correctly connected. The remote control does not work. Make sure there are correct. Make sure the power adapter is turned on adjusting the picture, consult your cable/satellite set-top box's manual or call your cable/satellite set-top box...
User Manual
Page 27
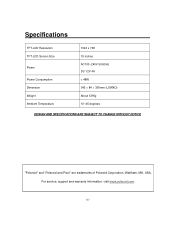
Specifications TFT-LCD Resolution TFT-LCD Screen Size Power Power Consumption Dimension Weight Ambient Temperature 1024 x 768 15 inches AC100~240V 50/60Hz DC 12V 4A < 48W 345 × 84 × 390mm (LXWXD) About 5.8Kg 10~45 degrees DESIGN AND SPECIFICATIONS ARE SUBJECT TO CHANGE WITHOUT NOTICE "Polaroid" and "Polaroid and Pixel" are trademarks of Polaroid Corporation, Waltham, MA, USA. For service, support and warranty information, visit www.polaroid.com. - 26 -
Specifications TFT-LCD Resolution TFT-LCD Screen Size Power Power Consumption Dimension Weight Ambient Temperature 1024 x 768 15 inches AC100~240V 50/60Hz DC 12V 4A < 48W 345 × 84 × 390mm (LXWXD) About 5.8Kg 10~45 degrees DESIGN AND SPECIFICATIONS ARE SUBJECT TO CHANGE WITHOUT NOTICE "Polaroid" and "Polaroid and Pixel" are trademarks of Polaroid Corporation, Waltham, MA, USA. For service, support and warranty information, visit www.polaroid.com. - 26 -


