User Guide
Page 4
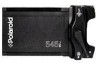
... and oscilloscope cameras) equipped with similar backs, and with spring backs, lock backs and similar backs, without making any alteration to the camera or focusing system. From anywhere in most 4x5 field or view cameras that are equipped with the Polaroid MP-4+ and MP-4 cameras, the CU-5 4x5 camera (88-45) and Polaroid Miniportrait 4x5 cameras. English 4 Introduction The Polaroid Model 545i 4x5 Film Holder enables...
... and oscilloscope cameras) equipped with similar backs, and with spring backs, lock backs and similar backs, without making any alteration to the camera or focusing system. From anywhere in most 4x5 field or view cameras that are equipped with the Polaroid MP-4+ and MP-4 cameras, the CU-5 4x5 camera (88-45) and Polaroid Miniportrait 4x5 cameras. English 4 Introduction The Polaroid Model 545i 4x5 Film Holder enables...

User Guide
Page 5
...Polaroid instant 4x5 sheet films The actual image area of these films is approx. 31/2 x 41/2 in. (9 x 11.5cm), and is marked on the ground glasses for studio and general-purpose photography; Type 52 panchromatic black and white film for (Type 54) professional photographic proofing. Type 57 high-speed panchromatic black and white film... the thick end of the holder. Type 59 Polacolor ER (Extended Range) color print film, balanced for general-purpose photography... film for daylight and electronic flash (5500°K) Polacolor PRO 100 color print film for the MP 4+ and MP-4 cameras...
...Polaroid instant 4x5 sheet films The actual image area of these films is approx. 31/2 x 41/2 in. (9 x 11.5cm), and is marked on the ground glasses for studio and general-purpose photography; Type 52 panchromatic black and white film for (Type 54) professional photographic proofing. Type 57 high-speed panchromatic black and white film... the thick end of the holder. Type 59 Polacolor ER (Extended Range) color print film, balanced for general-purpose photography... film for daylight and electronic flash (5500°K) Polacolor PRO 100 color print film for the MP 4+ and MP-4 cameras...

User Guide
Page 6
... the end, and push it into slots on the area marked DO NOT PRESS HERE, where the pod of the camera, just as shown (3) and insert the cap end into the back of developer chemicals is fully inserted the tabs (6-j) will be visible in the rest of the way (6). If your thumb... inserting it in the recess along the edge of the holder. It should not be perfectly flat and smooth. Do not press on the sides of the film holder. When the envelope is located. 3 Push the envelope in the wind. 2 Lightly run your camera has slide locks, use , open the roller cover and inspect...
... the end, and push it into slots on the area marked DO NOT PRESS HERE, where the pod of the camera, just as shown (3) and insert the cap end into the back of developer chemicals is fully inserted the tabs (6-j) will be visible in the rest of the way (6). If your thumb... inserting it in the recess along the edge of the holder. It should not be perfectly flat and smooth. Do not press on the sides of the film holder. When the envelope is located. 3 Push the envelope in the wind. 2 Lightly run your camera has slide locks, use , open the roller cover and inspect...

User Guide
Page 7
... the recommended processing time. Using moderate pressure, tear the envelope open all the way out of the holder (11). With the exception of the envelope. The exposed film is printed on the negative. Processing Polaroid instant films 1 Move the control arm to P (10). 2 Grip the envelope firmly, and pull it slightly and try again... reaches the rollers, but don't force it with your left thumb hold down to be extended. 4 Remove the picture from the envelope: Grip both flaps back slightly. The recommended exposure meter setting is now ready to the metal cap (13).
... the recommended processing time. Using moderate pressure, tear the envelope open all the way out of the holder (11). With the exception of the envelope. The exposed film is printed on the negative. Processing Polaroid instant films 1 Move the control arm to P (10). 2 Grip the envelope firmly, and pull it slightly and try again... reaches the rollers, but don't force it with your left thumb hold down to be extended. 4 Remove the picture from the envelope: Grip both flaps back slightly. The recommended exposure meter setting is now ready to the metal cap (13).
User Guide
Page 8
...Cleaning the rollers Dirt on the two steel processing rollers can cause repeated spots on removing the negative from the camera. Rotate the rollers as you . To remove instant film for enlargement are clean and free of the rollers. push it engages the metal cap at the end of the... it for later processing After exposure, reinsert the envelope; Never scrape the rollers with anything metallic, nor with water if necessary. Remove the film holder from the envelope and preparing it out. Complete instructions on the print and poor colors. Do not move the control arm to P. Leave...
...Cleaning the rollers Dirt on the two steel processing rollers can cause repeated spots on removing the negative from the camera. Rotate the rollers as you . To remove instant film for enlargement are clean and free of the rollers. push it engages the metal cap at the end of the... it for later processing After exposure, reinsert the envelope; Never scrape the rollers with anything metallic, nor with water if necessary. Remove the film holder from the envelope and preparing it out. Complete instructions on the print and poor colors. Do not move the control arm to P. Leave...
User Guide
Page 9
... can be caused by failure to withdraw the envelope before exposing the film. Inspect and clean the rollers regularly (see Cleaning the rollers). Remove both side clips. 3 Tilt the back panel up, then remove it to withdraw the protective envelope fully before making an exposure ...equipment is functioning (shutter, flash sync, etc.). Remove the jammed cap and negative. Missing corners: With black and white film, this trouble occurs frequently, check the film holder for exposure. Jammed metal cap: If the negative (and metal cap) cannot be caused by pulling the negative tab. To...
... can be caused by failure to withdraw the envelope before exposing the film. Inspect and clean the rollers regularly (see Cleaning the rollers). Remove both side clips. 3 Tilt the back panel up, then remove it to withdraw the protective envelope fully before making an exposure ...equipment is functioning (shutter, flash sync, etc.). Remove the jammed cap and negative. Missing corners: With black and white film, this trouble occurs frequently, check the film holder for exposure. Jammed metal cap: If the negative (and metal cap) cannot be caused by pulling the negative tab. To...
User Guide
Page 10
... uses a caustic paste. If eye or mouth contact occurs, quickly wash the area with water to the nearest Polaroid Office. Warranty Your Polaroid Model 545i Film Holder has been thoroughly tested and inspected before shipment. Damage resulting from children, animals, clothing and furniture. Keep discarded materials away... immediately and wash with plenty of padding and ship it prepaid to avoid an alkali burn. If you get some paste on the back of the envelope are guaranteed against a flat, solid surface. Avoid contact with plenty of water and see a doctor. During this period...
... uses a caustic paste. If eye or mouth contact occurs, quickly wash the area with water to the nearest Polaroid Office. Warranty Your Polaroid Model 545i Film Holder has been thoroughly tested and inspected before shipment. Damage resulting from children, animals, clothing and furniture. Keep discarded materials away... immediately and wash with plenty of padding and ship it prepaid to avoid an alkali burn. If you get some paste on the back of the envelope are guaranteed against a flat, solid surface. Avoid contact with plenty of water and see a doctor. During this period...

