User Guide
Page 4
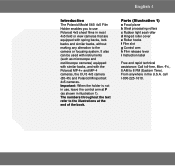
... 1). Parts (Illustration 1) a Focal plane b Steel processing rollers c Rubber light seal roller d Hinged roller cover e Roller hooks f Film slot g Control arm h Film release lever i Instruction label Free and rapid technical assistance: Call toll-free, Mon.-Fri., 8 AM to the illustrations at P (as microscope and oscilloscope cameras) equipped with similar backs, and with instruments (such as shown in the U.S.A. English 4 Introduction The Polaroid Model 545i 4x5 Film Holder...
... 1). Parts (Illustration 1) a Focal plane b Steel processing rollers c Rubber light seal roller d Hinged roller cover e Roller hooks f Film slot g Control arm h Film release lever i Instruction label Free and rapid technical assistance: Call toll-free, Mon.-Fri., 8 AM to the illustrations at P (as microscope and oscilloscope cameras) equipped with similar backs, and with instruments (such as shown in the U.S.A. English 4 Introduction The Polaroid Model 545i 4x5 Film Holder...

User Guide
Page 5
... electronic flash (5500°K). English 5 Polaroid instant 4x5 sheet films The actual image area of these films is approx. 31/2 x 41/2 in. (9 x 11.5cm), and is marked on the ground glasses for the MP 4+ and MP-4 cameras, but may not correspond precisely with tungsten/halogen light sources (3200°K) Polapan 400 panchromatic black and white coaterless film for longer exposure times Tungsten...
... electronic flash (5500°K). English 5 Polaroid instant 4x5 sheet films The actual image area of these films is approx. 31/2 x 41/2 in. (9 x 11.5cm), and is marked on the ground glasses for the MP 4+ and MP-4 cameras, but may not correspond precisely with tungsten/halogen light sources (3200°K) Polapan 400 panchromatic black and white coaterless film for longer exposure times Tungsten...

User Guide
Page 6
... THIS SIDE TOWARD LENS faces the lens. The negative will be removed for exposure. If you may buckle the envelope (4) and damage the film. Push the envelope in the recess along the edge of the camera, just as shown (3) and insert the cap end into the back of the film holder. English 6 Attach the holder to the camera Before use them if...
... THIS SIDE TOWARD LENS faces the lens. The negative will be removed for exposure. If you may buckle the envelope (4) and damage the film. Push the envelope in the recess along the edge of the camera, just as shown (3) and insert the cap end into the back of the film holder. English 6 Attach the holder to the camera Before use them if...

User Guide
Page 7
... right out of Type 55P/N film*, the negative serves no further purpose. Roll both tabs with your thumbs as shown (12-k). It will separate to allow the cap to be extended. 4 Remove the picture from the envelope: Grip both flaps back slightly. Discard it slightly and try again. See Caution notice. The recommended exposure meter setting is printed...
... right out of Type 55P/N film*, the negative serves no further purpose. Roll both tabs with your thumbs as shown (12-k). It will separate to allow the cap to be extended. 4 Remove the picture from the envelope: Grip both flaps back slightly. Discard it slightly and try again. See Caution notice. The recommended exposure meter setting is printed...
User Guide
Page 8
... necessary. English 8 Type 55P/N film only: Use your left thumb to P. To remove instant film for enlargement are clean and free of the other hand, gently push the film 4 envelope out as when first loading, move the control arm to hold down the negative. Leave it at the ends of the envelope and pull it for later processing After exposure, reinsert...
... necessary. English 8 Type 55P/N film only: Use your left thumb to P. To remove instant film for enlargement are clean and free of the other hand, gently push the film 4 envelope out as when first loading, move the control arm to hold down the negative. Leave it at the ends of the envelope and pull it for later processing After exposure, reinsert...
User Guide
Page 9
... the holder), open the hinged cover and disengage the rollers just as described above, you would for cleaning. Pull straight, at medium speed, without hesitation. Inspect and clean the rollers regularly (see Cleaning the rollers). Remove the jammed cap and negative. Check that no light reached the negative. or failure of the picture. Check the film loading instructions. Spots...
... the holder), open the hinged cover and disengage the rollers just as described above, you would for cleaning. Pull straight, at medium speed, without hesitation. Inspect and clean the rollers regularly (see Cleaning the rollers). Remove the jammed cap and negative. Check that no light reached the negative. or failure of the picture. Check the film loading instructions. Spots...
User Guide
Page 10
...Polaroid instant film process uses a caustic paste. English 10 4 To replace the back panel, insert the end of the panel under the lip of the envelope are guaranteed against a flat, solid surface. All parts are not parallel, tap the length of water and see a doctor. Avoid contact with plenty of original...repaired at a reasonable charge. Warranty Your Polaroid Model 545i Film Holder has been thoroughly tested and inspected before shipment. If you get some paste on the back of the roller cover (24-n), then lower the panel into position. 5 Hold the back panel in its original...
...Polaroid instant film process uses a caustic paste. English 10 4 To replace the back panel, insert the end of the panel under the lip of the envelope are guaranteed against a flat, solid surface. All parts are not parallel, tap the length of water and see a doctor. Avoid contact with plenty of original...repaired at a reasonable charge. Warranty Your Polaroid Model 545i Film Holder has been thoroughly tested and inspected before shipment. If you get some paste on the back of the roller cover (24-n), then lower the panel into position. 5 Hold the back panel in its original...


