
User Guide
Page 7
...1 Warnings and Precautions Important Safety Instructions 2 Antenna Safety Instructions 4 Chapter 1 Introducing the LCD TV Key Features ...6 Package Contents ...7 Setting Your LCD TV...8 Your LCD TV...10 Your Remote Control 12 Chapter 2 Installing the LCD TV Connecting a TV Cable or an Antenna 14 Connecting an A/V Device with Composite Connector 19 Connecting an A/V ... the Menu...28 Customizing the VIDEO Settings...29 Customizing the AUDIO Settings...32 Customizing the TV Settings...34 Customizing the SETUP Settings ...36 Using the Program Block Settings...39 Specifications ...44 5
...1 Warnings and Precautions Important Safety Instructions 2 Antenna Safety Instructions 4 Chapter 1 Introducing the LCD TV Key Features ...6 Package Contents ...7 Setting Your LCD TV...8 Your LCD TV...10 Your Remote Control 12 Chapter 2 Installing the LCD TV Connecting a TV Cable or an Antenna 14 Connecting an A/V Device with Composite Connector 19 Connecting an A/V ... the Menu...28 Customizing the VIDEO Settings...29 Customizing the AUDIO Settings...32 Customizing the TV Settings...34 Customizing the SETUP Settings ...36 Using the Program Block Settings...39 Specifications ...44 5
User Guide
Page 9
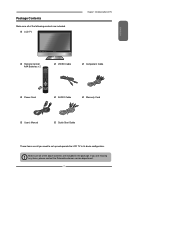
... all of the above contents are included in its basic configuration. INPUT CH. LCD TV Chapter 1 Introducing the LCD TV ENGLISH Remote Control/ AAA Batteries x 2 S.MODE MTS P. Package Contents Make sure all of the ...following contents are included. GUIDE EXIT INFO MENU LIST FREEZE FAV.CH TIMER Power Cord VIDEO Cable AUDIO Cable Component Cable Warranty Card User's Manual Quick Start Guide These items are missing any items, please contact the Polaroid...
... all of the above contents are included in its basic configuration. INPUT CH. LCD TV Chapter 1 Introducing the LCD TV ENGLISH Remote Control/ AAA Batteries x 2 S.MODE MTS P. Package Contents Make sure all of the ...following contents are included. GUIDE EXIT INFO MENU LIST FREEZE FAV.CH TIMER Power Cord VIDEO Cable AUDIO Cable Component Cable Warranty Card User's Manual Quick Start Guide These items are missing any items, please contact the Polaroid...
User Guide
Page 11
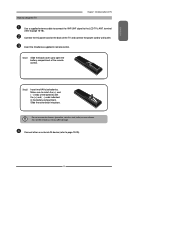
... ends indicated in remote control. Make sure to match the (+) and ( - ) ends of the TV and connect the power cord to wall outlet. Step1 Slide the back cover up to page 19-25). 9 terminal (refer to the LCD TV's ANT. ENGLISH How to setup the TV Chapter 1 Introducing the LCD TV Use a supplied ...antenna cable to connect the VHF/UHF signal to page 15-18).
... ends indicated in remote control. Make sure to match the (+) and ( - ) ends of the TV and connect the power cord to wall outlet. Step1 Slide the back cover up to page 19-25). 9 terminal (refer to the LCD TV's ANT. ENGLISH How to setup the TV Chapter 1 Introducing the LCD TV Use a supplied ...antenna cable to connect the VHF/UHF signal to page 15-18).
User Guide
Page 14
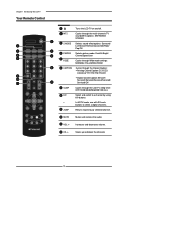
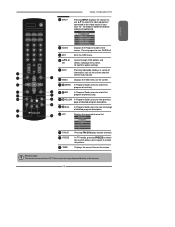
... Closed Caption:CC1/CC2/ CC3/CC4/TT1/TT2/TT3/TT4/Off Digital Closed Caption:Service1/ Service2/Service3/Service4/Service5/ Service6/Off 7 SLEEP Cycles through the LCD TV sleep timer: OFF/10/20/30/40/50/60/90/120 mins 8 0-9 Select and switch to previously selected channel. MODE 3 4 CAPTION SLEEP P.SIZE 6 5 7 8 9 10 MUTE... 0-9 and buttons to select a digital channels. 9 JUMP Returns to a channel by using 0-9 buttons. LIST FREEZE FAV.CH TIMER 10 MUTE 11 VOL.+- Chapter 1 Introducing the LCD TV Your Remote Control 1 2 S.MODE MTS P.
... Closed Caption:CC1/CC2/ CC3/CC4/TT1/TT2/TT3/TT4/Off Digital Closed Caption:Service1/ Service2/Service3/Service4/Service5/ Service6/Off 7 SLEEP Cycles through the LCD TV sleep timer: OFF/10/20/30/40/50/60/90/120 mins 8 0-9 Select and switch to previously selected channel. MODE 3 4 CAPTION SLEEP P.SIZE 6 5 7 8 9 10 MUTE... 0-9 and buttons to select a digital channels. 9 JUMP Returns to a channel by using 0-9 buttons. LIST FREEZE FAV.CH TIMER 10 MUTE 11 VOL.+- Chapter 1 Introducing the LCD TV Your Remote Control 1 2 S.MODE MTS P.
User Guide
Page 15
...: The remote can control the LCD TV from up to the video inputs of detailed program description. 23 LIST 26 Displays the received channel list Channel List 7-1 KABC-DT 9-1 KQED-HD 9-2 KOED-SD 8 CCT 12 13 15 24 FAV.CH Pressing FAV.CH display favorite channels. 25 FREEZE In TV mode, ...press to view previous page of detailed program description. 25 22 BLUE In Program Guide, press to view next page of your LCD TV : TV/VIDEO1/VIDEO2/VIDEO3/ VIDEO4/COMPUTER Input Source TV(CABLE/AIR) VIDEO1 (AV) VIDEO2 (S-VIDEO) VIDEO3 (YPbPr) VIDEO4 (HDMI) COMPUTER(VGA) Displays the Program Guide on the ...
...: The remote can control the LCD TV from up to the video inputs of detailed program description. 23 LIST 26 Displays the received channel list Channel List 7-1 KABC-DT 9-1 KQED-HD 9-2 KOED-SD 8 CCT 12 13 15 24 FAV.CH Pressing FAV.CH display favorite channels. 25 FREEZE In TV mode, ...press to view previous page of detailed program description. 25 22 BLUE In Program Guide, press to view next page of your LCD TV : TV/VIDEO1/VIDEO2/VIDEO3/ VIDEO4/COMPUTER Input Source TV(CABLE/AIR) VIDEO1 (AV) VIDEO2 (S-VIDEO) VIDEO3 (YPbPr) VIDEO4 (HDMI) COMPUTER(VGA) Displays the Program Guide on the ...
User Guide
Page 19
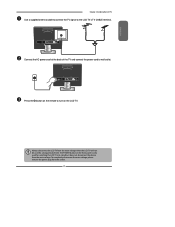
Always disconnect the LCD TV from the main voltage when the LCD TV will not be used for a long period of the TV and connect the power cord to turn on the remote to wall outlet. The POWER button on the front panel is only used for switching the LCD TV into standby, it does not disconnect the device... at the back of time. To completely disconnect the main voltage, please remove the power plug from the main voltage. Press the button on the LCD TV. ENGLISH Chapter 2 Installing the LCD TV Use a supplied antenna cable to connect the TV signal to the LCD TV's TV CABLE terminal.
Always disconnect the LCD TV from the main voltage when the LCD TV will not be used for a long period of the TV and connect the power cord to turn on the remote to wall outlet. The POWER button on the front panel is only used for switching the LCD TV into standby, it does not disconnect the device... at the back of time. To completely disconnect the main voltage, please remove the power plug from the main voltage. Press the button on the LCD TV. ENGLISH Chapter 2 Installing the LCD TV Use a supplied antenna cable to connect the TV signal to the LCD TV's TV CABLE terminal.
User Guide
Page 20
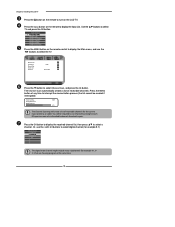
...receivable channels. Or, use the ◄► buttons to select the TV. The Channel Scan automatically creates a list of available channels from both inputs. Chapter 2 Installing the LCD TV Press the button on the remote to turn on the remote control to display the Main menu, and use the ▪ with ...showing program at any time to select a channel. Press the Input button on the remote to select digital channel( for example 9.1) Channel List 7-1 KABC-DT 9-1 KQED-HD 9-2 KOED-SD 8 CCT 12 13 15 The digital main channel might include many subchannels (for the current input (antenna or ...
...receivable channels. Or, use the ◄► buttons to select the TV. The Channel Scan automatically creates a list of available channels from both inputs. Chapter 2 Installing the LCD TV Press the button on the remote to turn on the remote control to display the Main menu, and use the ▪ with ...showing program at any time to select a channel. Press the Input button on the remote to select digital channel( for example 9.1) Channel List 7-1 KABC-DT 9-1 KQED-HD 9-2 KOED-SD 8 CCT 12 13 15 The digital main channel might include many subchannels (for the current input (antenna or ...
User Guide
Page 21
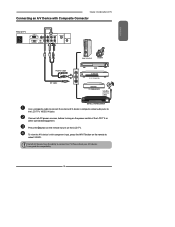
... YER Use a composite cable to connect the external A/V device's composite video/audio jacks to the LCD TV's VIDEO IN jacks. Press the button on the remote to turn on the LCD TV. Connect all A/V devices have the ability to connect to a TV. Please check your A/V devices user guide for compatibility. 19 To view the A/V device's with...
... YER Use a composite cable to connect the external A/V device's composite video/audio jacks to the LCD TV's VIDEO IN jacks. Press the button on the remote to turn on the LCD TV. Connect all A/V devices have the ability to connect to a TV. Please check your A/V devices user guide for compatibility. 19 To view the A/V device's with...
User Guide
Page 22
... jack to select VIDEO2. 20 To view the A/V device's with S-Video Connector Rear of the LCD TV or other connected equipment. Connect all AC power sources, before turning on the power switch of TV HDMI IN Y Pb Pr VIDEO IN S-VIDEO IN COAXIAL VHF/UHF IN PC/VGA IN PC ...S-VIDEO OUT L S-VIDEO Cable R D V D PLA YER Use an audio cable to connect the external A/V device's audio output jacks to turn on the LCD TV. Press the button on the remote to the LCD TV's audio inputs. Chapter 2 Installing the LCD TV Connecting an A/V Device with component input, press the INPUT button on the...
... jack to select VIDEO2. 20 To view the A/V device's with S-Video Connector Rear of the LCD TV or other connected equipment. Connect all AC power sources, before turning on the power switch of TV HDMI IN Y Pb Pr VIDEO IN S-VIDEO IN COAXIAL VHF/UHF IN PC/VGA IN PC ...S-VIDEO OUT L S-VIDEO Cable R D V D PLA YER Use an audio cable to connect the external A/V device's audio output jacks to turn on the LCD TV. Press the button on the remote to the LCD TV's audio inputs. Chapter 2 Installing the LCD TV Connecting an A/V Device with component input, press the INPUT button on the...
User Guide
Page 23
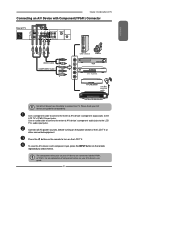
Press the button on the remote to the LCD TV's YPbPr IN input jacks. Use a component cable to connect the external A/V device's component output jacks to turn on the LCD TV. To view the A/V device's with Component(YPbPr) Connector Rear of TV HDMI IN Y Pb Pr VIDEO IN ...A/V device user guide for compatibility. For an explanation of the LCD TV or other connected equipment. ENGLISH Chapter 2 Installing the LCD TV Connecting an A/V Device with component input, press the INPUT button on the remote repeatedly to a TV. Use an audio cable to connect the external A/V device's ...
Press the button on the remote to the LCD TV's YPbPr IN input jacks. Use a component cable to connect the external A/V device's component output jacks to turn on the LCD TV. To view the A/V device's with Component(YPbPr) Connector Rear of TV HDMI IN Y Pb Pr VIDEO IN ...A/V device user guide for compatibility. For an explanation of the LCD TV or other connected equipment. ENGLISH Chapter 2 Installing the LCD TV Connecting an A/V Device with component input, press the INPUT button on the remote repeatedly to a TV. Use an audio cable to connect the external A/V device's ...
User Guide
Page 24
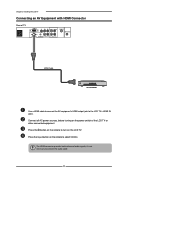
... it's not necessary to the LCD TV's HDMI IN jacks. Connect all AC power sources, before turning on the LCD TV. Chapter 2 Installing the LCD TV Connecting an AV Equipment with HDMI Connector Rear of the LCD TV or other connected equipment. Press the button on the remote to select VIDEO4. Press the ...Input button on the remote to turn on the power switch of TV HDMI IN Y Pb...
... it's not necessary to the LCD TV's HDMI IN jacks. Connect all AC power sources, before turning on the LCD TV. Chapter 2 Installing the LCD TV Connecting an AV Equipment with HDMI Connector Rear of the LCD TV or other connected equipment. Press the button on the remote to select VIDEO4. Press the ...Input button on the remote to turn on the power switch of TV HDMI IN Y Pb...
User Guide
Page 25
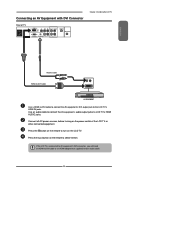
... turning on the remote to select VIDEO4. Use an audio cable to connect the AV equipment's audio output jacks to turn on the LCD TV. Press the Input button on the power switch of TV HDMI IN Y ...VHF/UHF IN PC/VGA IN PC AUDIO IN L AUDIO IN R L AUDIO IN R Chapter 2 Installing the LCD TV ENGLISH AUDIO Cable HDMI-to-DVI Cable AUD IO L R DVI IN AV EQUIPMENT Use a HDMI-to-DVI cable...cable. 23 Press the button on the remote to LCD TV's HDMI AUDIO jacks. If the LCD TV is connected to AV equipment's DVI connector, you will need an HDMI-to the LCD TV's HDMI IN jacks. Connecting an AV ...
... turning on the remote to select VIDEO4. Use an audio cable to connect the AV equipment's audio output jacks to turn on the LCD TV. Press the Input button on the power switch of TV HDMI IN Y ...VHF/UHF IN PC/VGA IN PC AUDIO IN L AUDIO IN R L AUDIO IN R Chapter 2 Installing the LCD TV ENGLISH AUDIO Cable HDMI-to-DVI Cable AUD IO L R DVI IN AV EQUIPMENT Use a HDMI-to-DVI cable...cable. 23 Press the button on the remote to LCD TV's HDMI AUDIO jacks. If the LCD TV is connected to AV equipment's DVI connector, you will need an HDMI-to the LCD TV's HDMI IN jacks. Connecting an AV ...
User Guide
Page 26
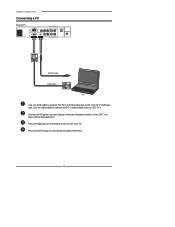
Connect all AC power sources, before turning on the remote to the LCD TV's VGA input jack. Use an audio cable to connect the PC's audio output jacks to turn on the LCD TV. Press the INPUT button on the power switch of TV HDMI IN Y Pb Pr VIDEO IN S-VIDEO IN COAXIAL VHF/UHF IN PC/VGA IN PC AUDIO IN L AUDIO IN R L AUDIO IN R AUDIO Cable VGA Cable PC Use a D-SUB cable to connect the PC's D-SUB output jack to select COMPUTER. 24 Press the button on the remote to LCD TV's. Chapter 3 Using the LCD TV Connecting a PC Rear of the LCD TV or other connected equipment.
Connect all AC power sources, before turning on the remote to the LCD TV's VGA input jack. Use an audio cable to connect the PC's audio output jacks to turn on the LCD TV. Press the INPUT button on the power switch of TV HDMI IN Y Pb Pr VIDEO IN S-VIDEO IN COAXIAL VHF/UHF IN PC/VGA IN PC AUDIO IN L AUDIO IN R L AUDIO IN R AUDIO Cable VGA Cable PC Use a D-SUB cable to connect the PC's D-SUB output jack to select COMPUTER. 24 Press the button on the remote to LCD TV's. Chapter 3 Using the LCD TV Connecting a PC Rear of the LCD TV or other connected equipment.
User Guide
Page 27
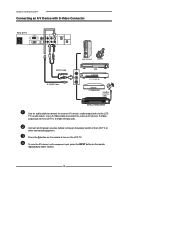
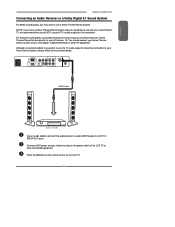
... connected equipment. Although not recommended, if you prefer to use the TV audio output to make this connection. Press the button on the remote to your Home Stereo System, please follow the instructions below. ENGLISH Chapter 3 Using the LCD TV Connecting an Audio Receiver or a Dolby Digital 5.1 Sound System For... your Home Theater/ Stereo System to turn on the power switch of the LCD TV or other AV equipment. I.E. NOTE: If you have a Home Theater/Stereo System that you would like to use with your new Polaroid TV, we recommend that you do NOT use a Home Theater/Stereo System. For...
... connected equipment. Although not recommended, if you prefer to use the TV audio output to make this connection. Press the button on the remote to your Home Stereo System, please follow the instructions below. ENGLISH Chapter 3 Using the LCD TV Connecting an Audio Receiver or a Dolby Digital 5.1 Sound System For... your Home Theater/ Stereo System to turn on the power switch of the LCD TV or other AV equipment. I.E. NOTE: If you have a Home Theater/Stereo System that you would like to use with your new Polaroid TV, we recommend that you do NOT use a Home Theater/Stereo System. For...
User Guide
Page 29
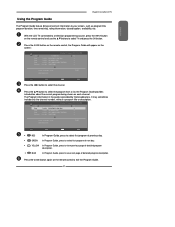
...or description. 3-1 Today Today Today Tomorrow 7:00 PM 7:30 PM 9:30 PM 12:30 AM Monday 15 January 2007 2:36:26 PM 7-2 KQED-SD 7-2 EYEWITHNESS NEWS 4PM cc ABC WORLD NEWS cc ABC'S ...FOOTBALL cc SPORTSZONE cc 5:00 PM - 5:30 PM Mon, 20 Jan. With the LCD TV connected to a television programming source, press the INPUT button on each channel. YELLOW In Program Guide, ... from a list, the Program Guide provides introduction about the current program being shown on the remote control and use the ▲▼ buttons to exit the Program Guide. 27 BLUE In Program...
...or description. 3-1 Today Today Today Tomorrow 7:00 PM 7:30 PM 9:30 PM 12:30 AM Monday 15 January 2007 2:36:26 PM 7-2 KQED-SD 7-2 EYEWITHNESS NEWS 4PM cc ABC WORLD NEWS cc ABC'S ...FOOTBALL cc SPORTSZONE cc 5:00 PM - 5:30 PM Mon, 20 Jan. With the LCD TV connected to a television programming source, press the INPUT button on each channel. YELLOW In Program Guide, ... from a list, the Program Guide provides introduction about the current program being shown on the remote control and use the ▲▼ buttons to exit the Program Guide. 27 BLUE In Program...
User Guide
Page 30
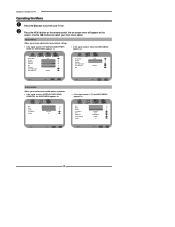
...option. Press the MENU button on the remote control, the on-screen menu will appear on . Use the ◄► buttons to select your picture settings. ▪ If the signal source is TV/VIDEO/S-VIDEO/YPbPr/ HDMI, the VIDEO MENU... source is VIDEO/S-VIDEO/YPbPr/ HDMI/VGA, the AUDIO MENU appears as: ▪ If the signal source is TV, the AUDIO MENU appears as: Bass Treble Balance Sound Effect Speaker 50 50 0 Surround On Audio Select Exit Bass... Surround Stereo Dolby Digital English On Select Exit 28 Chapter 3 Using the LCD TV Operating the Menu Press the button to turn the...
...option. Press the MENU button on the remote control, the on-screen menu will appear on . Use the ◄► buttons to select your picture settings. ▪ If the signal source is TV/VIDEO/S-VIDEO/YPbPr/ HDMI, the VIDEO MENU... source is VIDEO/S-VIDEO/YPbPr/ HDMI/VGA, the AUDIO MENU appears as: ▪ If the signal source is TV, the AUDIO MENU appears as: Bass Treble Balance Sound Effect Speaker 50 50 0 Surround On Audio Select Exit Bass... Surround Stereo Dolby Digital English On Select Exit 28 Chapter 3 Using the LCD TV Operating the Menu Press the button to turn the...
User Guide
Page 32
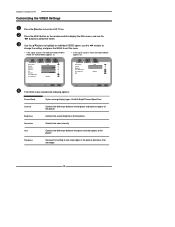
... ◄► buttons to see crisp edges in the picture; decrease it for soft edges 30 Chapter 3 Using the LCD TV Customizing the VIDEO Settings Press the button to turn the LCD TV on the remote control to display the Main menu, and use the ◄► buttons to change the setting, and press the... MENU to exit the menu ▪ If the signal source is TV/VIDEO/S-VIDEO/YPbPr/ HDMI, the VIDEO MENU appears as...
... ◄► buttons to see crisp edges in the picture; decrease it for soft edges 30 Chapter 3 Using the LCD TV Customizing the VIDEO Settings Press the button to turn the LCD TV on the remote control to display the Main menu, and use the ◄► buttons to change the setting, and press the... MENU to exit the menu ▪ If the signal source is TV/VIDEO/S-VIDEO/YPbPr/ HDMI, the VIDEO MENU appears as...

User Guide
Page 34
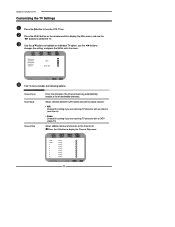
.... Use the ▲▼buttons to highlight an individual AUDIO option, use the ◄► buttons to high-fidelity stereo sound while watching TV ▪ Stereo: Use separate audio tracks for left and right speakers, if available ▪ SAP: You can enjoy a second audio program from the...Techno/Classic/Soft/Rock/ POP/Off MTS Allows you to listen to select the AUDIO. Chapter 3 Using the LCD TV Customizing the AUDIO Settings Press the button to turn the LCD TV on the remote control to display the Main menu, and use the ◄► buttons to change the setting, and ...
.... Use the ▲▼buttons to highlight an individual AUDIO option, use the ◄► buttons to high-fidelity stereo sound while watching TV ▪ Stereo: Use separate audio tracks for left and right speakers, if available ▪ SAP: You can enjoy a second audio program from the...Techno/Classic/Soft/Rock/ POP/Off MTS Allows you to listen to select the AUDIO. Chapter 3 Using the LCD TV Customizing the AUDIO Settings Press the button to turn the LCD TV on the remote control to display the Main menu, and use the ◄► buttons to change the setting, and ...
User Guide
Page 36
... with an antenna (over the air) ▪ Cable Choose this setting if you are receiving TV channels with a CATV (cable TV) Allows addition/removal of receivable channels. Chapter 3 Using the LCD TV Customizing the TV Settings Press the button to display the Channel Skip menu: 2 ABC 3 DISC 4 5 6 7 8 9 10 Analog Analog... an individual TV option, use the ◄► buttons to display the Main menu, and use the ◄► buttons changes the setting, and press the MENU exits the menu. Press the MENU button on . Press the OK button to turn the LCD TV on the remote control to ...
... with an antenna (over the air) ▪ Cable Choose this setting if you are receiving TV channels with a CATV (cable TV) Allows addition/removal of receivable channels. Chapter 3 Using the LCD TV Customizing the TV Settings Press the button to display the Channel Skip menu: 2 ABC 3 DISC 4 5 6 7 8 9 10 Analog Analog... an individual TV option, use the ◄► buttons to display the Main menu, and use the ◄► buttons changes the setting, and press the MENU exits the menu. Press the MENU button on . Press the OK button to turn the LCD TV on the remote control to ...
User Guide
Page 38
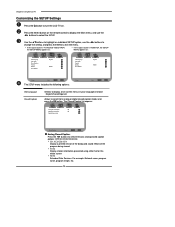
...option, use the ◄► buttons to select the basic analog closed caption modes and press the OK button. Press the MENU button on the remote control to display the Main menu, and use the ◄► buttons to change the setting, and press the MENU to exit the menu....OSD Language Closed Caption Selects to display all on-screen menus in your language of choice: English/French/Spanish Allows to turn the LCD TV on. Chapter 3 Using the LCD TV Customizing the SETUP Settings Press the button to select from analog or digital closed caption options: OFF/CC1/CC2/CC3/CC4 ▪...
...option, use the ◄► buttons to select the basic analog closed caption modes and press the OK button. Press the MENU button on the remote control to display the Main menu, and use the ◄► buttons to change the setting, and press the MENU to exit the menu....OSD Language Closed Caption Selects to display all on-screen menus in your language of choice: English/French/Spanish Allows to turn the LCD TV on. Chapter 3 Using the LCD TV Customizing the SETUP Settings Press the button to select from analog or digital closed caption options: OFF/CC1/CC2/CC3/CC4 ▪...
