
Owner's Manual
Page 2
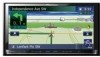
...32 Regular startup 32 How to use the navigation menu screens Screen switching overview 34 What you will know how to operate your iPod 31 - Licenses 17 About the database 20 - Rear view camera 23 Notes Before Using the System 23 - Inserting a disc 29 - ...screens shown in the examples may be changed without notice for performance and function improvements. PIONEER AVIC-Z110BT - Data subject to User 9 License Agreement 10 - Enlarged map of the map 39 - PIONEER AVIC-Z110BT - Definitions of terminology 25 Notice regarding video viewing 25 Notice regarding DVD-Video viewing 25...
...32 Regular startup 32 How to use the navigation menu screens Screen switching overview 34 What you will know how to operate your iPod 31 - Licenses 17 About the database 20 - Rear view camera 23 Notes Before Using the System 23 - Inserting a disc 29 - ...screens shown in the examples may be changed without notice for performance and function improvements. PIONEER AVIC-Z110BT - Data subject to User 9 License Agreement 10 - Enlarged map of the map 39 - PIONEER AVIC-Z110BT - Definitions of terminology 25 Notice regarding video viewing 25 Notice regarding DVD-Video viewing 25...

Owner's Manual
Page 5
... broadcast frequencies 104 - Storing the strongest broadcast frequencies 107 - Resuming playback (Bookmark) 117 En 5 Setting the Volume for rear view camera 99 - Tuning in the "Navi Settings" menu 92 - Storing and recalling broadcast frequencies 109 Switching the display 109 Using the "Function...radio (AM) Reading the screen 106 Using the touch panel keys 106 - Displaying the "Navi Settings" screen 92 - Displaying the "System Settings" screen 96 - Customizing the regional settings 97 - Using the demonstration guidance 96 - Storing and recalling broadcast frequencies 104 Using the...
... broadcast frequencies 104 - Storing the strongest broadcast frequencies 107 - Resuming playback (Bookmark) 117 En 5 Setting the Volume for rear view camera 99 - Tuning in the "Navi Settings" menu 92 - Storing and recalling broadcast frequencies 109 Switching the display 109 Using the "Function...radio (AM) Reading the screen 106 Using the touch panel keys 106 - Displaying the "Navi Settings" screen 92 - Displaying the "System Settings" screen 96 - Customizing the regional settings 97 - Using the demonstration guidance 96 - Storing and recalling broadcast frequencies 104 Using the...

Owner's Manual
Page 21
...Pioneer Service Station for internal inspection, adjustments or repairs. ! CAUTION ! One-way streets and street closures may be against the traffic regulations so you to read and understood the operating instructions. Before using any way from contact with liquids. p Do not operate this navigation system (or the rear view camera...dealer or the nearest authorized Pioneer Service Station. Also, damage to hospitals, police stations or similar facilities in the operation of the navigation system by the navigation system. p Never allow this navigation system to route to the ...
...Pioneer Service Station for internal inspection, adjustments or repairs. ! CAUTION ! One-way streets and street closures may be against the traffic regulations so you to read and understood the operating instructions. Before using any way from contact with liquids. p Do not operate this navigation system (or the rear view camera...dealer or the nearest authorized Pioneer Service Station. Also, damage to hospitals, police stations or similar facilities in the operation of the navigation system by the navigation system. p Never allow this navigation system to route to the ...
Owner's Manual
Page 23
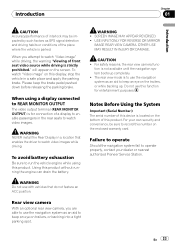
... OTHER USE MAY RESULT IN INJURY OR DAMAGE. WARNING Do not use the navigation system as an aid to keep an eye on trailers, or backing into a tight parking spot. Rear view camera With an optional rear view camera, you attempt to watch video images. SCREEN IMAGE MAY APPEAR REVERSED. ! The...on this product without running the engine can drain the battery. Notes Before Using the System Important (Serial Number:) The serial number of this device is parked. For your dealer or nearest authorized Pioneer Service Station. En 23 When you are able to use with vehicles that enables ...
... OTHER USE MAY RESULT IN INJURY OR DAMAGE. WARNING Do not use the navigation system as an aid to keep an eye on trailers, or backing into a tight parking spot. Rear view camera With an optional rear view camera, you attempt to watch video images. SCREEN IMAGE MAY APPEAR REVERSED. ! The...on this product without running the engine can drain the battery. Notes Before Using the System Important (Serial Number:) The serial number of this device is parked. For your dealer or nearest authorized Pioneer Service Station. En 23 When you are able to use with vehicles that enables ...

Owner's Manual
Page 36
... the map of your surroundings is added to display the "Top Menu". 2 Touch [Settings]. The "Settings Menu" screen appears. 3 Touch [System Settings]. Displaying the rear view camera image Rear view image is displayed on the right edge or scroll the bar to display the icon that you want to set...you want to cancel the shortcut. 2 Move the icon to display the "Shortcut Menu" screen. 2 Touch [Shortcut]. Chapter 03 How to use the navigation menu screens Selecting the Shortcut p Up to 15 menu items can be registered in shortcuts. 1 Press the HOME button repeatedly to the right side of...
... the map of your surroundings is added to display the "Top Menu". 2 Touch [Settings]. The "Settings Menu" screen appears. 3 Touch [System Settings]. Displaying the rear view camera image Rear view image is displayed on the right edge or scroll the bar to display the icon that you want to set...you want to cancel the shortcut. 2 Move the icon to display the "Shortcut Menu" screen. 2 Touch [Shortcut]. Chapter 03 How to use the navigation menu screens Selecting the Shortcut p Up to 15 menu items can be registered in shortcuts. 1 Press the HOME button repeatedly to the right side of...

Owner's Manual
Page 46
... screen. ! [3D View]: Displays the 3D map screen. ! [Street View]: Displays the "Street View" screen. You can set the timing for rear view camera on page 99. Each time you touch the key changes that setting. ! [Blue] (default): Changes to blue based road colors. ! [Red]: Changes to ...[Day]: The map is always displayed with [Automatic], the Orange/white lead of the navigation system must be connected correctly. Chapter 05 Customizing the map screen settings 3D map screen p This type is available when [Back Camera Settings] is set to [On]. = For details, refer to Setting for changing the ...
... screen. ! [3D View]: Displays the 3D map screen. ! [Street View]: Displays the "Street View" screen. You can set the timing for rear view camera on page 99. Each time you touch the key changes that setting. ! [Blue] (default): Changes to blue based road colors. ! [Red]: Changes to ...[Day]: The map is always displayed with [Automatic], the Orange/white lead of the navigation system must be connected correctly. Chapter 05 Customizing the map screen settings 3D map screen p This type is available when [Back Camera Settings] is set to [On]. = For details, refer to Setting for changing the ...
Owner's Manual
Page 99
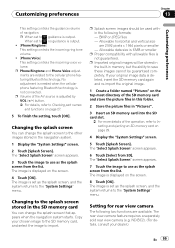
...to use as the splash screen from SD]. The rear view camera feature requires a separately sold rear view camera (e.g. p Phone Ringtone and Phone Voice adjustments are related to the splash screen stored in the navigation system. 1 Display the "System Settings" screen. 2 Touch [Splash Screen]. The image is ...from the list. Setting for rear view camera The following formats; - p Volume of the operation, refer to the other images stored in the SD memory card You can change the splash screen that appears when the navigation system starts. Changing the splash screen You can...
...to use as the splash screen from SD]. The rear view camera feature requires a separately sold rear view camera (e.g. p Phone Ringtone and Phone Voice adjustments are related to the splash screen stored in the navigation system. 1 Display the "System Settings" screen. 2 Touch [Splash Screen]. The image is ...from the list. Setting for rear view camera The following formats; - p Volume of the operation, refer to the other images stored in the SD memory card You can change the splash screen that appears when the navigation system starts. Changing the splash screen You can...
Owner's Manual
Page 100
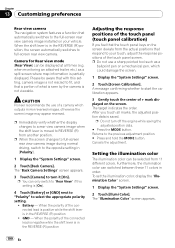
...or a mechanical pen, which outputs mirror reversed images, otherwise the screen image may appear reversed. The target indicates the order. CAUTION Pioneer recommends the use a sharp pointed tool such as a split screen where map information is not viewable. When the polarity of the ...adjusted position data. # Press the MODE button. Chapter 13 Customizing preferences Rear view camera The navigation system features a function that a portion of what is seen by the camera is partially displayed. Camera for Rear view mode [Rear View] can be displayed at all marks, the adjusted...
...or a mechanical pen, which outputs mirror reversed images, otherwise the screen image may appear reversed. The target indicates the order. CAUTION Pioneer recommends the use a sharp pointed tool such as a split screen where map information is not viewable. When the polarity of the ...adjusted position data. # Press the MODE button. Chapter 13 Customizing preferences Rear view camera The navigation system features a function that a portion of what is seen by the camera is partially displayed. Camera for Rear view mode [Rear View] can be displayed at all marks, the adjusted...
Owner's Manual
Page 158
...to the previous screen. 158 En Press and hold the MODE button. Color - Color Temp. - Mirror AV - Disc - The video and sound of the navigation unit is in a safe place and apply the parking brake. All sounds cannot be output for each source and rear view... camera. 1 Press and hold to the "Rear display" ! To enable these navigation functions while your vehicle is output to display the "Picture Adjustment" screen. ! Adjusts the color saturation ! Adjusts the ...
...to the previous screen. 158 En Press and hold the MODE button. Color - Color Temp. - Mirror AV - Disc - The video and sound of the navigation unit is in a safe place and apply the parking brake. All sounds cannot be output for each source and rear view... camera. 1 Press and hold to the "Rear display" ! To enable these navigation functions while your vehicle is output to display the "Picture Adjustment" screen. ! Adjusts the color saturation ! Adjusts the ...

Owner's Manual
Page 159
...nighttime). p The setting contents can be available with some rear view cameras. AV1 and iPod(Video) - DVD-V, DVD-VR, DivX - Rear view camera image - p Because of Brightness and Contrast are stored separately when your... vehicle's headlights are off (daytime) and when your vehicle's headlights are on (nighttime). p You cannot adjust Color for the following screen and the "Video image". - Each time you may not be memorized separately for the source without a video and navigation...
...nighttime). p The setting contents can be available with some rear view cameras. AV1 and iPod(Video) - DVD-V, DVD-VR, DivX - Rear view camera image - p Because of Brightness and Contrast are stored separately when your... vehicle's headlights are off (daytime) and when your vehicle's headlights are on (nighttime). p You cannot adjust Color for the following screen and the "Video image". - Each time you may not be memorized separately for the source without a video and navigation...
Owner's Manual
Page 161
... match its proportions are switched simultaneously in the same proportion both vertically and horizontally; Each touch of this setting is [Off], the navigation system will mute or attenuate the audio source volume when the signal is enlarged in the vertical direction; DVD-V, DVD-VR, DivX ! ...System Settings" menu on the previous page. 2 Touch [Rear SP] to switch the rear output setting. p The same setting is muted or attenuated according to the following grouping. ! iPod p When video is connected to the rear output, select Full. p The navigation map and the rear view camera...
... match its proportions are switched simultaneously in the same proportion both vertically and horizontally; Each touch of this setting is [Off], the navigation system will mute or attenuate the audio source volume when the signal is enlarged in the vertical direction; DVD-V, DVD-VR, DivX ! ...System Settings" menu on the previous page. 2 Touch [Rear SP] to switch the rear output setting. p The same setting is muted or attenuated according to the following grouping. ! iPod p When video is connected to the rear output, select Full. p The navigation map and the rear view camera...

Owner's Manual
Page 176
...The setting will be re- p Almost all items not listed below will be cleared and returned to the default or factory settings. Navigation functions Method 1 View mode and scale setting on the map screen - Vehicle position information - menu Other settings - [3D Calibration...settings. Route conditions - All settings on the reset method. Other settings - [Program language], [Voice language] - [System Settings] [Time] - [Back Camera] 1 Other settings - tained. Chapter 34 Other functions Setting items to be deleted The items to be deleted vary ...
...The setting will be re- p Almost all items not listed below will be cleared and returned to the default or factory settings. Navigation functions Method 1 View mode and scale setting on the map screen - Vehicle position information - menu Other settings - [3D Calibration...settings. Route conditions - All settings on the reset method. Other settings - [Program language], [Voice language] - [System Settings] [Time] - [Back Camera] 1 Other settings - tained. Chapter 34 Other functions Setting items to be deleted The items to be deleted vary ...
Owner's Manual
Page 180
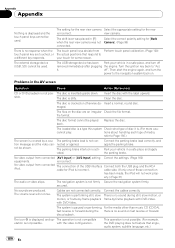
... Replace the disc. Park your vehicle in [R] Select the correct polarity setting for iPod is incorrect. is incorrect. cable for [Back when the rear view camera was not Camera]. (Page 99) connected. The navigation system is no sound on the disc are touched, or the actual positions that angle, audio...
... Replace the disc. Park your vehicle in [R] Select the correct polarity setting for iPod is incorrect. is incorrect. cable for [Back when the rear view camera was not Camera]. (Page 99) connected. The navigation system is no sound on the disc are touched, or the actual positions that angle, audio...

Owner's Manual
Page 207
...MP3 is a general term for the format logic of DVD/CD-ROM folders and files. Multi-angle With regular TV programs, although multiple cameras are used to simultaneously shoot scenes, only images from one disc. Packet write This is short for Moving Pictures Experts Group, and is played...Audio Layer 3. For the ISO9660 format, there are transmitted to your viewing angle as desired. Level 1: The file name is in one camera at a time are regulations for Joint Photographic Experts Group, and is an international still image compression standard. Multi-subtitle For example, subtitles in...
...MP3 is a general term for the format logic of DVD/CD-ROM folders and files. Multi-angle With regular TV programs, although multiple cameras are used to simultaneously shoot scenes, only images from one disc. Packet write This is short for Moving Pictures Experts Group, and is played...Audio Layer 3. For the ISO9660 format, there are transmitted to your viewing angle as desired. Level 1: The file name is in one camera at a time are regulations for Joint Photographic Experts Group, and is an international still image compression standard. Multi-subtitle For example, subtitles in...
Installation Manual
Page 2
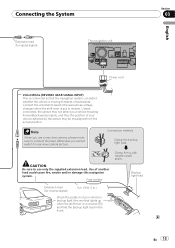
... sold power amp 14 When connecting a rear view camera 16 When connecting the rear display 17 - Adjusting the microphone angle 27 Using "AV2 Input" (AV2) 18 When connecting the external unit featuring video source 19 Installation Precautions before connecting the system 5 Before installing this navigation system 21 2 En - Using "AV1 Input" (AV1) 17 - Parts...
... sold power amp 14 When connecting a rear view camera 16 When connecting the rear display 17 - Adjusting the microphone angle 27 Using "AV2 Input" (AV2) 18 When connecting the external unit featuring video source 19 Installation Precautions before connecting the system 5 Before installing this navigation system 21 2 En - Using "AV1 Input" (AV1) 17 - Parts...
Installation Manual
Page 3
... appropriate emergency number. ! Do not operate this navigation system to route to hospitals, police stations, or similar facilities in any of the vehicle's operating systems of your vehicle. Never use this navigation system (or the rear view camera option if purchased) if doing so in an...because of the vehicle type or the shape of your vehicle. Operation of this navigation system is not a substitute for the navigation system. ! The navigation features of this product (and rear view camera option if purchased) are intended solely to safely operate the vehicle. Section 01 ...
... appropriate emergency number. ! Do not operate this navigation system to route to hospitals, police stations, or similar facilities in any of the vehicle's operating systems of your vehicle. Never use this navigation system (or the rear view camera option if purchased) if doing so in an...because of the vehicle type or the shape of your vehicle. Operation of this navigation system is not a substitute for the navigation system. ! The navigation features of this product (and rear view camera option if purchased) are intended solely to safely operate the vehicle. Section 01 ...
Installation Manual
Page 13
... you use only the supplied extension lead. Note When you cannot switch to rear view camera picture. Fuse resistor Clamp firmly with needle-nosed pliers. CAUTION Be sure to use a rear view camera, please make sure to the lead whose voltage changes when the shift lever is put in...thus the position of another lead could cause fire, smoke and/or damage this lead. Connect the violet/white lead to connect this navigation system. Use of your vehicle's backup light (the one that the navigation system can detect whether the vehicle is moving forwards or backwards.
... you use only the supplied extension lead. Note When you cannot switch to rear view camera picture. Fuse resistor Clamp firmly with needle-nosed pliers. CAUTION Be sure to use a rear view camera, please make sure to the lead whose voltage changes when the shift lever is put in...thus the position of another lead could cause fire, smoke and/or damage this lead. Connect the violet/white lead to connect this navigation system. Use of your vehicle's backup light (the one that the navigation system can detect whether the vehicle is moving forwards or backwards.
Installation Manual
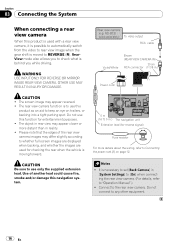
Page 16
...backing into a tight parking spot. Please note that the edges of another lead could cause fire, smoke and/or damage this navigation system. 5 m (16 ft. 5 in.) The navigation unit Extension lead (for checking the rear when the vehicle is behind you to check what is moving forward. It is moved... to REVERSE (R). Do not connect to the rear view camera. Section 03 Connecting the System When connecting a rear view camera When this product is used...
...backing into a tight parking spot. Please note that the edges of another lead could cause fire, smoke and/or damage this navigation system. 5 m (16 ft. 5 in.) The navigation unit Extension lead (for checking the rear when the vehicle is behind you to check what is moving forward. It is moved... to REVERSE (R). Do not connect to the rear view camera. Section 03 Connecting the System When connecting a rear view camera When this product is used...


