
Operating Instructions
Page 5
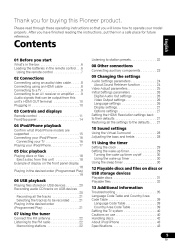
... their defaults ...Restoring all the settings to the defaults...24 24 25 26 26 26 26 27 27 27 27 Español 03 Controls and displays Remote control ...11 Front/top panel ...14 04 iPod/iPhone playback Confirm what iPod/iPhone models are supported ...15 Connecting your iPod/iPhone ...16 Connecting ...the wake-up timer ...Using the sleep timer ...29 29 30 30 30 05 Disc playback Playing discs or files ...18 Eject a disc from this Pioneer product. After you for future reference. Thank you have finished reading the instructions, put them in a safe place for buying this unit ...18 Example of...
... their defaults ...Restoring all the settings to the defaults...24 24 25 26 26 26 26 27 27 27 27 Español 03 Controls and displays Remote control ...11 Front/top panel ...14 04 iPod/iPhone playback Confirm what iPod/iPhone models are supported ...15 Connecting your iPod/iPhone ...16 Connecting ...the wake-up timer ...Using the sleep timer ...29 29 30 30 30 05 Disc playback Playing discs or files ...18 Eject a disc from this Pioneer product. After you for future reference. Thank you have finished reading the instructions, put them in a safe place for buying this unit ...18 Example of...

Operating Instructions
Page 6
... the batteries as indicated by the polarity marks ( and ). • Do not heat batteries, disassemble them, or throw them into the remote control, set them in the proper direction, as shown on the diagram below. Slide in the direction of the case, 6 En Do not use different types...it carefully off the inside of the arrow (). 2 Open the rear lid. 1 2 4 Close the rear lid. Loading the batteries in the remote control 1 Slide the rear lid in the direction. 01 Before you start Chapter 1: Before you start What's in the box Please confirm that the following ...
... the batteries as indicated by the polarity marks ( and ). • Do not heat batteries, disassemble them, or throw them into the remote control, set them in the proper direction, as shown on the diagram below. Slide in the direction of the case, 6 En Do not use different types...it carefully off the inside of the arrow (). 2 Open the rear lid. 1 2 4 Close the rear lid. Loading the batteries in the remote control 1 Slide the rear lid in the direction. 01 Before you start Chapter 1: Before you start What's in the box Please confirm that the following ...

Operating Instructions
Page 7
... in mind the following when using remotes for different devices can cause batteries to this unit. • Replace the batteries when you start 01 then insert new batteries. It can also reduce the life or performance of batteries. • Remote controllers for other . English Franç...ais Español Using the remote control The remote has a range of about 7 m at an angle of about 30º from the remote sensor. 30° 30° 7m Keep in direct sunlight...
... in mind the following when using remotes for different devices can cause batteries to this unit. • Replace the batteries when you start 01 then insert new batteries. It can also reduce the life or performance of batteries. • Remote controllers for other . English Franç...ais Español Using the remote control The remote has a range of about 7 m at an angle of about 30º from the remote sensor. 30° 30° 7m Keep in direct sunlight...
Operating Instructions
Page 11
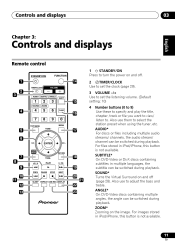
... 11 12 13 SLEEP REPEAT USB REC DISPLAY 20 21 22 23 11 En Also use to adjust the bass and treble. Controls and displays 03 Chapter 3: English Controls and displays Remote control STANDBY/ON FUNCTION Français 1 STANDBY/ON Press to turn the power on and off (page 28). AUDIO* For...
... 11 12 13 SLEEP REPEAT USB REC DISPLAY 20 21 22 23 11 En Also use to adjust the bass and treble. Controls and displays 03 Chapter 3: English Controls and displays Remote control STANDBY/ON FUNCTION Français 1 STANDBY/ON Press to turn the power on and off (page 28). AUDIO* For...
Operating Instructions
Page 13
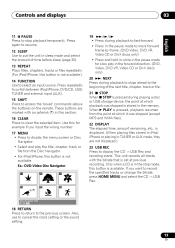
...ñol 04 05 06 Disc Navigator: Title 01- 49: - - 18 RETURN Press to return to access the 'boxed' commands (above the buttons) on the remote. These buttons are not displayed.) 23 USB REC Press to display the CD ->USB Rec and recoding starts. Only when a CD is in this section... HOME MENU and select the CD ->USB Rec. Use this for slow play the title, chapter, track or file from the point at previous recording. Controls and displays 03 11 PAUSE Press to stop mode, this button is available.
...ñol 04 05 06 Disc Navigator: Title 01- 49: - - 18 RETURN Press to return to access the 'boxed' commands (above the buttons) on the remote. These buttons are not displayed.) 23 USB REC Press to display the CD ->USB Rec and recoding starts. Only when a CD is in this section... HOME MENU and select the CD ->USB Rec. Use this for slow play the title, chapter, track or file from the point at previous recording. Controls and displays 03 11 PAUSE Press to stop mode, this button is available.
Operating Instructions
Page 35
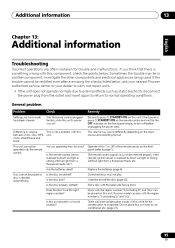
.... Scratched discs may lie in a humid location? Do not place this unit placed in another component. Is the remote control sensor exposed to page 7). The remote control signals may sound differently depending on the front panel (refer to direct sunlight or strong artificial light from far away?...properly if the remote control sensor is something wrong with the label side facing front. Disc cannot be played on ? Is the disc scratched? Remedy Be sure to press STANDBY/ON on this component, check the points below , ask your nearest Pioneer authorized service ...
.... Scratched discs may lie in a humid location? Do not place this unit placed in another component. Is the remote control sensor exposed to page 7). The remote control signals may sound differently depending on the front panel (refer to direct sunlight or strong artificial light from far away?...properly if the remote control sensor is something wrong with the label side facing front. Disc cannot be played on ? Is the disc scratched? Remedy Be sure to press STANDBY/ON on this component, check the points below , ask your nearest Pioneer authorized service ...

Operating Instructions
Page 38
If the iPod/iPhone is connected Problem Can't operate the iPod/ iPhone by the remote control. Can't operate the iPod/ iPhone. Make sure the iPod/iPhone is connected correctly (refer to Connecting your iPod/iPhone on page 16). Remedy Make sure the iPod/iPhone is connected correctly (refer to Connecting your iPod/iPhone on page 16). 13 Additional information When an iPod/iPhone is experiencing a hangup, try resetting the iPod/iPhone, and reconnect it to the unit. 38 En
If the iPod/iPhone is connected Problem Can't operate the iPod/ iPhone by the remote control. Can't operate the iPod/ iPhone. Make sure the iPod/iPhone is connected correctly (refer to Connecting your iPod/iPhone on page 16). Remedy Make sure the iPod/iPhone is connected correctly (refer to Connecting your iPod/iPhone on page 16). 13 Additional information When an iPod/iPhone is experiencing a hangup, try resetting the iPod/iPhone, and reconnect it to the unit. 38 En

Operating Instructions
Page 40
... if the unit is transported or moved with this unit. • Do not place this unit on this unit (or STANDBY/ON on the remote control), wait for a disc or USB storage device content. Do not use this unit on use When moving this unit When moving this unit. For iPod...
... if the unit is transported or moved with this unit. • Do not place this unit on this unit (or STANDBY/ON on the remote control), wait for a disc or USB storage device content. Do not use this unit on use When moving this unit When moving this unit. For iPod...

Operating Instructions
Page 43
...iPod" means that an electronic accessory has been designed to connect specifically to iPhone and has been certified by Pioneer Corporation. "Works with safety and regulatory standards. Speaker section Enclosure ...Passive radiator System ...1-way system Speakers: Fullrange... W Dimensions ...370 mm (W) x 175 mm (D) x 216 mm (H) Weight (without package) ...3.5 kg • Accessories 1 2 1 1 1 1 Remote control ...AA batteries (R6) ...Power cord ...Audio/Video cable...FM wire antenna...Warranty card ...Operating instructions (This document) Note • Specifications and the design are...
...iPod" means that an electronic accessory has been designed to connect specifically to iPhone and has been certified by Pioneer Corporation. "Works with safety and regulatory standards. Speaker section Enclosure ...Passive radiator System ...1-way system Speakers: Fullrange... W Dimensions ...370 mm (W) x 175 mm (D) x 216 mm (H) Weight (without package) ...3.5 kg • Accessories 1 2 1 1 1 1 Remote control ...AA batteries (R6) ...Power cord ...Audio/Video cable...FM wire antenna...Warranty card ...Operating instructions (This document) Note • Specifications and the design are...


