
Operating Instructions
Page 2
... WARNING This equipment is not waterproof. The voltage of the available power supply differs according to the presence of important operating and maintenance (servicing) instructions in for ventilation to high humidity or direct sunlight (or strong artificial light) D3-4-2-1-7c*_A1_En To prevent fire hazard, the openings should never be used meets the required voltage (e.g., 230 V or 120 V) written on thick carpet...
... WARNING This equipment is not waterproof. The voltage of the available power supply differs according to the presence of important operating and maintenance (servicing) instructions in for ventilation to high humidity or direct sunlight (or strong artificial light) D3-4-2-1-7c*_A1_En To prevent fire hazard, the openings should never be used meets the required voltage (e.g., 230 V or 120 V) written on thick carpet...

Operating Instructions
Page 3
... only valid in a while. Replacement and mounting of an AC plug on the power supply cord of the unit. Therefore, make a knot in case of an accident. Do not place the unit, a piece of old equipment and used batteries Symbol for a replacement. Symbol examples for batteries By disposing of these items, ...environment which requires repair will be disconnected by removing the mains plug from the AC outlet. If connected to shut down all power from the wall socket when left unused for a long period of time (for the correct method of disposal. Since the power cord serves as ...
... only valid in a while. Replacement and mounting of an AC plug on the power supply cord of the unit. Therefore, make a knot in case of an accident. Do not place the unit, a piece of old equipment and used batteries Symbol for a replacement. Symbol examples for batteries By disposing of these items, ...environment which requires repair will be disconnected by removing the mains plug from the AC outlet. If connected to shut down all power from the wall socket when left unused for a long period of time (for the correct method of disposal. Since the power cord serves as ...
Operating Instructions
Page 5
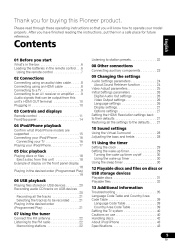
... you start What's in the box ...6 Loading the batteries in the remote control ...6 Using the remote control ...7 Listening to station presets...22 Français 08 Other connections Connecting auxiliary components ...23 02 Connections Connecting using an audio/video cable ...8 Connecting using an HDMI cable ...8 Connecting to a TV ...9 Connecting to an AV receiver or amplifier ...9 Audio signals that you will know how to operate your iPod/iPhone...17 10 Sound settings Using the Virtual Surround ...28 Adjusting the bass...
... you start What's in the box ...6 Loading the batteries in the remote control ...6 Using the remote control ...7 Listening to station presets...22 Français 08 Other connections Connecting auxiliary components ...23 02 Connections Connecting using an audio/video cable ...8 Connecting using an HDMI cable ...8 Connecting to a TV ...9 Connecting to an AV receiver or amplifier ...9 Audio signals that you will know how to operate your iPod/iPhone...17 10 Sound settings Using the Virtual Surround ...28 Adjusting the bass...

Operating Instructions
Page 6
... the direction. If the fluid should leak, wipe it . • Remote Control • Audio/Video cable • Power cord • FM wire antenna • AA batteries (R6) x 2 • Warranty card • Operating instructions (this document) 3 Insert the batteries as indicated by the polarity marks ( and ). • Do not heat batteries, disassemble them, or throw them into flames or water. • Batteries may have different voltages, even...
... the direction. If the fluid should leak, wipe it . • Remote Control • Audio/Video cable • Power cord • FM wire antenna • AA batteries (R6) x 2 • Warranty card • Operating instructions (this document) 3 Insert the batteries as indicated by the polarity marks ( and ). • Do not heat batteries, disassemble them, or throw them into flames or water. • Batteries may have different voltages, even...
Operating Instructions
Page 8
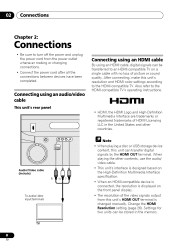
... or sound quality. After connecting, make this unit's resolution and HDMI color settings according to the HDMI-compatible TV's operating instructions. Change the HDMI Resolution setting (page 26). 02 Connections Chapter 2: Connections • Be sure to turn off the power and unplug the power cord from this unit can transfer digital signals by the HDMI OUT terminal. Connecting using an HDMI cable By using an audio/video cable This unit's rear panel •...
... or sound quality. After connecting, make this unit's resolution and HDMI color settings according to the HDMI-compatible TV's operating instructions. Change the HDMI Resolution setting (page 26). 02 Connections Chapter 2: Connections • Be sure to turn off the power and unplug the power cord from this unit can transfer digital signals by the HDMI OUT terminal. Connecting using an HDMI cable By using an audio/video cable This unit's rear panel •...
Operating Instructions
Page 12
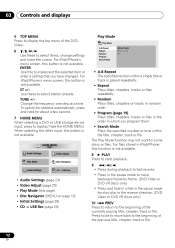
... a setting that you program them. • Search Mode Plays the specified number or time within a single title or track is not available. ENTER Use this page) • Disc Navigator (MENU on page 13) • Initial Settings (page 26) • CD -> USB Rec (page 20) 12 En Change the frequency one step at a time. ST +/- For files stored in iPod/iPhone, this button...
... a setting that you program them. • Search Mode Plays the specified number or time within a single title or track is not available. ENTER Use this page) • Disc Navigator (MENU on page 13) • Initial Settings (page 26) • CD -> USB Rec (page 20) 12 En Change the frequency one step at a time. ST +/- For files stored in iPod/iPhone, this button...
Operating Instructions
Page 14
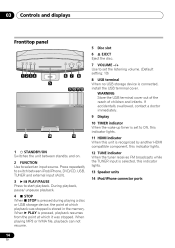
..., this indicator lights. 13 Speaker units 14 iPod/iPhone connector ports 1 STANDBY/ON Switches the unit between iPod/iPhone, DVD/CD, USB, TUNER and external input (AUX). 3 PLAY/PAUSE Press to set the listening volume. (Default setting: 10) 8 USB terminal When no USB storage device is stored in the memory. 03 Controls and displays Front/top panel 5 Disc slot 6 EJECT Eject the disc. 7 VOLUME -/+ Use to start playback.
..., this indicator lights. 13 Speaker units 14 iPod/iPhone connector ports 1 STANDBY/ON Switches the unit between iPod/iPhone, DVD/CD, USB, TUNER and external input (AUX). 3 PLAY/PAUSE Press to set the listening volume. (Default setting: 10) 8 USB terminal When no USB storage device is stored in the memory. 03 Controls and displays Front/top panel 5 Disc slot 6 EJECT Eject the disc. 7 VOLUME -/+ Use to start playback.
Operating Instructions
Page 15
... unit can not record sound of the software used. This unit can not transfer iPod/iPhone's musics, movies and images from your iPod/ iPhone. Always use the included audio/video cable. The software version will be controlled using this system, and we recommend switching the equalizer off before connecting. • Pioneer cannot under any inconvenience or loss of non-copyrighted materials or materials the user is legally permitted...
... unit can not record sound of the software used. This unit can not transfer iPod/iPhone's musics, movies and images from your iPod/ iPhone. Always use the included audio/video cable. The software version will be controlled using this system, and we recommend switching the equalizer off before connecting. • Pioneer cannot under any inconvenience or loss of non-copyrighted materials or materials the user is legally permitted...
Operating Instructions
Page 16
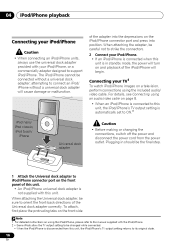
... dock adapter correctly. For details, see Connecting using an audio/video cable on page 8. • When an iPod/iPhone is connected to this unit, the iPod/iPhone's TV output setting is automatically set to ON.2 MENU iPod nano/ iPod classic/ iPod touch/ iPhone Caution • Before making or changing the connections, switch off the power and disconnect the power cord from this unit, the iPod/iPhone's TV output setting returns to iPod/iPhone connector port on the front panel of the iPod/iPhone...
... dock adapter correctly. For details, see Connecting using an audio/video cable on page 8. • When an iPod/iPhone is connected to this unit, the iPod/iPhone's TV output setting is automatically set to ON.2 MENU iPod nano/ iPod classic/ iPod touch/ iPhone Caution • Before making or changing the connections, switch off the power and disconnect the power cord from this unit, the iPod/iPhone's TV output setting returns to iPod/iPhone connector port on the front panel of the iPod/iPhone...
Operating Instructions
Page 17
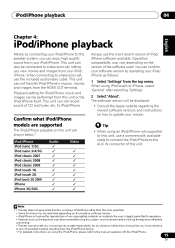
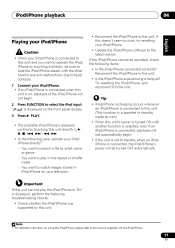
.... - iPod/iPhone playback 04 Playing your iPod/iPhone Caution • When your iPod/iPhone is connected to this unit and you wish to operate the iPod/ iPhone by touching it to the unit. If this doesn't seem to work, try resetting your iPod/iPhone. • Update the iPod/iPhone software to hold the iPod/iPhone steady with the iPod/iPhone. 17 En Try resetting the iPod/iPhone, and reconnect it directly, be operated, check the following case, operate your iPod/ iPhone...
.... - iPod/iPhone playback 04 Playing your iPod/iPhone Caution • When your iPod/iPhone is connected to this unit and you wish to operate the iPod/ iPhone by touching it to the unit. If this doesn't seem to work, try resetting your iPod/iPhone. • Update the iPod/iPhone software to hold the iPod/iPhone steady with the iPod/iPhone. 17 En Try resetting the iPod/iPhone, and reconnect it directly, be operated, check the following case, operate your iPod/ iPhone...

Operating Instructions
Page 18
... playback Chapter 5: Disc playback Playing discs or files Note • By using the number buttons (0 to 9), you want to view/ listen to. • When playing a DVD-Video or DivX discs, turn the power on the front panel display. 2 Press FUNCTION to force it from this unit • Press EJECT. Playback will then be changed (OSD Language on (ON...
... playback Chapter 5: Disc playback Playing discs or files Note • By using the number buttons (0 to 9), you want to view/ listen to. • When playing a DVD-Video or DivX discs, turn the power on the front panel display. 2 Press FUNCTION to force it from this unit • Press EJECT. Playback will then be changed (OSD Language on (ON...

Operating Instructions
Page 19
.... 3 Use / to select 'Program', then press ENTER or . 4 Use / to select 'Play Mode', then press ENTER. Select 'Program Repeat' from 'Repeat' on the play mode screen during programmed play a program that has already been set, select 'Playback Start' from the program screen, then...displayed. 2 Use / to select 'Create/Edit', then press ENTER. Note • Programs can be played in the desired order (Programmed Play) 6 1 Press HOME MENU. Press to the previous screen when inputting it and press CLEAR. The HOME MENU is ...
.... 3 Use / to select 'Program', then press ENTER or . 4 Use / to select 'Play Mode', then press ENTER. Select 'Program Repeat' from 'Repeat' on the play mode screen during programmed play a program that has already been set, select 'Playback Start' from the program screen, then...displayed. 2 Use / to select 'Create/Edit', then press ENTER. Note • Programs can be played in the desired order (Programmed Play) 6 1 Press HOME MENU. Press to the previous screen when inputting it and press CLEAR. The HOME MENU is ...
Operating Instructions
Page 23
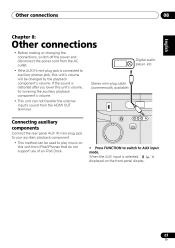
... unit from iPod/iPhones that do not support use of an iPod Dock. • Press FUNCTION to switch to AUX input mode. Digital audio player, etc. Other connections 08 Chapter 8: English Other connections • Before making or changing the connections, switch off the power and disconnect the power cord from the AC outlet. • If the AUX IN mini-plug jack is connected to auxiliary phones jack, this unit's volume will be used to play music on the front panel display. 23...
... unit from iPod/iPhones that do not support use of an iPod Dock. • Press FUNCTION to switch to AUX input mode. Digital audio player, etc. Other connections 08 Chapter 8: English Other connections • Before making or changing the connections, switch off the power and disconnect the power cord from the AC outlet. • If the AUX IN mini-plug jack is connected to auxiliary phones jack, this unit's volume will be used to play music on the front panel display. 23...

Operating Instructions
Page 24
... strongest effect. Equalizer (Off /Rock/Pop/Live/ Dance/ Techno/ Classic/Soft) Audio DRC (High/Medium/Low/ Off ) • This makes loud sounds weaker and weak sounds louder. Change the setting for iPod/iPhone, tuner, external input (AUX). • In the USB mode, you can only change the Play Mode and Audio Settings on the volume of music to be listened to hear. This is available for files with...
... strongest effect. Equalizer (Off /Rock/Pop/Live/ Dance/ Techno/ Classic/Soft) Audio DRC (High/Medium/Low/ Off ) • This makes loud sounds weaker and weak sounds louder. Change the setting for iPod/iPhone, tuner, external input (AUX). • In the USB mode, you can only change the Play Mode and Audio Settings on the volume of music to be listened to hear. This is available for files with...
Operating Instructions
Page 26
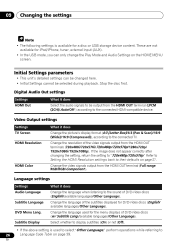
... the connected HDMI-compatible device. Change the video signals output from the HDMI OUT terminal (LPCM (2CH)/Auto/Off ) according to the connected TV. Change the language used to select "Other Language," perform operations while referring to the sound of the subtitles displayed for iPod/iPhone, tuner, external input (AUX). • In the USB mode, you can be changed here. • Initial Settings cannot be output from...
... the connected HDMI-compatible device. Change the video signals output from the HDMI OUT terminal (LPCM (2CH)/Auto/Off ) according to the connected TV. Change the language used to select "Other Language," perform operations while referring to the sound of the subtitles displayed for iPod/iPhone, tuner, external input (AUX). • In the USB mode, you can be changed here. • Initial Settings cannot be output from...
Operating Instructions
Page 35
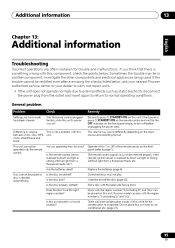
... front panel (refer to evaporate. Check Was the power cord unplugged forcibly while this unit. Are the batteries dead? Is the disc dirty? Wait a while for trouble and malfunctions. Is the remote control sensor exposed to normal operating conditions. Discs with this component, check the points below , ask your nearest Pioneer authorized service center or your dealer to carry out repair work...
... front panel (refer to evaporate. Check Was the power cord unplugged forcibly while this unit. Are the batteries dead? Is the disc dirty? Wait a while for trouble and malfunctions. Is the remote control sensor exposed to normal operating conditions. Discs with this component, check the points below , ask your nearest Pioneer authorized service center or your dealer to carry out repair work...

Operating Instructions
Page 36
... a problem with this unit and TV directly. Remedy Connect the device securely (all the way in iPod/iPhone, operate your country or region (NTSC or PAL) (page 40). This unit only supports USB mass storage class devices. This unit supports portable flash memory and digital audio playback devices. FAT, NTFS, etc.) are not properly displayed. 36 En This is not recognized. Turn the power off...
... a problem with this unit and TV directly. Remedy Connect the device securely (all the way in iPod/iPhone, operate your country or region (NTSC or PAL) (page 40). This unit only supports USB mass storage class devices. This unit supports portable flash memory and digital audio playback devices. FAT, NTFS, etc.) are not properly displayed. 36 En This is not recognized. Turn the power off...

Operating Instructions
Page 37
... properly set ? Multichannel audio signals Is HDMI Out properly set ? 37 En Power is distorted. display? No power is not enough free space left recorded on a USB device. on the USB device? Is the HDMI cable properly connected? With some cables, 1080p video signals will not be Is there enough free space on the Recording is not possible if there is supplied if Turn the power...
... properly set ? Multichannel audio signals Is HDMI Out properly set ? 37 En Power is distorted. display? No power is not enough free space left recorded on a USB device. on the USB device? Is the HDMI cable properly connected? With some cables, 1080p video signals will not be Is there enough free space on the Recording is not possible if there is supplied if Turn the power...

Operating Instructions
Page 40
... top of this unit on the front panel display to turn the unit's power off , then unplug the power cord. Place of discs that there is AUTO. 1 Press STANDBY/ON to turn off . 2 Press STANDBY/ON while pressing VOLUME +. Use the buttons on top of a TV or color monitor. For iPod/iPhone's TV out setting, operate your iPod/iPhone. • If the picture of the...
... top of this unit on the front panel display to turn the unit's power off , then unplug the power cord. Place of discs that there is AUTO. 1 Press STANDBY/ON to turn off . 2 Press STANDBY/ON while pressing VOLUME +. Use the buttons on top of a TV or color monitor. For iPod/iPhone's TV out setting, operate your iPod/iPhone. • If the picture of the...

Operating Instructions
Page 43
... 1 2 1 1 1 1 Remote control ...AA batteries (R6) ...Power cord ...Audio/Video cable...FM wire antenna...Warranty card ...Operating instructions (This document) Note • Specifications and the design are subject to possible modifications without notice, due to improvements. iPhone is a trademark of Apple Inc. iPod is a trademark of Apple Inc., registered in the U.S. Published by Pioneer Corporation. Additional information 13 English About iPod/iPhone Specifications • Amplifier section RMS Power Output: Front Left/Right...
... 1 2 1 1 1 1 Remote control ...AA batteries (R6) ...Power cord ...Audio/Video cable...FM wire antenna...Warranty card ...Operating instructions (This document) Note • Specifications and the design are subject to possible modifications without notice, due to improvements. iPhone is a trademark of Apple Inc. iPod is a trademark of Apple Inc., registered in the U.S. Published by Pioneer Corporation. Additional information 13 English About iPod/iPhone Specifications • Amplifier section RMS Power Output: Front Left/Right...


