Operating Instructions
Page 1
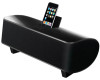
...www.pioneerelectronics.com (US) http://www.pioneerelectronics.ca (Canada) Operating Instructions Mode d'emploi Manual de instrucciones XW-NAS3 Digital Speaker System for iPod Station d'accueil audio numérique pour iPod Sistema digital de parlantes para iPod Register your product on http://www.pioneerelectronics.com (US) ...loss or theft. • Receive free tips, updates and service bulletins on your new product • Improve product development Your input helps us continue to design products that meet your needs. • Receive a free Pioneer newsletter Registered customers can opt in ...
...www.pioneerelectronics.com (US) http://www.pioneerelectronics.ca (Canada) Operating Instructions Mode d'emploi Manual de instrucciones XW-NAS3 Digital Speaker System for iPod Station d'accueil audio numérique pour iPod Sistema digital de parlantes para iPod Register your product on http://www.pioneerelectronics.com (US) ...loss or theft. • Receive free tips, updates and service bulletins on your new product • Improve product development Your input helps us continue to design products that meet your needs. • Receive a free Pioneer newsletter Registered customers can opt in ...

Operating Instructions
Page 2
... direct sunlight (or strong artificial light) D3-4-2-1-7c*_A1_En D8-10-2_A1_En CAUTION This product satisfies FCC regulations when shielded cables and connectors are provided for the first time, read the following measures: - D36-P5_B1_En WARNING Before plugging in the cabinet are used to connect the unit to ensure reliable operation of the FCC Rules. WARNING Slots and openings...
... direct sunlight (or strong artificial light) D3-4-2-1-7c*_A1_En D8-10-2_A1_En CAUTION This product satisfies FCC regulations when shielded cables and connectors are provided for the first time, read the following measures: - D36-P5_B1_En WARNING Before plugging in the cabinet are used to connect the unit to ensure reliable operation of the FCC Rules. WARNING Slots and openings...

Operating Instructions
Page 3
... power supply cord of this apparatus during the warranty period. A polarized plug has two blades with one fitted. A grounding type plug has two blades and a third grounding prong. Any failure due to qualified service personnel. Replacement and mounting of an AC plug on or pinched particularly at plugs, convenience receptacles, and the point where they exit from the apparatus. 11) Only use...
... power supply cord of this apparatus during the warranty period. A polarized plug has two blades with one fitted. A grounding type plug has two blades and a third grounding prong. Any failure due to qualified service personnel. Replacement and mounting of an AC plug on or pinched particularly at plugs, convenience receptacles, and the point where they exit from the apparatus. 11) Only use...
Operating Instructions
Page 4
... hearing adapts. ESTABLISH A SAFE LEVEL: Set your equipment by playing it with other cords. BE SURE TO OBSERVE THE FOLLOWING GUIDELINES: Do not turn up the volume so high that lets the sound come through clearly without annoying blaring or distortion and, most out of your volume control at a safe level - S001a_A1_En POWER-CORD CAUTION Handle the power cord by the plug. D3-4-2-2-4_B1_En Use...
... hearing adapts. ESTABLISH A SAFE LEVEL: Set your equipment by playing it with other cords. BE SURE TO OBSERVE THE FOLLOWING GUIDELINES: Do not turn up the volume so high that lets the sound come through clearly without annoying blaring or distortion and, most out of your volume control at a safe level - S001a_A1_En POWER-CORD CAUTION Handle the power cord by the plug. D3-4-2-2-4_B1_En Use...
Operating Instructions
Page 5
After you start What's in the box 6 Before using the remote control 6 Replace the battery 6 Using the remote control 7 Installing the unit 7 Plugging in a safe place for buying this Pioneer product. Contents 01 Before you have finished reading the instructions, put them in 7 02 Controls and displays Remote control 8 Front /top panel 8 03 iPod playback Confirm what iPod models are supported . . . . .9 Connecting your iPod 9 Connecting your TV 10 Playing your model properly. English Deutsch Français Italiano...
After you start What's in the box 6 Before using the remote control 6 Replace the battery 6 Using the remote control 7 Installing the unit 7 Plugging in a safe place for buying this Pioneer product. Contents 01 Before you have finished reading the instructions, put them in 7 02 Controls and displays Remote control 8 Front /top panel 8 03 iPod playback Confirm what iPod models are supported . . . . .9 Connecting your iPod 9 Connecting your TV 10 Playing your model properly. English Deutsch Français Italiano...

Operating Instructions
Page 6
...; Power cord • Cleaning cloth • Operating instructions (This document) Before using the remote control The remote control is stored in the casing. Make sure to open it in the remote control holder. Make sure the side of used battery cells immediately after replacement. Replace the battery When replacing the battery, use a commercially available Lithium CR2025 battery. 1 3 1 2 1 Push the release tab to the left to replace only with this unit is shipped already set in...
...; Power cord • Cleaning cloth • Operating instructions (This document) Before using the remote control The remote control is stored in the casing. Make sure to open it in the remote control holder. Make sure the side of used battery cells immediately after replacement. Replace the battery When replacing the battery, use a commercially available Lithium CR2025 battery. 1 3 1 2 1 Push the release tab to the left to replace only with this unit is shipped already set in...

Operating Instructions
Page 7
... batteries in direct sunlight or other movement - Important • Before making all connections, plug the unit into an AC outlet. 30° 30° AUDIO IN AC IN 7 m (23 ft.) Keep in the operating range of batteries. near a heater. This can also reduce the life or performance of the remote. 1 Plug the supplied power cord into a power outlet. special handling may interfere with the sound. - Installing...
... batteries in direct sunlight or other movement - Important • Before making all connections, plug the unit into an AC outlet. 30° 30° AUDIO IN AC IN 7 m (23 ft.) Keep in the operating range of batteries. near a heater. This can also reduce the life or performance of the remote. 1 Plug the supplied power cord into a power outlet. special handling may interfere with the sound. - Installing...
Operating Instructions
Page 8
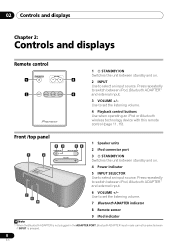
... input. 7 8 9 6 VOLUME +/- Use to set the listening volume. 7 Bluetooth ADAPTER indicator 8 Remote sensor 9 iPod indicator Note 1 When the Bluetooth ADAPTER is not plugged in the ADAPTER PORT, Bluetooth ADAPTER input mode cannot be selected even if INPUT is pressed. 8 En Use to set the listening volume. 4 Playback control buttons Use when operating an iPod or Bluetooth wireless technology device with this remote control (page 11, 15). Front /top panel 34 56 STANDBY/ON INPUT SELECTOR 1 2 VOLUME 1 Speaker units 2 iPod connector port 3 STANDBY/ON Switches...
... input. 7 8 9 6 VOLUME +/- Use to set the listening volume. 7 Bluetooth ADAPTER indicator 8 Remote sensor 9 iPod indicator Note 1 When the Bluetooth ADAPTER is not plugged in the ADAPTER PORT, Bluetooth ADAPTER input mode cannot be selected even if INPUT is pressed. 8 En Use to set the listening volume. 4 Playback control buttons Use when operating an iPod or Bluetooth wireless technology device with this remote control (page 11, 15). Front /top panel 34 56 STANDBY/ON INPUT SELECTOR 1 2 VOLUME 1 Speaker units 2 iPod connector port 3 STANDBY/ON Switches...
Operating Instructions
Page 9
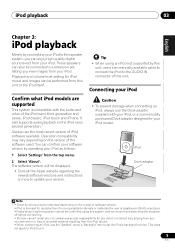
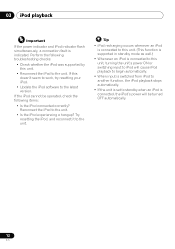
... your iPod. Playback and volume level setting for iPod music and images can also be connected to iPod touch. 9 En It also supports audio playback on how to this speaker system, you view images from this unit. You can enjoy high-quality digital sound direct from your iPod. Connecting your iPod Caution • To prevent damage when connecting an iPod, always use the 'Speaker' menu's 'Backlight' item to the AUDIO IN connector...
... your iPod. Playback and volume level setting for iPod music and images can also be connected to iPod touch. 9 En It also supports audio playback on how to this speaker system, you view images from this unit. You can enjoy high-quality digital sound direct from your iPod. Connecting your iPod Caution • To prevent damage when connecting an iPod, always use the 'Speaker' menu's 'Backlight' item to the AUDIO IN connector...
Operating Instructions
Page 10
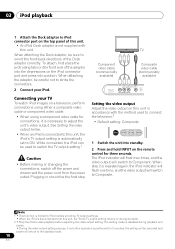
... top panel of the Dock adaptor correctly. When attaching the adaptor, be used to connect the television.2 • Default setting: Composite INPUT 1 Switch the unit into standby. 2 Press and hold INPUT on the iPod connector port and press into the depressions on the remote control for three seconds. While connected, the iPod can be careful not to orient the front-back directions of this unit, the iPod's TV output setting...
... top panel of the Dock adaptor correctly. When attaching the adaptor, be used to connect the television.2 • Default setting: Composite INPUT 1 Switch the unit into standby. 2 Press and hold INPUT on the iPod connector port and press into the depressions on the remote control for three seconds. While connected, the iPod can be careful not to orient the front-back directions of this unit, the iPod's TV output setting...
Operating Instructions
Page 11
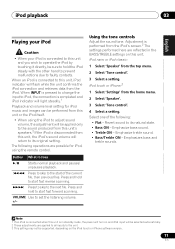
... to the start of the following operations are reflected in standby mode, the power will turn on and iPod input will light steadily.1 Playback and volume level setting for iPod, using the iPod to adjust sound volume, the adjustment will be applied only to the sound produced from this unit's speakers.2 If the iPod is disconnected from this unit, the iPod's sound volume will flash while the unit confirms the iPod connection and retrieves...
... to the start of the following operations are reflected in standby mode, the power will turn on and iPod input will light steadily.1 Playback and volume level setting for iPod, using the iPod to adjust sound volume, the adjustment will be applied only to the sound produced from this unit's speakers.2 If the iPod is disconnected from this unit, the iPod's sound volume will flash while the unit confirms the iPod connection and retrieves...
Operating Instructions
Page 12
... iPod connected correctly? Tip • iPod recharging occurs whenever an iPod is connected to this unit. (This function is supported in standby mode as well.) • Whenever an iPod is connected to this unit, turning the unit's power ON or switching input to iPod will be operated, check the following troubleshooting checks: • Check whether the iPod was supported by this doesn't seem to work, try resetting your iPod. • Update the iPod software...
... iPod connected correctly? Tip • iPod recharging occurs whenever an iPod is connected to this unit. (This function is supported in standby mode as well.) • Whenever an iPod is connected to this unit, turning the unit's power ON or switching input to iPod will be operated, check the following troubleshooting checks: • Check whether the iPod was supported by this doesn't seem to work, try resetting your iPod. • Update the iPod software...
Operating Instructions
Page 13
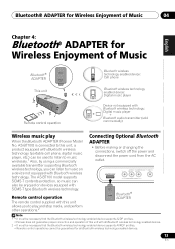
... device supports A2DP profiles. • Pioneer does not guarantee proper connection and operation of Music Bluetooth® ADAPTER This unit Remote control operation Bluetooth wireless technology enabled device: Cell phone Bluetooth wireless technology enabled device: Digital music player Device not equipped with Bluetooth wireless technology: Digital music player + Bluetooth audio transmitter (sold commercially) Wireless music play and stop media, and perform other operations.2 Connecting Optional Bluetooth ADAPTER • Before making or changing the connections, switch off the power...
... device supports A2DP profiles. • Pioneer does not guarantee proper connection and operation of Music Bluetooth® ADAPTER This unit Remote control operation Bluetooth wireless technology enabled device: Cell phone Bluetooth wireless technology enabled device: Digital music player Device not equipped with Bluetooth wireless technology: Digital music player + Bluetooth audio transmitter (sold commercially) Wireless music play and stop media, and perform other operations.2 Connecting Optional Bluetooth ADAPTER • Before making or changing the connections, switch off the power...
Operating Instructions
Page 14
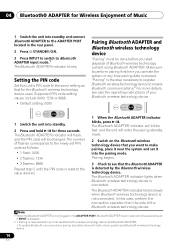
... start playback of Bluetooth wireless technology content using Bluetooth ADAPTER. The number of flashes corresponds to the newly set it into the pairing mode. The Bluetooth ADAPTER indicator will blinks fast, and the unit will be changed. "Pairing" is detected by the Bluetooth wireless technology device. Pairing begins. • 3 flashes: 8888 Repeat step 2 until the PIN code is reset to the value desired. 3 Check to see also the operating instructions of your system and Bluetooth wireless...
... start playback of Bluetooth wireless technology content using Bluetooth ADAPTER. The number of flashes corresponds to the newly set it into the pairing mode. The Bluetooth ADAPTER indicator will blinks fast, and the unit will be changed. "Pairing" is detected by the Bluetooth wireless technology device. Pairing begins. • 3 flashes: 8888 Repeat step 2 until the PIN code is reset to the value desired. 3 Check to see also the operating instructions of your system and Bluetooth wireless...
Operating Instructions
Page 15
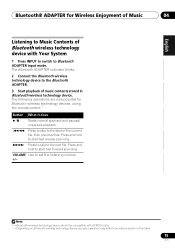
... compatible with Your System 1 Press INPUT to switch to Bluetooth ADAPTER input mode. The Bluetooth ADAPTER indicator blinks. 2 Connect the Bluetooth wireless technology device to the Bluetooth ADAPTER. 3 Start playback of Bluetooth wireless technology device with AVRCP profile. • Depending on Bluetooth wireless technology device you use, operation may differ from what is shown in Bluetooth wireless technology device. Press and hold to start fast forward scanning. VOLUME Use to Music Contents of music contents stored in this table...
... compatible with Your System 1 Press INPUT to switch to Bluetooth ADAPTER input mode. The Bluetooth ADAPTER indicator blinks. 2 Connect the Bluetooth wireless technology device to the Bluetooth ADAPTER. 3 Start playback of Bluetooth wireless technology device with AVRCP profile. • Depending on Bluetooth wireless technology device you use, operation may differ from what is shown in Bluetooth wireless technology device. Press and hold to start fast forward scanning. VOLUME Use to Music Contents of music contents stored in this table...
Operating Instructions
Page 16
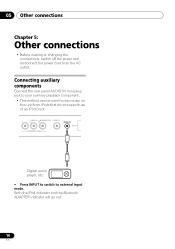
Connecting auxiliary components Connect the rear panel AUDIO IN mini-plug jack to your auxiliary playback component. • This method can be used to external input mode. VIDEO 2 MONITOR OUT VIDEO 1 Y PB PR AUDIO IN AC IN COMPONENT VIDEO Digital audio player, etc. • Press INPUT to switch to play music on this unit from the AC outlet. Both the iPod indicator and the Bluetooth ADAPTER indicator will go out. 16 En 05 Other...
Connecting auxiliary components Connect the rear panel AUDIO IN mini-plug jack to your auxiliary playback component. • This method can be used to external input mode. VIDEO 2 MONITOR OUT VIDEO 1 Y PB PR AUDIO IN AC IN COMPONENT VIDEO Digital audio player, etc. • Press INPUT to switch to play music on this unit from the AC outlet. Both the iPod indicator and the Bluetooth ADAPTER indicator will go out. 16 En 05 Other...
Operating Instructions
Page 17
.... • Check that the Bluetooth wireless technology device is near the unit. Reset the pairing. • Check that supports A2DP profile and AVRCP profile. 17 En If the trouble cannot be set the unit far from the outlet and insert again to return to normal operating conditions. Problem Remedy The power does not turn on page 16). Use a Bluetooth wireless technology device that the...
.... • Check that the Bluetooth wireless technology device is near the unit. Reset the pairing. • Check that supports A2DP profile and AVRCP profile. 17 En If the trouble cannot be set the unit far from the outlet and insert again to return to normal operating conditions. Problem Remedy The power does not turn on page 16). Use a Bluetooth wireless technology device that the...
Operating Instructions
Page 18
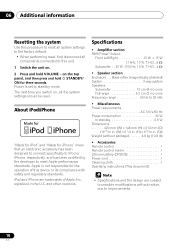
... section RMS Power Output: Front Left/Right 15 W + 15 W (1 kHz, 10 %, T.H.D., 8 Ω) Subwoofer . . 30 W (100 Hz, 10 %, T.H.D., 4 Ω) • Speaker section Enclosure . . . The next time you switch on the top panel, and then press and hold VOLUME - About iPod/iPhone "Made for iPod" and "Made for iPhone" mean that an electronic accessory has been designed to connect specifically to iPod or iPhone, respectively, and has been...
... section RMS Power Output: Front Left/Right 15 W + 15 W (1 kHz, 10 %, T.H.D., 8 Ω) Subwoofer . . 30 W (100 Hz, 10 %, T.H.D., 4 Ω) • Speaker section Enclosure . . . The next time you switch on the top panel, and then press and hold VOLUME - About iPod/iPhone "Made for iPod" and "Made for iPhone" mean that an electronic accessory has been designed to connect specifically to iPod or iPhone, respectively, and has been...
Operating Instructions
Page 58
... for parts or actual repair work. For hook-up and operation of comparable value, at 1-877-283-5901. P.O. OR CANADA. The warranty period for retail customers who rent the product commences upon the date product is available to resolve the dispute; To receive warranty service you without charge to have appointed a number of PUSA or POC. The Complaint Resolution Program...
... for parts or actual repair work. For hook-up and operation of comparable value, at 1-877-283-5901. P.O. OR CANADA. The warranty period for retail customers who rent the product commences upon the date product is available to resolve the dispute; To receive warranty service you without charge to have appointed a number of PUSA or POC. The Complaint Resolution Program...

Operating Instructions
Page 60
... traduction réservés. Publication de Pioneer Corporation. © 2009 Pioneer Corporation. Blvd.Manuel Avila Camacho 138 10 piso Col.Lomas de Chapultepec, Mexico, D.F. 11000 TEL: 55-9178-4270 K002_B1_En Printed in Imprimé en To register your product, find the nearest authorized service location, to purchase replacement parts, operating instructions, or accessories, please go to one...
... traduction réservés. Publication de Pioneer Corporation. © 2009 Pioneer Corporation. Blvd.Manuel Avila Camacho 138 10 piso Col.Lomas de Chapultepec, Mexico, D.F. 11000 TEL: 55-9178-4270 K002_B1_En Printed in Imprimé en To register your product, find the nearest authorized service location, to purchase replacement parts, operating instructions, or accessories, please go to one...


