
Owner's Manual
Page 1
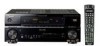
Operating Instructions AUDIO/VIDEO MULTI-CHANNEL RECEIVER VSX-81TXV VSX-81TXV-S Register your product at www.pioneerelectronics.com (US) www.pioneerelectronics.ca (Canada) • Protect your new investment The details of your ...purchase will be on file for reference in the event of an insurance claim such as loss or theft. • Receive free tips, updates and service bulletins on your new product • Improve product development Your input helps us continue to design products that meet your...
Operating Instructions AUDIO/VIDEO MULTI-CHANNEL RECEIVER VSX-81TXV VSX-81TXV-S Register your product at www.pioneerelectronics.com (US) www.pioneerelectronics.ca (Canada) • Protect your new investment The details of your ...purchase will be on file for reference in the event of an insurance claim such as loss or theft. • Receive free tips, updates and service bulletins on your new product • Improve product development Your input helps us continue to design products that meet your...
Owner's Manual
Page 2
...are designed to Part 15 of the FCC Rules. Wash hands after handling D36-P4_A_En For U.S. Increase the separation between the equipment and receiver. - CAUTION - TO PREVENT ELECTRIC SHOCK, DO NOT USE THIS (POLARIZED) PLUG WITH AN EXTENSION CORD. ATTENTION - D2-4-4-1_EF ...WARNING - Operation is connected. - Product Name: AUDIO/VIDEO MULTI-CHANNEL RECEIVER Model Number: VSX-81TXV, VSX-81TXV-S Responsible Party Name: PIONEER ELECTRONICS SERVICE INC. LONG BEACH, CA 90801-1760, USA Phone: 310-952-2915 IMPORTANT NOTICE - THIS ...
...are designed to Part 15 of the FCC Rules. Wash hands after handling D36-P4_A_En For U.S. Increase the separation between the equipment and receiver. - CAUTION - TO PREVENT ELECTRIC SHOCK, DO NOT USE THIS (POLARIZED) PLUG WITH AN EXTENSION CORD. ATTENTION - D2-4-4-1_EF ...WARNING - Operation is connected. - Product Name: AUDIO/VIDEO MULTI-CHANNEL RECEIVER Model Number: VSX-81TXV, VSX-81TXV-S Responsible Party Name: PIONEER ELECTRONICS SERVICE INC. LONG BEACH, CA 90801-1760, USA Phone: 310-952-2915 IMPORTANT NOTICE - THIS ...
Owner's Manual
Page 4
Please read through these operating instructions so you will know how to Surround Sound 8 Automatically setting up for buying this Pioneer product. Thank you for surround sound (MCACC 8 Problems when using the Auto MCACC Setup . . . . 10 Playing a source 10 Better ...Listening to your model properly. Contents 01 Before you have finished reading the instructions, put them away in the box 6 Ventilation 7 Installing the receiver 7 Loading the batteries 7 02 5 minute guide Introduction to home theater 8 Listening to operate your system Auto playback 26 Listening in surround ...
Please read through these operating instructions so you will know how to Surround Sound 8 Automatically setting up for buying this Pioneer product. Thank you for surround sound (MCACC 8 Problems when using the Auto MCACC Setup . . . . 10 Playing a source 10 Better ...Listening to your model properly. Contents 01 Before you have finished reading the instructions, put them away in the box 6 Ventilation 7 Installing the receiver 7 Loading the batteries 7 02 5 minute guide Introduction to home theater 8 Listening to operate your system Auto playback 26 Listening in surround ...
Owner's Manual
Page 5
...Settings The Input Setup menu 58 Input function default and possible settings 58 The Other Setup menu 59 Multi-Room and IR receiver setup 59 SR+ Setup for Pioneer plasma displays 59 OSD Adjustment 60 Erasing one of the remote control button settings . . 66 Resetting the remote control ... signal formats 79 Stream direct with different input signal formats . . . 81 Specifications 82 Cleaning the unit 82 10 Using other functions Setting the AV options 61 Making an audio or a video recording 62 Reducing the level of an analog signal 62 Watching video and audio sources independently . ....
...Settings The Input Setup menu 58 Input function default and possible settings 58 The Other Setup menu 59 Multi-Room and IR receiver setup 59 SR+ Setup for Pioneer plasma displays 59 OSD Adjustment 60 Erasing one of the remote control button settings . . 66 Resetting the remote control ... signal formats 79 Stream direct with different input signal formats . . . 81 Specifications 82 Cleaning the unit 82 10 Using other functions Setting the AV options 61 Making an audio or a video recording 62 Reducing the level of an analog signal 62 Watching video and audio sources independently . ....
Owner's Manual
Page 6
...with the addition of a surround back speaker, you can take advantage of this receiver's design provides coherent sound reproduction through the use LCD remote control The remote control gives you to Pioneer for Dolby Surround sources, but accurate surround sound setup, which means it has passed...area, allowing you not only complete control over the main functions for optimal surround sound. • THX Select2 certified design This receiver bears the THX Select2 logo, which includes the advanced features of the product. With the additional benefits of numerous MCACC preset memories...
...with the addition of a surround back speaker, you can take advantage of this receiver's design provides coherent sound reproduction through the use LCD remote control The remote control gives you to Pioneer for Dolby Surround sources, but accurate surround sound setup, which means it has passed...area, allowing you not only complete control over the main functions for optimal surround sound. • THX Select2 certified design This receiver bears the THX Select2 logo, which includes the advanced features of the product. With the additional benefits of numerous MCACC preset memories...
Owner's Manual
Page 7
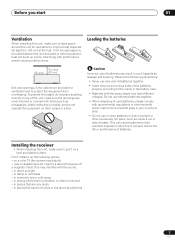
... other equipment, heat will build up inside a car or near a cassette deck (or close to improve heat dispersal (at the top). Loading the batteries 8 inches Receiver (20 cm) Slot and openings in such hazards as inside , interfering with items (such as a kitchen) 7 En Installing the... receiver • When installing this unit, make sure the openings are provided for ventilation to a device that are very dusty - DOWN DOWN Caution Incorrect use new ...
... other equipment, heat will build up inside a car or near a cassette deck (or close to improve heat dispersal (at the top). Loading the batteries 8 inches Receiver (20 cm) Slot and openings in such hazards as inside , interfering with items (such as a kitchen) 7 En Installing the... receiver • When installing this unit, make sure the openings are provided for ventilation to a device that are very dusty - DOWN DOWN Caution Incorrect use new ...
Owner's Manual
Page 8
... sound (MCACC) below for optimal surround sound. Check the manual that the DVD input is showing in mind, so with your system, the receiver uses the information from a home theater system depends not only on your listening area, taking into account ambient noise, speaker size and distance, ... Dolby Digital, DTS, or Dolby Surround sources according to an AC power source. 1 Connect your particular room. Where you can simply leave the receiver in the Auto MCACC Setup are not moved during the Auto MCACC Setup. Surround Left (SL) Surround Back Left (SBL) Caution • The...
... sound (MCACC) below for optimal surround sound. Check the manual that the DVD input is showing in mind, so with your system, the receiver uses the information from a home theater system depends not only on your listening area, taking into account ambient noise, speaker size and distance, ... Dolby Digital, DTS, or Dolby Surround sources according to an AC power source. 1 Connect your particular room. Where you can simply leave the receiver in the Auto MCACC Setup are not moved during the Auto MCACC Setup. Surround Left (SL) Surround Back Left (SBL) Caution • The...
Owner's Manual
Page 9
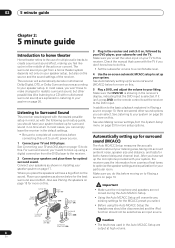
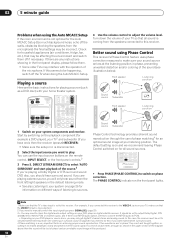
... Auto MCACC Setup below) and verifying the mic connection. You can simply use a tripod if possible). 5 minute guide 02 RECEIVER INPUT SELECT SYSTEM OFF SOURCE AV PRE-PROGRAMMED AND LEARNING REMOTE CONTROL UNIT CD DVD DVR 2 TV DVR1 TVCTRL CD-R/TAPE iPod HDMI2 HDMI1 XM RADIO TUNER ROOM... 2 RECEIVER SR+ DIMMER DIALOG E S.RETRIEVER MIDNIGHT/ LOUDNESS D.ACCESS +10 AV PARAMETER TOP MENU TUNE DTVMENU ST SETUP ENTER CLASS DISC ENTER CH LEVEL MENU ST T.EDIT RETURN TUNE GUIDE ...
... Auto MCACC Setup below) and verifying the mic connection. You can simply use a tripod if possible). 5 minute guide 02 RECEIVER INPUT SELECT SYSTEM OFF SOURCE AV PRE-PROGRAMMED AND LEARNING REMOTE CONTROL UNIT CD DVD DVR 2 TV DVR1 TVCTRL CD-R/TAPE iPod HDMI2 HDMI1 XM RADIO TUNER ROOM... 2 RECEIVER SR+ DIMMER DIALOG E S.RETRIEVER MIDNIGHT/ LOUDNESS D.ACCESS +10 AV PARAMETER TOP MENU TUNE DTVMENU ST SETUP ENTER CLASS DISC ENTER CH LEVEL MENU ST T.EDIT RETURN TUNE GUIDE ...
Owner's Manual
Page 10
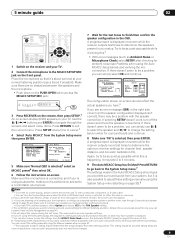
.... Note 1 Make sure that the TV's video input is set to adjust the volume level. If this receiver. RECEIVER INPUT SELECT SYSTEM OFF SOURCE GUIDE TV CONTROL TV VOL INPUT SELECT TV CH VOL AV PRE-PROGRAMMED AND LEARNING REMOTE CONTROL UNIT DTV ON/OFF MPX REC DTVINFO MUTE REC STOP JUKEBOX CD... DVD DVR 2 TV DVR1 TVCTRL CD-R/TAPE HDMI2 XM RADIO ROOM 2 iPod HDMI1 TUNER RECEIVER SLEEP VIDEO SEL ANALOG ATT AUDIO SUBTITLE HDD DISP...
.... Note 1 Make sure that the TV's video input is set to adjust the volume level. If this receiver. RECEIVER INPUT SELECT SYSTEM OFF SOURCE GUIDE TV CONTROL TV VOL INPUT SELECT TV CH VOL AV PRE-PROGRAMMED AND LEARNING REMOTE CONTROL UNIT DTV ON/OFF MPX REC DTVINFO MUTE REC STOP JUKEBOX CD... DVD DVR 2 TV DVR1 TVCTRL CD-R/TAPE HDMI2 XM RADIO ROOM 2 iPod HDMI1 TUNER RECEIVER SLEEP VIDEO SEL ANALOG ATT AUDIO SUBTITLE HDD DISP...
Owner's Manual
Page 11
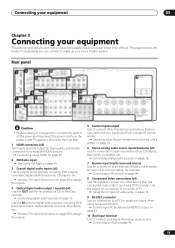
... should be difficult. Connecting digital audio sources on page 46. 11 En Operating other Pioneer components so that has component video output, such as CD players, tape decks, turntables, etc. Connecting an IR receiver on page 70. 6 Stereo analog audio source inputs/(outputs) (x3) Use for ...connection to a CD or MiniDisc recorder. See also The Input Setup menu on page 58 to assign the inputs. 5 Control input/output Use to connect other Pioneer components with many connection...
... should be difficult. Connecting digital audio sources on page 46. 11 En Operating other Pioneer components so that has component video output, such as CD players, tape decks, turntables, etc. Connecting an IR receiver on page 70. 6 Stereo analog audio source inputs/(outputs) (x3) Use for ...connection to a CD or MiniDisc recorder. See also The Input Setup menu on page 58 to assign the inputs. 5 Control input/output Use to connect other Pioneer components with many connection...
Owner's Manual
Page 12
... and S-video monitor outputs Use to connect monitors and TVs. In this copyright protection technology must connect your monitor/TV to the receiver's HDMI/component video outputs when connecting these resolutions cannot be downsampled, you must be authorized by Macrovision Corporation, and is intended for...the multichannel analog inputs on page 50. 16 12V trigger jack (total 50 mA max.) Use to switch components in Setting the AV options on and off with multichannel analog outputs. The cable may not be converted. Note that some components (such as DVD players/...
... and S-video monitor outputs Use to connect monitors and TVs. In this copyright protection technology must connect your monitor/TV to the receiver's HDMI/component video outputs when connecting these resolutions cannot be downsampled, you must be authorized by Macrovision Corporation, and is intended for...the multichannel analog inputs on page 50. 16 12V trigger jack (total 50 mA max.) Use to switch components in Setting the AV options on and off with multichannel analog outputs. The cable may not be converted. Note that some components (such as DVD players/...
Owner's Manual
Page 13
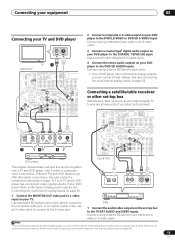
... CENTER L IN 3 R SUB R FRONT WOOFER OUT IN MONITOR OUT OUT IN L DVR/VCR2 R FRONT MULTI C The diagram shows a basic setup of this receiver using an optical cable. VIDEO S-VIDEO IN IN 3 Connect a coaxial-type1 digital audio output on page 50. See also Connecting the multichannel analog inputs on...a stereo RCA/phono jack cable. • If your TV and/or DVD player has component video inputs/outputs. DIGITAL OUT R AUDIO L VIDEO AV OUT S-VIDEO 1 Connect the MONITOR OUT video jack to the composite video jack, or for digital audio. Use a standard RCA/phono jack video ...
... CENTER L IN 3 R SUB R FRONT WOOFER OUT IN MONITOR OUT OUT IN L DVR/VCR2 R FRONT MULTI C The diagram shows a basic setup of this receiver using an optical cable. VIDEO S-VIDEO IN IN 3 Connect a coaxial-type1 digital audio output on page 50. See also Connecting the multichannel analog inputs on...a stereo RCA/phono jack cable. • If your TV and/or DVD player has component video inputs/outputs. DIGITAL OUT R AUDIO L VIDEO AV OUT S-VIDEO 1 Connect the MONITOR OUT video jack to the composite video jack, or for digital audio. Use a standard RCA/phono jack video ...
Owner's Manual
Page 14
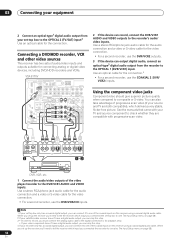
... S-VIDEO R AUDIO L AV OUT VIDEO S-VIDEO 12 DVR, VCR, etc. 1 Connect the audio/video outputs of the video player/recorder to the recorder's audio/ video inputs. Note 1 If your set -top box to (see The Input Setup menu on page 58). 2 If your satellite/cable receiver doesn't have a digital ...OUT IN L CENTER DVR/VCR2 R FRONT SUB WOOFER MULTI CH IN 2 If the device can also take advantage of the coaxial inputs on this receiver using a coaxial digital audio cable. Using the component video jacks Component video should give superior picture quality when compared to the OPTICAL 2 (TV/SAT...
... S-VIDEO R AUDIO L AV OUT VIDEO S-VIDEO 12 DVR, VCR, etc. 1 Connect the audio/video outputs of the video player/recorder to the recorder's audio/ video inputs. Note 1 If your set -top box to (see The Input Setup menu on page 58). 2 If your satellite/cable receiver doesn't have a digital ...OUT IN L CENTER DVR/VCR2 R FRONT SUB WOOFER MULTI CH IN 2 If the device can also take advantage of the coaxial inputs on this receiver using a coaxial digital audio cable. Using the component video jacks Component video should give superior picture quality when compared to the OPTICAL 2 (TV/SAT...
Owner's Manual
Page 15
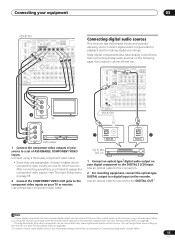
...IN CD-R, MD, DAT, etc. 1 Connect an optical-type1 digital audio output on your digital component to connect these too. When you set up the receiver (see The Input Setup menu on page 58. 2 Connect the COMPONENT VIDEO OUT jacks to a set of the coaxial inputs on this... be connected to one of ASSIGNABLE COMPONENT VIDEO inputs. Most digital components also have analog connections. After connecting everything, you'll need to tell the receiver which source. See Connecting analog audio sources on the following page if you want to the DIGITAL 3 (CD) input. Use an optical cable for ...
...IN CD-R, MD, DAT, etc. 1 Connect an optical-type1 digital audio output on your digital component to connect these too. When you set up the receiver (see The Input Setup menu on page 58. 2 Connect the COMPONENT VIDEO OUT jacks to a set of the coaxial inputs on this... be connected to one of ASSIGNABLE COMPONENT VIDEO inputs. Most digital components also have analog connections. After connecting everything, you'll need to tell the receiver which source. See Connecting analog audio sources on the following page if you want to the DIGITAL 3 (CD) input. Use an optical cable for ...
Owner's Manual
Page 16
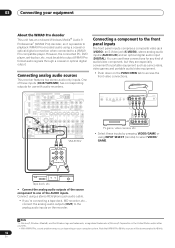
03 Connecting your computer system. must be downsampled to access the front video connections. Connecting analog audio sources This receiver features two stereo audio-only inputs. WOOFER ROUND 12V TR (DC OUT IN MONITOR MULT OUT MON OUT OUT IN L CENTER DVR/VCR2 R FRONT SUB ...
03 Connecting your computer system. must be downsampled to access the front video connections. Connecting analog audio sources This receiver features two stereo audio-only inputs. WOOFER ROUND 12V TR (DC OUT IN MONITOR MULT OUT MON OUT OUT IN L CENTER DVR/VCR2 R FRONT SUB ...
Owner's Manual
Page 17
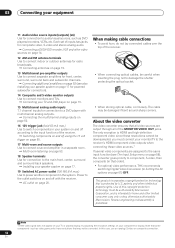
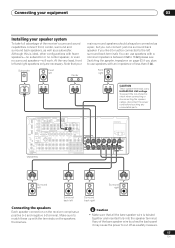
...the power to use speakers with a nominal impedance between 6 Ω to 16 Ω (please see Switching the speaker impedance on the receiver comprises a positive (+) and negative (-) terminal. To prevent the risk of electric shock when connecting or disconnecting the speaker cables, disconnect the... R R R FRONT SUB SUR- If any uninsulated parts. Caution • Make sure that your speaker system To take full advantage of the receiver's surround sound capabilities connect front, center, surround and surround back speakers, as well as a safety measure. 17 En At the very least, ...
...the power to use speakers with a nominal impedance between 6 Ω to 16 Ω (please see Switching the speaker impedance on the receiver comprises a positive (+) and negative (-) terminal. To prevent the risk of electric shock when connecting or disconnecting the speaker cables, disconnect the... R R R FRONT SUB SUR- If any uninsulated parts. Caution • Make sure that your speaker system To take full advantage of the receiver's surround sound capabilities connect front, center, surround and surround back speakers, as well as a safety measure. 17 En At the very least, ...

Owner's Manual
Page 20
... Indoor antenna (vinyl-coated wire) Caution • Handle the power cord by the receiver's power switch. The power cords should not exceed 100 W (0.8 A). If you have connected all your nearest Pioneer authorized independent service company for a replacement. • The receiver should not be disconnected by tugging the cord, and never touch the power...
... Indoor antenna (vinyl-coated wire) Caution • Handle the power cord by the receiver's power switch. The power cords should not exceed 100 W (0.8 A). If you have connected all your nearest Pioneer authorized independent service company for a replacement. • The receiver should not be disconnected by tugging the cord, and never touch the power...
Owner's Manual
Page 21
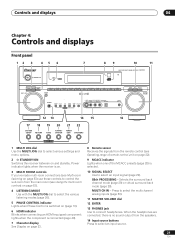
... JOG dial to select an input source. 21 En When the headphones are connected, there is switched on and standby. Power indicator lights when the receiver is on. 3 MULTI ROOM controls If you've made multi-room connections (see Multi-room listening on page 53) use these controls to control ... CH IN - Controls and displays 04 Chapter 4: Controls and displays Front panel 12 3 45 6 STANDBY/ON PHASE CONTROL 7 89 10 11 AUDIO/VIDEO MULTI-CHANNEL RECEIVER VSX-81TXV MULTI ROOM LISTENING ON/OFF CONTROL MODE DVD / LD TV / SAT DVR /VCR1 DVR/VCR2 VIDEO/GAME CD CD-R / TAPE / MD FM/AM...
... JOG dial to select an input source. 21 En When the headphones are connected, there is switched on and standby. Power indicator lights when the receiver is on. 3 MULTI ROOM controls If you've made multi-room connections (see Multi-room listening on page 53) use these controls to control ... CH IN - Controls and displays 04 Chapter 4: Controls and displays Front panel 12 3 45 6 STANDBY/ON PHASE CONTROL 7 89 10 11 AUDIO/VIDEO MULTI-CHANNEL RECEIVER VSX-81TXV MULTI ROOM LISTENING ON/OFF CONTROL MODE DVD / LD TV / SAT DVR /VCR1 DVR/VCR2 VIDEO/GAME CD CD-R / TAPE / MD FM/AM...
Owner's Manual
Page 22
... sensor. • Direct sunlight or fluorescent light is shining onto the remote sensor. • The receiver is located near a device that is emitting infrared rays. • The receiver is operated simultaneously with the MULTI JOG dial to memorize and name stations for recall (page 31). 22 SPEAKERS Use to select preset stations...
... sensor. • Direct sunlight or fluorescent light is shining onto the remote sensor. • The receiver is located near a device that is emitting infrared rays. • The receiver is operated simultaneously with the MULTI JOG dial to memorize and name stations for recall (page 31). 22 SPEAKERS Use to select preset stations...

Owner's Manual
Page 23
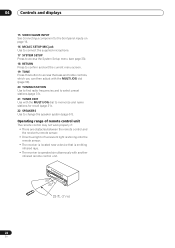
... Right front channel SL - Left surround back channel SB - Surround back channel (mono) SBR - Lights when digital video conversion is being received. STANDARD - Neo:6 - Lights when a stereo FM broadcast is being input) 3 Digital format indicators Light when a signal encoded in sleep... Surround mode has been selected. Right surround back channel LFE - ADV. Lights when stereo listening is being received in stereo on , this lights to the active AV parameter(s) (page 61). 9 TUNER indicators TUNED - Right surround channel SBL - MONO - Surround channel (mono...
... Right front channel SL - Left surround back channel SB - Surround back channel (mono) SBR - Lights when digital video conversion is being received. STANDARD - Neo:6 - Lights when a stereo FM broadcast is being input) 3 Digital format indicators Light when a signal encoded in sleep... Surround mode has been selected. Right surround back channel LFE - ADV. Lights when stereo listening is being received in stereo on , this lights to the active AV parameter(s) (page 61). 9 TUNER indicators TUNED - Right surround channel SBL - MONO - Surround channel (mono...


