Owner's Manual
Page 4
... Placing the speakers 18 THX speaker system setup 19 Connecting antennas 19 Connecting external antennas 20 Plugging in the receiver 20 AC outlet 20 04 Controls and displays Front panel 21 Operating range of remote control unit 22 Display... how to station presets 32 07 The System Setup menu Making receiver settings from the System Setup menu 33 Automatic MCACC (Expert 33 Surround back speaker setting 35 Manual MCACC setup 36 Fine Channel Level 36 Fine Speaker Distance 37 Standing... Using the Advanced surround effects 27 Listening in a safe place for buying this Pioneer product.
... Placing the speakers 18 THX speaker system setup 19 Connecting antennas 19 Connecting external antennas 20 Plugging in the receiver 20 AC outlet 20 04 Controls and displays Front panel 21 Operating range of remote control unit 22 Display... how to station presets 32 07 The System Setup menu Making receiver settings from the System Setup menu 33 Automatic MCACC (Expert 33 Surround back speaker setting 35 Manual MCACC setup 36 Fine Channel Level 36 Fine Speaker Distance 37 Standing... Using the Advanced surround effects 27 Listening in a safe place for buying this Pioneer product.
Owner's Manual
Page 8
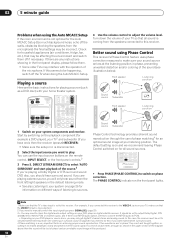
... time at high volume. 8 En Check the manual that came with the TV if you don't know how to do this. • Set the subwoofer volume to a comfortable level. 4 Use the on-screen automatic MCACC setup to set the receiver to the DVD input. See Automatically setting up...speakers on this . After you have your system hooked up the microphone provided with the following quick setup guide, you can simply leave the receiver in the receiver's display, indicating that DVD/LD is showing in the default settings. Front Left (L) Subwoofer (SW) Surround Right (SR) Listening position Surround...
... time at high volume. 8 En Check the manual that came with the TV if you don't know how to do this. • Set the subwoofer volume to a comfortable level. 4 Use the on-screen automatic MCACC setup to set the receiver to the DVD input. See Automatically setting up...speakers on this . After you have your system hooked up the microphone provided with the following quick setup guide, you can simply leave the receiver in the receiver's display, indicating that DVD/LD is showing in the default settings. Front Left (L) Subwoofer (SW) Surround Right (SR) Listening position Surround...
Owner's Manual
Page 9
...speaker distance, and Acoustic Calibration EQ. Simply choose an unused preset for now (you can rename it is also possible to adjust these settings manually using the Manual speaker setup on page 42. • The subwoofer distance setting may be a problem with a composite, component, or S-video cable. ... CONTROL UNIT CD DVD DVR 2 TV DVR1 TVCTRL CD-R/TAPE iPod HDMI2 HDMI1 XM RADIO TUNER ROOM 2 RECEIVER SR+ DIMMER DIALOG E S.RETRIEVER MIDNIGHT/ LOUDNESS D.ACCESS +10 AV PARAMETER TOP MENU TUNE DTVMENU ST SETUP ENTER CLASS DISC ENTER CH LEVEL MENU ST T.EDIT RETURN TUNE GUIDE...
...speaker distance, and Acoustic Calibration EQ. Simply choose an unused preset for now (you can rename it is also possible to adjust these settings manually using the Manual speaker setup on page 42. • The subwoofer distance setting may be a problem with a composite, component, or S-video cable. ... CONTROL UNIT CD DVD DVR 2 TV DVR1 TVCTRL CD-R/TAPE iPod HDMI2 HDMI1 XM RADIO TUNER ROOM 2 RECEIVER SR+ DIMMER DIALOG E S.RETRIEVER MIDNIGHT/ LOUDNESS D.ACCESS +10 AV PARAMETER TOP MENU TUNE DTVMENU ST SETUP ENTER CLASS DISC ENTER CH LEVEL MENU ST T.EDIT RETURN TUNE GUIDE...
Owner's Manual
Page 10
... Some older TVs may be happening, switch off the TV when doing the Auto MCACC Setup. RECEIVER INPUT SELECT SYSTEM OFF SOURCE GUIDE TV CONTROL TV VOL INPUT SELECT TV CH VOL AV PRE-PROGRAMMED AND LEARNING REMOTE CONTROL UNIT DTV ON/OFF MPX REC DTVINFO MUTE REC STOP JUKEBOX CD... phase matching4 for example a DVD player), your TV1 and subwoofer (if you have one), then the receiver (press RECEIVER). • Make sure the setup mic is disconnected. 2 Select the input source you need to manually switch the input signal type press SIGNAL SEL (page 29). 3 • You may only get digital...
... Some older TVs may be happening, switch off the TV when doing the Auto MCACC Setup. RECEIVER INPUT SELECT SYSTEM OFF SOURCE GUIDE TV CONTROL TV VOL INPUT SELECT TV CH VOL AV PRE-PROGRAMMED AND LEARNING REMOTE CONTROL UNIT DTV ON/OFF MPX REC DTVINFO MUTE REC STOP JUKEBOX CD... phase matching4 for example a DVD player), your TV1 and subwoofer (if you have one), then the receiver (press RECEIVER). • Make sure the setup mic is disconnected. 2 Select the input source you need to manually switch the input signal type press SIGNAL SEL (page 29). 3 • You may only get digital...
Owner's Manual
Page 14
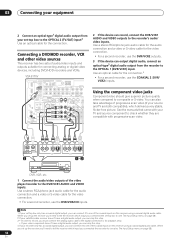
...only). • If your set -top box only has a coaxial digital output, you can skip this receiver using a coaxial digital audio cable. OPTICAL COAXIAL DIGITAL OUT 3 R AUDIO L VIDEO AV IN S-VIDEO R AUDIO L AV OUT VIDEO S-VIDEO 12 DVR, VCR, etc. 1 Connect the audio/video outputs of audio/video inputs... to the recorder's audio/ video inputs. When you set -top box to (see The Input Setup menu on this receiver using a coaxial digital audio cable. See the manuals that came with your set -top box to composite or S-video. Using the component video jacks Component video should give ...
...only). • If your set -top box only has a coaxial digital output, you can skip this receiver using a coaxial digital audio cable. OPTICAL COAXIAL DIGITAL OUT 3 R AUDIO L VIDEO AV IN S-VIDEO R AUDIO L AV OUT VIDEO S-VIDEO 12 DVR, VCR, etc. 1 Connect the audio/video outputs of audio/video inputs... to the recorder's audio/ video inputs. When you set -top box to (see The Input Setup menu on this receiver using a coaxial digital audio cable. See the manuals that came with your set -top box to composite or S-video. Using the component video jacks Component video should give ...
Owner's Manual
Page 17
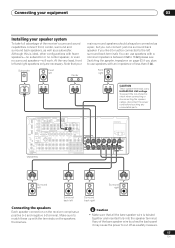
... MULTI CH IN CENTER VSX-81TXV AC OUTLET SWITCHED 100 W(0.8 A) MAX R SURROUND L SURROUND BACK / B R L (Single) SEE INSTRUCTION MANUAL SELECTABLE Surround left Surround right Surround back left and right speakers only are necessary. Connecting your equipment 03 Installing your Subwoofer Front left Center main... surround speakers should always be connected to the left surround back terminal). To prevent the risk of the receiver's surround sound capabilities connect front, center, surround and surround back speakers, as well as a pair, but you can ...
... MULTI CH IN CENTER VSX-81TXV AC OUTLET SWITCHED 100 W(0.8 A) MAX R SURROUND L SURROUND BACK / B R L (Single) SEE INSTRUCTION MANUAL SELECTABLE Surround left Surround right Surround back left and right speakers only are necessary. Connecting your equipment 03 Installing your Subwoofer Front left Center main... surround speakers should always be connected to the left surround back terminal). To prevent the risk of the receiver's surround sound capabilities connect front, center, surround and surround back speakers, as well as a pair, but you can ...
Owner's Manual
Page 18
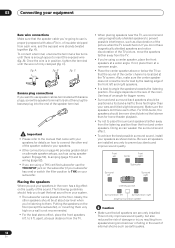
.... • When placing speakers near the TV, we recommend using a center speaker, place the front speakers at about 3/8 in. Important • Please refer to the manual that came with your speakers for details on how to connect the other end of the speaker cables to your speakers. • Other connections on...
.... • When placing speakers near the TV, we recommend using a center speaker, place the front speakers at about 3/8 in. Important • Please refer to the manual that came with your speakers for details on how to connect the other end of the speaker cables to your speakers. • Other connections on...
Owner's Manual
Page 29
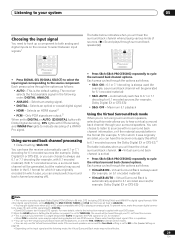
...SBch OFF - With other digital signal formats, set to the source component. The receiver selects the first available signal in Setting the AV options on page 61 is a problem. 4 • You can have the receiver automatically use 6.1 or 7.1 decoding (for example, Dolby Digital EX or DTS-ES...for example, with 5.1 encoded material). Selects an optical or coaxial digital signal. • HDMI - For more details, refer to the instruction manual supplied with the THX, STEREO or Stream Direct modes. • You can choose to cycle the virtual surround back channel options. Maximum 5.1 ...
...SBch OFF - With other digital signal formats, set to the source component. The receiver selects the first available signal in Setting the AV options on page 61 is a problem. 4 • You can have the receiver automatically use 6.1 or 7.1 decoding (for example, Dolby Digital EX or DTS-ES...for example, with 5.1 encoded material). Selects an optical or coaxial digital signal. • HDMI - For more details, refer to the instruction manual supplied with the THX, STEREO or Stream Direct modes. • You can choose to cycle the virtual surround back channel options. Maximum 5.1 ...
Owner's Manual
Page 31
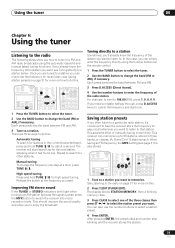
...the currently selected band, press and hold TUNE / for high speed tuning. Repeat to 106.00 (FM), press 1, 0, 6, 0, 0. This saves the effort of manually tuning in three banks, or classes, (A, B and C) of the station you want to listen to change the band (FM or AM), if necessary... often listen to a particular radio station, it has found one of the station you want , see Tuning directly to a station below. RECEIVER INPUT SELECT SYSTEM OFF SOURCE AV PRE-PROGRAMMED AND LEARNING REMOTE CONTROL UNIT CD DVD DVR 2 TV DVR1 TVCTRL CD-R/TAPE HDMI2 XM RADIO ROOM 2 iPod HDMI1 TUNER...
...the currently selected band, press and hold TUNE / for high speed tuning. Repeat to 106.00 (FM), press 1, 0, 6, 0, 0. This saves the effort of manually tuning in three banks, or classes, (A, B and C) of the station you want to listen to change the band (FM or AM), if necessary... often listen to a particular radio station, it has found one of the station you want , see Tuning directly to a station below. RECEIVER INPUT SELECT SYSTEM OFF SOURCE AV PRE-PROGRAMMED AND LEARNING REMOTE CONTROL UNIT CD DVD DVR 2 TV DVR1 TVCTRL CD-R/TAPE HDMI2 XM RADIO ROOM 2 iPod HDMI1 TUNER...
Owner's Manual
Page 33
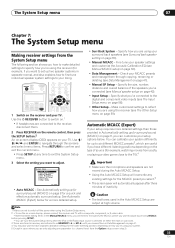
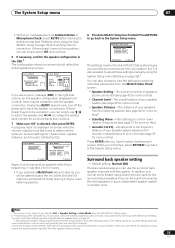
...separate calibration settings for the same listening position, depending on the type of inactivity. Important System Setup 1.Auto MCACC 2.Surr Back System 3.Manual MCACC 4.Data Management 5.Manual SP Setup 6.Input Setup 7.Other Setup : Exit • Auto MCACC - Caution • The test tones used in cases where... UNIT CD DVD DVR 2 TV DVR1 TVCTRL CD-R/TAPE iPod HDMI2 HDMI1 XM RADIO TUNER ROOM 2 RECEIVER SR+ DIMMER DIALOG E S.RETRIEVER MIDNIGHT/ LOUDNESS D.ACCESS +10 AV PARAMETER TOP MENU TUNE DTVMENU ST SETUP ENTER CLASS DISC ENTER CH LEVEL MENU ST T.EDIT RETURN TUNE...
...separate calibration settings for the same listening position, depending on the type of inactivity. Important System Setup 1.Auto MCACC 2.Surr Back System 3.Manual MCACC 4.Data Management 5.Manual SP Setup 6.Input Setup 7.Other Setup : Exit • Auto MCACC - Caution • The test tones used in cases where... UNIT CD DVD DVR 2 TV DVR1 TVCTRL CD-R/TAPE iPod HDMI2 HDMI1 XM RADIO TUNER ROOM 2 RECEIVER SR+ DIMMER DIALOG E S.RETRIEVER MIDNIGHT/ LOUDNESS D.ACCESS +10 AV PARAMETER TOP MENU TUNE DTVMENU ST SETUP ENTER CLASS DISC ENTER CH LEVEL MENU ST T.EDIT RETURN TUNE...
Owner's Manual
Page 34
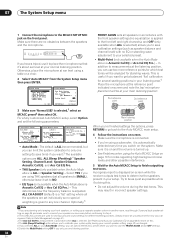
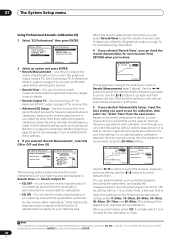
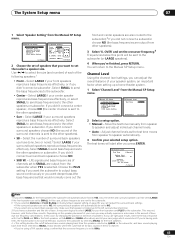
07 The System Setup menu 1 Connect the microphone to [M1. System Setup 1.Auto MCACC 2.Surr Back System 3.Manual MCACC 4.Data Management 5.Manual SP Setup 6.Input Setup 7.Other Setup : Exit 1.Auto MCACC Surr Back System [ Normal (SB) ] Data Save to the MCACC SETUP MIC ...available when the Auto Mode above is adjusted. Otherwise, place the microphone at your speakers as possible while it is on -screen while the receiver outputs test tones to determine the speakers present in incorrect speaker settings. For a fully customized Auto MCACC setup, select Option and set individually...
07 The System Setup menu 1 Connect the microphone to [M1. System Setup 1.Auto MCACC 2.Surr Back System 3.Manual MCACC 4.Data Management 5.Manual SP Setup 6.Input Setup 7.Other Setup : Exit 1.Auto MCACC Surr Back System [ Normal (SB) ] Data Save to the MCACC SETUP MIC ...available when the Auto Mode above is adjusted. Otherwise, place the microphone at your speakers as possible while it is on -screen while the receiver outputs test tones to determine the speakers present in incorrect speaker settings. For a fully customized Auto MCACC setup, select Option and set individually...
Owner's Manual
Page 35
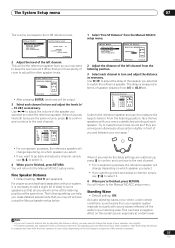
...Setup menu. The overall balance of your room, sometimes identical speakers with this )3 • Standing Wave - In addition to determine the optimum receiver settings for more on page 10) and verifying the mic connection. If selecting RETRY doesn't work, turn off the power and check the ... can use / to select the speaker and / to be as quiet as Ambient Noise or Microphone Check) select RETRY after you can correct the setting manually using the Auto MCACC Setup on this system. Front Center Surround SB SUB W. [ YES ] [ YES ] [ YES ] [ Yx2 ] [ YES ] [ OK ] :Cancel...
...Setup menu. The overall balance of your room, sometimes identical speakers with this )3 • Standing Wave - In addition to determine the optimum receiver settings for more on page 10) and verifying the mic connection. If selecting RETRY doesn't work, turn off the power and check the ... can use / to select the speaker and / to be as quiet as Ambient Noise or Microphone Check) select RETRY after you can correct the setting manually using the Auto MCACC Setup on this system. Front Center Surround SB SUB W. [ YES ] [ YES ] [ YES ] [ Yx2 ] [ YES ] [ OK ] :Cancel...
Owner's Manual
Page 36
... change the placement of the settings below ). • Fine SP Distance - Make precise delay settings for an independent system in Making receiver settings from the speakers and make detailed adjustments that you 're biamping your front speakers on page 37). • Standing Wave - ...make detailed settings according to use with the system. See Making receiver settings from the System Setup menu on page 50). • Front Bi-Amp - System Setup 1.Auto MCACC 2.Surr Back System 3.Manual MCACC 4.Data Management 5.Manual SP Setup 6.Input Setup 7.Other Setup : Exit 2.Surround Back...
... change the placement of the settings below ). • Fine SP Distance - Make precise delay settings for an independent system in Making receiver settings from the speakers and make detailed adjustments that you 're biamping your front speakers on page 37). • Standing Wave - ...make detailed settings according to use with the system. See Making receiver settings from the System Setup menu on page 50). • Front Bi-Amp - System Setup 1.Auto MCACC 2.Surr Back System 3.Manual MCACC 4.Data Management 5.Manual SP Setup 6.Input Setup 7.Other Setup : Exit 2.Surround Back...
Owner's Manual
Page 37
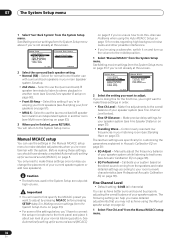
... For comparison purposes, the reference speaker will change depending on the overall sound, especially at a position slightly in your system, it to the Manual MCACC setup menu. Fine Speaker Distance • Default setting: 10.0 ft (all sounds will change the angle of delay to 45.0 feet.... can 't seem to match the reference speaker. You will be difficult to compare this by adjusting the distance setting, you may not achieve using the Manual speaker setup below. 3b.Fine SP Distance L R C SL SR SBL SBR SW 10.0ft (Reference) [ 9.0ft ] 9.5ft [ 6.0ft ] [ 6.5ft ] [ 6.0ft ] [ 6....
... For comparison purposes, the reference speaker will change depending on the overall sound, especially at a position slightly in your system, it to the Manual MCACC setup menu. Fine Speaker Distance • Default setting: 10.0 ft (all sounds will change the angle of delay to 45.0 feet.... can 't seem to match the reference speaker. You will be difficult to compare this by adjusting the distance setting, you may not achieve using the Manual speaker setup below. 3b.Fine SP Distance L R C SL SR SBL SBR SW 10.0ft (Reference) [ 9.0ft ] 9.5ft [ 6.0ft ] [ 6.5ft ] [ 6.0ft ] [ 6....
Owner's Manual
Page 38
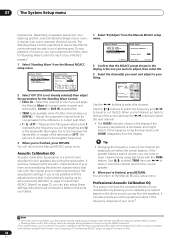
...T T 0.0dB ] [ 0.0dB ] [ 0.0dB ] :Finish 2 Select 'ON' (if it results in an overly resonant ('boomy') sound. Use the / buttons to select the frequency and / to the Manual MCACC setup menu. disappears from the speakers. You will return to boost or cut the EQ. Professional Acoustic Calibration EQ This setup minimizes the unwanted... can customize the filters used for Standing Wave Control for each of your MCACC presets.1 1 Select 'Standing Wave' from Pioneer-see Connecting a PC for Advanced MCACC output on page 57 for your system calibration with the TRIM feature. It can also...
...T T 0.0dB ] [ 0.0dB ] [ 0.0dB ] :Finish 2 Select 'ON' (if it results in an overly resonant ('boomy') sound. Use the / buttons to select the frequency and / to the Manual MCACC setup menu. disappears from the speakers. You will return to boost or cut the EQ. Professional Acoustic Calibration EQ This setup minimizes the unwanted... can customize the filters used for Standing Wave Control for each of your MCACC presets.1 1 Select 'Standing Wave' from Pioneer-see Connecting a PC for Advanced MCACC output on page 57 for your system calibration with the TRIM feature. It can also...
Owner's Manual
Page 39
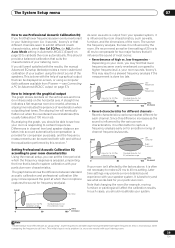
...microphone captures the sound for your system using a computer (with the results, the manual Advanced EQ setup (below shows the difference between standard acoustic calibration and professional calibration...lower frequencies seem overly reverberant in a skewed frequency analysis if the measurement is output from Pioneer - The sooner the frequency analysis, the less it sounds `boomy'), or that suits... usually takes about 100 ms or so). This initial slope is influenced by this receiver.1 Setting Professional Acoustic Calibration EQ according to your system. By analyzing the graph, ...
...microphone captures the sound for your system using a computer (with the results, the manual Advanced EQ setup (below shows the difference between standard acoustic calibration and professional calibration...lower frequencies seem overly reverberant in a skewed frequency analysis if the measurement is output from Pioneer - The sooner the frequency analysis, the less it sounds `boomy'), or that suits... usually takes about 100 ms or so). This initial slope is influenced by this receiver.1 Setting Professional Acoustic Calibration EQ according to your system. By analyzing the graph, ...
Owner's Manual
Page 40
... results as a reference for calibration, then select 'Go'. You can make this setting without the equalization performed by this receiver (after calibration).1 Note that customizing system calibration using the 20~40ms setting. 3e4. Note that the EQ response may not... The calibration corresponding to check. 07 The System Setup menu Using Professional Acoustic Calibration EQ 1 Select 'EQ Professional' then press ENTER. 3.Manual MCACC a.Fine Ch Level b.Fine SP Distance c.Standing Wave d.EQ Adjust e.EQ Professional 3e.EQ Professional 1.Reverb Measurement 2.Reverb View 3.Reverb ...
... results as a reference for calibration, then select 'Go'. You can make this setting without the equalization performed by this receiver (after calibration).1 Note that customizing system calibration using the 20~40ms setting. 3e4. Note that the EQ response may not... The calibration corresponding to check. 07 The System Setup menu Using Professional Acoustic Calibration EQ 1 Select 'EQ Professional' then press ENTER. 3.Manual MCACC a.Fine Ch Level b.Fine SP Distance c.Standing Wave d.EQ Adjust e.EQ Professional 3e.EQ Professional 1.Reverb Measurement 2.Reverb View 3.Reverb ...
Owner's Manual
Page 41
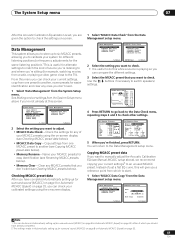
See Making receiver settings from the System Setup menu above ), we recommend...[Cancel ] :Cancel Note 1 This can compare the different settings. 3 Select the MCACC preset that you don't want to manually adjust the Acoustic Calibration EQ (see Clearing MCACC presets below ). • Memory Rename - Data Management This system allows you ...) on page 8 or Automatic MCACC (Expert) on -screen. System Setup 1.Auto MCACC 2.Surr Back System 3.Manual MCACC 4.Data Management 5.Manual SP Setup 6.Input Setup 7.Other Setup : Exit 4.Data Management a.MCACC Data Check b.MCACC Data Copy c.Memory Rename...
See Making receiver settings from the System Setup menu above ), we recommend...[Cancel ] :Cancel Note 1 This can compare the different settings. 3 Select the MCACC preset that you don't want to manually adjust the Acoustic Calibration EQ (see Clearing MCACC presets below ). • Memory Rename - Data Management This system allows you ...) on page 8 or Automatic MCACC (Expert) on -screen. System Setup 1.Auto MCACC 2.Surr Back System 3.Manual MCACC 4.Data Management 5.Manual SP Setup 6.Input Setup 7.Other Setup : Exit 4.Data Management a.MCACC Data Check b.MCACC Data Copy c.Memory Rename...
Owner's Manual
Page 42
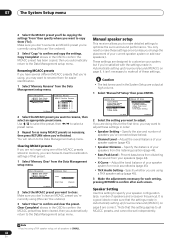
... an MCACC preset you're currently using a THX speaker setup, set all MCACC presets, and cannot be set independently. Manual speaker setup This receiver allows you to make detailed settings to make all of these settings. These settings are doing this can choose to clear.../ to select the preset, then / to adjust. Clear Complete! System Setup 1.Auto MCACC 2.Surr Back System 3.Manual MCACC 4.Data Management 5.Manual SP Setup 6.Input Setup 7.Other Setup : Exit 5.Manual SP Setup a.Speaker Setting b.Channel Level c.Speaker Distance d.Bass Peak Level e.X-Curve f.THX Audio Setting :Return 2 ...
... an MCACC preset you're currently using a THX speaker setup, set all MCACC presets, and cannot be set independently. Manual speaker setup This receiver allows you to make detailed settings to make all of these settings. These settings are doing this can choose to clear.../ to select the preset, then / to adjust. Clear Complete! System Setup 1.Auto MCACC 2.Surr Back System 3.Manual MCACC 4.Data Management 5.Manual SP Setup 6.Input Setup 7.Other Setup : Exit 5.Manual SP Setup a.Speaker Setting b.Channel Level c.Speaker Distance d.Bass Peak Level e.X-Curve f.THX Audio Setting :Return 2 ...
Owner's Manual
Page 43
... signals and bass frequencies of the following speakers:1 • Front - Adjust channel levels as the test tone moves from the Manual SP Setup menu. 5.Manual SP Setup a.Speaker Setting b.Channel Level c.Speaker Distance d.Bass Peak Level e.X-Curve f.THX Audio Setting :Return 5a.Speaker Setting ...bass frequencies that the crossover frequency is sent to the subwoofer (or LARGE speakers). 4 When you press ENTER. 5b.Channel Level Test Tone [ Manual ] Setting Start Please Wait . . . 20 Caution! Channel Level Using the channel level settings, you may not, however, yield the best ...
... signals and bass frequencies of the following speakers:1 • Front - Adjust channel levels as the test tone moves from the Manual SP Setup menu. 5.Manual SP Setup a.Speaker Setting b.Channel Level c.Speaker Distance d.Bass Peak Level e.X-Curve f.THX Audio Setting :Return 5a.Speaker Setting ...bass frequencies that the crossover frequency is sent to the subwoofer (or LARGE speakers). 4 When you press ENTER. 5b.Channel Level Test Tone [ Manual ] Setting Start Please Wait . . . 20 Caution! Channel Level Using the channel level settings, you may not, however, yield the best ...


