Owner's Manual
Page 4
...start Features 6 Checking what's in the box 6 Ventilation 7 Installing the receiver 7 Loading the batteries 7 02 5 minute guide Introduction to home theater 8 Listening to Surround Sound 8 Automatically setting up for buying this Pioneer product. Thank you have finished reading the instructions, put them away in ... presets 32 Listening to station presets 32 07 The System Setup menu Making receiver settings from the System Setup menu 33 Automatic MCACC (Expert 33 Surround back speaker setting 35 Manual MCACC setup 36 Fine Channel Level 36 Fine Speaker Distance 37 Standing Wave ...
...start Features 6 Checking what's in the box 6 Ventilation 7 Installing the receiver 7 Loading the batteries 7 02 5 minute guide Introduction to home theater 8 Listening to Surround Sound 8 Automatically setting up for buying this Pioneer product. Thank you have finished reading the instructions, put them away in ... presets 32 Listening to station presets 32 07 The System Setup menu Making receiver settings from the System Setup menu 33 Automatic MCACC (Expert 33 Surround back speaker setting 35 Manual MCACC setup 36 Fine Channel Level 36 Fine Speaker Distance 37 Standing Wave ...
Owner's Manual
Page 8
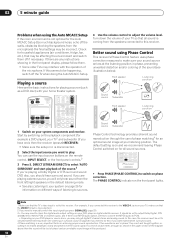
... speaker setup. If it on page 33 for surround sound in Playing a source on the source and the sound settings of the receiver. Connect your system, the receiver uses the information from the DVD player to Playing a source on the sound. The surround sound you 're in Installing your speaker...page 26. 3 Plug in mind, so with the TV if you don't know how to do this before connecting this unit to this receiver. Check the manual that the DVD input is showing in the receiver's display, indicating that came with the following quick setup guide, you 'll want to complete all .
... speaker setup. If it on page 33 for surround sound in Playing a source on the source and the sound settings of the receiver. Connect your system, the receiver uses the information from the DVD player to Playing a source on the sound. The surround sound you 're in Installing your speaker...page 26. 3 Plug in mind, so with the TV if you don't know how to do this before connecting this unit to this receiver. Check the manual that the DVD input is showing in the receiver's display, indicating that came with the following quick setup guide, you 'll want to complete all .
Owner's Manual
Page 9
... progress report is displayed on page 41). 5 Do not adjust the volume during the test tones. 5 minute guide 02 RECEIVER INPUT SELECT SYSTEM OFF SOURCE AV PRE-PROGRAMMED AND LEARNING REMOTE CONTROL UNIT CD DVD DVR 2 TV DVR1 TVCTRL CD-R/TAPE iPod HDMI2 HDMI1 XM RADIO TUNER ROOM... on your TV. A progress report is displayed on-screen while the receiver outputs more on -screen. Try to be a problem with the speaker connection. System Setup 1.Auto MCACC 2.Surr Back System 3.Manual MCACC 4.Data Management 5.Manual SP Setup 6.Input Setup 7.Other Setup : Exit 1.Auto MCACC Surr ...
... progress report is displayed on page 41). 5 Do not adjust the volume during the test tones. 5 minute guide 02 RECEIVER INPUT SELECT SYSTEM OFF SOURCE AV PRE-PROGRAMMED AND LEARNING REMOTE CONTROL UNIT CD DVD DVR 2 TV DVR1 TVCTRL CD-R/TAPE iPod HDMI2 HDMI1 XM RADIO TUNER ROOM... on your TV. A progress report is displayed on-screen while the receiver outputs more on -screen. Try to be a problem with the speaker connection. System Setup 1.Auto MCACC 2.Surr Back System 3.Manual MCACC 4.Data Management 5.Manual SP Setup 6.Input Setup 7.Other Setup : Exit 1.Auto MCACC Surr ...
Owner's Manual
Page 10
... from the front left/right speakers in the front panel display, please follow them off if necessary. RECEIVER INPUT SELECT SYSTEM OFF SOURCE GUIDE TV CONTROL TV VOL INPUT SELECT TV CH VOL AV PRE-PROGRAMMED AND LEARNING REMOTE CONTROL UNIT DTV ON/OFF MPX REC DTVINFO MUTE REC STOP JUKEBOX CD.... You can use of phase matching4 for an optimal sound image at the listening position in surround sound on page 26 if you need to manually switch the input signal type press SIGNAL SEL (page 29). 3 • You may need to check the digital audio output settings on your TV1 and...
... from the front left/right speakers in the front panel display, please follow them off if necessary. RECEIVER INPUT SELECT SYSTEM OFF SOURCE GUIDE TV CONTROL TV VOL INPUT SELECT TV CH VOL AV PRE-PROGRAMMED AND LEARNING REMOTE CONTROL UNIT DTV ON/OFF MPX REC DTVINFO MUTE REC STOP JUKEBOX CD.... You can use of phase matching4 for an optimal sound image at the listening position in surround sound on page 26 if you need to manually switch the input signal type press SIGNAL SEL (page 29). 3 • You may need to check the digital audio output settings on your TV1 and...
Owner's Manual
Page 14
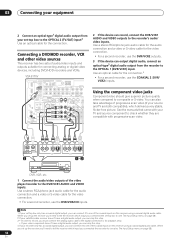
..., connect the DVR/VCR1 AUDIO and VIDEO outputs to the recorder's audio/ video inputs. OPTICAL COAXIAL DIGITAL OUT 3 R AUDIO L VIDEO AV IN S-VIDEO R AUDIO L AV OUT VIDEO S-VIDEO 12 DVR, VCR, etc. 1 Connect the audio/video outputs of the video player/recorder to composite or S-video. Note...also take advantage of the coaxial inputs on page 58). 2 If your satellite/cable receiver doesn't have a digital audio output, you can skip this receiver using a coaxial digital audio cable. See the manuals that came with your TV and source component to check whether they are both compatible),...
..., connect the DVR/VCR1 AUDIO and VIDEO outputs to the recorder's audio/ video inputs. OPTICAL COAXIAL DIGITAL OUT 3 R AUDIO L VIDEO AV IN S-VIDEO R AUDIO L AV OUT VIDEO S-VIDEO 12 DVR, VCR, etc. 1 Connect the audio/video outputs of the video player/recorder to composite or S-video. Note...also take advantage of the coaxial inputs on page 58). 2 If your satellite/cable receiver doesn't have a digital audio output, you can skip this receiver using a coaxial digital audio cable. See the manuals that came with your TV and source component to check whether they are both compatible),...
Owner's Manual
Page 17
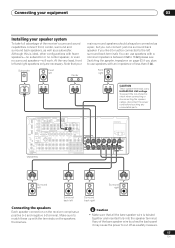
... IN CENTER VSX-81TXV AC OUTLET SWITCHED 100 W(0.8 A) MAX R SURROUND L SURROUND BACK / B R L (Single) SEE INSTRUCTION MANUAL SELECTABLE Surround left Surround right Surround back left Surround back right Connecting the speakers Each speaker connection on the speakers themselves. Note that all...back speaker if you plan to use speakers with the terminals on the receiver comprises a positive (+) and negative (-) terminal. Make sure to match these up with an impedance of the receiver's surround sound capabilities connect front, center, surround and surround back speakers, ...
... IN CENTER VSX-81TXV AC OUTLET SWITCHED 100 W(0.8 A) MAX R SURROUND L SURROUND BACK / B R L (Single) SEE INSTRUCTION MANUAL SELECTABLE Surround left Surround right Surround back left Surround back right Connecting the speakers Each speaker connection on the speakers themselves. Note that all...back speaker if you plan to use speakers with the terminals on the receiver comprises a positive (+) and negative (-) terminal. Make sure to match these up with an impedance of the receiver's surround sound capabilities connect front, center, surround and surround back speakers, ...
Owner's Manual
Page 18
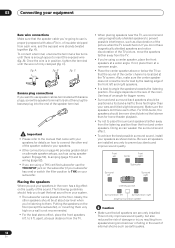
... speakers as shown below the TV so that the sound of the picture when the TV is switched on. Important • Please refer to the manual that came with your speakers for home theater playback. • Try not to place the surround speakers farther away from speakers being knocked over or...
... speakers as shown below the TV so that the sound of the picture when the TV is switched on. Important • Please refer to the manual that came with your speakers for home theater playback. • Try not to place the surround speakers farther away from speakers being knocked over or...
Owner's Manual
Page 29
...Setting the AV options on 5.1 encoded material) • VirtualSB AUTO - With 5.1 encoded sources, a surround back channel will be generated, but the material may sound better in the 5.1 format for which it was originally encoded (in which it was originally encoded, you can have the receiver automatically ...signal on a CD, for example, Dolby Digital EX or DTS-ES) • SBch OFF - For more details, refer to the instruction manual supplied with DTS decoding, and WMA9 Pro lights to cycle the virtual surround back channel options. Selects an optical or coaxial digital signal. •...
...Setting the AV options on 5.1 encoded material) • VirtualSB AUTO - With 5.1 encoded sources, a surround back channel will be generated, but the material may sound better in the 5.1 format for which it was originally encoded (in which it was originally encoded, you can have the receiver automatically ...signal on a CD, for example, Dolby Digital EX or DTS-ES) • SBch OFF - For more details, refer to the instruction manual supplied with DTS decoding, and WMA9 Pro lights to cycle the virtual surround back channel options. Selects an optical or coaxial digital signal. •...
Owner's Manual
Page 31
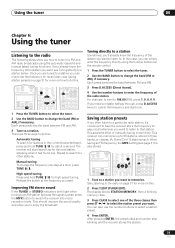
... to the radio The following steps show you how to tune in to change the band (FM or AM), if necessary. RECEIVER INPUT SELECT SYSTEM OFF SOURCE AV PRE-PROGRAMMED AND LEARNING REMOTE CONTROL UNIT CD DVD DVR 2 TV DVR1 TVCTRL CD-R/TAPE HDMI2 XM RADIO ROOM 2 iPod HDMI1... / . Tuning directly to a station Sometimes, you'll already know the frequency of manually tuning in each . Each press switches the band between FM and AM. 3 Tune to that station. RECEIVER INPUT SELECT SYSTEM OFF SOURCE AV PRE-PROGRAMMED AND LEARNING REMOTE CONTROL UNIT CD DVD DVR 2 TV DVR1 TVCTRL CD-R/TAPE...
... to the radio The following steps show you how to tune in to change the band (FM or AM), if necessary. RECEIVER INPUT SELECT SYSTEM OFF SOURCE AV PRE-PROGRAMMED AND LEARNING REMOTE CONTROL UNIT CD DVD DVR 2 TV DVR1 TVCTRL CD-R/TAPE HDMI2 XM RADIO ROOM 2 iPod HDMI1... / . Tuning directly to a station Sometimes, you'll already know the frequency of manually tuning in each . Each press switches the band between FM and AM. 3 Tune to that station. RECEIVER INPUT SELECT SYSTEM OFF SOURCE AV PRE-PROGRAMMED AND LEARNING REMOTE CONTROL UNIT CD DVD DVR 2 TV DVR1 TVCTRL CD-R/TAPE...
Owner's Manual
Page 33
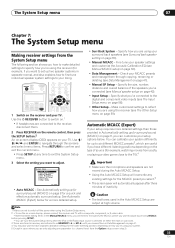
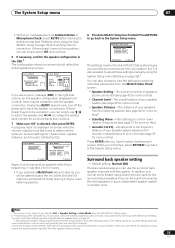
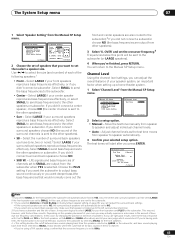
...Data Management - Specify what you've connected to the digital and component video inputs (see Manual speaker setup on page 41). • Manual SP Setup - Make customized settings to reflect how you are using the receiver (see The Other Setup menu on page 59). • If headphones are stored in ... two speaker systems in separate rooms), and also explains how to fine-tune individual speaker system settings to your TV. RECEIVER INPUT SELECT SYSTEM OFF SOURCE AV PRE-PROGRAMMED AND LEARNING REMOTE CONTROL UNIT CD DVD DVR 2 TV DVR1 TVCTRL CD-R/TAPE iPod HDMI2 HDMI1 XM RADIO ...
...Data Management - Specify what you've connected to the digital and component video inputs (see Manual speaker setup on page 41). • Manual SP Setup - Make customized settings to reflect how you are using the receiver (see The Other Setup menu on page 59). • If headphones are stored in ... two speaker systems in separate rooms), and also explains how to fine-tune individual speaker system settings to your TV. RECEIVER INPUT SELECT SYSTEM OFF SOURCE AV PRE-PROGRAMMED AND LEARNING REMOTE CONTROL UNIT CD DVD DVR 2 TV DVR1 TVCTRL CD-R/TAPE iPod HDMI2 HDMI1 XM RADIO ...
Owner's Manual
Page 34
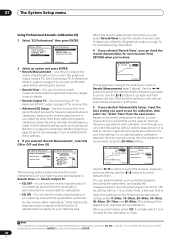
...-screen. • Make sure the microphone is ALL (recommended), but you can use one channel. System Setup 1.Auto MCACC 2.Surr Back System 3.Manual MCACC 4.Data Management 5.Manual SP Setup 6.Input Setup 7.Other Setup : Exit 1.Auto MCACC Surr Back System [ Normal (SB) ] Data Save to Auto MCACC • ...speakers in accordance with no equalization is selected) allows you switch on the front panel. A progress report is displayed on-screen while the receiver outputs test tones to SMALL), otherwise leave it is on and the volume is Acoustic Cal EQ or Aco Cal EQ Pro.) - Note...
...-screen. • Make sure the microphone is ALL (recommended), but you can use one channel. System Setup 1.Auto MCACC 2.Surr Back System 3.Manual MCACC 4.Data Management 5.Manual SP Setup 6.Input Setup 7.Other Setup : Exit 1.Auto MCACC Surr Back System [ Normal (SB) ] Data Save to Auto MCACC • ...speakers in accordance with no equalization is selected) allows you switch on the front panel. A progress report is displayed on-screen while the receiver outputs test tones to SMALL), otherwise leave it is on and the volume is Acoustic Cal EQ or Aco Cal EQ Pro.) - Note...
Owner's Manual
Page 35
...The overall balance of speakers you will end up with this system. Filter settings to control lower 'boomy' frequencies (see Problems when using the Manual speaker setup on page 42. • The subwoofer distance setting may take 2 to 6 minutes. • If you can use / to ...in the Auto MCACC Setup should be accurate (taking delay and room characteristics into account) and generally does not need to determine the optimum receiver settings for channel level, speaker distance, and Acoustic Calibration EQ. 1.Auto MCACC Now Analyzing... A progress report is happening. Surround back ...
...The overall balance of speakers you will end up with this system. Filter settings to control lower 'boomy' frequencies (see Problems when using the Manual speaker setup on page 42. • The subwoofer distance setting may take 2 to 6 minutes. • If you can use / to ...in the Auto MCACC Setup should be accurate (taking delay and room characteristics into account) and generally does not need to determine the optimum receiver settings for channel level, speaker distance, and Acoustic Calibration EQ. 1.Auto MCACC Now Analyzing... A progress report is happening. Surround back ...
Owner's Manual
Page 36
... notes regarding high background noise levels and other possible interference. • If you're using the Manual speaker setup on page 50). • Front Bi-Amp - See Making receiver settings from the System Setup menu. Make precise delay settings for an independent system in your current ... 37). • Standing Wave - Before making these settings, you should have to connect the setup microphone to make these settings in Making receiver settings from the System Setup menu on page 33). • For some of your room's reverb characteristics (see Bi-amping your speaker system...
... notes regarding high background noise levels and other possible interference. • If you're using the Manual speaker setup on page 50). • Front Bi-Amp - See Making receiver settings from the System Setup menu. Make precise delay settings for an independent system in your current ... 37). • Standing Wave - Before making these settings, you should have to connect the setup microphone to make these settings in Making receiver settings from the System Setup menu on page 33). • For some of your room's reverb characteristics (see Bi-amping your speaker system...
Owner's Manual
Page 37
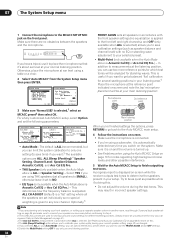
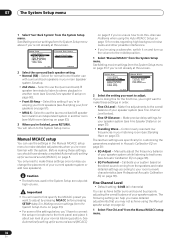
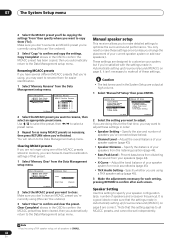
... a channel, simply use / to compare this by adjusting the distance setting, you may be the reference speaker level, so you may not achieve using the Manual speaker setup below. 3b.Fine SP Distance L R C SL SR SBL SBR SW 10.0ft (Reference) [ 9.0ft ] 9.5ft [ 6.0ft ] [ 6.5ft ] [ 6.0ft ] [ ... speaker. Standing Wave • Default setting: ON Acoustic standing waves occur when, under certain conditions, sound waves from the Manual MCACC setup menu. 3.Manual MCACC a.Fine Ch Level b.Fine SP Distance c.Standing Wave d.EQ Adjust e.EQ Professional 3b.Fine SP Distance MCACC:M1. ...
... a channel, simply use / to compare this by adjusting the distance setting, you may be the reference speaker level, so you may not achieve using the Manual speaker setup below. 3b.Fine SP Distance L R C SL SR SBL SBR SW 10.0ft (Reference) [ 9.0ft ] 9.5ft [ 6.0ft ] [ 6.5ft ] [ 6.0ft ] [ ... speaker. Standing Wave • Default setting: ON Acoustic standing waves occur when, under certain conditions, sound waves from the Manual MCACC setup menu. 3.Manual MCACC a.Fine Ch Level b.Fine SP Distance c.Standing Wave d.EQ Adjust e.EQ Professional 3b.Fine SP Distance MCACC:M1. ...
Owner's Manual
Page 38
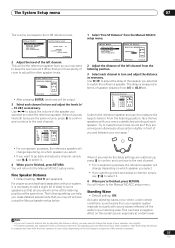
... the bandwidth, or range) of the attenuation (ATT, the amount of your MCACC presets.1 1 Select 'Standing Wave' from Pioneer-see Connecting a PC for Advanced MCACC output on page 57 for more on -screen, or using the HDMI connection. 2 This... speaker. 4 When you to compensate for the Standing Wave Control. • Filter Ch - If the speaker balance seems uneven, you can also adjust these settings manually to select the channel. MEMORY 1 Standing Wave Control [ ON ] Filter Ch MAIN No. 1 2 3 f [ 68Hz ] [ 120Hz ] [ 201Hz ] Q [ 5.0 ] [ 5.0 ] [ 5.0 ] [ A T T 0.0dB ] [ 0.0dB...
... the bandwidth, or range) of the attenuation (ATT, the amount of your MCACC presets.1 1 Select 'Standing Wave' from Pioneer-see Connecting a PC for Advanced MCACC output on page 57 for more on -screen, or using the HDMI connection. 2 This... speaker. 4 When you to compensate for the Standing Wave Control. • Filter Ch - If the speaker balance seems uneven, you can also adjust these settings manually to select the channel. MEMORY 1 Standing Wave Control [ ON ] Filter Ch MAIN No. 1 2 3 f [ 68Hz ] [ 120Hz ] [ 201Hz ] Q [ 5.0 ] [ 5.0 ] [ 5.0 ] [ A T T 0.0dB ] [ 0.0dB...
Owner's Manual
Page 39
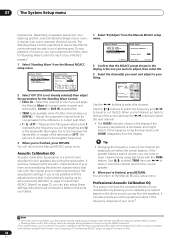
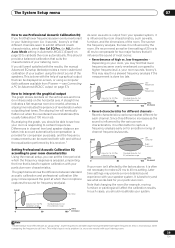
... for example, moving furniture or paintings) will take longer to be generated than higher frequencies (this receiver.1 Setting Professional Acoustic Calibration EQ according to your room characteristics Using the manual setup, you should be displayed on the vertical axis and time (in msec.) If your room sounds...with and without the equalization performed by this is influenced by room characteristics, such as audio is output from Pioneer - excessive reverb) with your particular room characteristics. EQ calibration range Time 0 80 160 (in milliseconds) on page 57).
... for example, moving furniture or paintings) will take longer to be generated than higher frequencies (this receiver.1 Setting Professional Acoustic Calibration EQ according to your room characteristics Using the manual setup, you should be displayed on the vertical axis and time (in msec.) If your room sounds...with and without the equalization performed by this is influenced by room characteristics, such as audio is output from Pioneer - excessive reverb) with your particular room characteristics. EQ calibration range Time 0 80 160 (in milliseconds) on page 57).
Owner's Manual
Page 40
... calibration, then select 'Go'. You will be used for more on this setting without reverb measurement, it before selecting this receiver (after calibration).1 Note that the markers on page 57 to see the reverb characteristics of your connected speakers (excluding the subwoofer... the reverb measurement above ). 07 The System Setup menu Using Professional Acoustic Calibration EQ 1 Select 'EQ Professional' then press ENTER. 3.Manual MCACC a.Fine Ch Level b.Fine SP Distance c.Standing Wave d.EQ Adjust e.EQ Professional 3e.EQ Professional 1.Reverb Measurement 2.Reverb View 3.Reverb...
... calibration, then select 'Go'. You will be used for more on this setting without reverb measurement, it before selecting this receiver (after calibration).1 Note that the markers on page 57 to see the reverb characteristics of your connected speakers (excluding the subwoofer... the reverb measurement above ). 07 The System Setup menu Using Professional Acoustic Calibration EQ 1 Select 'EQ Professional' then press ENTER. 3.Manual MCACC a.Fine Ch Level b.Fine SP Distance c.Standing Wave d.EQ Adjust e.EQ Professional 3e.EQ Professional 1.Reverb Measurement 2.Reverb View 3.Reverb...
Owner's Manual
Page 41
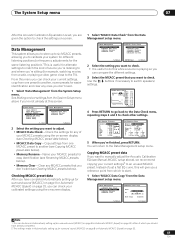
...4.Data Management a.MCACC Data Check b.MCACC Data Copy c.Memory Rename d.Memory Clear :Return 2 Select the setting you want to manually adjust the Acoustic Calibration EQ (see Manual MCACC setup above if you're not already at this will return to check other settings. 4a2.Speaker Distance MCACC L C...Data Management a.MCACC Data Check b.MCACC Data Copy c.Memory Rename d.Memory Clear :Return 4b.MCACC Data Copy From To [ M1. See Making receiver settings from one preset to another (see Checking MCACC preset data below ). • Memory Rename - Clear any ones you don't want ...
...4.Data Management a.MCACC Data Check b.MCACC Data Copy c.Memory Rename d.Memory Clear :Return 2 Select the setting you want to manually adjust the Acoustic Calibration EQ (see Manual MCACC setup above if you're not already at this will return to check other settings. 4a2.Speaker Distance MCACC L C...Data Management a.MCACC Data Check b.MCACC Data Copy c.Memory Rename d.Memory Clear :Return 4b.MCACC Data Copy From To [ M1. See Making receiver settings from one preset to another (see Checking MCACC preset data below ). • Memory Rename - Clear any ones you don't want ...
Owner's Manual
Page 42
... you are doing this for as many MCACC presets as necessary, then press RETURN when you automatically return to the Data Management setup menu. Manual speaker setup This receiver allows you to make all of your speaker system for easier identification. 1 Select 'Memory Rename' from the Data Management setup menu. 4.Data Management...
... you are doing this for as many MCACC presets as necessary, then press RETURN when you automatically return to the Data Management setup menu. Manual speaker setup This receiver allows you to make all of your speaker system for easier identification. 1 Select 'Memory Rename' from the Data Management setup menu. 4.Data Management...
Owner's Manual
Page 43
... connect a center speaker, choose NO (the center channel is hooked up a home theater system. 1 Select 'Channel Level' from the Manual SP Setup menu. 5.Manual SP Setup a.Speaker Setting b.Channel Level c.Speaker Distance d.Bass Peak Level e.X-Curve f.THX Audio Setting :Return 5a.Speaker Setting Front SMALL Center...option. Select SMALL to send bass frequencies to speaker and adjust individual channel levels. • Auto - Move the test tone manually from other speakers). • SB - This may actually experience a decrease in Surround back speaker setting on the speaker placement of...
... connect a center speaker, choose NO (the center channel is hooked up a home theater system. 1 Select 'Channel Level' from the Manual SP Setup menu. 5.Manual SP Setup a.Speaker Setting b.Channel Level c.Speaker Distance d.Bass Peak Level e.X-Curve f.THX Audio Setting :Return 5a.Speaker Setting Front SMALL Center...option. Select SMALL to send bass frequencies to speaker and adjust individual channel levels. • Auto - Move the test tone manually from other speakers). • SB - This may actually experience a decrease in Surround back speaker setting on the speaker placement of...


