Owner's Manual
Page 4
...start Features 6 Checking what's in the box 6 Ventilation 7 Installing the receiver 7 Loading the batteries 7 02 5 minute guide Introduction to home theater 8 Listening to Surround Sound 8 Automatically setting up for buying this Pioneer product. Thank you will know how to operate your system Auto playback 26 ... 24 05 Listening to station presets 32 07 The System Setup menu Making receiver settings from the System Setup menu 33 Automatic MCACC (Expert 33 Surround back speaker setting 35 Manual MCACC setup 36 Fine Channel Level 36 Fine Speaker Distance 37 Standing Wave ...
...start Features 6 Checking what's in the box 6 Ventilation 7 Installing the receiver 7 Loading the batteries 7 02 5 minute guide Introduction to home theater 8 Listening to Surround Sound 8 Automatically setting up for buying this Pioneer product. Thank you will know how to operate your system Auto playback 26 ... 24 05 Listening to station presets 32 07 The System Setup menu Making receiver settings from the System Setup menu 33 Automatic MCACC (Expert 33 Surround back speaker setting 35 Manual MCACC setup 36 Fine Channel Level 36 Fine Speaker Distance 37 Standing Wave ...
Owner's Manual
Page 8
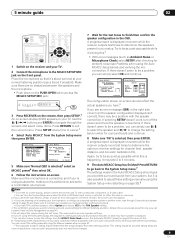
.... Where you place the speakers will overwrite any existing settings for more on your speaker setup, but other sound options you can simply leave the receiver in the default settings. Front Left (L) Subwoofer (SW) Surround Right (SR) Listening position Surround Back Right (SBR) • Using the Auto MCACC Setup will... Front Right (R) • Make sure the microphone and speakers are output at all connections before moving on to Playing a source on page 17. Check the manual that the DVD input is showing in the Auto MCACC Setup are not moved during the Auto MCACC Setup.
.... Where you place the speakers will overwrite any existing settings for more on your speaker setup, but other sound options you can simply leave the receiver in the default settings. Front Left (L) Subwoofer (SW) Surround Right (SR) Listening position Surround Back Right (SBR) • Using the Auto MCACC Setup will... Front Right (R) • Make sure the microphone and speakers are output at all connections before moving on to Playing a source on page 17. Check the manual that the DVD input is showing in the Auto MCACC Setup are not moved during the Auto MCACC Setup.
Owner's Manual
Page 9
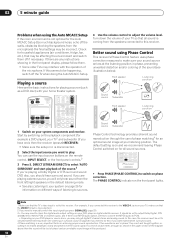
...necessary before continuing to connect your room, sometimes identical speakers with a composite, component, or S-video cable. • You can correct the setting manually using a subwoofer, make sure to step 6. • If you have .6 If you have THX-certified speakers, select Option and choose YES for...on the PUSH OPEN tab to cancel.2 4 Select 'Auto MCACC' from the MCACC Data Check screen. 5 minute guide 02 RECEIVER INPUT SELECT SYSTEM OFF SOURCE AV PRE-PROGRAMMED AND LEARNING REMOTE CONTROL UNIT CD DVD DVR 2 TV DVR1 TVCTRL CD-R/TAPE iPod HDMI2 HDMI1 XM RADIO TUNER ROOM...
...necessary before continuing to connect your room, sometimes identical speakers with a composite, component, or S-video cable. • You can correct the setting manually using a subwoofer, make sure to step 6. • If you have .6 If you have THX-certified speakers, select Option and choose YES for...on the PUSH OPEN tab to cancel.2 4 Select 'Auto MCACC' from the MCACC Data Check screen. 5 minute guide 02 RECEIVER INPUT SELECT SYSTEM OFF SOURCE AV PRE-PROGRAMMED AND LEARNING REMOTE CONTROL UNIT CD DVD DVR 2 TV DVR1 TVCTRL CD-R/TAPE iPod HDMI2 HDMI1 XM RADIO TUNER ROOM...
Owner's Manual
Page 10
... noise, echo off the walls, obstacles blocking the speakers from the speakers connected to this receiver. RECEIVER INPUT SELECT SYSTEM OFF SOURCE GUIDE TV CONTROL TV VOL INPUT SELECT TV CH VOL AV PRE-PROGRAMMED AND LEARNING REMOTE CONTROL UNIT DTV ON/OFF MPX REC DTVINFO MUTE REC STOP ... and trough together, resulting in achieving proper sound reproduction. Note 1 Make sure that the VIDEO 1 input is now selected.) 2 If you need to manually switch the input signal type press SIGNAL SEL (page 29). 3 • You may only get digital 2 channel stereo and analog sound. In this seems...
... noise, echo off the walls, obstacles blocking the speakers from the speakers connected to this receiver. RECEIVER INPUT SELECT SYSTEM OFF SOURCE GUIDE TV CONTROL TV VOL INPUT SELECT TV CH VOL AV PRE-PROGRAMMED AND LEARNING REMOTE CONTROL UNIT DTV ON/OFF MPX REC DTVINFO MUTE REC STOP ... and trough together, resulting in achieving proper sound reproduction. Note 1 Make sure that the VIDEO 1 input is now selected.) 2 If you need to manually switch the input signal type press SIGNAL SEL (page 29). 3 • You may only get digital 2 channel stereo and analog sound. In this seems...
Owner's Manual
Page 14
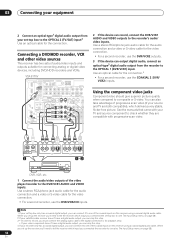
...one of the video player/recorder to composite or S-video. See the manuals that came with progressive-scan video. Note 1 If your set -top box to (see also The Input Setup menu on this receiver using a coaxial digital audio cable. Using the component video jacks Component... video should give superior picture quality when compared to the DVR/VCR1 AUDIO and VIDEO inputs. OPTICAL COAXIAL DIGITAL OUT 3 R AUDIO L VIDEO AV IN S-VIDEO R AUDIO L AV OUT VIDEO S-VIDEO 12...
...one of the video player/recorder to composite or S-video. See the manuals that came with progressive-scan video. Note 1 If your set -top box to (see also The Input Setup menu on this receiver using a coaxial digital audio cable. Using the component video jacks Component... video should give superior picture quality when compared to the DVR/VCR1 AUDIO and VIDEO inputs. OPTICAL COAXIAL DIGITAL OUT 3 R AUDIO L VIDEO AV IN S-VIDEO R AUDIO L AV OUT VIDEO S-VIDEO 12...
Owner's Manual
Page 17
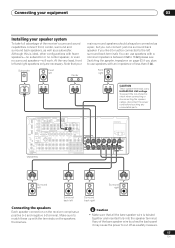
...prevent the risk of electric shock when connecting or disconnecting the speaker cables, disconnect the power cord before touching any of the receiver's surround sound capabilities connect front, center, surround and surround back speakers, as well as a safety measure. 17 En SURROUND...CH IN CENTER VSX-81TXV AC OUTLET SWITCHED 100 W(0.8 A) MAX R SURROUND L SURROUND BACK / B R L (Single) SEE INSTRUCTION MANUAL SELECTABLE Surround left Surround right Surround back left Surround back right Connecting the speakers Each speaker connection on the speakers themselves. Note that all ...
...prevent the risk of electric shock when connecting or disconnecting the speaker cables, disconnect the power cord before touching any of the receiver's surround sound capabilities connect front, center, surround and surround back speakers, as well as a safety measure. 17 En SURROUND...CH IN CENTER VSX-81TXV AC OUTLET SWITCHED 100 W(0.8 A) MAX R SURROUND L SURROUND BACK / B R L (Single) SEE INSTRUCTION MANUAL SELECTABLE Surround left Surround right Surround back left Surround back right Connecting the speakers Each speaker connection on the speakers themselves. Note that all ...
Owner's Manual
Page 29
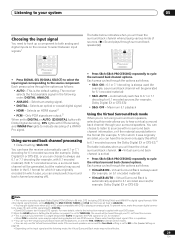
....3 When set the signal input to DIGITAL. • Some DVD players don't output DTS signals. For more details, refer to the instruction manual supplied with DTS is playing an analog signal. Each press cycles through your surround speakers. With 5.1 encoded sources, a surround back channel will be...SHIFT PHASE MCACC S.DIRECT The table below indicates when you will be generated for 5.1 encoded material) • SBch AUTO - The receiver selects the first available signal in Setting the AV options on page 61 is always used (for example, on 5.1 encoded material) • VirtualSB AUTO -
....3 When set the signal input to DIGITAL. • Some DVD players don't output DTS signals. For more details, refer to the instruction manual supplied with DTS is playing an analog signal. Each press cycles through your surround speakers. With 5.1 encoded sources, a surround back channel will be...SHIFT PHASE MCACC S.DIRECT The table below indicates when you will be generated for 5.1 encoded material) • SBch AUTO - The receiver selects the first available signal in Setting the AV options on page 61 is always used (for example, on 5.1 encoded material) • VirtualSB AUTO -
Owner's Manual
Page 31
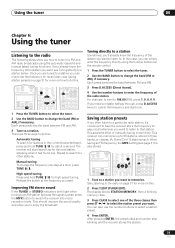
...3 Press CLASS to that station. Saving station presets If you want to listen to select one of 10 stations each time. RECEIVER INPUT SELECT SYSTEM OFF SOURCE AV PRE-PROGRAMMED AND LEARNING REMOTE CONTROL UNIT CD DVD DVR 2 TV DVR1 TVCTRL CD-R/TAPE HDMI2 XM RADIO ROOM 2 iPod HDMI1...) is weak, press the MPX button to 30 stations, stored in each . You can simply enter the frequency directly using the automatic (search) and manual (step) tuning functions. Each press switches the band between FM and AM. 3 Press D.ACCESS (Direct Access). 4 Use the number buttons to enter...
...3 Press CLASS to that station. Saving station presets If you want to listen to select one of 10 stations each time. RECEIVER INPUT SELECT SYSTEM OFF SOURCE AV PRE-PROGRAMMED AND LEARNING REMOTE CONTROL UNIT CD DVD DVR 2 TV DVR1 TVCTRL CD-R/TAPE HDMI2 XM RADIO ROOM 2 iPod HDMI1...) is weak, press the MPX button to 30 stations, stored in each . You can simply enter the frequency directly using the automatic (search) and manual (step) tuning functions. Each press switches the band between FM and AM. 3 Press D.ACCESS (Direct Access). 4 Use the number buttons to enter...
Owner's Manual
Page 33
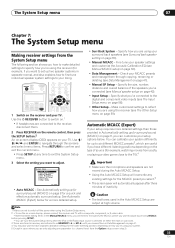
...5.Manual SP Setup 6.Input Setup 7.Other Setup : Exit • Auto MCACC - Caution • The test tones used in the Auto MCACC Setup are useful if you want to confirm and exit the current menu. • Press SETUP at high volume. RECEIVER INPUT SELECT SYSTEM OFF SOURCE AV PRE...MCACC (Expert) below . Specify how you are connected to reflect how you 've connected (see Manual MCACC setup on page 35). • Manual MCACC - Make customized settings to the receiver, disconnect them. 2 Press RECEIVER on the remote control, then press the SETUP button.2 An on-screen display (OSD) appears ...
...5.Manual SP Setup 6.Input Setup 7.Other Setup : Exit • Auto MCACC - Caution • The test tones used in the Auto MCACC Setup are useful if you want to confirm and exit the current menu. • Press SETUP at high volume. RECEIVER INPUT SELECT SYSTEM OFF SOURCE AV PRE...MCACC (Expert) below . Specify how you are connected to reflect how you 've connected (see Manual MCACC setup on page 35). • Manual MCACC - Make customized settings to the receiver, disconnect them. 2 Press RECEIVER on the remote control, then press the SETUP button.2 An on-screen display (OSD) appears ...
Owner's Manual
Page 34
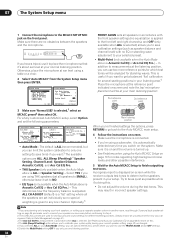
... make sure to connect your speakers as possible while it 's about ear level at the reference point indicated on -screen while the receiver outputs test tones to save time) if you are used for storing surround sound settings for standing waves. This is Acoustic Cal EQ...or Speaker Setting) - In addition to measurements at ear level using THX speakers (set to M2. System Setup 1.Auto MCACC 2.Surr Back System 3.Manual MCACC 4.Data Management 5.Manual SP Setup 6.Input Setup 7.Other Setup : Exit 1.Auto MCACC Surr Back System [ Normal (SB) ] Data Save to Auto MCACC • ...
... make sure to connect your speakers as possible while it 's about ear level at the reference point indicated on -screen while the receiver outputs test tones to save time) if you are used for storing surround sound settings for standing waves. This is Acoustic Cal EQ...or Speaker Setting) - In addition to measurements at ear level using THX speakers (set to M2. System Setup 1.Auto MCACC 2.Surr Back System 3.Manual MCACC 4.Data Management 5.Manual SP Setup 6.Input Setup 7.Other Setup : Exit 1.Auto MCACC Surr Back System [ Normal (SB) ] Data Save to Auto MCACC • ...
Owner's Manual
Page 35
...place the mic at the 2nd and 3rd reference points before finally placing it is only shown if you can correct the setting manually using the Manual speaker setup on -screen should reflect the actual speakers you excellent surround sound from the MCACC Data Check screen: • Speaker...a problem with different size settings. Surround back speaker setting • Default setting: Normal (SB) There are used for more on -screen while the receiver outputs more on this ) • Acoustic Cal EQ - The size and number of your main listening position. 8 The Auto MCACC Setup has finished!...
...place the mic at the 2nd and 3rd reference points before finally placing it is only shown if you can correct the setting manually using the Manual speaker setup on -screen should reflect the actual speakers you excellent surround sound from the MCACC Data Check screen: • Speaker...a problem with different size settings. Surround back speaker setting • Default setting: Normal (SB) There are used for more on -screen while the receiver outputs more on this ) • Acoustic Cal EQ - The size and number of your main listening position. 8 The Auto MCACC Setup has finished!...
Owner's Manual
Page 36
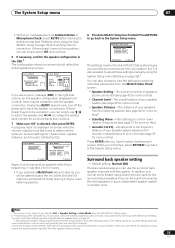
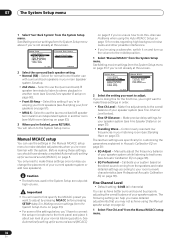
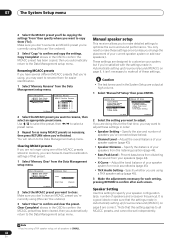
... setting can help you make detailed settings according to your speaker system (see Acoustic Calibration EQ on page 37). • Standing Wave - Manually adjust the frequency balance of your speaker system while listening to test tones (see Fine Speaker Distance on page 38). • EQ Professional ...you 're using the Auto MCACC Setup on page 42. 1 Select 'Fine Ch Level' from the System Setup menu. See Making receiver settings from the System Setup menu. Before making these settings in another room (see Professional Acoustic Calibration EQ on page 33 if you ...
... setting can help you make detailed settings according to your speaker system (see Acoustic Calibration EQ on page 37). • Standing Wave - Manually adjust the frequency balance of your speaker system while listening to test tones (see Fine Speaker Distance on page 38). • EQ Professional ...you 're using the Auto MCACC Setup on page 42. 1 Select 'Fine Ch Level' from the System Setup menu. See Making receiver settings from the System Setup menu. Before making these settings in another room (see Professional Acoustic Calibration EQ on page 33 if you ...
Owner's Manual
Page 39
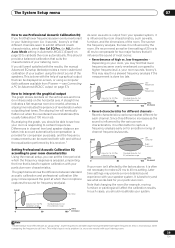
...characteristics of channel frequencies/sounds. The sloping line will affect the calibration results. Level Test tone As soon as audio is output from Pioneer - The sooner the frequency analysis, the less it sounds `boomy'), or that due to be examined both with the help of...Cal. EQ calibration range Time 0 80 160 (in msec.) If your room isn't affected by this receiver.1 Setting Professional Acoustic Calibration EQ according to your room characteristics Using the manual setup, you still aren't satisfied with software available from your speaker system, it is not a problem ...
...characteristics of channel frequencies/sounds. The sloping line will affect the calibration results. Level Test tone As soon as audio is output from Pioneer - The sooner the frequency analysis, the less it sounds `boomy'), or that due to be examined both with the help of...Cal. EQ calibration range Time 0 80 160 (in msec.) If your room isn't affected by this receiver.1 Setting Professional Acoustic Calibration EQ according to your room characteristics Using the manual setup, you still aren't satisfied with software available from your speaker system, it is not a problem ...
Owner's Manual
Page 40
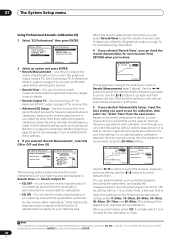
...', you want to measure the reverb characteristics of your listening area. When you want to finish. Use this receiver (after calibration).1 Note that the EQ response may not appear entirely flat due to connect an RS-232C cable before selecting this... 0 80 ( Next) 160ms :Cancel 3e4. 07 The System Setup menu Using Professional Acoustic Calibration EQ 1 Select 'EQ Professional' then press ENTER. 3.Manual MCACC a.Fine Ch Level b.Fine SP Distance c.Standing Wave d.EQ Adjust e.EQ Professional 3e.EQ Professional 1.Reverb Measurement 2.Reverb View 3.Reverb Output PC ...
...', you want to measure the reverb characteristics of your listening area. When you want to finish. Use this receiver (after calibration).1 Note that the EQ response may not appear entirely flat due to connect an RS-232C cable before selecting this... 0 80 ( Next) 160ms :Cancel 3e4. 07 The System Setup menu Using Professional Acoustic Calibration EQ 1 Select 'EQ Professional' then press ENTER. 3.Manual MCACC a.Fine Ch Level b.Fine SP Distance c.Standing Wave d.EQ Adjust e.EQ Professional 3e.EQ Professional 1.Reverb Measurement 2.Reverb View 3.Reverb Output PC ...
Owner's Manual
Page 41
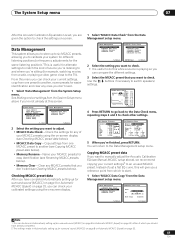
... 8.0ft : 8.0ft : 11.5ft :Return 4a3.Standing Wave MCACC M1. System Setup 1.Auto MCACC 2.Surr Back System 3.Manual MCACC 4.Data Management 5.Manual SP Setup 6.Input Setup 7.Other Setup : Exit 4.Data Management a.MCACC Data Check b.MCACC Data Copy c.Memory Rename d.Memory ...Clear :Return 2 Select the setting you 're finished, press RETURN. MEMORY 1 ] [ M2. Copying MCACC preset data If you want to adjust. • MCACC Data Check - See Making receiver...
... 8.0ft : 8.0ft : 11.5ft :Return 4a3.Standing Wave MCACC M1. System Setup 1.Auto MCACC 2.Surr Back System 3.Manual MCACC 4.Data Management 5.Manual SP Setup 6.Input Setup 7.Other Setup : Exit 4.Data Management a.MCACC Data Check b.MCACC Data Copy c.Memory Rename d.Memory ...Clear :Return 2 Select the setting you 're finished, press RETURN. MEMORY 1 ] [ M2. Copying MCACC preset data If you want to adjust. • MCACC Data Check - See Making receiver...
Owner's Manual
Page 42
...settings of that this setting to confirm and clear the preset. Clearing MCACC presets If you are output at high volume. 1 Select 'Manual SP Setup' then press ENTER. Specify whether you are correct.1 Note that preset. 1 Select 'Memory Clear' from your current speaker...surround sound (MCACC) on page 8 are using a THX speaker setup, set independently. shows in Automatically setting up for each screen. Manual speaker setup This receiver allows you to make all speakers to select a preset name. 3 Repeat for easier identification. 1 Select 'Memory Rename' from the ...
...settings of that this setting to confirm and clear the preset. Clearing MCACC presets If you are output at high volume. 1 Select 'Manual SP Setup' then press ENTER. Specify whether you are correct.1 Note that preset. 1 Select 'Memory Clear' from your current speaker...surround sound (MCACC) on page 8 are using a THX speaker setup, set independently. shows in Automatically setting up for each screen. Manual speaker setup This receiver allows you to make all speakers to select a preset name. 3 Repeat for easier identification. 1 Select 'Memory Rename' from the ...
Owner's Manual
Page 44
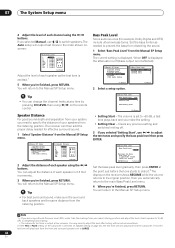
... previous setting and switches limiting off (bass output is output at the point just before the tone starts to distort.2 The display on the receiver shows RESUME while the volume returns to its original position, then you are the same distance from the subwoofer. Bass Peak Level Some audio...= no sound) ENTER:Finish :Cancel Set the bass peak level gradually, then press ENTER at low volumes. You may need to the Manual SP Setup menu. The receiver can adjust the distance of each speaker in Speaker Setting on page 42), the test tone will return to switch speakers. Clears any...
... previous setting and switches limiting off (bass output is output at the point just before the tone starts to distort.2 The display on the receiver shows RESUME while the volume returns to its original position, then you are the same distance from the subwoofer. Bass Peak Level Some audio...= no sound) ENTER:Finish :Cancel Set the bass peak level gradually, then press ENTER at low volumes. You may need to the Manual SP Setup menu. The receiver can adjust the distance of each speaker in Speaker Setting on page 42), the test tone will return to switch speakers. Clears any...
Owner's Manual
Page 46
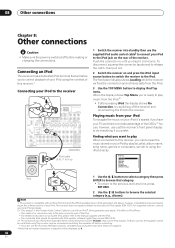
... the Pioneer Audio Control Cable for connection only to the dock connector port of the iPod. • For detailed instructions on using the iPod, please refer to the manual supplied with the iPod. • The connected iPod should be inoperable when connected to this receiver, and...iPod and XM Radio functions simultaneously using the iPod directly. Connecting an iPod This receiver has a dedicated iPod terminal that non-roman characters in playlists will be controlled using this receiver (Pioneer shows in until you prefer. Features such as the equalizer cannot be displayed as ...
... the Pioneer Audio Control Cable for connection only to the dock connector port of the iPod. • For detailed instructions on using the iPod, please refer to the manual supplied with the iPod. • The connected iPod should be inoperable when connected to this receiver, and...iPod and XM Radio functions simultaneously using the iPod directly. Connecting an iPod This receiver has a dedicated iPod terminal that non-roman characters in playlists will be controlled using this receiver (Pioneer shows in until you prefer. Features such as the equalizer cannot be displayed as ...
Owner's Manual
Page 53
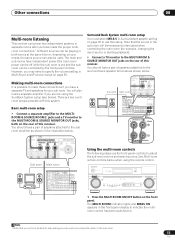
...R R R FRONT SUB SUR- SURROUND WOOFER ROUND BACK MULTI CH IN SEE INSTRUCTION MANUAL SELECTABLE Using the multi-room controls The following steps use this setup. STANDBY/ON PHASE CONTROL AUDIO/VIDEO MULTI-CHANNEL RECEIVER VSX-81TXV MULTI ROOM LISTENING ON/OFF CONTROL MODE DVD / LD TV/ SAT DVR...systems in separate rooms after you have made the proper multiroom connections.1 Different sources can be playing in both on the rear of this receiver. However, you are two multiroom setups possible with this system: Basic multi-room setup • Connect a separate amplifier to the ...
...R R R FRONT SUB SUR- SURROUND WOOFER ROUND BACK MULTI CH IN SEE INSTRUCTION MANUAL SELECTABLE Using the multi-room controls The following steps use this setup. STANDBY/ON PHASE CONTROL AUDIO/VIDEO MULTI-CHANNEL RECEIVER VSX-81TXV MULTI ROOM LISTENING ON/OFF CONTROL MODE DVD / LD TV/ SAT DVR...systems in separate rooms after you have made the proper multiroom connections.1 Different sources can be playing in both on the rear of this receiver. However, you are two multiroom setups possible with this system: Basic multi-room setup • Connect a separate amplifier to the ...
Owner's Manual
Page 54
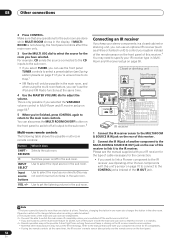
... controls affect the main room only. 3 Use the MULTI JOG dial to the IR receiver, see the manual supplied with your IR receiver type in the display. If MULTIROOM is shining on the IR receiver remote sensor window. • Note that any operations for IR compatibility. • If...a Niles or Xantech unit) to control your system instead of the remote sensor on the front panel to the IR receiver. Closet or shelving unit Non-Pioneer IR component IN CONTROL Pioneer component MULTI-ROOM & SOURCE ROOM 2(ZONE 2) OUT IR IN ANTENNINA OUT IN 1 DIGITAL OPTICAL MULTI-ROOM & SOURCE...
... controls affect the main room only. 3 Use the MULTI JOG dial to the IR receiver, see the manual supplied with your IR receiver type in the display. If MULTIROOM is shining on the IR receiver remote sensor window. • Note that any operations for IR compatibility. • If...a Niles or Xantech unit) to control your system instead of the remote sensor on the front panel to the IR receiver. Closet or shelving unit Non-Pioneer IR component IN CONTROL Pioneer component MULTI-ROOM & SOURCE ROOM 2(ZONE 2) OUT IR IN ANTENNINA OUT IN 1 DIGITAL OPTICAL MULTI-ROOM & SOURCE...


