Owner's Manual
Page 5
... Connecting a component to the front panel inputs . . . 38 Connecting an iPod 38 Connecting a USB device 39 Plugging in the receiver 39 02 Controls and displays Remote control 10 Front panel 12 Display 13 04 Basic Setup Switching the speaker impedance 40 Changing the OSD display language (OSD Language 40 03 Connecting your equipment Rear panel 15 Determining the speakers' application 17 Other speaker connection 17 Placing the speakers 18 Automatically setting up for surround sound (Auto MCACC 41 Problems when using the Auto MCACC Setup . . . . 43 The Input Setup menu...
... Connecting a component to the front panel inputs . . . 38 Connecting an iPod 38 Connecting a USB device 39 Plugging in the receiver 39 02 Controls and displays Remote control 10 Front panel 12 Display 13 04 Basic Setup Switching the speaker impedance 40 Changing the OSD display language (OSD Language 40 03 Connecting your equipment Rear panel 15 Determining the speakers' application 17 Other speaker connection 17 Placing the speakers 18 Automatically setting up for surround sound (Auto MCACC 41 Problems when using the Auto MCACC Setup . . . . 43 The Input Setup menu...
Owner's Manual
Page 10
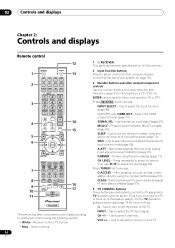
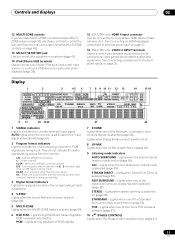
... Controls and displays Chapter 2: Controls and displays Remote control 12 1 RECEIVER This switches between standby and on a CD, DVD, etc. RECEIVER 1 SOURCE DVD BD DVR HDMI 13 2 Input function buttons Press to select control of an analog input signal to directly select a radio frequency (page 51) or the tracks on for more on your system on /off the power of the TV. CH LEVEL - Use to turn on page 73). 2 3 4 5 6 7 8 9 10 11 TV CD CD-R VIDEO iPod USB TUNER XM...
... Controls and displays Chapter 2: Controls and displays Remote control 12 1 RECEIVER This switches between standby and on a CD, DVD, etc. RECEIVER 1 SOURCE DVD BD DVR HDMI 13 2 Input function buttons Press to select control of an analog input signal to directly select a radio frequency (page 51) or the tracks on for more on your system on /off the power of the TV. CH LEVEL - Use to turn on page 73). 2 3 4 5 6 7 8 9 10 11 TV CD CD-R VIDEO iPod USB TUNER XM...
Owner's Manual
Page 11
...). 6 TUNE/PRESET) /ENTER Use the arrow buttons when setting up surround sound. Press to access the Video options (page 68). Use to check selected receiver settings (page 71). If the signal is sent from the remote control (page 73). 13 SOURCE Press to the receiver (see page 77) and the Audio or Video options (page 66 or 68). STEREO - ADV SURR - PHASE CTRL - HOME MENU - Switches between the various surround modes (page...
...). 6 TUNE/PRESET) /ENTER Use the arrow buttons when setting up surround sound. Press to access the Video options (page 68). Use to check selected receiver settings (page 71). If the signal is sent from the remote control (page 73). 13 SOURCE Press to the receiver (see page 77) and the Audio or Video options (page 66 or 68). STEREO - ADV SURR - PHASE CTRL - HOME MENU - Switches between the various surround modes (page...

Owner's Manual
Page 12
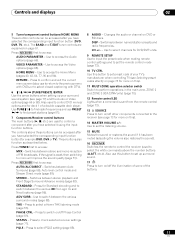
...Lights to change the speaker system (page 69). 12 En Lights when the PQLS feature is in the AUDIO PARAMETER menu (page 66). HOME THX - STEREO - Blinks when connecting an HDMIequipped component; 02 Controls and displays Front panel 1 2 3 4 5 67 STANDBY/ON INPUT SELECTOR BAND TUNE TUNE PHASE CONTROL ADVANCED MCACC PQLS HDMI ENTER PRESET PRESET TUNER EDIT AUTO SURR/ALC/ STREAM DIRECT STEREO ADVANCED SURROUND STANDARD SURROUND HOME THX SPEAKERS MULTI-ZONE CONTROL ON / OFF 8 VSX-23TXH MASTER VOLUME PHONES MCACC SETUP MIC iPod iPhone USB VIDEO...
...Lights to change the speaker system (page 69). 12 En Lights when the PQLS feature is in the AUDIO PARAMETER menu (page 66). HOME THX - STEREO - Blinks when connecting an HDMIequipped component; 02 Controls and displays Front panel 1 2 3 4 5 67 STANDBY/ON INPUT SELECTOR BAND TUNE TUNE PHASE CONTROL ADVANCED MCACC PQLS HDMI ENTER PRESET PRESET TUNER EDIT AUTO SURR/ALC/ STREAM DIRECT STEREO ADVANCED SURROUND STANDARD SURROUND HOME THX SPEAKERS MULTI-ZONE CONTROL ON / OFF 8 VSX-23TXH MASTER VOLUME PHONES MCACC SETUP MIC iPod iPhone USB VIDEO...
Owner's Manual
Page 13
... Using the MULTI-ZONE controls on page 69). 13 MCACC SETUP MIC jack Use to connect the supplied microphone (page 41). 14 iPod/iPhone/USB terminals Use to connect your Apple iPod as an audio and video source, or connect a USB device for audio and photo playback (page 38). 15 VSX-23TXH only: HDMI 4 input connector Use for connection to connect your portable equipment such as camcorders, video games and portable audio/video equipment. AUTO lights when the receiver is switched on (page 56). Center channel...
... Using the MULTI-ZONE controls on page 69). 13 MCACC SETUP MIC jack Use to connect the supplied microphone (page 41). 14 iPod/iPhone/USB terminals Use to connect your Apple iPod as an audio and video source, or connect a USB device for audio and photo playback (page 38). 15 VSX-23TXH only: HDMI 4 input connector Use for connection to connect your portable equipment such as camcorders, video games and portable audio/video equipment. AUTO lights when the receiver is switched on (page 56). Center channel...

Owner's Manual
Page 16
... Radio input See Connecting a SiriusConnect™ tuner on page 32. 6 Component video connectors (x3) Use the inputs to audio sources such as a DVD player. See Connecting your TV with multichannel analog outputs. See Connecting the multichannel analog inputs on page 29. 12 Multichannel pre-amplifier outputs Use to connect separate amplifiers for front, center, surround, surround back and subwoofer channels. See Connecting additional amplifiers on page 30 (see also Installing your speaker system on page 20 for powered subwoofer connection). 13...
... Radio input See Connecting a SiriusConnect™ tuner on page 32. 6 Component video connectors (x3) Use the inputs to audio sources such as a DVD player. See Connecting your TV with multichannel analog outputs. See Connecting the multichannel analog inputs on page 29. 12 Multichannel pre-amplifier outputs Use to connect separate amplifiers for front, center, surround, surround back and subwoofer channels. See Connecting additional amplifiers on page 30 (see also Installing your speaker system on page 20 for powered subwoofer connection). 13...

Owner's Manual
Page 43
... possible settings on the receiver and your component. RECEIVER SOURCE DVD BD DVR HDMI TV CD CD-R VIDEO iPod USB TUNER XM SIRIUS AUDIO PARAMETER LIST VIDEO PARAMETER TUNE TOOLS TOP MENU BAND T.EDIT GUIDE PRESET ENTER PRESET CATEGORY HOME MENU TUNE iPod CTRL RETURN ANT MPX PQLS MEMORY AUDIO INFO CH DISP TV CTRL RECEIVER REMOTE SETUP ZONE 2 ZONE 3 MAIN 1 Switch on page 44). There are any instructions showing in the Input Setup menu if you didn't hook up . You will need to make settings in the front panel display...
... possible settings on the receiver and your component. RECEIVER SOURCE DVD BD DVR HDMI TV CD CD-R VIDEO iPod USB TUNER XM SIRIUS AUDIO PARAMETER LIST VIDEO PARAMETER TUNE TOOLS TOP MENU BAND T.EDIT GUIDE PRESET ENTER PRESET CATEGORY HOME MENU TUNE iPod CTRL RETURN ANT MPX PQLS MEMORY AUDIO INFO CH DISP TV CTRL RECEIVER REMOTE SETUP ZONE 2 ZONE 3 MAIN 1 Switch on page 44). There are any instructions showing in the Input Setup menu if you didn't hook up . You will need to make settings in the front panel display...

Owner's Manual
Page 45
... HDMI connection • Use INPUT SELECT to select the HDMI input you want multichannel surround sound. 45 En Note that the VIDEO input is displayed when playing DTS 5.1-channel signals. It is being performed properly. RECEIVER SOURCE DVD BD DVR HDMI AUTO/ALC/ MENU DIRECT STEREO STANDARD ADV SURR HDD DVD THX PHASE CTRL STATUS TV CD CD-R VIDEO ANT MPX PQLS MEMORY iPod USB TUNER XM SIRIUS INPUT SELECT 12 HDMI OUT 3 AUDIO INFO CH DISP TV CTRL RECEIVER REMOTE SETUP 1 Switch on the remote control, INPUT...
... HDMI connection • Use INPUT SELECT to select the HDMI input you want multichannel surround sound. 45 En Note that the VIDEO input is displayed when playing DTS 5.1-channel signals. It is being performed properly. RECEIVER SOURCE DVD BD DVR HDMI AUTO/ALC/ MENU DIRECT STEREO STANDARD ADV SURR HDD DVD THX PHASE CTRL STATUS TV CD CD-R VIDEO ANT MPX PQLS MEMORY iPod USB TUNER XM SIRIUS INPUT SELECT 12 HDMI OUT 3 AUDIO INFO CH DISP TV CTRL RECEIVER REMOTE SETUP 1 Switch on the remote control, INPUT...

Owner's Manual
Page 46
.... For details, see Multi Channel Input Setup on the remote control to switch the receiver to the iPod/USB. To display video clips, switch iPod operation to the iPod (see Multi Channel Input Setup on the software version of your iPod by 10 dB in the Multi Ch In Setup in the front panel display of this receiver are licensed for reproduction of non-copyrighted materials or materials the user is legally permitted to...
.... For details, see Multi Channel Input Setup on the remote control to switch the receiver to the iPod/USB. To display video clips, switch iPod operation to the iPod (see Multi Channel Input Setup on the software version of your iPod by 10 dB in the Multi Ch In Setup in the front panel display of this receiver are licensed for reproduction of non-copyrighted materials or materials the user is legally permitted to...

Owner's Manual
Page 60
... input signal and listening mode. 60 En PHONES PUSH OPEN 1 Switch the receiver into standby. 2 While holding down ENTER on page 18. The display shows RESET NO . Virtual Surround Back is always used (for example, Dolby Digital EX or DTS-ES) • VirtualSB OFF - The Up Mix function mixes the sound of the speakers and the sound source, in the 7.1-channel surround system are on and the SB setting...
... input signal and listening mode. 60 En PHONES PUSH OPEN 1 Switch the receiver into standby. 2 While holding down ENTER on page 18. The display shows RESET NO . Virtual Surround Back is always used (for example, Dolby Digital EX or DTS-ES) • VirtualSB OFF - The Up Mix function mixes the sound of the speakers and the sound source, in the 7.1-channel surround system are on and the SB setting...

Owner's Manual
Page 64
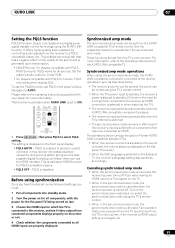
AUDIO PARAMETER LIST VIDEO PARAMETER TUNE TOOLS TOP MENU BAND T.EDIT GUIDE PRESET ENTER PRESET CATEGORY HOME MENU TUNE iPod CTRL RETURN ANT MPX PQLS MEMORY AUDIO INFO CH DISP TV CTRL RECEIVER REMOTE SETUP ZONE 2 ZONE 3 MAIN 1 Press RECEIVER , then press Home Menu. 2 Select 'System Setup', then press ENTER. 3 Select 'Other Setup', then press ENTER. 4d.Other Setup A/V RECEIVER 1. Power ON Level Setup 5. When using the KURO LINK function, the audio and video output from the HDMI connection are not output. 5 Select the 'Display Power Off' setting you 're...
AUDIO PARAMETER LIST VIDEO PARAMETER TUNE TOOLS TOP MENU BAND T.EDIT GUIDE PRESET ENTER PRESET CATEGORY HOME MENU TUNE iPod CTRL RETURN ANT MPX PQLS MEMORY AUDIO INFO CH DISP TV CTRL RECEIVER REMOTE SETUP ZONE 2 ZONE 3 MAIN 1 Press RECEIVER , then press Home Menu. 2 Select 'System Setup', then press ENTER. 3 Select 'Other Setup', then press ENTER. 4d.Other Setup A/V RECEIVER 1. Power ON Level Setup 5. When using the KURO LINK function, the audio and video output from the HDMI connection are not output. 5 Select the 'Display Power Off' setting you 're...
Owner's Manual
Page 65
.... Synchronized amp mode operations When using the synchronized amp mode, the KURO LINK-compatible component connected to a component other than one connected by controlling audio signals from the TV's menu screen, if the receiver's HDMI output setting is changed, etc. 65 En THX PHASE CTRL STATUS ANT MPX PQLS MEMORY AUDIO INFO CH DISP TV CTRL RECEIVER REMOTE SETUP ZONE 2 ZONE 3 MAIN • Press RECEIVER , then press PQLS to Linear PCM. • On players compatible with the power for all sources. This...
.... Synchronized amp mode operations When using the synchronized amp mode, the KURO LINK-compatible component connected to a component other than one connected by controlling audio signals from the TV's menu screen, if the receiver's HDMI output setting is changed, etc. 65 En THX PHASE CTRL STATUS ANT MPX PQLS MEMORY AUDIO INFO CH DISP TV CTRL RECEIVER REMOTE SETUP ZONE 2 ZONE 3 MAIN • Press RECEIVER , then press PQLS to Linear PCM. • On players compatible with the power for all sources. This...
Owner's Manual
Page 70
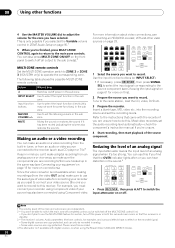
... the video OUT jacks) make sure to adjust the volume for connecting your recorder as a CD player or TV).3 Keep in the same way (see Connecting your equipment on page 15 for more on connections). DVD BD DVR HDMI ANT MPX PQLS MEMORY TV CD CD-R VIDEO iPod USB TUNER XM SIRIUS AUDIO INFO CH DISP TV CTRL RECEIVER INPUT SELECT 12 SIGNAL SEL MCACC 45 HDMI OUT 3 SLEEP 6 REMOTE SETUP ZONE 2 ZONE 3 MAIN 1 Select the source...
... the video OUT jacks) make sure to adjust the volume for connecting your recorder as a CD player or TV).3 Keep in the same way (see Connecting your equipment on page 15 for more on connections). DVD BD DVR HDMI ANT MPX PQLS MEMORY TV CD CD-R VIDEO iPod USB TUNER XM SIRIUS AUDIO INFO CH DISP TV CTRL RECEIVER INPUT SELECT 12 SIGNAL SEL MCACC 45 HDMI OUT 3 SLEEP 6 REMOTE SETUP ZONE 2 ZONE 3 MAIN 1 Select the source...

Owner's Manual
Page 71
... the front panel display. The HDMI OUT1 terminal is pressed.2 Checking your system settings Use the status display screen to check your current settings for features such as surround back channel processing and your current MCACC preset. The output switches among HDMI OUT ALL, HDMI OUT 1 and HDMI OUT 2 each : Input Source ↓ Sampling Frequency ↓ Surround Back channel Processing ↓ MCACC preset ↓ ZONE 2 input ↓ ZONE 3 input (VSX-23TXH only) ↓ KURO LINK ↓ HDMI OUT...
... the front panel display. The HDMI OUT1 terminal is pressed.2 Checking your system settings Use the status display screen to check your current settings for features such as surround back channel processing and your current MCACC preset. The output switches among HDMI OUT ALL, HDMI OUT 1 and HDMI OUT 2 each : Input Source ↓ Sampling Frequency ↓ Surround Back channel Processing ↓ MCACC preset ↓ ZONE 2 input ↓ ZONE 3 input (VSX-23TXH only) ↓ KURO LINK ↓ HDMI OUT...

Owner's Manual
Page 81
... finished, press RETURN. You can achieve better surround sound by pressing MCACC before you might want to go back and adjust a channel, simply use / to this screen. 1.Advanced MCACC A/V RECEIVER a. The volume increases to display the HOME MENU before pressing HOME MENU (step 2 in order. • Fine Channel Level - Make precise delay settings for the first time, you connect the microphone to select it about ear...
... finished, press RETURN. You can achieve better surround sound by pressing MCACC before you might want to go back and adjust a channel, simply use / to this screen. 1.Advanced MCACC A/V RECEIVER a. The volume increases to display the HOME MENU before pressing HOME MENU (step 2 in order. • Fine Channel Level - Make precise delay settings for the first time, you connect the microphone to select it about ear...

Owner's Manual
Page 99
... a problem with surround back channel processing set to SBch Auto, there will be no flag to indicate 6.1 compatibility, then with the receiver's power unit. Display blinks 12V TRG ERR. • An error has arisen in a well-ventilated place before switching back on. Do not try setting it 's connected to the left channel speaker terminal. power turns off . Reconnect accurately then turn on. input function is selected. • Make sure the correct input...
... a problem with surround back channel processing set to SBch Auto, there will be no flag to indicate 6.1 compatibility, then with the receiver's power unit. Display blinks 12V TRG ERR. • An error has arisen in a well-ventilated place before switching back on. Do not try setting it 's connected to the left channel speaker terminal. power turns off . Reconnect accurately then turn on. input function is selected. • Make sure the correct input...

Owner's Manual
Page 101
... setting up the surround sound manually (page 90). • When using the same type of your component or display doesn't work, try switching Digital Video Conversion (in Setting the Video options on page 68), you must connect your TV is correct for components connected using the same type of the subwoofer. Check that the same type of the source component (see The Input Setup menu on page 43). • Check the video output settings of the source component...
... setting up the surround sound manually (page 90). • When using the same type of your component or display doesn't work, try switching Digital Video Conversion (in Setting the Video options on page 68), you must connect your TV is correct for components connected using the same type of the subwoofer. Check that the same type of the source component (see The Input Setup menu on page 43). • Check the video output settings of the source component...

Owner's Manual
Page 102
... Auto MCACC menu in the room and use the ALL (Keep SP System) option for analysis may not contain 5.1/6.1 channel material. Change the speaker setting manually in the graphical output following calibration does not appear entirely flat. • There are several audio tracks on page 91, and use Auto MCACC Setup again. Professional Calibration EQ graphical output Symptom Remedy The EQ response displayed in Speaker Setting on the disc, the Dolby Digital...
... Auto MCACC menu in the room and use the ALL (Keep SP System) option for analysis may not contain 5.1/6.1 channel material. Change the speaker setting manually in the graphical output following calibration does not appear entirely flat. • There are several audio tracks on page 91, and use Auto MCACC Setup again. Professional Calibration EQ graphical output Symptom Remedy The EQ response displayed in Speaker Setting on the disc, the Dolby Digital...

Owner's Manual
Page 103
... audio output settings of the source component. 103 En automatically and some indicator flashes, or some indicator flashes and the power does not turn on the compatible. In this receiver to a component or TV with the system remote. Remedy • Set a 5-digit preset code corresponding to the receiver to be operated in the remote control (see Operating multiple receivers on page 73). • Check whether the receiver's remote control mode is properly set (see Remote Control Mode Setup on page 96). • Try replacing...
... audio output settings of the source component. 103 En automatically and some indicator flashes, or some indicator flashes and the power does not turn on the compatible. In this receiver to a component or TV with the system remote. Remedy • Set a 5-digit preset code corresponding to the receiver to be operated in the remote control (see Operating multiple receivers on page 73). • Check whether the receiver's remote control mode is properly set (see Remote Control Mode Setup on page 96). • Try replacing...

Owner's Manual
Page 104
... displaying video, this is not a malfunction. • Check the HDMI connections. • The cable may also depend on first the TV's power, then this receiver (from the connected display unit (for example audio output is compatible with the manufacturer for sending audio to connect the video output of the following configurations when connecting up. Amp-linked operation not possible using an HDMI cable. Switch off the video converter and reconnect the source and display device using a different type of connection (component, S-Video...
... displaying video, this is not a malfunction. • Check the HDMI connections. • The cable may also depend on first the TV's power, then this receiver (from the connected display unit (for example audio output is compatible with the manufacturer for sending audio to connect the video output of the following configurations when connecting up. Amp-linked operation not possible using an HDMI cable. Switch off the video converter and reconnect the source and display device using a different type of connection (component, S-Video...


