
Owner's Manual
Page 2
...BLADE EXPOSURE. These limits are designed to provide reasonable protection against harmful interference in the literature accompanying the appliance. If this fine Pioneer product. Increase the separation between the equipment and receiver. - IMPORTANT NOTICE The serial number for a Class B digital device, ...pursuant to Part 15 of the FCC Rules. THE POWER SWITCH IS SECONDARY CONNECTED AND THEREFORE DOES NOT SEPARATE THE UNIT FROM MAINS POWER IN STANDBY POSITION. ATTENTION: POUR PREVENIR LES CHOCS ELECTRIQUES NE PAS UTILISER CETTE FICHE POLARISEE ...
...BLADE EXPOSURE. These limits are designed to provide reasonable protection against harmful interference in the literature accompanying the appliance. If this fine Pioneer product. Increase the separation between the equipment and receiver. - IMPORTANT NOTICE The serial number for a Class B digital device, ...pursuant to Part 15 of the FCC Rules. THE POWER SWITCH IS SECONDARY CONNECTED AND THEREFORE DOES NOT SEPARATE THE UNIT FROM MAINS POWER IN STANDBY POSITION. ATTENTION: POUR PREVENIR LES CHOCS ELECTRIQUES NE PAS UTILISER CETTE FICHE POLARISEE ...
Owner's Manual
Page 3
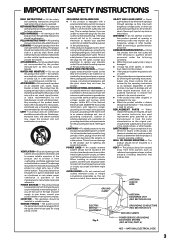
...Figure A. An outside antenna system should be located in wire to an antenna discharge unit, size of grounding conductors, location of power supply to grounding electrodes, and requirements for the grounding electrode. When installing an outside antenna or cable system is operated. OVERLOADING ...force, and uneven surfaces may touch dangerous voltage points or short-out parts that produce heat. This product should be read before cleaning. POWER SOURCES - If you to qualified service personnel. LOCATION - GROUNDING OR POLARIZATION ÷ If this indicates a need for example, near a...
...Figure A. An outside antenna system should be located in wire to an antenna discharge unit, size of grounding conductors, location of power supply to grounding electrodes, and requirements for the grounding electrode. When installing an outside antenna or cable system is operated. OVERLOADING ...force, and uneven surfaces may touch dangerous voltage points or short-out parts that produce heat. This product should be read before cleaning. POWER SOURCES - If you to qualified service personnel. LOCATION - GROUNDING OR POLARIZATION ÷ If this indicates a need for example, near a...
Owner's Manual
Page 4
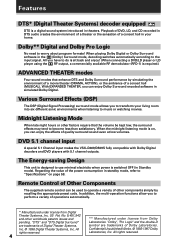
...MUSICAL). When the midnight listening mode is on page 58. "Dolby", "Pro Logic" and the double-D symbol are trademarks of the power consumption in your living room into six different sonic environments when listening to "Specifications" on , you to operate a variety of other...When playing Dolby Digital or Dolby Surround software in simulated Dolby Digital. DVD 5.1 channel input A special 5.1 Channel input makes the VSX-D409/D509S fully compatible with Dolby Digital decoders and DVD players with 5.1 channel outputs. All rights reserved. 4 ** Manufactured under license from Dolby...
...MUSICAL). When the midnight listening mode is on page 58. "Dolby", "Pro Logic" and the double-D symbol are trademarks of the power consumption in your living room into six different sonic environments when listening to "Specifications" on , you to operate a variety of other...When playing Dolby Digital or Dolby Surround software in simulated Dolby Digital. DVD 5.1 channel input A special 5.1 Channel input makes the VSX-D409/D509S fully compatible with Dolby Digital decoders and DVD players with 5.1 channel outputs. All rights reserved. 4 ** Manufactured under license from Dolby...

Owner's Manual
Page 8
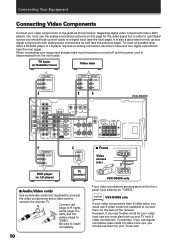
... that for more on digital connections. To use these analog connections. NOTE • Only the VSX-D509S has S-video jacks and optical digital out jack. • The arrows indicate the direction of stereo plugs (two plugs). VSX-D509S IN AM LOOP ANTENNA IN O U T IN AUX CD VCR / DVR IN CONTROL OUT... or Cassette deck 7 Audio cords Use audio cords (not supplied) to analog audio jacks. When connecting your equipment, always make sure the power is turned off and the power cord is caused by leakage flux from the receiver. 8 R L Connect red plugs to R (right) and white plugs to the jacks...
... that for more on digital connections. To use these analog connections. NOTE • Only the VSX-D509S has S-video jacks and optical digital out jack. • The arrows indicate the direction of stereo plugs (two plugs). VSX-D509S IN AM LOOP ANTENNA IN O U T IN AUX CD VCR / DVR IN CONTROL OUT... or Cassette deck 7 Audio cords Use audio cords (not supplied) to analog audio jacks. When connecting your equipment, always make sure the power is turned off and the power cord is caused by leakage flux from the receiver. 8 R L Connect red plugs to R (right) and white plugs to the jacks...
Owner's Manual
Page 9
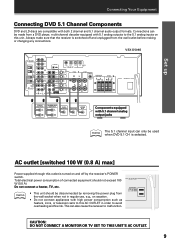
... THIS UNIT'S AC OUTLET. 9 VSX-D509S IN AM LOOP ANTENNA IN O U T IN AUX CD VCR / DVR IN CONTROL OUT OUT IN IN FM UNBAL 75Ω FM ANTENNA R E C P L A Y R TV / SAT IN DVD / LD IN TO MONTOR TV SUB WOOFER PREOUT OUT R CD - AC outlet [switched 100 W (0.8 A) max] Power supplied through this outlet is...
... THIS UNIT'S AC OUTLET. 9 VSX-D509S IN AM LOOP ANTENNA IN O U T IN AUX CD VCR / DVR IN CONTROL OUT OUT IN IN FM UNBAL 75Ω FM ANTENNA R E C P L A Y R TV / SAT IN DVD / LD IN TO MONTOR TV SUB WOOFER PREOUT OUT R CD - AC outlet [switched 100 W (0.8 A) max] Power supplied through this outlet is...
Owner's Manual
Page 10
... this page for your video components to insert completely. 10 7 Front Video camera (etc.) S-VIDEO VIDEO INPUT VIDEO L AUDIO R VIDEO INPUT V L R VSX-D509S only Front video connections are accessed via the front panel input selector as "VIDEO." Conversely, if you should hook up their audio to hook up...connect them for the video signal but in order to use the analog connections pictured on the back of the receiver. memo VSX-D509S only If your equipment always make sure the power is turned off and the power cord is also a good idea to a digital input (see the next page).
... this page for your video components to insert completely. 10 7 Front Video camera (etc.) S-VIDEO VIDEO INPUT VIDEO L AUDIO R VIDEO INPUT V L R VSX-D509S only Front video connections are accessed via the front panel input selector as "VIDEO." Conversely, if you should hook up their audio to hook up...connect them for the video signal but in order to use the analog connections pictured on the back of the receiver. memo VSX-D509S only If your equipment always make sure the power is turned off and the power cord is also a good idea to a digital input (see the next page).
Owner's Manual
Page 11
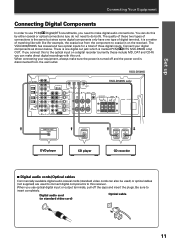
Connect your equipment, always make sure the power is marked PCM/2/DTS (VSX-D509S only) OUT. When connecting your digital components as shown below. Set up Connecting Your Equipment Connecting Digital Components In order to use optical digital input or output terminals, pull off and the power cord is a matter of three digital inputs. Digital...
Connect your equipment, always make sure the power is marked PCM/2/DTS (VSX-D509S only) OUT. When connecting your digital components as shown below. Set up Connecting Your Equipment Connecting Digital Components In order to use optical digital input or output terminals, pull off and the power cord is a matter of three digital inputs. Digital...
Owner's Manual
Page 14
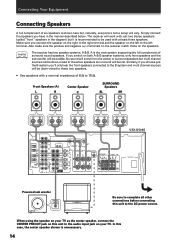
... TV S OUT VCR / DVR S IN A FRONT SPEAKERS RL CENTER SPEAKERS CENTER PREOUT S TV / IN SAT S IN DVD / LD SURROUND SPEAKERS RL B FRONT SPEAKERS RL VSX-D509S AC OUTLET Powered sub woofer INPUT Be sure to be down -mixed to these two speakers. • Use speakers with at least three speakers. A is shown here... OUT R CD - Connecting Your Equipment Connecting Speakers A full complement of six speakers is the main system supporting the full complement of 8 Ω to the AC power source.
... TV S OUT VCR / DVR S IN A FRONT SPEAKERS RL CENTER SPEAKERS CENTER PREOUT S TV / IN SAT S IN DVD / LD SURROUND SPEAKERS RL B FRONT SPEAKERS RL VSX-D509S AC OUTLET Powered sub woofer INPUT Be sure to be down -mixed to these two speakers. • Use speakers with at least three speakers. A is shown here... OUT R CD - Connecting Your Equipment Connecting Speakers A full complement of six speakers is the main system supporting the full complement of 8 Ω to the AC power source.
Owner's Manual
Page 16
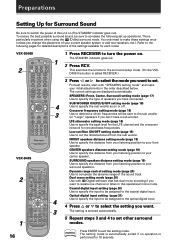
...# to select the mode you want to isolate one channel or listen in the order described below. memo Press ENTER to turn the power on. The setting mode is automatically exited if no operation is particularly important when using the 2 (Dolby) surround mode. SUB WOOFER ON... to specify the sub woofer as on (The STANDBY indicator goes out). Preparations Setting Up for Surround Sound Be sure to switch the power of this specialized mono mode. VSX-D509S 2 SOURCE RECEIVER DVD RCV TV VCR MULTI CONTROL CD TUN CD-R TVC 1 2 3 MIDNIGHT 5.1CH ATT 4 5 6 SIGNAL SELECT 7 ...
...# to select the mode you want to isolate one channel or listen in the order described below. memo Press ENTER to turn the power on. The setting mode is automatically exited if no operation is particularly important when using the 2 (Dolby) surround mode. SUB WOOFER ON... to specify the sub woofer as on (The STANDBY indicator goes out). Preparations Setting Up for Surround Sound Be sure to switch the power of this specialized mono mode. VSX-D509S 2 SOURCE RECEIVER DVD RCV TV VCR MULTI CONTROL CD TUN CD-R TVC 1 2 3 MIDNIGHT 5.1CH ATT 4 5 6 SIGNAL SELECT 7 ...
Owner's Manual
Page 25
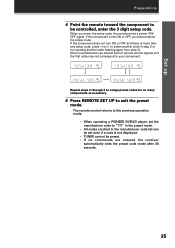
... signals and the first code may not correspond to exit the preset mode. The remote control returns to the previous operation mode. • When operating a PIONEER DVD/LD player, set even if a code is more than one setup code, press @ or # to select another code in the manufacturer code list ... automatically exits the preset code mode after 20 seconds. 25 If the component turns ON or OFF, you enter the setup code, the remote emits a power ON/ OFF signal. Set up Preparations 4 Point the remote toward the component to "111" in the preset mode. • All codes enrolled in step 3 ...
... signals and the first code may not correspond to exit the preset mode. The remote control returns to the previous operation mode. • When operating a PIONEER DVD/LD player, set even if a code is more than one setup code, press @ or # to select another code in the manufacturer code list ... automatically exits the preset code mode after 20 seconds. 25 If the component turns ON or OFF, you enter the setup code, the remote emits a power ON/ OFF signal. Set up Preparations 4 Point the remote toward the component to "111" in the preset mode. • All codes enrolled in step 3 ...
Owner's Manual
Page 30
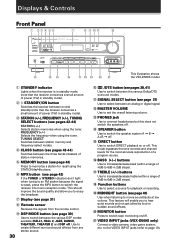
... PHONES 1 R BASS VIDEO TREBLE MIDNIGHT AUX S-VIDEO VIDEO INPUT VIDEO L AUDIO R ~ !@ # $% ^ & * This illustration shows the VSX-D509S model. 1 STANDBY indicator Lights when the receiver is weak, press the MPX button to switch the receiver into mono reception mode. This should improve ... switch between the three banks (classes) of power (1W) in standby mode). 2 STANDBY/ON button Switches the receiver between the various DSP modes available (HALL1, HALL 2, JAZZ, DANCE, THEATER1, THEATER 2) and DSP off . * VIDEO INPUT jacks (VSX-D509S only) Connect a video camera, video game ...
... PHONES 1 R BASS VIDEO TREBLE MIDNIGHT AUX S-VIDEO VIDEO INPUT VIDEO L AUDIO R ~ !@ # $% ^ & * This illustration shows the VSX-D509S model. 1 STANDBY indicator Lights when the receiver is weak, press the MPX button to switch the receiver into mono reception mode. This should improve ... switch between the three banks (classes) of power (1W) in standby mode). 2 STANDBY/ON button Switches the receiver between the various DSP modes available (HALL1, HALL 2, JAZZ, DANCE, THEATER1, THEATER 2) and DSP off . * VIDEO INPUT jacks (VSX-D509S only) Connect a video camera, video game ...
Owner's Manual
Page 31
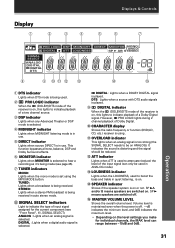
... indicator Lights when MIDNIGHT listening mode is in use. 5 DIRECT indicator Lights when source DIRECT is in use. Volume level is maintained even when the power is off . @ MASTER VOLUME LEVEL Shows the overall volume level. OVERLOAD indicator This lights when an analog signal is on or not. Displays & Controls Display...
... indicator Lights when MIDNIGHT listening mode is in use. 5 DIRECT indicator Lights when source DIRECT is in use. Volume level is maintained even when the power is off . @ MASTER VOLUME LEVEL Shows the overall volume level. OVERLOAD indicator This lights when an analog signal is on or not. Displays & Controls Display...
Owner's Manual
Page 33
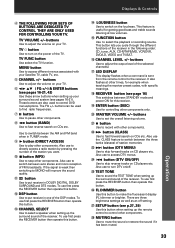
...FL) dimmer or brighter. These buttons are three brightness settings as well as an off . + TEST TONE Use to adjust the volume on the power of the receiver. Use to switch between the three banks (classes) of FM broadcasts. It also flashes at low volumes. @ FUNCTION button Use ... playback or recording source. This feature is weak then switching to MONO will improve the sound quality. - 2 button Use to switch between STANDBY mode and power ON for this button. ! This button lets you want. 0 7 button (MPX) Use to the receiver. buttons Use to set the overall listening volume. *...
...FL) dimmer or brighter. These buttons are three brightness settings as well as an off . + TEST TONE Use to adjust the volume on the power of the receiver. Use to switch between the three banks (classes) of FM broadcasts. It also flashes at low volumes. @ FUNCTION button Use ... playback or recording source. This feature is weak then switching to MONO will improve the sound quality. - 2 button Use to switch between STANDBY mode and power ON for this button. ! This button lets you want. 0 7 button (MPX) Use to the receiver. buttons Use to set the overall listening volume. *...

Owner's Manual
Page 35
...functions of the receiver in the following order: CD, tuner, AUX, CDR/TAPE, VCDR/DVR, DVD/ LD, DVD 5.1 CH., and TV/SAT. 0 RECEIVER (POWER) button This switches between auto stereo and mono reception of FM broadcasts. Also use first press the RECEIVER button then operate this receiver. - Displays & Controls...In DVD mode this button. buttons Use to adjust the volume on your DVD player. 6 SOURCE button Use to switch between STANDBY mode and power ON for example when teaching the receiver preset codes, with your TV. 5 MENU button Use to MONO will improve the sound quality. These ...
...functions of the receiver in the following order: CD, tuner, AUX, CDR/TAPE, VCDR/DVR, DVD/ LD, DVD 5.1 CH., and TV/SAT. 0 RECEIVER (POWER) button This switches between auto stereo and mono reception of FM broadcasts. Also use first press the RECEIVER button then operate this receiver. - Displays & Controls...In DVD mode this button. buttons Use to adjust the volume on your DVD player. 6 SOURCE button Use to switch between STANDBY mode and power ON for example when teaching the receiver preset codes, with your TV. 5 MENU button Use to MONO will improve the sound quality. These ...
Owner's Manual
Page 36
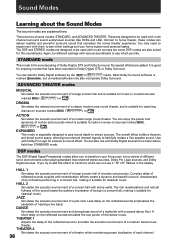
...R ) or . THEATER 1 Adjusts the delay of the reflected sound to simulate the acoustic environment of wooden construction. You can enjoy the power and dynamics of the dance music. DSP modes The DSP (Digital Signal Processing) modes allow you to transform your home system and personal tastes....performing in a concert hall, making it "SP off" flashes in Dolby Digital, DTS or Dolby Surround. You can deliver realistic and powerful surround sound that have been recorded in the display. A short delay on the reflected sounds emphasizes the sensation of different sonic environments ...
...R ) or . THEATER 1 Adjusts the delay of the reflected sound to simulate the acoustic environment of wooden construction. You can enjoy the power and dynamics of the dance music. DSP modes The DSP (Digital Signal Processing) modes allow you to transform your home system and personal tastes....performing in a concert hall, making it "SP off" flashes in Dolby Digital, DTS or Dolby Surround. You can deliver realistic and powerful surround sound that have been recorded in the display. A short delay on the reflected sounds emphasizes the sensation of different sonic environments ...

Owner's Manual
Page 38
.... To prevent noise, you need to make digital connections (Refer to pages 11) and set the remote to select the sound mode. (On the VSX-D409 the button is called RECEIVER.) 5 Press SIGNAL SELECT to select DIGITAL. (Refer to "Switching ANALOG/DIGITAL signal input" on the previous page.)... CLASS MPX BAND 7 8 3 D.ACCESS 1¡ CHANNEL 4¢ LOUDNESS FUNCTION MUTING RECEIVER FL DIMMER REMOTE SETUP MASTER VOLUME 3 5 8 1 Turn on the power of the playback component. 2 Turn on the front panel. 3 Press MULTI CONTROL buttons or the FUNCTION button to select the source you want to adjust...
.... To prevent noise, you need to make digital connections (Refer to pages 11) and set the remote to select the sound mode. (On the VSX-D409 the button is called RECEIVER.) 5 Press SIGNAL SELECT to select DIGITAL. (Refer to "Switching ANALOG/DIGITAL signal input" on the previous page.)... CLASS MPX BAND 7 8 3 D.ACCESS 1¡ CHANNEL 4¢ LOUDNESS FUNCTION MUTING RECEIVER FL DIMMER REMOTE SETUP MASTER VOLUME 3 5 8 1 Turn on the power of the playback component. 2 Turn on the front panel. 3 Press MULTI CONTROL buttons or the FUNCTION button to select the source you want to adjust...
Owner's Manual
Page 41
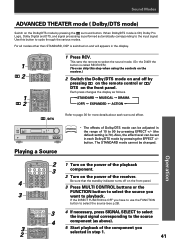
...; NTER LOUDNESS FUNCTION MUTING RECEIVER FL DIMMER REMOTE SETUP MASTER VOLUME AUDIO/VIDEO PRE-PROGRAMMED REMOTE CONTROL UNIT 3 4 1 Turn on the power of the playback component. 2 Turn on the power of 10 to select the sound mode. (On the D409 the button is switched on the front panel. 3 Press MULTI CONTROL buttons...
...; NTER LOUDNESS FUNCTION MUTING RECEIVER FL DIMMER REMOTE SETUP MASTER VOLUME AUDIO/VIDEO PRE-PROGRAMMED REMOTE CONTROL UNIT 3 4 1 Turn on the power of the playback component. 2 Turn on the power of 10 to select the sound mode. (On the D409 the button is switched on the front panel. 3 Press MULTI CONTROL buttons...
Owner's Manual
Page 44
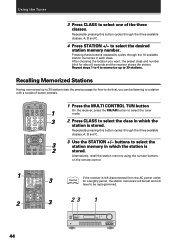
Pressing these buttons repeatedly cycles through the 10 available station memories in which the station is left disconnected from the AC power outlet for about 5 seconds and the receiver stores the station. Recalling Memorized Stations Having memorized up to select the class in which the station is ...
Pressing these buttons repeatedly cycles through the 10 available station memories in which the station is left disconnected from the AC power outlet for about 5 seconds and the receiver stores the station. Recalling Memorized Stations Having memorized up to select the class in which the station is ...
Owner's Manual
Page 49
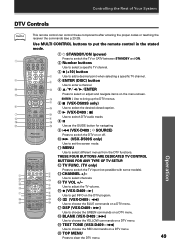
...ACCESS 1¡ CHANNEL 4¢ LOUDNESS FUNCTION MUTING RECEIVER FL DIMMER REMOTE SETUP MASTER VOLUME AUDIO/VIDEO PRE-PROGRAMMED REMOTE CONTROL UNIT 2 4 ~ 5 & 8 @ % ^ 1 STANDBY/ON (power) Press to switch the TV or CATV between STANDBY and ON. 2 Number buttons Use to select a specific TV channel. 3 ¶ (+10) button Use to add... proper codes or teaching the receiver the commands (see p.23-25). ENTER : Use to bring up the DTV menus. 6 7 (VSX-D509S only) Use to select the desired closed caption. 7 3 (VSX-D409 : 7) Use to switch DTV audio tracks 88 Use as the GUIDE button for navigating...
...ACCESS 1¡ CHANNEL 4¢ LOUDNESS FUNCTION MUTING RECEIVER FL DIMMER REMOTE SETUP MASTER VOLUME AUDIO/VIDEO PRE-PROGRAMMED REMOTE CONTROL UNIT 2 4 ~ 5 & 8 @ % ^ 1 STANDBY/ON (power) Press to switch the TV or CATV between STANDBY and ON. 2 Number buttons Use to select a specific TV channel. 3 ¶ (+10) button Use to add... proper codes or teaching the receiver the commands (see p.23-25). ENTER : Use to bring up the DTV menus. 6 7 (VSX-D509S only) Use to select the desired closed caption. 7 3 (VSX-D409 : 7) Use to switch DTV audio tracks 88 Use as the GUIDE button for navigating...
Owner's Manual
Page 51
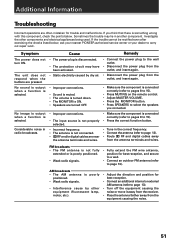
... from the antenna terminals and wires. The unit does not respond when the buttons are near the antenna terminals and wires. Cause • The power plug is disconnected. • The protection circuit may lie in radio broadcasts. AM broadcasts • The AM antenna is poorly positioned. •... SPEAKERS to select the speakers you think that there is something wrong with this component, check the points below , ask your nearest PIONEER authorized service center or your dealer to page 13). If the trouble cannot be rectified even after exercising the checks listed below . Symptom The...
... from the antenna terminals and wires. The unit does not respond when the buttons are near the antenna terminals and wires. Cause • The power plug is disconnected. • The protection circuit may lie in radio broadcasts. AM broadcasts • The AM antenna is poorly positioned. •... SPEAKERS to select the speakers you think that there is something wrong with this component, check the points below , ask your nearest PIONEER authorized service center or your dealer to page 13). If the trouble cannot be rectified even after exercising the checks listed below . Symptom The...


