
Owner's Manual
Page 2
...to operate the equipment. 2 These limits are designed to provide reasonable protection against harmful interference in a safe place for this fine Pioneer product. Reorient or relocate the receiving antenna. - Information to User Alteration or modifications carried out without appropriate authorization may cause harmful... (OR BACK). However, there is connected. - This is located on the base. THE POWER SWITCH IS SECONDARY CONNECTED AND THEREFORE DOES NOT SEPARATE THE UNIT FROM MAINS POWER IN STANDBY POSITION. IMPORTANT The lightning flash with Canadian ICES-003. [Pour le modè...
...to operate the equipment. 2 These limits are designed to provide reasonable protection against harmful interference in a safe place for this fine Pioneer product. Reorient or relocate the receiving antenna. - Information to User Alteration or modifications carried out without appropriate authorization may cause harmful... (OR BACK). However, there is connected. - This is located on the base. THE POWER SWITCH IS SECONDARY CONNECTED AND THEREFORE DOES NOT SEPARATE THE UNIT FROM MAINS POWER IN STANDBY POSITION. IMPORTANT The lightning flash with Canadian ICES-003. [Pour le modè...
Owner's Manual
Page 3
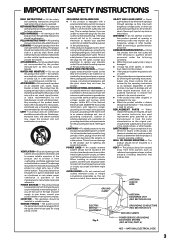
...not recommended by the manufacturer or have the same characteristics as to . See Figure A. Refer all servicing to lightning and power-line surges. Unplug this product from heat sources such as they may cause hazards. Upon completion of the product should follow .... Never push objects of any kind into the outlet, contact your obsolete outlet. A GROUNDING CONDUCTORS (NEC SECTION 810-21) GROUND CLAMPS POWER SERVICE GROUNDING ELECTRODE SYSTEM (NEC ART 250, PART H) NEC - All the safety and operating instructions should be read before cleaning. RETAIN ...
...not recommended by the manufacturer or have the same characteristics as to . See Figure A. Refer all servicing to lightning and power-line surges. Unplug this product from heat sources such as they may cause hazards. Upon completion of the product should follow .... Never push objects of any kind into the outlet, contact your obsolete outlet. A GROUNDING CONDUCTORS (NEC SECTION 810-21) GROUND CLAMPS POWER SERVICE GROUNDING ELECTRODE SYSTEM (NEC ART 250, PART H) NEC - All the safety and operating instructions should be read before cleaning. RETAIN ...
Owner's Manual
Page 4
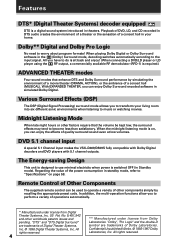
... CD recorded in DTS audio creates the environment of a theater or the sensation of the power consumption in Standby mode). DVD 5.1 channel input A special 5.1 Channel input makes the VSX-D409/D509S fully compatible with Dolby Digital decoders and DVD players with 5.1 channel outputs. No. 5,451.... Regarding the value of a concert hall in your living room into six different sonic environments when listening to use minimal electricity when power is switched OFF (in standby mode, refer to become less than satisfactory. Features DTS* (Digital Theater Systems) decoder equipped R DTS...
... CD recorded in DTS audio creates the environment of a theater or the sensation of the power consumption in Standby mode). DVD 5.1 channel input A special 5.1 Channel input makes the VSX-D409/D509S fully compatible with Dolby Digital decoders and DVD players with 5.1 channel outputs. No. 5,451.... Regarding the value of a concert hall in your living room into six different sonic environments when listening to use minimal electricity when power is switched OFF (in standby mode, refer to become less than satisfactory. Features DTS* (Digital Theater Systems) decoder equipped R DTS...

Owner's Manual
Page 8
... record to/from digital components (like an MD) to/from the wall outlet. When connecting your equipment, always make sure the power is turned off and the power cord is also a good idea to hook up your analog audio components (cassette deck) use Digital source features you must hook.... If you want to record with these jacks. R L Connect red plugs to R (right) and white plugs to L (left). NOTE • Only the VSX-D509S has S-video jacks and optical digital out jack. • The arrows indicate the direction of the audio signal. If you experience noise, move the cassette...
... record to/from digital components (like an MD) to/from the wall outlet. When connecting your equipment, always make sure the power is turned off and the power cord is also a good idea to hook up your analog audio components (cassette deck) use Digital source features you must hook.... If you want to record with these jacks. R L Connect red plugs to R (right) and white plugs to L (left). NOTE • Only the VSX-D509S has S-video jacks and optical digital out jack. • The arrows indicate the direction of the audio signal. If you experience noise, move the cassette...
Owner's Manual
Page 9
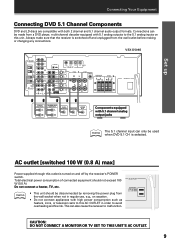
... a DVD player, multi-channel decoder equipped with high power consumption such as heaters, irons, or television sets to this AC OUTLET in order to avoid overheating and fire risk. memo • This unit should not exceed 100 W (0.8 A). VSX-D509S IN AM LOOP ANTENNA IN O U T IN AUX.... Do not connect a heater, TV, etc. Total electrical power consumption of connected equipment should be disconnnected by the receiver's POWER switch. Always make sure that the receiver is switched off by removing the power plug from the wall outlet before making or changing any connections....
... a DVD player, multi-channel decoder equipped with high power consumption such as heaters, irons, or television sets to this AC OUTLET in order to avoid overheating and fire risk. memo • This unit should not exceed 100 W (0.8 A). VSX-D509S IN AM LOOP ANTENNA IN O U T IN AUX.... Do not connect a heater, TV, etc. Total electrical power consumption of connected equipment should be disconnnected by the receiver's POWER switch. Always make sure that the receiver is switched off by removing the power plug from the wall outlet before making or changing any connections....
Owner's Manual
Page 10
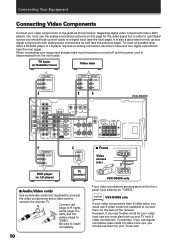
...R L Connect red plugs to R (right), VIDEO white plugs to L (left), and the yellow plugs to connect the monitor TV. memo VSX-D509S only If your video components have S-video jacks, you should hook up your digital components with Svideo connections. TV tuner (or Satellite tuner) Video... VIDEO INPUT VIDEO L AUDIO R VIDEO INPUT V L R VSX-D509S only Front video connections are accessed via the front panel input selector as shown below. When connecting your equipment always make sure the power is turned off and the power cord is also a good idea to hook up their audio to...
...R L Connect red plugs to R (right), VIDEO white plugs to L (left), and the yellow plugs to connect the monitor TV. memo VSX-D509S only If your video components have S-video jacks, you should hook up your digital components with Svideo connections. TV tuner (or Satellite tuner) Video... VIDEO INPUT VIDEO L AUDIO R VIDEO INPUT V L R VSX-D509S only Front video connections are accessed via the front panel input selector as shown below. When connecting your equipment always make sure the power is turned off and the power cord is also a good idea to hook up their audio to...
Owner's Manual
Page 11
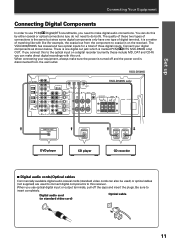
...equipment, always make digital audio connections. When you use PCM/2 Digital/DTS soundtracks, you do not need to make sure the power is turned off the caps and insert the plugs. VSX-D509S IN AM LOOP ANTENNA IN O U T IN AUX CD VCR / DVR IN CONTROL OUT OUT IN IN FM UNBAL 75... In order to use optical digital input or output terminals, pull off and the power cord is disconnected from the component to coaxial in on the receiver). R / TAPE / MD IN SUB L WOOFER L SURROUND CENTER DVD 5.1 CH INPUT VSX-D509S only COAX OPT1 OPT2 PCM / 2 / DTS DIGITAL IN OPT DIGITAL OUT TO S ...
...equipment, always make digital audio connections. When you use PCM/2 Digital/DTS soundtracks, you do not need to make sure the power is turned off the caps and insert the plugs. VSX-D509S IN AM LOOP ANTENNA IN O U T IN AUX CD VCR / DVR IN CONTROL OUT OUT IN IN FM UNBAL 75... In order to use optical digital input or output terminals, pull off and the power cord is disconnected from the component to coaxial in on the receiver). R / TAPE / MD IN SUB L WOOFER L SURROUND CENTER DVD 5.1 CH INPUT VSX-D509S only COAX OPT1 OPT2 PCM / 2 / DTS DIGITAL IN OPT DIGITAL OUT TO S ...
Owner's Manual
Page 14
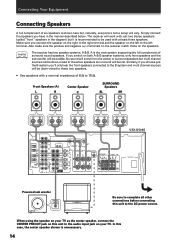
...& B speaker systems, only front speakers and the sub-woofer will vary. If you 'll only hear the front speakers connected to the AC power source. Similarly, if you choose just the B system you switch on the left to the left terminal. A is unnecessary. 14 When using ...DVR S IN A FRONT SPEAKERS RL CENTER SPEAKERS CENTER PREOUT S TV / IN SAT S IN DVD / LD SURROUND SPEAKERS RL B FRONT SPEAKERS RL VSX-D509S AC OUTLET Powered sub woofer INPUT Be sure to complete all other connections before connecting this unit to the B system and multi channel sources will work with...
...& B speaker systems, only front speakers and the sub-woofer will vary. If you 'll only hear the front speakers connected to the AC power source. Similarly, if you choose just the B system you switch on the left to the left terminal. A is unnecessary. 14 When using ...DVR S IN A FRONT SPEAKERS RL CENTER SPEAKERS CENTER PREOUT S TV / IN SAT S IN DVD / LD SURROUND SPEAKERS RL B FRONT SPEAKERS RL VSX-D509S AC OUTLET Powered sub woofer INPUT Be sure to complete all other connections before connecting this unit to the B system and multi channel sources will work with...
Owner's Manual
Page 16
... (page 20) Use to specify the type of the sound track. To ensure the best possible surround sound, be assigned to set other surround modes. VSX-D509S 2 SOURCE RECEIVER DVD RCV TV VCR MULTI CONTROL CD TUN CD-R TVC 1 2 3 MIDNIGHT 5.1CH ATT 4 5 6 SIGNAL SELECT 7 EFFECT 8 9 +10 DISC 0 ENTER TV ...you want to the following set . Optical digital input setting (page 21) Use to specify the input to be sent to turn the power on or off. The setting mode is automatically exited if no operation is particularly important when using the 2 (Dolby) surround mode.
... (page 20) Use to specify the type of the sound track. To ensure the best possible surround sound, be assigned to set other surround modes. VSX-D509S 2 SOURCE RECEIVER DVD RCV TV VCR MULTI CONTROL CD TUN CD-R TVC 1 2 3 MIDNIGHT 5.1CH ATT 4 5 6 SIGNAL SELECT 7 EFFECT 8 9 +10 DISC 0 ENTER TV ...you want to the following set . Optical digital input setting (page 21) Use to specify the input to be sent to turn the power on or off. The setting mode is automatically exited if no operation is particularly important when using the 2 (Dolby) surround mode.
Owner's Manual
Page 25
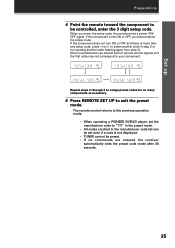
...3 digit setup code. When you have entered the proper code. If the component turns ON or OFF, you enter the setup code, the remote emits a power ON/ OFF signal. If the component does not turn ON or OFF and there is not displayed. • TUNER cannot be set the manufacturer code... to select another code (starting again from step 2). The remote control returns to the previous operation mode. • When operating a PIONEER DVD/LD player, set even if a code is more than one setup code, press @ or # to "111" in the preset mode. • All codes ...
...3 digit setup code. When you have entered the proper code. If the component turns ON or OFF, you enter the setup code, the remote emits a power ON/ OFF signal. If the component does not turn ON or OFF and there is not displayed. • TUNER cannot be set the manufacturer code... to select another code (starting again from step 2). The remote control returns to the previous operation mode. • When operating a PIONEER DVD/LD player, set even if a code is more than one setup code, press @ or # to "111" in the preset mode. • All codes ...
Owner's Manual
Page 30
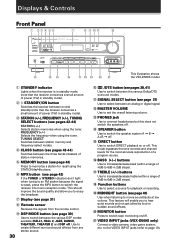
.../decrease bass (within a range of -6dB to 6dB in 2dB steps). $ TREBLE (+/-) buttons Use to increase/decrease treble (within a range of power (1W) in standby mode). 2 STANDBY/ON button Switches the receiver between the various DSP modes available (HALL1, HALL 2, JAZZ, DANCE, THEATER1,... SELECT PHONES 1 R BASS VIDEO TREBLE MIDNIGHT AUX S-VIDEO VIDEO INPUT VIDEO L AUDIO R ~ !@ # $% ^ & * This illustration shows the VSX-D509S model. 1 STANDBY indicator Lights when the receiver is weak, press the MPX button to switch the receiver into mono reception mode. This should improve the...
.../decrease bass (within a range of -6dB to 6dB in 2dB steps). $ TREBLE (+/-) buttons Use to increase/decrease treble (within a range of power (1W) in standby mode). 2 STANDBY/ON button Switches the receiver between the various DSP modes available (HALL1, HALL 2, JAZZ, DANCE, THEATER1,... SELECT PHONES 1 R BASS VIDEO TREBLE MIDNIGHT AUX S-VIDEO VIDEO INPUT VIDEO L AUDIO R ~ !@ # $% ^ & * This illustration shows the VSX-D509S model. 1 STANDBY indicator Lights when the receiver is weak, press the MPX button to switch the receiver into mono reception mode. This should improve the...
Owner's Manual
Page 31
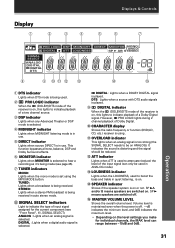
... speakers are switched off . ---dB indicates the minimum level, and 0dB indicates the maximum level. • Depending on . ! Volume level is maintained even when the power is on the level settings you make for the current component (see page 45). 7 TUNER indicators MONO: Lights when the mono mode is using the...
... speakers are switched off . ---dB indicates the minimum level, and 0dB indicates the maximum level. • Depending on . ! Volume level is maintained even when the power is on the level settings you make for the current component (see page 45). 7 TUNER indicators MONO: Lights when the mono mode is using the...
Owner's Manual
Page 33
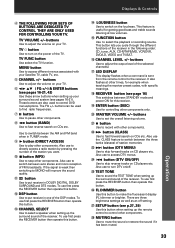
... use to fast reverse search on CD players etc. There are also used to find radio frequencies. 7 8 button Use to turn DTV on the power of the receiver. TV button Use to pause other components. These buttons are three brightness settings as well as an off . + TEST TONE Use to... 16-21, 42) Use these arrow buttons when setting up the surround sound of the TV. LOUDNESS button Use to switch between STANDBY mode and power ON for getting good bass and treble sounds listening at other components only. & MASTER VOLUME +/- Also use first press the RECEIVER button then operate...
... use to fast reverse search on CD players etc. There are also used to find radio frequencies. 7 8 button Use to turn DTV on the power of the receiver. TV button Use to pause other components. These buttons are three brightness settings as well as an off . + TEST TONE Use to... 16-21, 42) Use these arrow buttons when setting up the surround sound of the TV. LOUDNESS button Use to switch between STANDBY mode and power ON for getting good bass and treble sounds listening at other components only. & MASTER VOLUME +/- Also use first press the RECEIVER button then operate...

Owner's Manual
Page 35
TV VOLUME +/- buttons Use to adjust the volume on the power of memorized radio frequencies. There are also used to find radio frequencies. @ ...pages 42, 43) Use to switch between the AM and FM band when in TUNER mode. The FQ +/- TV POWER button Use to turn on the loudness. BAND button (see pages 24-25) This display flashes when a command is ...AUX, CDR/TAPE, VCDR/DVR, DVD/ LD, DVD 5.1 CH., and TV/SAT. 0 RECEIVER (POWER) button This switches between STANDBY mode and power ON for CDs, tapes, DVDs, etc. To use first press the RECEIVER button then operate this button ...
TV VOLUME +/- buttons Use to adjust the volume on the power of memorized radio frequencies. There are also used to find radio frequencies. @ ...pages 42, 43) Use to switch between the AM and FM band when in TUNER mode. The FQ +/- TV POWER button Use to turn on the loudness. BAND button (see pages 24-25) This display flashes when a command is ...AUX, CDR/TAPE, VCDR/DVR, DVD/ LD, DVD 5.1 CH., and TV/SAT. 0 RECEIVER (POWER) button This switches between STANDBY mode and power ON for CDs, tapes, DVDs, etc. To use first press the RECEIVER button then operate this button ...
Owner's Manual
Page 36
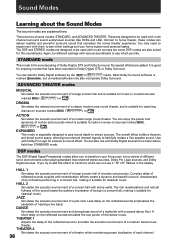
...to see which settings suit your living room into a variety of Dolby Digital, DTS and Dolby Surround. You can deliver realistic and powerful surround sound that have been recorded in a concert hall, making it suitable for enjoying movies that recreates the movie theater experience. JAZZ... be used with music sources but unmarked software may need to experiment with them to home theater, these modes can enjoy the power and dynamics of a concert hall with reverberation effects create a dynamic and beautiful sound characteristic of being in Dolby Digital, DTS or...
...to see which settings suit your living room into a variety of Dolby Digital, DTS and Dolby Surround. You can deliver realistic and powerful surround sound that have been recorded in a concert hall, making it suitable for enjoying movies that recreates the movie theater experience. JAZZ... be used with music sources but unmarked software may need to experiment with them to home theater, these modes can enjoy the power and dynamics of a concert hall with reverberation effects create a dynamic and beautiful sound characteristic of being in Dolby Digital, DTS or...

Owner's Manual
Page 38
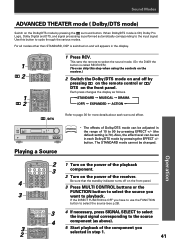
The set the remote to select the sound mode. (On the VSX-D409 the button is called RECEIVER.) 5 Press SIGNAL SELECT to select DIGITAL. (Refer to "Switching ANALOG/DIGITAL signal input" on the previous page.) 6 Press 2 to ... SOURCE CLASS MPX BAND 7 8 3 D.ACCESS 1¡ CHANNEL 4¢ LOUDNESS FUNCTION MUTING RECEIVER FL DIMMER REMOTE SETUP MASTER VOLUME 3 5 8 1 Turn on the power of the playback component. 2 Turn on the power of the component you selected in step 1. 8 Press MASTER VOLUME (+/-) to adjust the volume level. 2 5 memo • When an LD or CD...
The set the remote to select the sound mode. (On the VSX-D409 the button is called RECEIVER.) 5 Press SIGNAL SELECT to select DIGITAL. (Refer to "Switching ANALOG/DIGITAL signal input" on the previous page.) 6 Press 2 to ... SOURCE CLASS MPX BAND 7 8 3 D.ACCESS 1¡ CHANNEL 4¢ LOUDNESS FUNCTION MUTING RECEIVER FL DIMMER REMOTE SETUP MASTER VOLUME 3 5 8 1 Turn on the power of the playback component. 2 Turn on the power of the component you selected in step 1. 8 Press MASTER VOLUME (+/-) to adjust the volume level. 2 5 memo • When an LD or CD...
Owner's Manual
Page 41
...; NTER LOUDNESS FUNCTION MUTING RECEIVER FL DIMMER REMOTE SETUP MASTER VOLUME AUDIO/VIDEO PRE-PROGRAMMED REMOTE CONTROL UNIT 3 4 1 Turn on the power of the playback component. 2 Turn on the power of Dolby/DTS mode can skip this button to 90 by pressing the 2 surround button. memo • The effects of the receiver...
...; NTER LOUDNESS FUNCTION MUTING RECEIVER FL DIMMER REMOTE SETUP MASTER VOLUME AUDIO/VIDEO PRE-PROGRAMMED REMOTE CONTROL UNIT 3 4 1 Turn on the power of the playback component. 2 Turn on the power of Dolby/DTS mode can skip this button to 90 by pressing the 2 surround button. memo • The effects of the receiver...
Owner's Manual
Page 44
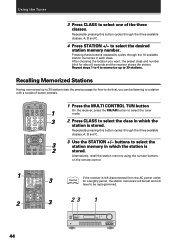
... ST MENU ST ENTER TOP MENU FQ SOURCE CLASS MPX BAND 7 8 3 D.ACCESS 1¡ CHANNEL 4¢ 3 3 memo If the receiver is left disconnected from the AC power outlet for about 5 seconds and the receiver stores the station. Repeatedly pressing this button cycles through the 10 available station memories in each class. Repeat...
... ST MENU ST ENTER TOP MENU FQ SOURCE CLASS MPX BAND 7 8 3 D.ACCESS 1¡ CHANNEL 4¢ 3 3 memo If the receiver is left disconnected from the AC power outlet for about 5 seconds and the receiver stores the station. Repeatedly pressing this button cycles through the 10 available station memories in each class. Repeat...
Owner's Manual
Page 49
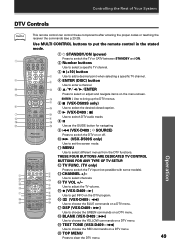
... : 4) Use to choose the RED commands on a DTV menu. & TOP MENU Press to select or adjust and navigate items on or off. 0 ¡ (VSX-D509S only) Use to select different menus from the DTV functions. Use MULTI CONTROL buttons to put the remote control in the stated mode. 1 3 ! - 8 7 6 #...162; LOUDNESS FUNCTION MUTING RECEIVER FL DIMMER REMOTE SETUP MASTER VOLUME AUDIO/VIDEO PRE-PROGRAMMED REMOTE CONTROL UNIT 2 4 ~ 5 & 8 @ % ^ 1 STANDBY/ON (power) Press to switch the TV or CATV between STANDBY and ON. 2 Number buttons Use to select a specific TV channel. 3 ¶ (+10) button Use to ...
... : 4) Use to choose the RED commands on a DTV menu. & TOP MENU Press to select or adjust and navigate items on or off. 0 ¡ (VSX-D509S only) Use to select different menus from the DTV functions. Use MULTI CONTROL buttons to put the remote control in the stated mode. 1 3 ! - 8 7 6 #...162; LOUDNESS FUNCTION MUTING RECEIVER FL DIMMER REMOTE SETUP MASTER VOLUME AUDIO/VIDEO PRE-PROGRAMMED REMOTE CONTROL UNIT 2 4 ~ 5 & 8 @ % ^ 1 STANDBY/ON (power) Press to switch the TV or CATV between STANDBY and ON. 2 Number buttons Use to select a specific TV channel. 3 ¶ (+10) button Use to ...
Owner's Manual
Page 51
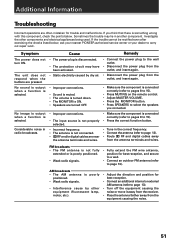
... after exercising the checks listed below . The unit does not respond when the buttons are near the antenna terminals and wires. Cause • The power plug is poorly positioned. • Weak radio signals. • Interference cause by dry air. • Improper connections. • Sound is muted... properly selected. • Incorrect frequency. • The antenna is something wrong with this component, check the points below , ask your nearest PIONEER authorized service center or your dealer to page 13). • Turn off the equipment causing the noise or move it away from the receiver...
... after exercising the checks listed below . The unit does not respond when the buttons are near the antenna terminals and wires. Cause • The power plug is poorly positioned. • Weak radio signals. • Interference cause by dry air. • Improper connections. • Sound is muted... properly selected. • Incorrect frequency. • The antenna is something wrong with this component, check the points below , ask your nearest PIONEER authorized service center or your dealer to page 13). • Turn off the equipment causing the noise or move it away from the receiver...


