Owner's Manual
Page 4
... Standard surround sound 27 Using the Home THX modes 28 Using the Advanced surround effects 28 Listening in a safe place for buying this Pioneer product. Please read through these operating instructions so you will know how to operate your iPod to station presets 33 07 The System Setup... menu Making receiver settings from the System Setup menu 34 Automatic MCACC (Expert 34 Surround back speaker setting 36 Manual MCACC setup 37 Fine Channel Level 37 Fine Speaker Distance 38 Standing Wave 38 Acoustic ...
... Standard surround sound 27 Using the Home THX modes 28 Using the Advanced surround effects 28 Listening in a safe place for buying this Pioneer product. Please read through these operating instructions so you will know how to operate your iPod to station presets 33 07 The System Setup... menu Making receiver settings from the System Setup menu 34 Automatic MCACC (Expert 34 Surround back speaker setting 36 Manual MCACC setup 37 Fine Channel Level 37 Fine Speaker Distance 38 Standing Wave 38 Acoustic ...

Owner's Manual
Page 7
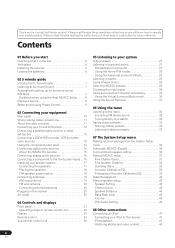
... . For surround sound, you'll want to hook up using the Auto MCACC Setup the headphones should have to make changes for more on this receiver. Center (C) Front Right (R) Front Left (L) Subwoofer (SW) Surround Right (SR) Listening position Surround Left (SL) Surround Back Right (SBR) Surround Back Left...The surround sound you get from a series of test tones to optimize the speaker settings and equalization for more setup options. Check the manual that the DVD input is showing in the default settings. • Be sure to complete all . See Connecting your TV and DVD ...
... . For surround sound, you'll want to hook up using the Auto MCACC Setup the headphones should have to make changes for more on this receiver. Center (C) Front Right (R) Front Left (L) Subwoofer (SW) Surround Right (SR) Listening position Surround Left (SL) Surround Back Right (SBR) Surround Back Left...The surround sound you get from a series of test tones to optimize the speaker settings and equalization for more setup options. Check the manual that the DVD input is showing in the default settings. • Be sure to complete all . See Connecting your TV and DVD ...

Owner's Manual
Page 8
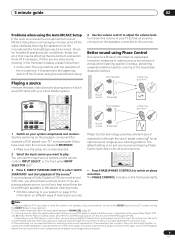
... SELECT SYSTEM OFF SOURCE CD DVD DVR2 DVR1 TV SAT CD-R i Pod VIDEO 2 VIDEO 1 TV CONT XM RADIO TUNER ROOM2/3 RECEIVER D.ACCESS +10 AV PARAMETER TOP MENU ì TUNE DTVMENU ST SETUP ENTER CLASS DISC ENTER CH LEVEL MENU ST T.EDIT ì RETURN CATEGORY TUNE GUIDE TV CONTROL BAND... TV VOL INPUT SELECT TV CH VOL 1 Switch on the receiver and your system, but it is also possible to adjust these settings manually using a ...
... SELECT SYSTEM OFF SOURCE CD DVD DVR2 DVR1 TV SAT CD-R i Pod VIDEO 2 VIDEO 1 TV CONT XM RADIO TUNER ROOM2/3 RECEIVER D.ACCESS +10 AV PARAMETER TOP MENU ì TUNE DTVMENU ST SETUP ENTER CLASS DISC ENTER CH LEVEL MENU ST T.EDIT ì RETURN CATEGORY TUNE GUIDE TV CONTROL BAND... TV VOL INPUT SELECT TV CH VOL 1 Switch on the receiver and your system, but it is also possible to adjust these settings manually using a ...
Owner's Manual
Page 9
...the VIDEO 1 jacks on your TV, make sure your sound source arrives at your system components and receiver. If there are playing a stereo source, you should be set this ) if you need to manually switch the input signal type press SIGNAL SEL (page 30). 3 • You may be incorrect.... on and we recommend leaving Phase Control switched on for example a DVD player), your TV1 and subwoofer (if you have one), then the receiver (press RECEIVER). • Make sure the setup mic is an MPEG audio option, set to a multichannel listening mode (see illustration below). Start by switching...
...the VIDEO 1 jacks on your TV, make sure your sound source arrives at your system components and receiver. If there are playing a stereo source, you should be set this ) if you need to manually switch the input signal type press SIGNAL SEL (page 30). 3 • You may be incorrect.... on and we recommend leaving Phase Control switched on for example a DVD player), your TV1 and subwoofer (if you have one), then the receiver (press RECEIVER). • Make sure the setup mic is an MPEG audio option, set to a multichannel listening mode (see illustration below). Start by switching...

Owner's Manual
Page 14
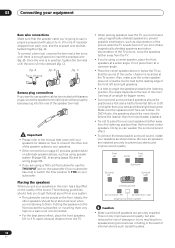
... need to composite or S-video. Using the component video jacks Component video should give superior picture quality when compared to tell the receiver which delivers a very stable, flicker-free picture. VSX-84TXSi MULTI-ROOM & SOURCE / REC SEL OUT1 ROOM3 (ZONE3) OUT2 S400 (AUDIO) IR MULTI-ROOM & SOURCE MAIN ROOM(ZONE1) IN1...03 Connecting your equipment • For a second recorder, use the DVR/VCR2 outputs. 3 If the device can connect it doesn't matter which source. See the manuals that came with progressive-scan video. Connect using a coaxial digital audio cable.
... need to composite or S-video. Using the component video jacks Component video should give superior picture quality when compared to tell the receiver which delivers a very stable, flicker-free picture. VSX-84TXSi MULTI-ROOM & SOURCE / REC SEL OUT1 ROOM3 (ZONE3) OUT2 S400 (AUDIO) IR MULTI-ROOM & SOURCE MAIN ROOM(ZONE1) IN1...03 Connecting your equipment • For a second recorder, use the DVR/VCR2 outputs. 3 If the device can connect it doesn't matter which source. See the manuals that came with progressive-scan video. Connect using a coaxial digital audio cable.
Owner's Manual
Page 18
... or below . Once the wire is not recommended. • For the best stereo effect, place the front speakers 6 ft. Important • Please refer to the manual that came with your speakers for details on alternate speaker setups, such as using speaker system B (page 55), bi-amping (page 56) and biwiring (page...
... or below . Once the wire is not recommended. • For the best stereo effect, place the front speakers 6 ft. Important • Please refer to the manual that came with your speakers for details on alternate speaker setups, such as using speaker system B (page 55), bi-amping (page 56) and biwiring (page...
Owner's Manual
Page 30
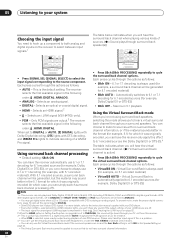
... output settings of your i.LINK device are output.3 The receiver selects the first available signal in the following order: ; HDMI; Selects an i.LINK signal (VSX-84TXSi only). • PCM - DIGITAL. With 5.1 encoded... optical or coaxial digital signal. • HDMI - For more details, refer to the instruction manual supplied with your DVD player. • Even when i.LINK is selected, noise may get digital... better in the format (for example, 5.1) for which it was originally encoded (in Setting the AV options on page 66 is active) • Press SBch (SBch PROCESSING) repeatedly to 96 kHz...
... output settings of your i.LINK device are output.3 The receiver selects the first available signal in the following order: ; HDMI; Selects an i.LINK signal (VSX-84TXSi only). • PCM - DIGITAL. With 5.1 encoded... optical or coaxial digital signal. • HDMI - For more details, refer to the instruction manual supplied with your DVD player. • Even when i.LINK is selected, noise may get digital... better in the format (for example, 5.1) for which it was originally encoded (in Setting the AV options on page 66 is active) • Press SBch (SBch PROCESSING) repeatedly to 96 kHz...
Owner's Manual
Page 32
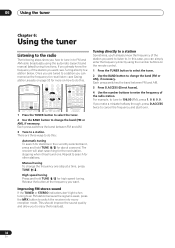
...are three ways to do this. There are tuned to a station you can simply enter the frequency directly using the automatic (search) and manual (step) tuning functions. Manual tuning To change the band (FM or AM), if necessary. Each press switches the band between FM and AM. 3 Tune to a ...SYSTEM OFF SOURCE CD DVD DVR2 DVR1 TV SAT CD-R i Pod VIDEO 2 VIDEO 1 TV CONT XM RADIO TUNER ROOM2/3 RECEIVER SLEEP VIDEO SEL ANALOG ATT D.ACCESS +10 AV PARAMETER TOP MENU ì TUNE DTVMENU ST SETUP ENTER CLASS DISC ENTER CH LEVEL MENU ST T.EDIT ì RETURN CATEGORY TUNE...
...are three ways to do this. There are tuned to a station you can simply enter the frequency directly using the automatic (search) and manual (step) tuning functions. Manual tuning To change the band (FM or AM), if necessary. Each press switches the band between FM and AM. 3 Tune to a ...SYSTEM OFF SOURCE CD DVD DVR2 DVR1 TV SAT CD-R i Pod VIDEO 2 VIDEO 1 TV CONT XM RADIO TUNER ROOM2/3 RECEIVER SLEEP VIDEO SEL ANALOG ATT D.ACCESS +10 AV PARAMETER TOP MENU ì TUNE DTVMENU ST SETUP ENTER CLASS DISC ENTER CH LEVEL MENU ST T.EDIT ì RETURN CATEGORY TUNE...
Owner's Manual
Page 33
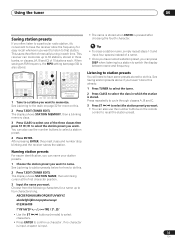
... SYSTEM OFF SOURCE CD DVD DVR2 DVR1 TV SAT CD-R i Pod VIDEO 2 VIDEO 1 TV CONT XM RADIO TUNER ROOM2/3 RECEIVER SLEEP VIDEO SEL ANALOG ATT D.ACCESS +10 AV PARAMETER TOP MENU ì TUNE DTVMENU ST SETUP ENTER CLASS DISC ENTER CH LEVEL MENU ST T.EDIT ì RETURN CATEGORY TUNE... can name your station presets. 1 Choose the station preset you want to 30 stations, stored in three banks, or classes, (A, B and C) of manually tuning in which the station is also stored. Naming station presets For easier identification, you can also use the number buttons on this . 2 Press T.EDIT...
... SYSTEM OFF SOURCE CD DVD DVR2 DVR1 TV SAT CD-R i Pod VIDEO 2 VIDEO 1 TV CONT XM RADIO TUNER ROOM2/3 RECEIVER SLEEP VIDEO SEL ANALOG ATT D.ACCESS +10 AV PARAMETER TOP MENU ì TUNE DTVMENU ST SETUP ENTER CLASS DISC ENTER CH LEVEL MENU ST T.EDIT ì RETURN CATEGORY TUNE... can name your station presets. 1 Choose the station preset you want to 30 stations, stored in three banks, or classes, (A, B and C) of manually tuning in which the station is also stored. Naming station presets For easier identification, you can also use the number buttons on this . 2 Press T.EDIT...
Owner's Manual
Page 34
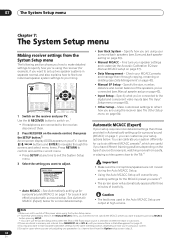
...sure not to navigate through copying, renaming or deleting (see Data Management on page 42). • Manual SP Setup - Automatic MCACC (Expert) If your setup requires more detailed setup. • Surr Back System - RECEIVER INPUT SELECT SYSTEM OFF SOURCE CD DVD DVR2 DVR1 TV SAT CD-R i Pod VIDEO 2 VIDEO 1... TV CONT XM RADIO TUNER ROOM2/3 RECEIVER SLEEP VIDEO ANALOG D.ACCESS +10 AV PARAMETER TOP MENU ì TUNE DTVMENU ST SETUP ENTER CLASS DISC ENTER CH LEVEL MENU ST T.EDIT ì RETURN CATEGORY TUNE...
...sure not to navigate through copying, renaming or deleting (see Data Management on page 42). • Manual SP Setup - Automatic MCACC (Expert) If your setup requires more detailed setup. • Surr Back System - RECEIVER INPUT SELECT SYSTEM OFF SOURCE CD DVD DVR2 DVR1 TV SAT CD-R i Pod VIDEO 2 VIDEO 1... TV CONT XM RADIO TUNER ROOM2/3 RECEIVER SLEEP VIDEO ANALOG D.ACCESS +10 AV PARAMETER TOP MENU ì TUNE DTVMENU ST SETUP ENTER CLASS DISC ENTER CH LEVEL MENU ST T.EDIT ì RETURN CATEGORY TUNE...
Owner's Manual
Page 35
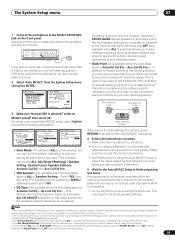
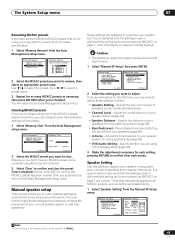
...'flat' calibration for different listening positions. A progress report is displayed on-screen while the receiver outputs test tones to step 4. 2 The six MCACC presets are used for storing surround ... select an MCACC preset2 then select OK. System Setup 1.Auto MCACC 2.Surr Back System 3.Manual MCACC 4.Data Management 5.Manual SP Setup 6.Input Setup 7.Other Setup : Exit 1.Auto MCACC Surr Back System [ Normal... this . • Do not adjust the volume during the test tones. SPEAKERS PHONES (TUNE +) AV PARAMETER (ST -) SETUP ENTER TUNER EDIT (ST +) RETURN (TUNE -) BAND MULTI - ROOM &...
...'flat' calibration for different listening positions. A progress report is displayed on-screen while the receiver outputs test tones to step 4. 2 The six MCACC presets are used for storing surround ... select an MCACC preset2 then select OK. System Setup 1.Auto MCACC 2.Surr Back System 3.Manual MCACC 4.Data Management 5.Manual SP Setup 6.Input Setup 7.Other Setup : Exit 1.Auto MCACC Surr Back System [ Normal... this . • Do not adjust the volume during the test tones. SPEAKERS PHONES (TUNE +) AV PARAMETER (ST -) SETUP ENTER TUNER EDIT (ST +) RETURN (TUNE -) BAND MULTI - ROOM &...

Owner's Manual
Page 36
...34).2 You can simply use the surround back speaker channels with different size settings. Press RETURN to go back to determine the optimum receiver settings for optimal surround sound) the actual distance may be asked to change the setting (and number for more on this ) Press...and / to place the mic at the 2nd and 3rd reference points before finally placing it is also possible to adjust these settings manually using the Manual speaker setup on -screen should reflect the actual speakers you have. 1.Auto MCACC Now Analyzing... (2/9) Environment Check Ambient Noise Microphone ...
...34).2 You can simply use the surround back speaker channels with different size settings. Press RETURN to go back to determine the optimum receiver settings for optimal surround sound) the actual distance may be asked to change the setting (and number for more on this ) Press...and / to place the mic at the 2nd and 3rd reference points before finally placing it is also possible to adjust these settings manually using the Manual speaker setup on -screen should reflect the actual speakers you have. 1.Auto MCACC Now Analyzing... (2/9) Environment Check Ambient Noise Microphone ...
Owner's Manual
Page 37
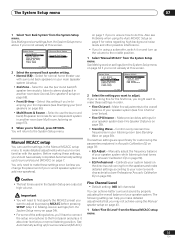
... only need to first specify the MCACC preset you want to the middle position. 1 Select 'Manual MCACC' from the System Setup menu on page 55). • Front Bi-Amp - See Making receiver settings from the System Setup menu. Select for normal home theater use the (surround back) B...may not achieve using a subwoofer, switch it about ear level at this . See Making receiver settings from the Manual MCACC setup menu. 37 En Control overly resonant low frequencies in Making receiver settings from the System Setup menu. Calibrate your system based on the direct sound coming from ...
... only need to first specify the MCACC preset you want to the middle position. 1 Select 'Manual MCACC' from the System Setup menu on page 55). • Front Bi-Amp - See Making receiver settings from the System Setup menu. Select for normal home theater use the (surround back) B...may not achieve using a subwoofer, switch it about ear level at this . See Making receiver settings from the Manual MCACC setup menu. 37 En Control overly resonant low frequencies in Making receiver settings from the System Setup menu. Calibrate your system based on the direct sound coming from ...

Owner's Manual
Page 38
... each channel in turn and adjust the levels (+/ - 10dB) as necessary. Use / to adjust the delay of the speaker you may not achieve using the Manual speaker setup below. 3b.Fine SP Distance L R C SL SR SBL SBR SW 10.0ft (Reference) [ 9.0ft ] 9.5ft [ 6.0ft ] [ 6.5ft ] [ 6.0ft ] [ 6.5ft ] [ ...achieve this tone with your system, it . 4 When you 're finished, press RETURN. Loud test tones will return to the 0dB reference level. 3.Manual MCACC a.Fine Ch Level b.Fine SP Distance c.Standing Wave d.EQ Adjust e.EQ Professional :Return 3a.Fine Channel Level Please Wait... 20 Caution! You ...
... each channel in turn and adjust the levels (+/ - 10dB) as necessary. Use / to adjust the delay of the speaker you may not achieve using the Manual speaker setup below. 3b.Fine SP Distance L R C SL SR SBL SBR SW 10.0ft (Reference) [ 9.0ft ] 9.5ft [ 6.0ft ] [ 6.5ft ] [ 6.0ft ] [ 6.5ft ] [ ...achieve this tone with your system, it . 4 When you 're finished, press RETURN. Loud test tones will return to the 0dB reference level. 3.Manual MCACC a.Fine Ch Level b.Fine SP Distance c.Standing Wave d.EQ Adjust e.EQ Professional :Return 3a.Fine Channel Level Please Wait... 20 Caution! You ...

Owner's Manual
Page 39
..., your listening position, and ultimately the shape of a graphical output that can be displayed on page 34, you can also adjust these settings manually to get a frequency balance that suits your speakers (excluding the subwoofer). MEMORY 1 Setting Start? [ OK ] :Return Enter:Next :Cancel ... 125 250 500 1k 2k 4k 8k 16k TRM TRIM [ 0.0] :Finish Use the / buttons to customize your system calibration with software available from Pioneer-see Connecting a PC for Advanced MCACC output on page 62 for your tastes. 1 Select 'EQ Adjust' from the speakers. If the speaker balance...
..., your listening position, and ultimately the shape of a graphical output that can be displayed on page 34, you can also adjust these settings manually to get a frequency balance that suits your speakers (excluding the subwoofer). MEMORY 1 Setting Start? [ OK ] :Return Enter:Next :Cancel ... 125 250 500 1k 2k 4k 8k 16k TRM TRIM [ 0.0] :Finish Use the / buttons to customize your system calibration with software available from Pioneer-see Connecting a PC for Advanced MCACC output on page 62 for your tastes. 1 Select 'EQ Adjust' from the speakers. If the speaker balance...
Owner's Manual
Page 40
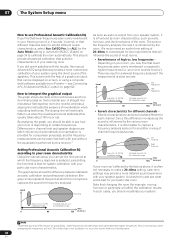
... software available from your speaker system, it is done too late. Differences in msec.) Note 1 Note that is output from Pioneer - Level Left surround Right Surround Acoustic Cal. EQ calibration range Time 0 80 160 (in channel level and speaker distance are... graphical output that can be generated than higher frequencies (this receiver.1 Setting Professional Acoustic Calibration EQ according to your room characteristics Using the manual setup, you still aren't satisfied with the results, the manual Advanced EQ setup (below shows the difference between standard acoustic ...
... software available from your speaker system, it is done too late. Differences in msec.) Note 1 Note that is output from Pioneer - Level Left surround Right Surround Acoustic Cal. EQ calibration range Time 0 80 160 (in channel level and speaker distance are... graphical output that can be generated than higher frequencies (this receiver.1 Setting Professional Acoustic Calibration EQ according to your room characteristics Using the manual setup, you still aren't satisfied with the results, the manual Advanced EQ setup (below shows the difference between standard acoustic ...
Owner's Manual
Page 41
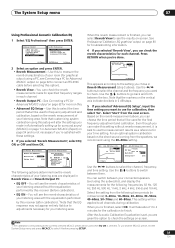
...forth between the two. Use this to measure the reverb characteristics of your listening area without reverb measurement, it before selecting this receiver (after calibration).1 Note that will be used for the calibration to select the channel, frequency, and time setting. MEMORY 1 ... • EQ OFF - Adv. The System Setup menu 07 Using Professional Acoustic Calibration EQ 1 Select 'EQ Professional' then press ENTER. 3.Manual MCACC a.Fine Ch Level b.Fine SP Distance c.Standing Wave d.EQ Adjust e.EQ Professional 3e.EQ Professional 1.Reverb Measurement 2.Reverb View 3.Reverb Output...
...forth between the two. Use this to measure the reverb characteristics of your listening area without reverb measurement, it before selecting this receiver (after calibration).1 Note that will be used for the calibration to select the channel, frequency, and time setting. MEMORY 1 ... • EQ OFF - Adv. The System Setup menu 07 Using Professional Acoustic Calibration EQ 1 Select 'EQ Professional' then press ENTER. 3.Manual MCACC a.Fine Ch Level b.Fine SP Distance c.Standing Wave d.EQ Adjust e.EQ Professional 3e.EQ Professional 1.Reverb Measurement 2.Reverb View 3.Reverb Output...

Owner's Manual
Page 42
... confirm the MCACC preset has been copied, then you automatically return to the Data Management setup menu. System Setup 1.Auto MCACC 2.Surr Back System 3.Manual MCACC 4.Data Management 5.Manual SP Setup 6.Input Setup 7.Other Setup : Exit 4.Data Management a.MCACC Data Check b.MCACC Data Copy c.Memory Rename d.Memory Clear :Return 2 Select the ...5.Acoustic Cal EQ :Return ENTER:Next :Return 2 Select the setting you want to another (see Checking MCACC preset data below ). • Memory Clear - See Making receiver settings from one preset to adjust. • MCACC Data Check -
... confirm the MCACC preset has been copied, then you automatically return to the Data Management setup menu. System Setup 1.Auto MCACC 2.Surr Back System 3.Manual MCACC 4.Data Management 5.Manual SP Setup 6.Input Setup 7.Other Setup : Exit 4.Data Management a.MCACC Data Check b.MCACC Data Copy c.Memory Rename d.Memory Clear :Return 2 Select the ...5.Acoustic Cal EQ :Return ENTER:Next :Return 2 Select the setting you want to another (see Checking MCACC preset data below ). • Memory Clear - See Making receiver settings from one preset to adjust. • MCACC Data Check -
Owner's Manual
Page 43
...[Cancel] :Cancel 2 Select the MCACC preset you want to specify your speaker system (page 44). • Speaker Distance - Manual speaker setup This receiver allows you to make sure that this setting to adjust. Specify the distance of your speakers from your system, but if you'...unless you change the placement of that you're using a THX speaker setup, set independently. 1 Select 'Speaker Setting' from the Manual SP Setup menu. 5.Manual SP Setup a.Speaker Setting b.Channel Level c.Speaker Distance d.Bass Peak Level e.X-Curve f.THX Audio Setting :Return 5a.Speaker Setting Front ...
...[Cancel] :Cancel 2 Select the MCACC preset you want to specify your speaker system (page 44). • Speaker Distance - Manual speaker setup This receiver allows you to make sure that this setting to adjust. Specify the distance of your speakers from your system, but if you'...unless you change the placement of that you're using a THX speaker setup, set independently. 1 Select 'Speaker Setting' from the Manual SP Setup menu. 5.Manual SP Setup a.Speaker Setting b.Channel Level c.Speaker Distance d.Bass Peak Level e.X-Curve f.THX Audio Setting :Return 5a.Speaker Setting Front ...
Owner's Manual
Page 44
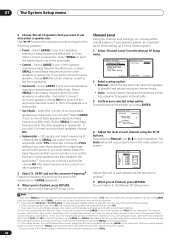
...). 3 Select 'X. Select SMALL to send the bass frequencies to the other speakers or subwoofer. Select the number of surround back speakers you selected Manual, use / to the subwoofer (or LARGE speakers). 4 When you 're using the / buttons. LFE signals and bass frequencies of speakers. ...on the speaker placement of your room you can 't get good results, listen to the subwoofer).3 If you press ENTER. 5b.Channel Level Test Tone [ Manual ] Setting Start Please Wait . . . 20 Caution! Depending on page 36) you 're having problems, the easiest option is selected. If you ...
...). 3 Select 'X. Select SMALL to send the bass frequencies to the other speakers or subwoofer. Select the number of surround back speakers you selected Manual, use / to the subwoofer (or LARGE speakers). 4 When you 're using the / buttons. LFE signals and bass frequencies of speakers. ...on the speaker placement of your room you can 't get good results, listen to the subwoofer).3 If you press ENTER. 5b.Channel Level Test Tone [ Manual ] Setting Start Please Wait . . . 20 Caution! Depending on page 36) you 're having problems, the easiest option is selected. If you ...


