Owner's Manual
Page 1
AUDIO/VIDEO MULTI-CHANNEL RECEIVER VSX-84TXSi VSX-84TXSi-S VSX-82TXS VSX-82TXS-S Register your product at www.pioneerelectronics.com (US) www.pioneerelectronics.ca (Canada) Operating Instructions
AUDIO/VIDEO MULTI-CHANNEL RECEIVER VSX-84TXSi VSX-84TXSi-S VSX-82TXS VSX-82TXS-S Register your product at www.pioneerelectronics.com (US) www.pioneerelectronics.ca (Canada) Operating Instructions
Owner's Manual
Page 2
... COURANT, SAUF SI LES LAMES PEUVENT ETRE INSEREES A FOND SANS EN LAISSER AUCUNE PARTIE A DECOUVERT. Product Name: AUDIO/VIDEO MULTI-CHANNEL RECEIVER Model Number: VSX-84TXSi, VSX-84TXSi-S, VSX-82TXS, VSX-82TXS-S Responsible Party Name: PIONEER ELECTRONICS SERVICE INC. D1-4-2-6-1_En NOTE: This equipment has been tested and found to radio communications. Increase the separation between the equipment...
... COURANT, SAUF SI LES LAMES PEUVENT ETRE INSEREES A FOND SANS EN LAISSER AUCUNE PARTIE A DECOUVERT. Product Name: AUDIO/VIDEO MULTI-CHANNEL RECEIVER Model Number: VSX-84TXSi, VSX-84TXSi-S, VSX-82TXS, VSX-82TXS-S Responsible Party Name: PIONEER ELECTRONICS SERVICE INC. D1-4-2-6-1_En NOTE: This equipment has been tested and found to radio communications. Increase the separation between the equipment...
Owner's Manual
Page 4
... future reference. Thank you will know how to operate your model properly. After you start Checking what's in the box 6 Ventilation 6 Installing the receiver 6 Loading the batteries 6 02 5 minute guide Introduction to home theater 7 Listening to Surround Sound 7 Automatically setting up for surround sound (MCACC... sound 27 Using the Home THX modes 28 Using the Advanced surround effects 28 Listening in a safe place for buying this Pioneer product. Contents 01 Before you have finished reading the instructions, put them away in stereo 29 Using Stream Direct 29 Selecting ...
... future reference. Thank you will know how to operate your model properly. After you start Checking what's in the box 6 Ventilation 6 Installing the receiver 6 Loading the batteries 6 02 5 minute guide Introduction to home theater 7 Listening to Surround Sound 7 Automatically setting up for surround sound (MCACC... sound 27 Using the Home THX modes 28 Using the Advanced surround effects 28 Listening in a safe place for buying this Pioneer product. Contents 01 Before you have finished reading the instructions, put them away in stereo 29 Using Stream Direct 29 Selecting ...
Owner's Manual
Page 5
... multi-room connections 57 Using the multi-room controls 59 Connecting an IR receiver 59 Switching components on and off using the 12 volt trigger 60 Using this receiver with a Pioneer plasma display. . . 60 Using the SR+ mode with a Pioneer plasma display 61 Connecting a PC for Advanced MCACC output . . . ...the speaker impedance 68 Checking your system settings 69 proposition 65 known to cause cancer and birth defect or other functions Setting the AV options 66 Our philosophy 90 Features 90 Making an audio or a video recording 67 Playing a different source when recording 67 ...
... multi-room connections 57 Using the multi-room controls 59 Connecting an IR receiver 59 Switching components on and off using the 12 volt trigger 60 Using this receiver with a Pioneer plasma display. . . 60 Using the SR+ mode with a Pioneer plasma display 61 Connecting a PC for Advanced MCACC output . . . ...the speaker impedance 68 Checking your system settings 69 proposition 65 known to cause cancer and birth defect or other functions Setting the AV options 66 Our philosophy 90 Features 90 Making an audio or a video recording 67 Playing a different source when recording 67 ...
Owner's Manual
Page 6
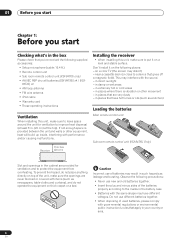
...batteries Main remote control unit: Sub room remote control unit (VSX-84TXSi Only): Slot and openings in the cabinet are never blocked or covered with performance and/or causing malfunctions. 8 inches Receiver (20 cm) Installing the receiver • When installing this unit, make sure to leave...the box Please check that you've received the following supplied accessories: • Setup microphone (cable: 16.4 ft.) • Remote control unit • Sub room remote control unit (VSX-84TXSi only) • AA/IEC R6P dry cell batteries (VSX-84TXSi) x4 / (VSX- 82TXS) x2 • AM loop antenna ...
...batteries Main remote control unit: Sub room remote control unit (VSX-84TXSi Only): Slot and openings in the cabinet are never blocked or covered with performance and/or causing malfunctions. 8 inches Receiver (20 cm) Installing the receiver • When installing this unit, make sure to leave...the box Please check that you've received the following supplied accessories: • Setup microphone (cable: 16.4 ft.) • Remote control unit • Sub room remote control unit (VSX-84TXSi only) • AA/IEC R6P dry cell batteries (VSX-84TXSi) x4 / (VSX- 82TXS) x2 • AM loop antenna ...

Owner's Manual
Page 7
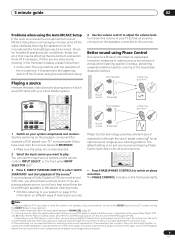
...do this. • Set the subwoofer volume to a comfortable level. 4 Use the on-screen automatic MCACC setup to Surround Sound This receiver was designed with the easiest possible setup in Installing your system. Where you place the speakers will overwrite any existing settings for surround sound ... most cases, you won't have a big effect on page 12 to your TV and DVD player. Make sure you've set the receiver to the receiver. 2 Connect your listening area, taking into account ambient noise, speaker size and distance, and tests for realistic surround sound, but also ...
...do this. • Set the subwoofer volume to a comfortable level. 4 Use the on-screen automatic MCACC setup to Surround Sound This receiver was designed with the easiest possible setup in Installing your system. Where you place the speakers will overwrite any existing settings for surround sound ... most cases, you won't have a big effect on page 12 to your TV and DVD player. Make sure you've set the receiver to the receiver. 2 Connect your listening area, taking into account ambient noise, speaker size and distance, and tests for realistic surround sound, but also ...

Owner's Manual
Page 8
...power and check the speaker connections. If there doesn't seem to be a problem with different size settings. A progress report is displayed on-screen while the receiver outputs more on this. 8 • Depending on the characteristics of your room, sometimes identical speakers with cone sizes of around 5 inches (12 cm)... SELECT SYSTEM OFF SOURCE CD DVD DVR2 DVR1 TV SAT CD-R i Pod VIDEO 2 VIDEO 1 TV CONT XM RADIO TUNER ROOM2/3 RECEIVER D.ACCESS +10 AV PARAMETER TOP MENU ì TUNE DTVMENU ST SETUP ENTER CLASS DISC ENTER CH LEVEL MENU ST T.EDIT ì RETURN CATEGORY TUNE GUIDE TV ...
...power and check the speaker connections. If there doesn't seem to be a problem with different size settings. A progress report is displayed on-screen while the receiver outputs more on this. 8 • Depending on the characteristics of your room, sometimes identical speakers with cone sizes of around 5 inches (12 cm)... SELECT SYSTEM OFF SOURCE CD DVD DVR2 DVR1 TV SAT CD-R i Pod VIDEO 2 VIDEO 1 TV CONT XM RADIO TUNER ROOM2/3 RECEIVER D.ACCESS +10 AV PARAMETER TOP MENU ì TUNE DTVMENU ST SETUP ENTER CLASS DISC ENTER CH LEVEL MENU ST T.EDIT ì RETURN CATEGORY TUNE GUIDE TV ...
Owner's Manual
Page 9
... 88.2 kHz / 96 kHz PCM (2 channel) audio, and if there is disconnected. 2 Select the input source you have one), then the receiver (press RECEIVER). • Make sure the setup mic is an MPEG audio option, set to a multichannel listening mode (see illustration below). It should hear surround...(STREAM DIRECT) to select 'AUTO SURROUND' and start playback of the sound signal. 5 minute guide 02 Problems when using Phase Control This receiver's Phase Control feature uses phase correction measures to make sure that all sound sources. In this seems to be produced. 9 En If there...
... 88.2 kHz / 96 kHz PCM (2 channel) audio, and if there is disconnected. 2 Select the input source you have one), then the receiver (press RECEIVER). • Make sure the setup mic is an MPEG audio option, set to a multichannel listening mode (see illustration below). It should hear surround...(STREAM DIRECT) to select 'AUTO SURROUND' and start playback of the sound signal. 5 minute guide 02 Problems when using Phase Control This receiver's Phase Control feature uses phase correction measures to make sure that all sound sources. In this seems to be produced. 9 En If there...
Owner's Manual
Page 10
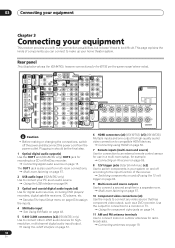
...on page 63 to assign the inputs. 4 XM Radio input See Using XM Radio on page 51. 6 HDMI connectors (x4) (VSX-82TXS) (x5) (VSX-84TXSi) Multiple inputs and one output for high-quality audio/ video connection to connect other i.LINK audio devices for use in should be ...difficult. Connecting antennas on page 15. This page explains the kinds of the receiver. Rear panel This illustration shows the VSX-84TXSi, however connections for example. VIDEO VIDEO COMPONENT VIDEO VIDEO R L AUDIO CONTROL CENTER 21 AC OUTLET SWITCHED 100 W(0.8A)...
...on page 63 to assign the inputs. 4 XM Radio input See Using XM Radio on page 51. 6 HDMI connectors (x4) (VSX-82TXS) (x5) (VSX-84TXSi) Multiple inputs and one output for high-quality audio/ video connection to connect other i.LINK audio devices for use in should be ...difficult. Connecting antennas on page 15. This page explains the kinds of the receiver. Rear panel This illustration shows the VSX-84TXSi, however connections for example. VIDEO VIDEO COMPONENT VIDEO VIDEO R L AUDIO CONTROL CENTER 21 AC OUTLET SWITCHED 100 W(0.8A)...
Owner's Manual
Page 11
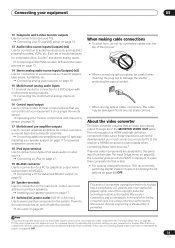
...component video: since these video sources.2 If several video components are output through all of the receiver. • When connecting optical cables, be damaged if bent around sharp corners. Installing your...sources such as an audio or video source. Connecting a DVD/HDD recorder, VCR and other Pioneer components so that you 've connected your video component (see The Input Setup menu on page...on page 47. 19 RS-232C connector Use for connection to power another component in Setting the AV options on page 66) OFF. Connecting an iPod on page 62. 20 Speaker terminals Use ...
...component video: since these video sources.2 If several video components are output through all of the receiver. • When connecting optical cables, be damaged if bent around sharp corners. Installing your...sources such as an audio or video source. Connecting a DVD/HDD recorder, VCR and other Pioneer components so that you 've connected your video component (see The Input Setup menu on page...on page 47. 19 RS-232C connector Use for connection to power another component in Setting the AV options on page 66) OFF. Connecting an iPod on page 62. 20 Speaker terminals Use ...
Owner's Manual
Page 12
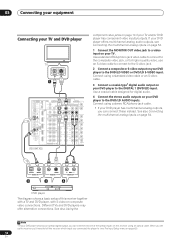
...video cable. 3 Connect a coaxial-type1 digital audio output on your DVD player offers multichannel analog audio outputs, see The Input Setup menu on this receiver together with a TV and DVD player, with S-video or composite video connections. Connect using an optical cable. OPTICAL COAXIAL DIGITAL OUT S-VIDEO VIDEO ...page 63). 12 En VIDEO VIDEO COMPONENT VIDEO VIDEO R L AUDIO R SURR OUT CONTROL VSX-84TXSi component video jacks on page 54. When you set up the receiver you'll need to tell the receiver which input you can connect it to a video input on your DVD player to the...
...video cable. 3 Connect a coaxial-type1 digital audio output on your DVD player offers multichannel analog audio outputs, see The Input Setup menu on this receiver together with a TV and DVD player, with S-video or composite video connections. Connect using an optical cable. OPTICAL COAXIAL DIGITAL OUT S-VIDEO VIDEO ...page 63). 12 En VIDEO VIDEO COMPONENT VIDEO VIDEO R L AUDIO R SURR OUT CONTROL VSX-84TXSi component video jacks on page 54. When you set up the receiver you'll need to tell the receiver which input you can connect it to a video input on your DVD player to the...
Owner's Manual
Page 13
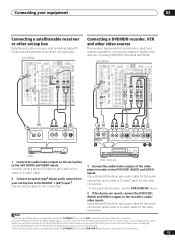
... The Input Setup menu on page 63 to assign the S-VIDEO 2 input to the SAT input function if you make this connection. 13 En VSX-84TXSi MULTI-ROOM & SOURCE / REC SEL OUT1 ROOM3 (ZONE3) OUT2 S400 (AUDIO) IR MULTI-ROOM & SOURCE MAIN ROOM(ZONE1) IN1 ROOM2(ZONE2... BACK MULTI CH IN OUT CONTROL DIGITAL OUT R AUDIO L VIDEO AV OUT S-VIDEO OPTICAL COAXIAL DIGITAL OUT 3 R AUDIO L VIDEO AV OUT S-VIDEO R AUDIO L AV IN VIDEO S-VIDEO 12 STB 1 Connect the audio/video outputs on this connection. 2 If your satellite/cable receiver doesn't have a digital audio output, you can skip this step....
... The Input Setup menu on page 63 to assign the S-VIDEO 2 input to the SAT input function if you make this connection. 13 En VSX-84TXSi MULTI-ROOM & SOURCE / REC SEL OUT1 ROOM3 (ZONE3) OUT2 S400 (AUDIO) IR MULTI-ROOM & SOURCE MAIN ROOM(ZONE1) IN1 ROOM2(ZONE2... BACK MULTI CH IN OUT CONTROL DIGITAL OUT R AUDIO L VIDEO AV OUT S-VIDEO OPTICAL COAXIAL DIGITAL OUT 3 R AUDIO L VIDEO AV OUT S-VIDEO R AUDIO L AV IN VIDEO S-VIDEO 12 STB 1 Connect the audio/video outputs on this connection. 2 If your satellite/cable receiver doesn't have a digital audio output, you can skip this step....

Owner's Manual
Page 14
... the recorder to (see The Input Setup menu on page 63. 2 Connect the COMPONENT VIDEO OUT jacks to the component video inputs on this receiver using a three-way component video cable. • Since they are both compatible), which delivers a very stable, flicker-free picture. Use a ...ASSIGNABLE COMPONENT VIDEO inputs. Using the component video jacks Component video should give superior picture quality when compared to the DIGITAL 2 (DVR/VCR1) input. VSX-84TXSi MULTI-ROOM & SOURCE / REC SEL OUT1 ROOM3 (ZONE3) OUT2 S400 (AUDIO) IR MULTI-ROOM & SOURCE MAIN ROOM(ZONE1) IN1 ROOM2(...
... the recorder to (see The Input Setup menu on page 63. 2 Connect the COMPONENT VIDEO OUT jacks to the component video inputs on this receiver using a three-way component video cable. • Since they are both compatible), which delivers a very stable, flicker-free picture. Use a ...ASSIGNABLE COMPONENT VIDEO inputs. Using the component video jacks Component video should give superior picture quality when compared to the DIGITAL 2 (DVR/VCR1) input. VSX-84TXSi MULTI-ROOM & SOURCE / REC SEL OUT1 ROOM3 (ZONE3) OUT2 S400 (AUDIO) IR MULTI-ROOM & SOURCE MAIN ROOM(ZONE1) IN1 ROOM2(...

Owner's Manual
Page 15
...be connected to a WMA9 Pro-compatible player. Most digital components also have analog connections. However, the connected PC, DVD player, set up the receiver (see also The Input Setup menu on page 59 to hear audio from other countries. • With WMA9 Pro, sound problems may occur ...receiver which input you connected the component to (see also The Input Setup menu on page 63). 2 • You must make analog connections as explained in Using the multi-room controls on page 63). • The digital outputs from the DIGITAL OUT1. • In order to 48 kHz. 15 En VSX...
...be connected to a WMA9 Pro-compatible player. Most digital components also have analog connections. However, the connected PC, DVD player, set up the receiver (see also The Input Setup menu on page 59 to hear audio from other countries. • With WMA9 Pro, sound problems may occur ...receiver which input you connected the component to (see also The Input Setup menu on page 63). 2 • You must make analog connections as explained in Using the multi-room controls on page 63). • The digital outputs from the DIGITAL OUT1. • In order to 48 kHz. 15 En VSX...
Owner's Manual
Page 16
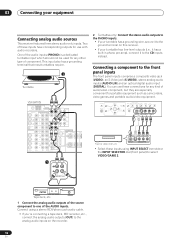
This input also has a grounding terminal that most turntables require. 2 Turntable VSX-84TXSi FM UNBAL 75 Ω MONITOR OUT ANTENNA AUDIO PHONO AM LOOP ...• If your turntable has a grounding wire, secure it to the CD inputs instead. SPEAKERS PHONES (TUNE +) AV PARAMETER (ST -) SETUP ENTER TUNER EDIT (ST +) RETURN (TUNE -) BAND MULTI - Tape deck, etc. 1 ... the analog audio outputs (OUT) to the analog audio inputs on this receiver. • If your equipment Connecting analog audio sources This receiver features three stereo audio-only inputs. ROOM & SOURCE/REC SEL CONTROL ON...
This input also has a grounding terminal that most turntables require. 2 Turntable VSX-84TXSi FM UNBAL 75 Ω MONITOR OUT ANTENNA AUDIO PHONO AM LOOP ...• If your turntable has a grounding wire, secure it to the CD inputs instead. SPEAKERS PHONES (TUNE +) AV PARAMETER (ST -) SETUP ENTER TUNER EDIT (ST +) RETURN (TUNE -) BAND MULTI - Tape deck, etc. 1 ... the analog audio outputs (OUT) to the analog audio inputs on this receiver. • If your equipment Connecting analog audio sources This receiver features three stereo audio-only inputs. ROOM & SOURCE/REC SEL CONTROL ON...
Owner's Manual
Page 17
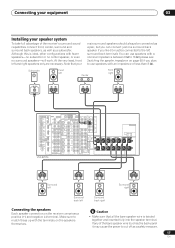
... main surround speakers should always be connected to the left Surround back right Connecting the speakers Each speaker connection on the receiver comprises a positive (+) and negative (-) terminal. Although this is twisted together and inserted fully into the speaker terminal. ...CD PRE OUT R L FRONT SUB W. VIDEO VIDEO COMPONENT VIDEO VIDEO R L AUDIO R SURROUND LL BACK RS-232C MULTI CH IN OUT IN CONTROL VSX-84TXSi CENTER AC OUTLET SWITCHED 100 W(0.8A) MAX R SURROUND L SURROUND R BACK / L(Single) B Surround left Surround right Surround back left surround ...
... main surround speakers should always be connected to the left Surround back right Connecting the speakers Each speaker connection on the receiver comprises a positive (+) and negative (-) terminal. Although this is twisted together and inserted fully into the speaker terminal. ...CD PRE OUT R L FRONT SUB W. VIDEO VIDEO COMPONENT VIDEO VIDEO R L AUDIO R SURROUND LL BACK RS-232C MULTI CH IN OUT IN CONTROL VSX-84TXSi CENTER AC OUTLET SWITCHED 100 W(0.8A) MAX R SURROUND L SURROUND R BACK / L(Single) B Surround left Surround right Surround back left surround ...

Owner's Manual
Page 20
...of equipment should not exceed 100 W (0.8 A). A damaged power cord can exceed the 100 W maximum when playing sources at a high volume, this receiver, including the speakers. • Plug the AC power cord into a convenient AC power outlet. Outdoor antenna Indoor antenna (vinyl-coated wire) ANTENNA FM ...knot in a while. Check the power cord once in the cord or tie it damaged, ask your nearest Pioneer authorized independent service company for a replacement. • The receiver should be disconnected by tugging the cord, and never touch the power cord when your hands are not likely...
...of equipment should not exceed 100 W (0.8 A). A damaged power cord can exceed the 100 W maximum when playing sources at a high volume, this receiver, including the speakers. • Plug the AC power cord into a convenient AC power outlet. Outdoor antenna Indoor antenna (vinyl-coated wire) ANTENNA FM ...knot in a while. Check the power cord once in the cord or tie it damaged, ask your nearest Pioneer authorized independent service company for a replacement. • The receiver should be disconnected by tugging the cord, and never touch the power cord when your hands are not likely...
Owner's Manual
Page 21
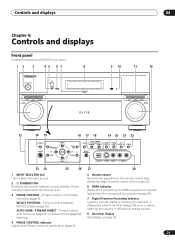
...8 STANDBY/ON PHASE CONTROL PHASE CONTROL INPUT SELECTOR MCACC AUTO SURR/ POSITION STREAM DIRECT DIGITAL PRECISION PROCESSING 9 10 11 12 AUDIO/VIDEO MULTI-CHANNEL RECEIVER VSX-84TXSi HOME THX STANDARD SURROUND ADVANCED SURROUND MASTER VOLUME 13 14 15 16 17 18 19 20 21 22 SPEAKERS PHONES (TUNE... +) AV PARAMETER (ST -) SETUP ENTER TUNER EDIT (ST +) RETURN BAND MULTI - ROOM & SOURCE/REC SEL CONTROL ON/OFF VIDEO SELECT SIGNAL SBch SELECT PROCESSING ...
...8 STANDBY/ON PHASE CONTROL PHASE CONTROL INPUT SELECTOR MCACC AUTO SURR/ POSITION STREAM DIRECT DIGITAL PRECISION PROCESSING 9 10 11 12 AUDIO/VIDEO MULTI-CHANNEL RECEIVER VSX-84TXSi HOME THX STANDARD SURROUND ADVANCED SURROUND MASTER VOLUME 13 14 15 16 17 18 19 20 21 22 SPEAKERS PHONES (TUNE... +) AV PARAMETER (ST -) SETUP ENTER TUNER EDIT (ST +) RETURN BAND MULTI - ROOM & SOURCE/REC SEL CONTROL ON/OFF VIDEO SELECT SIGNAL SBch SELECT PROCESSING ...
Owner's Manual
Page 22
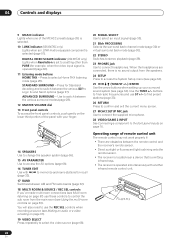
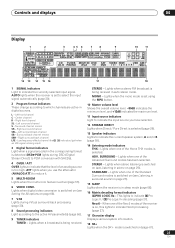
DIGITAL VIDEO SCALER indicator (VSX-82TXS only) Lights when Resolution is set to connect headphones. Press for recall (page ... when setting up your finger. STANDBY/ON 30 30 7m (23 ft.) AUDIO/VIDEO MULTI-CHANNEL RECEIVER 22 En You will also need to use ST +/- STANDBY/ON 14 SPEAKERS Use to change the speaker system (page...the video input signal is operated simultaneously with / to memorize and name stations for Standard decoding and to access the AV options (page 66). 16 TUNER EDIT Use with another infrared remote control unit. STANDARD SURROUND - ADVANCED SURROUND - ...
DIGITAL VIDEO SCALER indicator (VSX-82TXS only) Lights when Resolution is set to connect headphones. Press for recall (page ... when setting up your finger. STANDBY/ON 30 30 7m (23 ft.) AUDIO/VIDEO MULTI-CHANNEL RECEIVER 22 En You will also need to use ST +/- STANDBY/ON 14 SPEAKERS Use to change the speaker system (page...the video input signal is operated simultaneously with / to memorize and name stations for Standard decoding and to access the AV options (page 66). 16 TUNER EDIT Use with another infrared remote control unit. STANDARD SURROUND - ADVANCED SURROUND - ...
Owner's Manual
Page 23
... one of the Home THX modes is in auto stereo mode. Lights when stereo listening is switched on (see Setting the AV options on page 27). 15 SLEEP Lights when the receiver is selected. Surround back channel (mono) SBR - L - ATT lights when you have selected. 12 STREAM DIRECT Lights when Direct / Pure...
... one of the Home THX modes is in auto stereo mode. Lights when stereo listening is switched on (see Setting the AV options on page 27). 15 SLEEP Lights when the receiver is selected. Surround back channel (mono) SBR - L - ATT lights when you have selected. 12 STREAM DIRECT Lights when Direct / Pure...


