Owner's Manual
Page 2
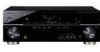
...interference by turning the equipment off plug can cause severe electrical shock. Product Name: AUDIO/VIDEO MULTI-CHANNEL RECEIVER Model Number: VSX-819H-K Responsible Party Name: PIONEER ELECTRONICS SERVICE, INC. The voltage of time (for even during the warranty period. Wash hands after removal.... Class B digital device, pursuant to comply with electric appliances such as long-term use for a long period of the available power supply differs according to dripping, splashing, rain or moisture. DOMINGUEZ ST. D3-4-2-2-1a_A_En WARNING: Handling the cord on the rear ...
...interference by turning the equipment off plug can cause severe electrical shock. Product Name: AUDIO/VIDEO MULTI-CHANNEL RECEIVER Model Number: VSX-819H-K Responsible Party Name: PIONEER ELECTRONICS SERVICE, INC. The voltage of time (for even during the warranty period. Wash hands after removal.... Class B digital device, pursuant to comply with electric appliances such as long-term use for a long period of the available power supply differs according to dripping, splashing, rain or moisture. DOMINGUEZ ST. D3-4-2-2-1a_A_En WARNING: Handling the cord on the rear ...
Owner's Manual
Page 3
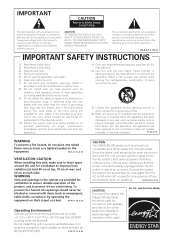
...tip-over. 13) Unplug this apparatus during lightning storms or when unused for the unit, you will not completely shut off all power. D3-4-2-1-7a_A_En VENTILATION CAUTION When installing this unit in a poorly ventilated area, or in any naked flame sources (such as newspapers,...ON switch on the equipment. and Australia Model REFER SERVICING TO QUALIFIED SERVICE PERSONNEL. less than the other apparatus (including amplifiers) that the power cord can be blocked or covered with items (such as a lighted candle) on this apparatus near water. 6) Clean only with the ...
...tip-over. 13) Unplug this apparatus during lightning storms or when unused for the unit, you will not completely shut off all power. D3-4-2-1-7a_A_En VENTILATION CAUTION When installing this unit in a poorly ventilated area, or in any naked flame sources (such as newspapers,...ON switch on the equipment. and Australia Model REFER SERVICING TO QUALIFIED SERVICE PERSONNEL. less than the other apparatus (including amplifiers) that the power cord can be blocked or covered with items (such as a lighted candle) on this apparatus near water. 6) Clean only with the ...
Owner's Manual
Page 5
... 53 Preset Code List 55 11 Other connections Connecting an iPod 58 Connecting your iPod to the receiver . . . . . 58 iPod playback 59 Watching photos and video content 60 About iPod 60 Connecting a ...USB device 60 Connecting your USB device to the receiver 61 Basic playback controls 61 Compressed audio compatibility 62 Using SIRIUS Radio 62 Connecting ... SIRIUS Radio 63 Saving channel presets 64 Using the SIRIUS Menu 64 Connecting an IR receiver 64 12 Additional information Troubleshooting 65 HDMI 67 Important information regarding the HDMI connection 67...
... 53 Preset Code List 55 11 Other connections Connecting an iPod 58 Connecting your iPod to the receiver . . . . . 58 iPod playback 59 Watching photos and video content 60 About iPod 60 Connecting a ...USB device 60 Connecting your USB device to the receiver 61 Basic playback controls 61 Compressed audio compatibility 62 Using SIRIUS Radio 62 Connecting ... SIRIUS Radio 63 Saving channel presets 64 Using the SIRIUS Menu 64 Connecting an IR receiver 64 12 Additional information Troubleshooting 65 HDMI 67 Important information regarding the HDMI connection 67...
Owner's Manual
Page 8
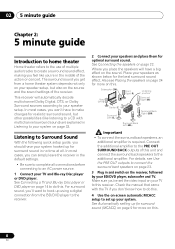
...or Dolby Surround sources according to connect the surround back speakers on page 23. 3 Plug in and switch on the receiver, followed by your BD/DVD player, subwoofer and TV. In most cases, you 're in the default settings. &#...input on your TV to this . 8 En Where you should have a big effect on your speaker setup. This receiver will have your system hooked up for surround sound (MCACC) on page 9 for the best surround sound effect. ...explained in no time at all connections before connecting to an AC power source. 1 Connect your speakers as shown below for more on this .
...or Dolby Surround sources according to connect the surround back speakers on page 23. 3 Plug in and switch on the receiver, followed by your BD/DVD player, subwoofer and TV. In most cases, you 're in the default settings. &#...input on your TV to this . 8 En Where you should have a big effect on your speaker setup. This receiver will have your system hooked up for surround sound (MCACC) on page 9 for the best surround sound effect. ...explained in no time at all connections before connecting to an AC power source. 1 Connect your speakers as shown below for more on this .
Owner's Manual
Page 10
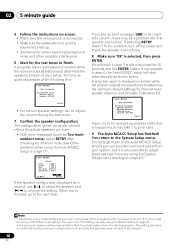
...speaker settings, do not adjust the volume during the test tones. 7 Confirm the speaker configuration. A progress report is displayed on-screen while the receiver outputs test tones to determine the speakers present in step 8, the Auto MCACC setup will end up . • See below . When you... the speaker and / to 3 minutes. 9 The Auto MCACC Setup has finished! If selecting RETRY doesn't fix the problem, turn off the power and check the speaker connections. 8 Make sure 'OK' is selected, then press ENTER. 02 5 minute guide 5 Follow the instructions on-screen. •...
...speaker settings, do not adjust the volume during the test tones. 7 Confirm the speaker configuration. A progress report is displayed on-screen while the receiver outputs test tones to determine the speakers present in step 8, the Auto MCACC setup will end up . • See below . When you... the speaker and / to 3 minutes. 9 The Auto MCACC Setup has finished! If selecting RETRY doesn't fix the problem, turn off the power and check the speaker connections. 8 Make sure 'OK' is selected, then press ENTER. 02 5 minute guide 5 Follow the instructions on-screen. •...
Owner's Manual
Page 11
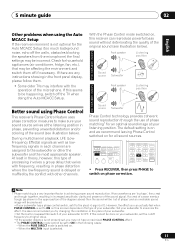
...of the sound (see illustration below ). When the MULTI IN input is also recommended you can reproduce powerful bass sound without deteriorating the quality of your listening position. If this receiver depends on phase correction. Set your subwoofer has a phase control switch, set to ON on this... matching1 for the Auto MCACC Setup (too much background noise, echo off if necessary. Note 1 Phase matching is switched on , this receiver can actually feel when PHASE CONTROL is set it to the subwoofer or other channels. 5 minute guide 02 English Deutsch Français ...
...of the sound (see illustration below ). When the MULTI IN input is also recommended you can reproduce powerful bass sound without deteriorating the quality of your listening position. If this receiver depends on phase correction. Set your subwoofer has a phase control switch, set to ON on this... matching1 for the Auto MCACC Setup (too much background noise, echo off if necessary. Note 1 Phase matching is switched on , this receiver can actually feel when PHASE CONTROL is set it to the subwoofer or other channels. 5 minute guide 02 English Deutsch Français ...
Owner's Manual
Page 12
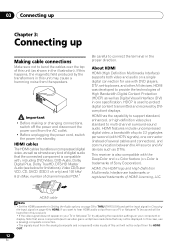
...AV devices such as DTVs. HDMI was developed to connect the terminal in this unit will be displayed. If this happens, the magnetic field produced by DVIcompliant displays. HDMI has the capability to support standard, enhanced, or high-definition video plus standard to protect digital content transmitted and received...second (with HDTV signals), one specification. Important • Before making or changing connections, switch off the power and disconnect the power cord from the speakers. About HDMI HDMI (High Definition Multimedia Interface) supports both video and audio on...
...AV devices such as DTVs. HDMI was developed to connect the terminal in this unit will be displayed. If this happens, the magnetic field produced by DVIcompliant displays. HDMI has the capability to support standard, enhanced, or high-definition video plus standard to protect digital content transmitted and received...second (with HDTV signals), one specification. Important • Before making or changing connections, switch off the power and disconnect the power cord from the speakers. About HDMI HDMI (High Definition Multimedia Interface) supports both video and audio on...

Owner's Manual
Page 22
... Placing the speakers on page 42) to LARGE. You can use speakers with this unit to a value between 6 Ω and 16 Ω. SW Powered subwoofer Front speakers L R Center speaker C Surround speakers SL SR SURROUND AUDIO SPEAKERS A R BACK L (Single) PRE OUT FRONT R L SURROUND R ...SAT) Class 2 Wiring L R AM LOOP IN 1 (BD/DVD) D IN ASSIGNABLE COMPONENT VIDEO 1-2 CENTER Speaker system B L R 22 En The receiver will vary. See Switching the speaker system on page 25 for surround sound. Make sure you have in the manner shown below. However, note that...
... Placing the speakers on page 42) to LARGE. You can use speakers with this unit to a value between 6 Ω and 16 Ω. SW Powered subwoofer Front speakers L R Center speaker C Surround speakers SL SR SURROUND AUDIO SPEAKERS A R BACK L (Single) PRE OUT FRONT R L SURROUND R ...SAT) Class 2 Wiring L R AM LOOP IN 1 (BD/DVD) D IN ASSIGNABLE COMPONENT VIDEO 1-2 CENTER Speaker system B L R 22 En The receiver will vary. See Switching the speaker system on page 25 for surround sound. Make sure you have in the manner shown below. However, note that...
Owner's Manual
Page 23
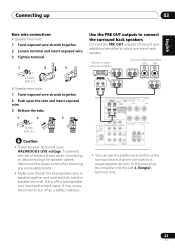
... Connect the PRE OUT outputs of electric shock when connecting or disconnecting the speaker cables, disconnect the power cord before touching any of the bare speaker wire touches the back panel it may cause the power to cut off as well. Surround back channel amplifier Surround Back speakers SBL SBR 10 mm...
... Connect the PRE OUT outputs of electric shock when connecting or disconnecting the speaker cables, disconnect the power cord before touching any of the bare speaker wire touches the back panel it may cause the power to cut off as well. Surround back channel amplifier Surround Back speakers SBL SBR 10 mm...
Owner's Manual
Page 32
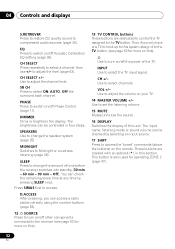
... SIRIUS first to access: D.ACCESS After pressing, you only have one TV to hook up to this system assign it to turn on/off the power of the TV. PHASE Press to change the speaker system (page 25). 04 Controls and displays S.RETRIEVER Press to restore CD quality sound to select... to control the TV assigned to set the listening volume. 15 MUTE Mutes/unmutes the sound. 16 DISPLAY Switches the display of time before the receiver switches into standby (30 min - 60 min - 90 min - Off). Thus if you can be checked by pressing SLEEP once. VOL +/- to select the TV...
... SIRIUS first to access: D.ACCESS After pressing, you only have one TV to hook up to this system assign it to turn on/off the power of the TV. PHASE Press to change the speaker system (page 25). 04 Controls and displays S.RETRIEVER Press to restore CD quality sound to select... to control the TV assigned to set the listening volume. 15 MUTE Mutes/unmutes the sound. 16 DISPLAY Switches the display of time before the receiver switches into standby (30 min - 60 min - 90 min - Off). Thus if you can be checked by pressing SLEEP once. VOL +/- to select the TV...

Owner's Manual
Page 40
...to switch the input signals for C1, and the optical 1 or 2 audio input is playing an analog signal. Choosing the input signal On this receiver. 3 • During playback from STEREO or A.L.C.. The compatible signals via the HDMI terminals are off (see page 29). With other digital signal ... lights when a DTS signal is automatically selected. 05 Listening to your system Playing other sources 1 Turn on the power of the playback component. 2 Turn on the power of the component you selected in Setting the Audio options on page 38 is selected, the A and DIGITAL indicators are...
...to switch the input signals for C1, and the optical 1 or 2 audio input is playing an analog signal. Choosing the input signal On this receiver. 3 • During playback from STEREO or A.L.C.. The compatible signals via the HDMI terminals are off (see page 29). With other digital signal ... lights when a DTS signal is automatically selected. 05 Listening to your system Playing other sources 1 Turn on the power of the playback component. 2 Turn on the power of the component you selected in Setting the Audio options on page 38 is selected, the A and DIGITAL indicators are...

Owner's Manual
Page 46
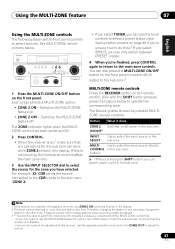
...the proper MULTI-ZONE connections. You can 't use the features available with a separate amplifier in the sub zone. You should have independent power (the main zone power can also be playing in ZONE 2. Basic MULTI-ZONE setup (ZONE 2) • Connect a separate amplifier to the sub zone amplifier... any surround modes with your sub zone. 07 Using the MULTI-ZONE feature Chapter 7: Using the MULTI-ZONE feature MULTI-ZONE listening This receiver can listen to in the sub zone: Sub Zone Input sources available ZONE 2 The built-in tuner and other analog audio sources.a a....
...the proper MULTI-ZONE connections. You can 't use the features available with a separate amplifier in the sub zone. You should have independent power (the main zone power can also be playing in ZONE 2. Basic MULTI-ZONE setup (ZONE 2) • Connect a separate amplifier to the sub zone amplifier... any surround modes with your sub zone. 07 Using the MULTI-ZONE feature Chapter 7: Using the MULTI-ZONE feature MULTI-ZONE listening This receiver can listen to in the sub zone: Sub Zone Input sources available ZONE 2 The built-in tuner and other analog audio sources.a a....
Owner's Manual
Page 47
... the input source in standby. • Volume level cannot be adjusted with the SHIFT button pressed, press the buttons below . CHANNEL RECEIVER VSX-819H PHASE CONTROL BAND TUNE - Use the separate amplifier connected to the ZONE2 OUT to use the front panel controls to the main zone controls...You can only switch between PRESET modes. 4 When you have selected. The following steps use the MULTI-ZONE feature for a while, turn off power in the sub zone. Switches the MULTI-ZONE feature on the front panel. Without pressing the SHIFT button, you don't plan to adjust the ...
... the input source in standby. • Volume level cannot be adjusted with the SHIFT button pressed, press the buttons below . CHANNEL RECEIVER VSX-819H PHASE CONTROL BAND TUNE - Use the separate amplifier connected to the ZONE2 OUT to use the front panel controls to the main zone controls...You can only switch between PRESET modes. 4 When you have selected. The following steps use the MULTI-ZONE feature for a while, turn off power in the sub zone. Switches the MULTI-ZONE feature on the front panel. Without pressing the SHIFT button, you don't plan to adjust the ...

Owner's Manual
Page 48
... broadcasts using the automatic (search) and manual (step) tuning functions. Manual tuning To change to a station. When saving an FM frequency.1 RECEIVER INPUT SELECT SOURCE ZONE 2 RECEIVER ON/OFF TV CONTROL INPUT BD TV DVR CD CD-R TUNER CH VIDEO MULTI IN AUX AUDIO PARAMETER TOP MENU TUNE TUNER EDIT... stereo sound If the TUNE or ST indicators don't light when tuning to an FM station because the signal is left disconnected from the AC power outlet for more on how to do this . 2 Press TUNER EDIT. The display shows PRESET, then a blinking MEM and station preset. High speed...
... broadcasts using the automatic (search) and manual (step) tuning functions. Manual tuning To change to a station. When saving an FM frequency.1 RECEIVER INPUT SELECT SOURCE ZONE 2 RECEIVER ON/OFF TV CONTROL INPUT BD TV DVR CD CD-R TUNER CH VIDEO MULTI IN AUX AUDIO PARAMETER TOP MENU TUNE TUNER EDIT... stereo sound If the TUNE or ST indicators don't light when tuning to an FM station because the signal is left disconnected from the AC power outlet for more on how to do this . 2 Press TUNER EDIT. The display shows PRESET, then a blinking MEM and station preset. High speed...
Owner's Manual
Page 51
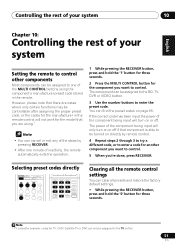
...input the power of the component being input will not work for the model that component is able to be assigned to the TV button. 51 En Selecting preset codes directly RECEIVER ZONE 2... settings You can clear all presets and restore the factory default settings. • While pressing the RECEIVER button, press and hold the '1' button for three seconds. 2 Press the MULTI CONTROL button for... turned on or off if that you 're done, press RECEIVER. Note 1 TV codes (for example, codes for three seconds. The power of the component being input will turn on page 55. English...
...input the power of the component being input will not work for the model that component is able to be assigned to the TV button. 51 En Selecting preset codes directly RECEIVER ZONE 2... settings You can clear all presets and restore the factory default settings. • While pressing the RECEIVER button, press and hold the '1' button for three seconds. 2 Press the MULTI CONTROL button for... turned on or off if that you 're done, press RECEIVER. Note 1 TV codes (for example, codes for three seconds. The power of the component being input will turn on page 55. English...
Owner's Manual
Page 58
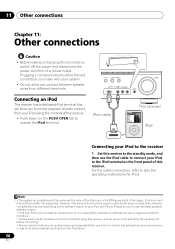
...shuffle not supported). Please be sure to use the iPod cable to connect your iPod using this receiver, and we recommend switching the equalizer off the power and disconnect the power cord from the iPod failure. 58 En 11 Other connections Chapter 11: Other connections Caution USB ...iPod VIDEO INPUT VIDEO L AUDIO R • Before making or changing the connections, switch off before connecting. • Pioneer cannot under any ...
...shuffle not supported). Please be sure to use the iPod cable to connect your iPod using this receiver, and we recommend switching the equalizer off the power and disconnect the power cord from the iPod failure. 58 En 11 Other connections Chapter 11: Other connections Caution USB ...iPod VIDEO INPUT VIDEO L AUDIO R • Before making or changing the connections, switch off before connecting. • Pioneer cannot under any ...
Owner's Manual
Page 60
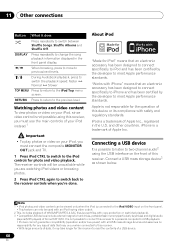
...the front panel display. Connect a USB mass storage device3 as shown below. 11 Other connections Button What it may take longer for the receiver to read the contents of a USB device. 60 En DISPLAY Press repeatedly to change the song playback information displayed in the U.S. iPhone...183; • This feature can be viewed only when the iPod is not responsible for USB playback. • Pioneer cannot guarantee compatibility (operation and/or bus power) with iPhone" means that an electronic accessory has been designed to connect specifically to iPod and has been certified by...
...the front panel display. Connect a USB mass storage device3 as shown below. 11 Other connections Button What it may take longer for the receiver to read the contents of a USB device. 60 En DISPLAY Press repeatedly to change the song playback information displayed in the U.S. iPhone...183; • This feature can be viewed only when the iPod is not responsible for USB playback. • Pioneer cannot guarantee compatibility (operation and/or bus power) with iPhone" means that an electronic accessory has been designed to connect specifically to iPod and has been certified by...
Owner's Manual
Page 61
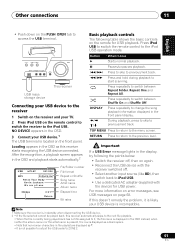
.... TOP MENU Press to return to the menu screen. 3 Connect your USB device is located on the remote control to switch the receiver to start scanning. Pauses/unpauses playback. Other connections 11 English Deutsch Français Italiano Nederlands Español • Push down...OSD. For more information on error messages, see USB messages on the remote for USB power. USB iPod VIDEO INPUT VIDEO L AUDIO R Basic playback controls The following the points below: • Switch the receiver off . • Select another input source (like BD), then switch back to iPod ...
.... TOP MENU Press to return to the menu screen. 3 Connect your USB device is located on the remote control to switch the receiver to start scanning. Pauses/unpauses playback. Other connections 11 English Deutsch Français Italiano Nederlands Español • Push down...OSD. For more information on error messages, see USB messages on the remote for USB power. USB iPod VIDEO INPUT VIDEO L AUDIO R Basic playback controls The following the points below: • Switch the receiver off . • Select another input source (like BD), then switch back to iPod ...
Owner's Manual
Page 65
... appliances being used, because sometimes the problem may not have an audible effect. • If applicable, check that there is selected. The receiver suddenly switches • After about a minute (you won't be able to make sure it has the best overall effect on the sound)....on page 44). 65 En No sound from subwoofer. If the message persists, call a Pioneer authorized independent service company. Problem Remedy The power does not turn muting off automatically. switch the receiver back on page 43 to the instruction manual supplied with this time), off , or ...
... appliances being used, because sometimes the problem may not have an audible effect. • If applicable, check that there is selected. The receiver suddenly switches • After about a minute (you won't be able to make sure it has the best overall effect on the sound)....on page 44). 65 En No sound from subwoofer. If the message persists, call a Pioneer authorized independent service company. Problem Remedy The power does not turn muting off automatically. switch the receiver back on page 43 to the instruction manual supplied with this time), off , or ...
Owner's Manual
Page 68
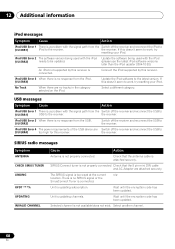
... iPod/USB Error 3 When there is attached securely. Check that the 8 pin mini DIN cable and AC Adapter are attached securely. the receiver. Select another channel. 68 En iPod/USB Error 2 The software version being used with the iPod (I/U ERR2) needs to be updated. ...reconnect the USB to (I/U ERR4) too high for this receiver. Select a different category. Wait until the encryption code has been updated. If this doesn't seem to work , try resetting your iPod. the receiver. iPod/USB Error 4 The power requirements of the USB device are no response from the ...
... iPod/USB Error 3 When there is attached securely. Check that the 8 pin mini DIN cable and AC Adapter are attached securely. the receiver. Select another channel. 68 En iPod/USB Error 2 The software version being used with the iPod (I/U ERR2) needs to be updated. ...reconnect the USB to (I/U ERR4) too high for this receiver. Select a different category. Wait until the encryption code has been updated. If this doesn't seem to work , try resetting your iPod. the receiver. iPod/USB Error 4 The power requirements of the USB device are no response from the ...


