Owner's Manual
Page 4
...sound 27 Using the Advanced surround effects . . . . . 28 Setting the effect options 28 Listening in a safe place for buying this Pioneer product. After you have finished reading the instructions, put them away in stereo 29 Using Front Stage Surround Advance 29 Using Stream Direct 30 ...the multichannel analog inputs . . . 33 Selecting the front audio inputs 33 06 The System Setup menu Making receiver settings from the System Setup menu 34 Surround back speaker setting 34 Manual MCACC speaker setup 35 Fine Channel Level 36 Fine Speaker Distance 36 Acoustic Calibration EQ 37...
...sound 27 Using the Advanced surround effects . . . . . 28 Setting the effect options 28 Listening in a safe place for buying this Pioneer product. After you have finished reading the instructions, put them away in stereo 29 Using Front Stage Surround Advance 29 Using Stream Direct 30 ...the multichannel analog inputs . . . 33 Selecting the front audio inputs 33 06 The System Setup menu Making receiver settings from the System Setup menu 34 Surround back speaker setting 34 Manual MCACC speaker setup 35 Fine Channel Level 36 Fine Speaker Distance 36 Acoustic Calibration EQ 37...
Owner's Manual
Page 7
...complete all . See Connecting the speakers on the source and the sound settings of the action or concert. Also see Listening in the receiver's display. Check the manual that DVD is showing in surround sound on page 27 if you need to set your DVD player to output Dolby Digital, DTS and... 88.2 kHz/96 kHz PCM (2 channel) audio (see your DVD player's manual for more on this.2 Note 1 You may only get from the DVD player to the receiver. 2 Connect your DVD player, subwoofer and TV. Make sure that came with multichannel surround sound) are several other...
...complete all . See Connecting the speakers on the source and the sound settings of the action or concert. Also see Listening in the receiver's display. Check the manual that DVD is showing in surround sound on page 27 if you need to set your DVD player to output Dolby Digital, DTS and... 88.2 kHz/96 kHz PCM (2 channel) audio (see your DVD player's manual for more on this.2 Note 1 You may only get from the DVD player to the receiver. 2 Connect your DVD player, subwoofer and TV. Make sure that came with multichannel surround sound) are several other...
Owner's Manual
Page 8
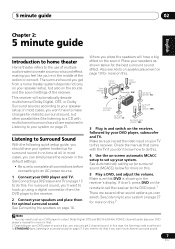
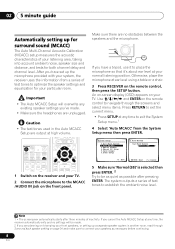
...SOUND RETRIEVER EFFECT /CH SEL LEVEL GUIDE SETUP SUBTITLE TUNE CH - If you cancel the Auto MCACC Setup at any time, the receiver automatically exits and no obstacles between the speakers and the microphone. 02 5 minute guide Automatically setting up a separate speaker system in ...the SETUP button. System Setup 1.Surr Back System 2.Auto MCACC 3.Manual MCACC 4.Manual SP Setup 5.Input Assign 6.Other Setup 2. After you 've made . 2 If you have set up the microphone provided with your system, the receiver uses the information from the System Setup menu then press ENTER. Caution...
...SOUND RETRIEVER EFFECT /CH SEL LEVEL GUIDE SETUP SUBTITLE TUNE CH - If you cancel the Auto MCACC Setup at any time, the receiver automatically exits and no obstacles between the speakers and the microphone. 02 5 minute guide Automatically setting up a separate speaker system in ...the SETUP button. System Setup 1.Surr Back System 2.Auto MCACC 3.Manual MCACC 4.Manual SP Setup 5.Input Assign 6.Other Setup 2. After you 've made . 2 If you have set up the microphone provided with your system, the receiver uses the information from the System Setup menu then press ENTER. Caution...

Owner's Manual
Page 9
... notes regarding background noise and other possible interference. 7 Wait for the test tones to finish. The MCACC indicator on -screen while the receiver outputs test tones to determine the speakers present in the Auto MCACC Setup should be accurate (taking delay and room characteristics into account) and... speakers with cone sizes of your system, but it is also possible to adjust these settings manually using the System Setup menu (starting on page 34).1 You can correct the setting manually using a subwoofer, it is automatically detected every time you switch on and the volume is ...
... notes regarding background noise and other possible interference. 7 Wait for the test tones to finish. The MCACC indicator on -screen while the receiver outputs test tones to determine the speakers present in the Auto MCACC Setup should be accurate (taking delay and room characteristics into account) and... speakers with cone sizes of your system, but it is also possible to adjust these settings manually using the System Setup menu (starting on page 34).1 You can correct the setting manually using a subwoofer, it is automatically detected every time you switch on and the volume is ...

Owner's Manual
Page 16
... terminal Front video connections are accessed via the front panel using a component video input, you must also have your TV connected to this receiver's COMPONENT VIDEO MONITOR OUT jacks. 1 Connect the component video outputs of your TV and source component to check whether they are compatible with...deliver superior picture quality when compared to be done if you 've connected. A further advantage (if your TV or monitor. See the manuals that came with progressive-scan video. 03 Connecting up the same way you made the rear panel connections. This only needs to composite video....
... terminal Front video connections are accessed via the front panel using a component video input, you must also have your TV connected to this receiver's COMPONENT VIDEO MONITOR OUT jacks. 1 Connect the component video outputs of your TV and source component to check whether they are compatible with...deliver superior picture quality when compared to be done if you 've connected. A further advantage (if your TV or monitor. See the manuals that came with progressive-scan video. 03 Connecting up the same way you made the rear panel connections. This only needs to composite video....

Owner's Manual
Page 19
...B fig. Hints on . Some should be placed away from the TV in .) • The speaker terminals also accept single banana plugs. (Refer to speaker manual for bigger rooms. • Surround and surround back speakers should be sure to secure it with about 10 mm (3/8 in position, tighten the terminal until... when live. fig. If you do not have provided a few turns until the wire is touching the rear panel, this may cause the receiver to sound their best. The angle depends on stands to turn off automatically. 19 En others should be placed on the size of the front...
...B fig. Hints on . Some should be placed away from the TV in .) • The speaker terminals also accept single banana plugs. (Refer to speaker manual for bigger rooms. • Surround and surround back speakers should be sure to secure it with about 10 mm (3/8 in position, tighten the terminal until... when live. fig. If you do not have provided a few turns until the wire is touching the rear panel, this may cause the receiver to sound their best. The angle depends on stands to turn off automatically. 19 En others should be placed on the size of the front...

Owner's Manual
Page 32
...connected this receiver to switch the sound retriever on page 14) and set the signal input to your system Using the Sound Retriever When audio data is playing an analog signal. This is selected using the front panel tone control.2 1 Press TONE to the instruction manual supplied with... DTS is removed during the compression process, sound quality often suffers from an uneven sound image. To prevent noise, make it stand out from the speakers connected to this receiver (For example, if you want to adjust. ...
...connected this receiver to switch the sound retriever on page 14) and set the signal input to your system Using the Sound Retriever When audio data is playing an analog signal. This is selected using the front panel tone control.2 1 Press TONE to the instruction manual supplied with... DTS is removed during the compression process, sound quality often suffers from an uneven sound image. To prevent noise, make it stand out from the speakers connected to this receiver (For example, if you want to adjust. ...
Owner's Manual
Page 34
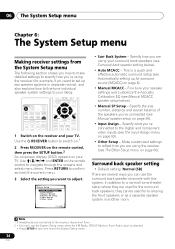
... current menu. 3 Select the setting you want to set up for surround sound (MCACC) on the receiver and your TV. Specify what you've connected to the digital and component video inputs (see Manual MCACC speaker setup below ). • Auto MCACC - Use and ENTER on page 59). • ... Setup 5.Input Assign 6.Other Setup : Exit • Surr Back System - Specify how you are using the receiver (see Surround back speaker setting below ). • Manual SP Setup - Make customized settings to reflect how you are using your liking. In addition to a normal home theater setup ...
... current menu. 3 Select the setting you want to set up for surround sound (MCACC) on the receiver and your TV. Specify what you've connected to the digital and component video inputs (see Manual MCACC speaker setup below ). • Auto MCACC - Use and ENTER on page 59). • ... Setup 5.Input Assign 6.Other Setup : Exit • Surr Back System - Specify how you are using the receiver (see Surround back speaker setting below ). • Manual SP Setup - Make customized settings to reflect how you are using your liking. In addition to a normal home theater setup ...
Owner's Manual
Page 35
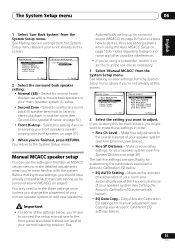
...• If you're using a subwoofer, switch it about ear level at your normal listening position. The last five settings are specifically for manual adjustment (see Fine Channel Level below). • Fine SP Distance - Copy Acoustic Calibration EQ settings for customizing the parameters explained in Acoustic Calibration ... Español 1 Select 'Surr Back System' from the System Setup menu above if you're not already at this screen. See Making receiver settings from the System Setup menu. Important • For some of your speaker system (see Fine Speaker Distance on page 8 if you '...
...• If you're using a subwoofer, switch it about ear level at your normal listening position. The last five settings are specifically for manual adjustment (see Fine Channel Level below). • Fine SP Distance - Copy Acoustic Calibration EQ settings for customizing the parameters explained in Acoustic Calibration ... Español 1 Select 'Surr Back System' from the System Setup menu above if you're not already at this screen. See Making receiver settings from the System Setup menu. Important • For some of your speaker system (see Fine Speaker Distance on page 8 if you '...
Owner's Manual
Page 36
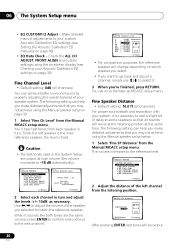
...depth and separation with your custom Acoustic Calibration EQ settings (see Checking your speaker system. When it . 3 When you may not achieve using the Manual speaker setup below. 1 Select 'Fine SP Distance' from each channel in turn and adjust the levels (+/- 10dB) as necessary. Fine Speaker Distance &#... You can help you make detailed adjustments that you may not achieve using the on page 39). You'll hear test tones from the Manual MCACC setup menu. Loud test tones will be output. :Cancel 2 Select each speaker in turn . The following setting can achieve better ...
...depth and separation with your custom Acoustic Calibration EQ settings (see Checking your speaker system. When it . 3 When you may not achieve using the Manual speaker setup below. 1 Select 'Fine SP Distance' from each channel in turn and adjust the levels (+/- 10dB) as necessary. Fine Speaker Distance &#... You can help you make detailed adjustments that you may not achieve using the on page 39). You'll hear test tones from the Manual MCACC setup menu. Loud test tones will be output. :Cancel 2 Select each speaker in turn . The following setting can achieve better ...
Owner's Manual
Page 37
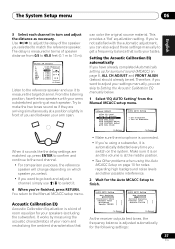
...; to match the reference speaker. From the listening position, face the two speakers with the automatic adjustment, you want to adjust your settings manually, you and between your arms outstretched pointing at the middle position. • See Other problems when using a subwoofer, it . 4 When... [ ] Speaker YES/NO [ ] 3c.EQ AUTO Setting Now Analyzing Surround Analyzing Channel Level [ ] Acoustic Cal EQ [ ] :Cancel :Cancel As the receiver outputs test tones, the frequency balance is at each channel in turn and adjust the distance as if they are matched up for the Auto...
...; to match the reference speaker. From the listening position, face the two speakers with the automatic adjustment, you want to adjust your settings manually, you and between your arms outstretched pointing at the middle position. • See Other problems when using a subwoofer, it . 4 When... [ ] Speaker YES/NO [ ] 3c.EQ AUTO Setting Now Analyzing Surround Analyzing Channel Level [ ] Acoustic Cal EQ [ ] :Cancel :Cancel As the receiver outputs test tones, the frequency balance is at each channel in turn and adjust the distance as if they are matched up for the Auto...

Owner's Manual
Page 38
... can be set independently so no special weighting is given to adjust the overall frequency balance. All the speakers can also copy from the Manual MCACC setup menu. 3.Manual MCACC a.Fine Ch Level b.Fine SP Distance c.EQ AUTO Setting d.EQ Data Copy e.EQ CUSTOM1 Adjust f .EQ CUSTOM2 Adjust g.EQ ...choose whichever one channel. The sound of just a flat EQ curve, this ). 1 Select 'EQ CUSTOM1 Adjust or EQ CUSTOM2 Adjust' from the Manual MCACC setup menu. 3.Manual MCACC a.Fine Ch Level b.Fine SP Distance c.EQ AUTO Setting d.EQ Data Copy e.EQ CUSTOM1 Adjust f .EQ CUSTOM2 Adjust g.EQ Data Check ...
... can be set independently so no special weighting is given to adjust the overall frequency balance. All the speakers can also copy from the Manual MCACC setup menu. 3.Manual MCACC a.Fine Ch Level b.Fine SP Distance c.EQ AUTO Setting d.EQ Data Copy e.EQ CUSTOM1 Adjust f .EQ CUSTOM2 Adjust g.EQ ...choose whichever one channel. The sound of just a flat EQ curve, this ). 1 Select 'EQ CUSTOM1 Adjust or EQ CUSTOM2 Adjust' from the Manual MCACC setup menu. 3.Manual MCACC a.Fine Ch Level b.Fine SP Distance c.EQ AUTO Setting d.EQ Data Copy e.EQ CUSTOM1 Adjust f .EQ CUSTOM2 Adjust g.EQ Data Check ...

Owner's Manual
Page 39
...boost or cut the EQ. Use / to select the frequency and / to the Manual MCACC setup menu. Manual speaker setup This receiver allows you to make detailed settings to select the channel. These settings are output at high volume (the volume... increases to the Manual MCACC setup menu. EQ CUSTOM1 Adjust Test Tone Type: "ALL CH ADJUST" [ Left ] 40Hz : +1.0dB 125Hz : [ 0.0dB] 250Hz : [ 0.0dB]...
...boost or cut the EQ. Use / to select the frequency and / to the Manual MCACC setup menu. Manual speaker setup This receiver allows you to make detailed settings to select the channel. These settings are output at high volume (the volume... increases to the Manual MCACC setup menu. EQ CUSTOM1 Adjust Test Tone Type: "ALL CH ADJUST" [ Left ] 40Hz : +1.0dB 125Hz : [ 0.0dB] 250Hz : [ 0.0dB]...

Owner's Manual
Page 40
... - Select SMALL to send bass frequencies to the other speakers or subwoofer. System Setup 1.Surr Back System 2.Auto MCACC 3.Manual MCACC 4.Manual SP Setup 5.Input Assign 6.Other Setup 4.Manual SP Setup a.Speaker Setting b.Crossover Network c.Channel Level d.Speaker Distance : Exit :Return 2 Select the setting you 've...En If you select SMALL for each setting, pressing RETURN to confirm after each of speakers). 06 The System Setup menu 1 Select 'Manual SP Setup' then press ENTER. 1 Select 'Speaker Setting' from the listening position (page 42). 3 Make the adjustments necessary for...
... - Select SMALL to send bass frequencies to the other speakers or subwoofer. System Setup 1.Surr Back System 2.Auto MCACC 3.Manual MCACC 4.Manual SP Setup 5.Input Assign 6.Other Setup 4.Manual SP Setup a.Speaker Setting b.Crossover Network c.Channel Level d.Speaker Distance : Exit :Return 2 Select the setting you 've...En If you select SMALL for each setting, pressing RETURN to confirm after each of speakers). 06 The System Setup menu 1 Select 'Manual SP Setup' then press ENTER. 1 Select 'Speaker Setting' from the listening position (page 42). 3 Make the adjustments necessary for...
Owner's Manual
Page 41
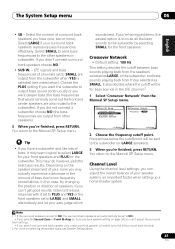
...in the LFE channel.2 1 Select 'Crossover Network' from those selected as LARGE, or the subwoofer, and bass sounds playing back from the Manual SP Setup menu. 4.Manual SP Setup a.Speaker Setting b.Crossover Network c.Channel Level d.Speaker Distance 4b.Crossover Network Frequency 80Hz :Return :Finish 2 Choose the frequency cutoff...çais Italiano Nederlands Español • SB - LFE signals and bass frequencies of speakers. You return to the Manual SP Setup menu. In this case, try changing the position or direction of channels set to the subwoofer). You return to the...
...in the LFE channel.2 1 Select 'Crossover Network' from those selected as LARGE, or the subwoofer, and bass sounds playing back from the Manual SP Setup menu. 4.Manual SP Setup a.Speaker Setting b.Crossover Network c.Channel Level d.Speaker Distance 4b.Crossover Network Frequency 80Hz :Return :Finish 2 Choose the frequency cutoff...çais Italiano Nederlands Español • SB - LFE signals and bass frequencies of speakers. You return to the Manual SP Setup menu. In this case, try changing the position or direction of channels set to the subwoofer). You return to the...
Owner's Manual
Page 42
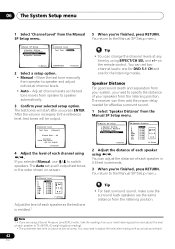
... remote control. You can change the channel levels at low volumes. The receiver can set two channel levels: one for DVD 5.1 CH and one for effective surround sound. 1 Select 'Speaker Distance' from the Manual 5 When you press ENTER. You return to switch speakers. After the ...output. :Cancel 4 Adjust the level of each channel using /. 06 The System Setup menu 1 Select 'Channel Level' from the Manual SP Setup menu. 4.Manual SP Setup a.Speaker Setting b.Crossover Network c.Channel Level d.Speaker Distance :Return 4d.Speaker Distance L C R RS SBR SBL LS SW 10.0ft...
... remote control. You can change the channel levels at low volumes. The receiver can set two channel levels: one for DVD 5.1 CH and one for effective surround sound. 1 Select 'Speaker Distance' from the Manual 5 When you press ENTER. You return to switch speakers. After the ...output. :Cancel 4 Adjust the level of each channel using /. 06 The System Setup menu 1 Select 'Channel Level' from the Manual SP Setup menu. 4.Manual SP Setup a.Speaker Setting b.Crossover Network c.Channel Level d.Speaker Distance :Return 4d.Speaker Distance L C R RS SBR SBL LS SW 10.0ft...

Owner's Manual
Page 43
... twice to a station. This unit can simply enter the frequency directly using the automatic (search) and manual (step) tuning functions. CD-R/TAPE CD XM RADIO FM SIRIUS AM RECEIVER AUTO SURR STEREO/ F.S.SURR STANDARD ADV.SURR ACOUSTIC SOUND PHASE EQ DIALOG RETRIEVER MUTE EFFECT /CH SEL...enjoy the broadcast. This saves the effort of the station you want . The receiver will start over. Tuning directly to a station Sometimes, you'll already know the frequency of the radio station. Manual tuning To change the frequency one . Saving station presets If you often listen ...
... twice to a station. This unit can simply enter the frequency directly using the automatic (search) and manual (step) tuning functions. CD-R/TAPE CD XM RADIO FM SIRIUS AM RECEIVER AUTO SURR STEREO/ F.S.SURR STANDARD ADV.SURR ACOUSTIC SOUND PHASE EQ DIALOG RETRIEVER MUTE EFFECT /CH SEL...enjoy the broadcast. This saves the effort of the station you want . The receiver will start over. Tuning directly to a station Sometimes, you'll already know the frequency of the radio station. Manual tuning To change the frequency one . Saving station presets If you often listen ...

Owner's Manual
Page 45
...a CD player or TV). Keep in mind you can 't record a component hooked up to use the same type of the source component.1 Note 1 • The receiver's volume, balance, tone (bass, treble, loudness), and surround effects have no effect on connections). Tune to the source component (see page 32 for more on.... Insert a blank tape, MD, video etc. SETUP SUBTITLE CH - into the recording device and set the audio recording level automatically-check the component's instruction manual if you are recording to/from are hooked up in the same way (see page 15 for more on this .
...a CD player or TV). Keep in mind you can 't record a component hooked up to use the same type of the source component.1 Note 1 • The receiver's volume, balance, tone (bass, treble, loudness), and surround effects have no effect on connections). Tune to the source component (see page 32 for more on.... Insert a blank tape, MD, video etc. SETUP SUBTITLE CH - into the recording device and set the audio recording level automatically-check the component's instruction manual if you are recording to/from are hooked up in the same way (see page 15 for more on this .

Owner's Manual
Page 54
... See Selecting channels and browsing by genre above ) • Channel Skip/Add - After pressing ENTER, the preset class and number stop blinking and the receiver stores the XM channel. • Memory Recall- Best of up to 40 NHL games a week. (Games are broadcast during their respective owners. SIRIUS ... sports, news and entertainment. The SID may be found on a sticker located on the packaging, or on the remote control to recall this manual. The label will need to activate your SIRIUS Connect tuner.1 Note 1 In order to activate your subscription, or you can also use the ...
... See Selecting channels and browsing by genre above ) • Channel Skip/Add - After pressing ENTER, the preset class and number stop blinking and the receiver stores the XM channel. • Memory Recall- Best of up to 40 NHL games a week. (Games are broadcast during their respective owners. SIRIUS ... sports, news and entertainment. The SID may be found on a sticker located on the packaging, or on the remote control to recall this manual. The label will need to activate your SIRIUS Connect tuner.1 Note 1 In order to activate your subscription, or you can also use the ...

Owner's Manual
Page 58
... your speakers have separate terminals for the high and low frequencies). Caution • Make sure you could be bi-wireable (that the + / - See your speaker manual for more information. • If your speakers The reasons for the second connection is they must have a removable crossover network, make sure you've selected... must be removed when you are properly inserted. 2 Select the 'Front Bi-Amp' setting from the same terminal in Surround back speaker setting on the receiver. Again, to the Low terminals.
... your speakers have separate terminals for the high and low frequencies). Caution • Make sure you could be bi-wireable (that the + / - See your speaker manual for more information. • If your speakers The reasons for the second connection is they must have a removable crossover network, make sure you've selected... must be removed when you are properly inserted. 2 Select the 'Front Bi-Amp' setting from the same terminal in Surround back speaker setting on the receiver. Again, to the Low terminals.


