Owner's Manual
Page 3
... THE RISK OF ELECTRIC SHOCK, DO NOT REMOVE COVER (OR BACK). RETAIN INSTRUCTIONS - HEED WARNINGS - Do not use this product from the wall outlet and disconnect the antenna or cable system. or near water - This is left un-used replacement parts specified by following conditions: • When the power-supply cord or plug is equipped with a three-wire grounding type plug, a plug having one way.
... THE RISK OF ELECTRIC SHOCK, DO NOT REMOVE COVER (OR BACK). RETAIN INSTRUCTIONS - HEED WARNINGS - Do not use this product from the wall outlet and disconnect the antenna or cable system. or near water - This is left un-used replacement parts specified by following conditions: • When the power-supply cord or plug is equipped with a three-wire grounding type plug, a plug having one way.
Owner's Manual
Page 4
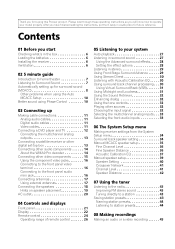
... Connecting other sources 32 Choosing the input signal 32 Selecting the multichannel analog inputs . . . 33 Selecting the front audio inputs 33 06 The System Setup menu Making receiver settings from the System Setup menu 34 Surround back speaker setting 34 Manual MCACC speaker setup 35 Fine Channel Level 36 Fine Speaker Distance 36 Acoustic Calibration EQ 37 Manual speaker setup 39 Speaker Setting 40 Crossover Network 41 Channel Level 41 Speaker Distance 42 07 Using the tuner Listening to the radio 43 Improving FM stereo sound 43 Tuning directly to a station 43 Saving station...
... Connecting other sources 32 Choosing the input signal 32 Selecting the multichannel analog inputs . . . 33 Selecting the front audio inputs 33 06 The System Setup menu Making receiver settings from the System Setup menu 34 Surround back speaker setting 34 Manual MCACC speaker setup 35 Fine Channel Level 36 Fine Speaker Distance 36 Acoustic Calibration EQ 37 Manual speaker setup 39 Speaker Setting 40 Crossover Network 41 Channel Level 41 Speaker Distance 42 07 Using the tuner Listening to the radio 43 Improving FM stereo sound 43 Tuning directly to a station 43 Saving station...
Owner's Manual
Page 7
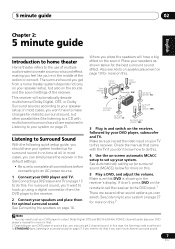
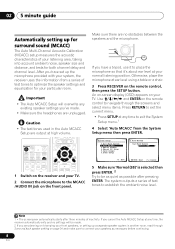
... Surround Sound With the following quick setup guide, you should have a big effect on the remote to set the receiver to the DVD input.1 There are explained in no time at all connections before connecting to an AC power source. 1 Connect your DVD player and TV. Where you place the speakers will automatically decode multichannel Dolby Digital, DTS, or Dolby Surround sources according to your speaker setup. Make sure you've set the video input on this . 5 Play a DVD, and adjust the volume...
... Surround Sound With the following quick setup guide, you should have a big effect on the remote to set the receiver to the DVD input.1 There are explained in no time at all connections before connecting to an AC power source. 1 Connect your DVD player and TV. Where you place the speakers will automatically decode multichannel Dolby Digital, DTS, or Dolby Surround sources according to your speaker setup. Make sure you've set the video input on this . 5 Play a DVD, and adjust the volume...
Owner's Manual
Page 8
... RECEIVER INPUT SELECT SOURCE MULTI CONTROL TV CTRL DVD/LD TV/SAT DVR/VCR F.AUDIO MASTER VOLUME RECEIVER CONTROL ONE TOUCH COPY CH+ TOP MENU TUNE MENU T.EDIT ST ST ENTER CD-R/TAPE CD XM RADIO FM SIRIUS AM RECEIVER AUTO SURR STEREO/ F.S.SURR STANDARD ADV.SURR PHASE ACOUSTIC EQ DIALOG SOUND RETRIEVER EFFECT /CH SEL LEVEL GUIDE SETUP SUBTITLE TUNE CH - Use and ENTER on the remote control to navigate through Surround back speaker setting on page 34 and make...
... RECEIVER INPUT SELECT SOURCE MULTI CONTROL TV CTRL DVD/LD TV/SAT DVR/VCR F.AUDIO MASTER VOLUME RECEIVER CONTROL ONE TOUCH COPY CH+ TOP MENU TUNE MENU T.EDIT ST ST ENTER CD-R/TAPE CD XM RADIO FM SIRIUS AM RECEIVER AUTO SURR STEREO/ F.S.SURR STANDARD ADV.SURR PHASE ACOUSTIC EQ DIALOG SOUND RETRIEVER EFFECT /CH SEL LEVEL GUIDE SETUP SUBTITLE TUNE CH - Use and ENTER on the remote control to navigate through Surround back speaker setting on page 34 and make...

Owner's Manual
Page 9
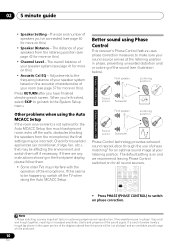
.... If selecting RETRY doesn't fix the problem, turn off the power and check the speaker connections. 9 Make sure 'OK' is turned up with different size settings. The settings made in the Auto MCACC Setup should give you excellent surround sound from your system, but it is also possible to adjust these settings manually using the System Setup menu (starting on page 34).1 You can correct the setting manually using the Speaker Setting on -screen while the receiver outputs test tones to...
.... If selecting RETRY doesn't fix the problem, turn off the power and check the speaker connections. 9 Make sure 'OK' is turned up with different size settings. The settings made in the Auto MCACC Setup should give you excellent surround sound from your system, but it is also possible to adjust these settings manually using the System Setup menu (starting on page 34).1 You can correct the setting manually using the Speaker Setting on -screen while the receiver outputs test tones to...
Owner's Manual
Page 10
... the speakers from the microphone) the final settings may be affecting the environment and switch them . • Some older TVs may be incorrect. The overall balance of the microphone. When you have finished checking each screen. RECEIVER INPUT SELECT SOURCE MULTI CONTROL TV CTRL DVD/LD TV/SAT DVR/VCR F.AUDIO CD-R/TAPE CD XM RADIO FM SIRIUS AM RECEIVER AUTO SURR STEREO/ F.S.SURR STANDARD ADV.SURR ACOUSTIC SOUND...
... the speakers from the microphone) the final settings may be affecting the environment and switch them . • Some older TVs may be incorrect. The overall balance of the microphone. When you have finished checking each screen. RECEIVER INPUT SELECT SOURCE MULTI CONTROL TV CTRL DVD/LD TV/SAT DVR/VCR F.AUDIO CD-R/TAPE CD XM RADIO FM SIRIUS AM RECEIVER AUTO SURR STEREO/ F.S.SURR STANDARD ADV.SURR ACOUSTIC SOUND...

Owner's Manual
Page 11
... coaxial digital audio cables or optical cables should connect the red plugs to R (right) terminals and white plugs to the composite video terminals. Component video cables Green (Y) Blue (PB) Red (PR) Coaxial digital audio cable Optical cable Note 1 • When connecting optical cables, be damaged if bent around sharp corners. • You can also use a standard RCA video cable for audio. The cable may cause a humming noise from the speakers. • Before unplugging the power cord, switch the power into the luminance (Y) signal and...
... coaxial digital audio cables or optical cables should connect the red plugs to R (right) terminals and white plugs to the composite video terminals. Component video cables Green (Y) Blue (PB) Red (PR) Coaxial digital audio cable Optical cable Note 1 • When connecting optical cables, be damaged if bent around sharp corners. • You can also use a standard RCA video cable for audio. The cable may cause a humming noise from the speakers. • Before unplugging the power cord, switch the power into the luminance (Y) signal and...

Owner's Manual
Page 12
... inputs on your DVD player to play the sound from your DVD player. 3 For better quality, you can connect this receiver. Use an optical cable for how to connect it. 3 Connect the analog audio outputs from your TV to make analog recordings from the TV's built-in digital decoder, you can connect it to the optical input on this receiver. If your player also has a component video output, you can also connect with S-video using the S-VIDEO DVD/LD jack. See Using the component video jacks...
... inputs on your DVD player to play the sound from your DVD player. 3 For better quality, you can connect this receiver. Use an optical cable for how to connect it. 3 Connect the analog audio outputs from your TV to make analog recordings from the TV's built-in digital decoder, you can connect it to the optical input on this receiver. If your player also has a component video output, you can also connect with S-video using the S-VIDEO DVD/LD jack. See Using the component video jacks...

Owner's Manual
Page 13
... your DVD player may have a digital audio output, omit this step. Connecting up the receiver you'll need to press the input select button for the input you can also connect with multi-channel analog output jacks 1 Connect a set of the coaxial inputs on this receiver. If it to one of audio/video outputs on the set-top box component to the TV/SAT AUDIO and VIDEO inputs on this receiver.2 Use a stereo RCA phono cable for the audio connection and a standard RCA video cable for the video connection.3 2 Connect an optical digital audio output...
... your DVD player may have a digital audio output, omit this step. Connecting up the receiver you'll need to press the input select button for the input you can also connect with multi-channel analog output jacks 1 Connect a set of the coaxial inputs on this receiver. If it to one of audio/video outputs on the set-top box component to the TV/SAT AUDIO and VIDEO inputs on this receiver.2 Use a stereo RCA phono cable for the audio connection and a standard RCA video cable for the video connection.3 2 Connect an optical digital audio output...

Owner's Manual
Page 18
... IN TV / SAT IN SR P E SUB WOOFER A DVD / LD A PREOUT IN S-VIDEO K E R S FRONT MONITOR OUT COMPONENT VIDEO (TV/SAT)IN 2 LR SURROUND L CENTER R SURROUND BACK L B Powered subwoofer SW INPUT AC OUTLET Caution • Make sure that all the bare speaker wire is best. 03 Connecting up Connecting the speakers A complete setup of less than 8 Ω). Note 1 If you're not using a subwoofer, change the front speaker setting (see Switching the speaker impedance on page 40) to LARGE...
... IN TV / SAT IN SR P E SUB WOOFER A DVD / LD A PREOUT IN S-VIDEO K E R S FRONT MONITOR OUT COMPONENT VIDEO (TV/SAT)IN 2 LR SURROUND L CENTER R SURROUND BACK L B Powered subwoofer SW INPUT AC OUTLET Caution • Make sure that all the bare speaker wire is best. 03 Connecting up Connecting the speakers A complete setup of less than 8 Ω). Note 1 If you're not using a subwoofer, change the front speaker setting (see Switching the speaker impedance on page 40) to LARGE...

Owner's Manual
Page 20
... 3-D speaker setup illustration on vacation). A) shows orientation with one surround back speaker (or none) connected. AC OUTLET AC 120 V 60 Hz SWITCHED 100 W MAX 0.8 A MAX Surround back left Subwoofer Surround right Listening position AC outlet Power supplied through this type of speaker setup You can exceed the 100 W maximum when playing sources at a high volume, this outlet is turned on and off by removing the power plug from the wall...
... 3-D speaker setup illustration on vacation). A) shows orientation with one surround back speaker (or none) connected. AC OUTLET AC 120 V 60 Hz SWITCHED 100 W MAX 0.8 A MAX Surround back left Subwoofer Surround right Listening position AC outlet Power supplied through this type of speaker setup You can exceed the 100 W maximum when playing sources at a high volume, this outlet is turned on and off by removing the power plug from the wall...

Owner's Manual
Page 24
... input source (use SHIFT for this receiver. 3 MULTI CONTROL buttons Press to make dialog stand out when watching TV or a movie (page 32). You can then use LEVEL +/- REC RETURN AUDIO 11 12 13 HDD DVD REC STOP TUNER DISP CLASS MPX D.ACCESS MIDNIGHT ANALOG ATT DIMMER ENTER DISC SLEEP +10 SIGNAL SB ch INFO TV CONTROL SHIFT INPUT SELECT TV CH TV VOL 14 AUDIO/VIDEO PRE-PROGRAMMED REMOTE CONTROL UNIT RECEIVER 1 INPUT SELECT Use to select a channel...
... input source (use SHIFT for this receiver. 3 MULTI CONTROL buttons Press to make dialog stand out when watching TV or a movie (page 32). You can then use LEVEL +/- REC RETURN AUDIO 11 12 13 HDD DVD REC STOP TUNER DISP CLASS MPX D.ACCESS MIDNIGHT ANALOG ATT DIMMER ENTER DISC SLEEP +10 SIGNAL SB ch INFO TV CONTROL SHIFT INPUT SELECT TV CH TV VOL 14 AUDIO/VIDEO PRE-PROGRAMMED REMOTE CONTROL UNIT RECEIVER 1 INPUT SELECT Use to select a channel...

Owner's Manual
Page 25
.... 8 Number buttons and other buttons that can be accessed after you have selected the corresponding MULTI CONTROL button (DVD/LD, TV/SAT, RECEIVER, etc.) TOP MENU Displays the disc 'top' menu of DVD-Video discs. RETURN Press to access the System Setup menu (see page 34). MASTER VOLUME +/- Controls and displays 04 English Deutsch Français Italiano Nederlands Español LEVEL +/- AUDIO* Changes the audio language or channel on a digital TV. Use to adjust the Advanced Surround effect and channel levels...
.... 8 Number buttons and other buttons that can be accessed after you have selected the corresponding MULTI CONTROL button (DVD/LD, TV/SAT, RECEIVER, etc.) TOP MENU Displays the disc 'top' menu of DVD-Video discs. RETURN Press to access the System Setup menu (see page 34). MASTER VOLUME +/- Controls and displays 04 English Deutsch Français Italiano Nederlands Español LEVEL +/- AUDIO* Changes the audio language or channel on a digital TV. Use to adjust the Advanced Surround effect and channel levels...

Owner's Manual
Page 26
... hook up to this button to set up information screens on a digital TV. 10 SHIFT Press to the TV CTRL button. TV CH +/- Use to select the TV input signal. 04 Controls and displays MPX* Switches between the remote control and the receiver's remote sensor. • Direct sunlight or fluorescent light is shining onto the remote sensor. • The receiver is located near a device that is emitting infrared rays. • The receiver is operated...
... hook up to this button to set up information screens on a digital TV. 10 SHIFT Press to the TV CTRL button. TV CH +/- Use to select the TV input signal. 04 Controls and displays MPX* Switches between the remote control and the receiver's remote sensor. • Direct sunlight or fluorescent light is shining onto the remote sensor. • The receiver is located near a device that is emitting infrared rays. • The receiver is operated...

Owner's Manual
Page 32
... other sources 1 Turn on the power of the playback component. 2 Turn on the power of the receiver to select between BASS and TREBLE. 2 Use the MULTI JOG dial to change the amount of your source is the TV's built-in tuner, switch to the channel you are selected (except when STEREO is selected using the front panel tone control.2 1 Press TONE to select the frequency you connected this receiver. 4 • This receiver can only play back Dolby Digital, PCM (32 kHz to switch dialog...
... other sources 1 Turn on the power of the playback component. 2 Turn on the power of the receiver to select between BASS and TREBLE. 2 Use the MULTI JOG dial to change the amount of your source is the TV's built-in tuner, switch to the channel you are selected (except when STEREO is selected using the front panel tone control.2 1 Press TONE to select the frequency you connected this receiver. 4 • This receiver can only play back Dolby Digital, PCM (32 kHz to switch dialog...
Owner's Manual
Page 34
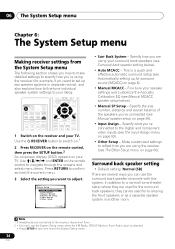
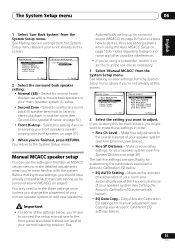
...; RECEIVER button to the digital and component video inputs (see The Input Assign menu on your TV. Specify what you've connected to switch on.1 2 Press RECEIVER on the remote control, then press the SETUP button.2 An on-screen display (OSD) appears on page 59). • Other Setup - Note 1 If headphones are using the receiver (see Surround back speaker setting below ). • Manual SP Setup - Use and ENTER on the remote control to navigate through the screens and select menu items...
...; RECEIVER button to the digital and component video inputs (see The Input Assign menu on your TV. Specify what you've connected to switch on.1 2 Press RECEIVER on the remote control, then press the SETUP button.2 An on-screen display (OSD) appears on page 59). • Other Setup - Note 1 If headphones are using the receiver (see Surround back speaker setting below ). • Manual SP Setup - Use and ENTER on the remote control to navigate through the screens and select menu items...
Owner's Manual
Page 35
... (speaker system A) setup. • Second Zone - The last five settings are specifically for surround sound (MCACC) on page 57). 3 When you're finished, press RETURN. You return to adjust. Also see Copying your front speakers (see Fine Channel Level below : • EQ AUTO Setting - Copy Acoustic Calibration EQ settings for manual adjustment (see Other problems when using a subwoofer, switch it about ear level at this screen. See Making receiver settings from the System Setup menu. The System Setup menu 06...
... (speaker system A) setup. • Second Zone - The last five settings are specifically for surround sound (MCACC) on page 57). 3 When you're finished, press RETURN. You return to adjust. Also see Copying your front speakers (see Fine Channel Level below : • EQ AUTO Setting - Copy Acoustic Calibration EQ settings for manual adjustment (see Other problems when using a subwoofer, switch it about ear level at this screen. See Making receiver settings from the System Setup menu. The System Setup menu 06...

Owner's Manual
Page 57
...AB - See Surround back speaker setting on page 34 output from the surround back pre-out terminals may change. • All speaker systems (except Second Zone connections) are switched off when headphones are downmixed for the Second Zone setting only.1 • Use the SPEAKERS button on the settings you made in another room. SOUND MIDNIGHT/ SB ch RETRIEVER LOUDNESS PROCESSING TONE SIGNAL SPEAKERS SELECT TUNING/ STATION TUNER EDIT SETUP RETURN MULTI JOG Press repeatedly to...
...AB - See Surround back speaker setting on page 34 output from the surround back pre-out terminals may change. • All speaker systems (except Second Zone connections) are switched off when headphones are downmixed for the Second Zone setting only.1 • Use the SPEAKERS button on the settings you made in another room. SOUND MIDNIGHT/ SB ch RETRIEVER LOUDNESS PROCESSING TONE SIGNAL SPEAKERS SELECT TUNING/ STATION TUNER EDIT SETUP RETURN MULTI JOG Press repeatedly to...
Owner's Manual
Page 62
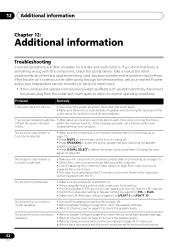
... Pioneer authorized independent service company to carry out repair work. • If the unit does not operate normally due to external effects such as static electricity disconnect the power plug from the outlet, and insert again. • Make sure there are set (see Choosing the input signal on . No sound is output when a function is selected. • Make sure the component is incorrect. No sound from surround or center speakers. • Connect...
... Pioneer authorized independent service company to carry out repair work. • If the unit does not operate normally due to external effects such as static electricity disconnect the power plug from the outlet, and insert again. • Make sure there are set (see Choosing the input signal on . No sound is output when a function is selected. • Make sure the component is incorrect. No sound from surround or center speakers. • Connect...
Owner's Manual
Page 63
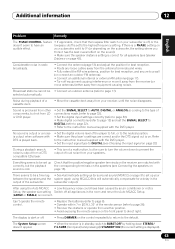
... all speakers (see Choosing the input signal on sound is odd. Everything seems to be sure to turn the volume down STEREO/ F.S.SURR (front panel) and pressing STANDBY/ON (the current setting is displayed). 63 En page 18). After using MCACC (this will automatically compensate for a delay in radio broadcasts. • Connect the antenna (page 18) and adjust the position for best reception. • Route any loose cables...
... all speakers (see Choosing the input signal on sound is odd. Everything seems to be sure to turn the volume down STEREO/ F.S.SURR (front panel) and pressing STANDBY/ON (the current setting is displayed). 63 En page 18). After using MCACC (this will automatically compensate for a delay in radio broadcasts. • Connect the antenna (page 18) and adjust the position for best reception. • Route any loose cables...


