
Owner's Manual
Page 4
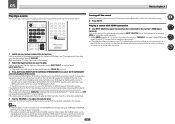
...Playing a source...39 Playing an iPod...40 Playing a USB device...41 Listening to the radio...42 Bluetooth ADAPTER for buying this Pioneer product. Please read through LAN interface...30 Connecting optional Bluetooth ADAPTER...30 Connecting an iPod...31 Connecting a USB device...31 Connecting an...Sound Retriever Link and Stream Smoother Link 57 Cautions on and off using AVNavigator (included CD-ROM)...9 02 Controls and displays Remote control...11 Display...13 Front panel...14 03 Connecting your equipment Connecting your equipment...16 Rear panel...16 Determining the speakers' application...
...Playing a source...39 Playing an iPod...40 Playing a USB device...41 Listening to the radio...42 Bluetooth ADAPTER for buying this Pioneer product. Please read through LAN interface...30 Connecting optional Bluetooth ADAPTER...30 Connecting an iPod...31 Connecting a USB device...31 Connecting an...Sound Retriever Link and Stream Smoother Link 57 Cautions on and off using AVNavigator (included CD-ROM)...9 02 Controls and displays Remote control...11 Display...13 Front panel...14 03 Connecting your equipment Connecting your equipment...16 Rear panel...16 Determining the speakers' application...
Owner's Manual
Page 5
... Power...88 No sound...88 Other audio problems...89 ADAPTER PORT terminal...90 Video...90 Settings...90 Professional Calibration EQ graphical output...91 Display...91 Remote control...91 HDMI...91 AVNavigator...92 USB interface...93 iPod...93 Network...93 Wireless LAN...94 14 Additional information Surround sound formats...97 About iPod...
... Power...88 No sound...88 Other audio problems...89 ADAPTER PORT terminal...90 Video...90 Settings...90 Professional Calibration EQ graphical output...91 Display...91 Remote control...91 HDMI...91 AVNavigator...92 USB interface...93 iPod...93 Network...93 Wireless LAN...94 14 Additional information Surround sound formats...97 About iPod...
Owner's Manual
Page 6
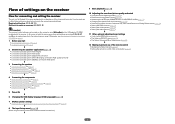
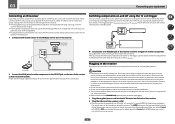
...Flow for connecting and setting the receiver The unit is a full-fledged AV receiver equipped with an abundance of the remote control ! Installing your speaker system on page 28 ! Connecting AM/FM antennas on page 19 ! Better sound using AVNavigator... (included CD-ROM) on the computer using connections other components (page 67) 6 Setting the remote to control other than the recommended connections) j 9 Basic playback (page 38) j 10 Adjusting the sound and picture quality as desired ! Required setting ...
...Flow for connecting and setting the receiver The unit is a full-fledged AV receiver equipped with an abundance of the remote control ! Installing your speaker system on page 28 ! Connecting AM/FM antennas on page 19 ! Better sound using AVNavigator... (included CD-ROM) on the computer using connections other components (page 67) 6 Setting the remote to control other than the recommended connections) j 9 Basic playback (page 38) j 10 Adjusting the sound and picture quality as desired ! Required setting ...

Owner's Manual
Page 7
Before you start Checking what's in the box...8 Installing the receiver...8 Loading the batteries...8 Operating range of remote control unit 8 About using AVNavigator (included CD-ROM 9 7
Before you start Checking what's in the box...8 Installing the receiver...8 Loading the batteries...8 Operating range of remote control unit 8 About using AVNavigator (included CD-ROM 9 7
Owner's Manual
Page 8
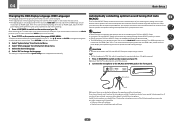
...hazards as inside a car or near a heater. The receiver is located near a cassette deck (or close to leak, overheat, explode or catch fire. Remote control unit ! FM wire antenna ! When installing this receiver's bottom panel while the power is on a level and stable surface. ! near a device...where there is operated simultaneously with governmental regulations or environmental public insti- Don't install it on (or right after it is shining onto the remote sensor. ! in extremely hot or cold areas - The bottom panel becomes hot when the power is on the following places: - Direct...
...hazards as inside a car or near a heater. The receiver is located near a cassette deck (or close to leak, overheat, explode or catch fire. Remote control unit ! FM wire antenna ! When installing this receiver's bottom panel while the power is on a level and stable surface. ! near a device...where there is operated simultaneously with governmental regulations or environmental public insti- Don't install it on (or right after it is shining onto the remote sensor. ! in extremely hot or cold areas - The bottom panel becomes hot when the power is on the following places: - Direct...

Owner's Manual
Page 10
Controls and displays Remote control...11 Display...13 Front panel...14 10
Controls and displays Remote control...11 Display...13 Front panel...14 10

Owner's Manual
Page 11
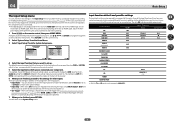
... ! White - Other controls (See pages 40, 41, 42, 43 and 70.) 1 u RECEIVER This switches between the various surround modes (page 46). 11 Remote control LED Lights when a command is assigned. STATUS - PQLS - MCACC - Dims or brightens the display (page 64). ! AUDIO PARAMETER - HOME MENU - AUTO... 0 ENTER CH AUTO/ALC/ ZONE 2 DIRECT STANDARD ADV SURR Z2 LISTENING MODE 11 12 13 14 15 RECEIVER Controls and displays The remote has been conveniently color-coded according to component control using the following system: ! PHASE - Use to switch between Auto Surround (page 46...
... ! White - Other controls (See pages 40, 41, 42, 43 and 70.) 1 u RECEIVER This switches between the various surround modes (page 46). 11 Remote control LED Lights when a command is assigned. STATUS - PQLS - MCACC - Dims or brightens the display (page 64). ! AUDIO PARAMETER - HOME MENU - AUTO... 0 ENTER CH AUTO/ALC/ ZONE 2 DIRECT STANDARD ADV SURR Z2 LISTENING MODE 11 12 13 14 15 RECEIVER Controls and displays The remote has been conveniently color-coded according to component control using the following system: ! PHASE - Use to switch between Auto Surround (page 46...

Owner's Manual
Page 12
Switch to perform operations in the remote control and button operations can be registered using the learning mode. 13 Switches the remote to control the receiver (used to select the white commands). 02 12 OPTION The preset codes of desired devices can be registered in the main zone. Use to set the listening volume. 15 MUTE Mutes the sound or restores the sound if it has been muted (adjusting the volume also restores the sound). Controls and displays 12 Also use this button to set up surround sound. 14 VOLUME +/-
Switch to perform operations in the remote control and button operations can be registered using the learning mode. 13 Switches the remote to control the receiver (used to select the white commands). 02 12 OPTION The preset codes of desired devices can be registered in the main zone. Use to set the listening volume. 15 MUTE Mutes the sound or restores the sound if it has been muted (adjusting the volume also restores the sound). Controls and displays 12 Also use this button to set up surround sound. 14 VOLUME +/-

Owner's Manual
Page 13
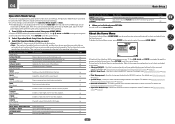
... the receiver is switched on , this lights to indicate Neo:6 processing (page 46). 19 Character display Displays various system information. 20 Remote control mode indicator Lights to indicate the receiver's remote control mode setting. (Not displayed when set to select the input signal automatically (page 47). 2 Program format indicators Light to indicate...
... the receiver is switched on , this lights to indicate Neo:6 processing (page 46). 19 Character display Displays various system information. 20 Remote control mode indicator Lights to indicate the receiver's remote control mode setting. (Not displayed when set to select the input signal automatically (page 47). 2 Program format indicators Light to indicate...

Owner's Manual
Page 14
... 23). ! Blinks when connecting an HDMI-equipped component; Switches between the various surround modes (page 46). ! TUNE i/j - Find preset stations (page 43). 7 Remote sensor Receives the signals from the remote control (page 8). 8 MASTER VOLUME dial 9 SPEAKERS Use to change the speaker terminal (page 63). 10 PHONES jack Use to control the sub...
... 23). ! Blinks when connecting an HDMI-equipped component; Switches between the various surround modes (page 46). ! TUNE i/j - Find preset stations (page 43). 7 Remote sensor Receives the signals from the remote control (page 8). 8 MASTER VOLUME dial 9 SPEAKERS Use to change the speaker terminal (page 63). 10 PHONES jack Use to control the sub...

Owner's Manual
Page 29
... ZONE 2 L OUT R 29 Sub zone (ZONE 2) Main zone MULTI-ZONE setup using speaker terminals (ZONE 2) on ) and the sub zone can be controlled by the remote or front panel controls. The main and sub zone have made the proper MULTIZONE connections. When any of speakers to the sub zone amplifier as...
... ZONE 2 L OUT R 29 Sub zone (ZONE 2) Main zone MULTI-ZONE setup using speaker terminals (ZONE 2) on ) and the sub zone can be controlled by the remote or front panel controls. The main and sub zone have made the proper MULTIZONE connections. When any of speakers to the sub zone amplifier as...
Owner's Manual
Page 32
...the front panel display blinks during this process. Handle the power cord by tugging the cord, and never touch the power cord when your nearest Pioneer authorized independent service company for any power cord other than that they are wet, as this receiver so that described below. ! Do not place... IR receiver (such as a screen or projector) to this could cause a short circuit or electric shock. When you set on the IR receiver remote sensor window. ! Note that they switch on the front panel of another zone, you can turn on or off just by removing the mains plug...
...the front panel display blinks during this process. Handle the power cord by tugging the cord, and never touch the power cord when your nearest Pioneer authorized independent service company for any power cord other than that they are wet, as this receiver so that described below. ! Do not place... IR receiver (such as a screen or projector) to this could cause a short circuit or electric shock. When you set on the IR receiver remote sensor window. ! Note that they switch on the front panel of another zone, you can turn on or off just by removing the mains plug...
Owner's Manual
Page 34
...). 2 Press on any existing settings for the MCACC preset you connected this receiver. 2 Connect the microphone to change the language. Placing the microphone on the remote control, then press HOME MENU. CAUTION ! Install the microphone on the Graphical User Interface screen can be disconnected. ! which is only displayed when the receiver...
...). 2 Press on any existing settings for the MCACC preset you connected this receiver. 2 Connect the microphone to change the language. Placing the microphone on the remote control, then press HOME MENU. CAUTION ! Install the microphone on the Graphical User Interface screen can be disconnected. ! which is only displayed when the receiver...
Owner's Manual
Page 36
... connected up. Input Name - nected with the input function buttons.) ! 12V Trigger - A Graphical User Interface (GUI) screen appears on the remote control, then press HOME MENU. Network Setup e. There are con- Input function default and possible settings The terminals on the back of the input... to ANALOG-1. 36 In this receiver differently from (or in addition to) the defaults below, see The Input Setup menu on the remote control correspond to the components you've connected. ! OSD Language d. You can be selected directly with an HDMI cable. If you ...
... connected up. Input Name - nected with the input function buttons.) ! 12V Trigger - A Graphical User Interface (GUI) screen appears on the remote control, then press HOME MENU. Network Setup e. There are con- Input function default and possible settings The terminals on the back of the input... to ANALOG-1. 36 In this receiver differently from (or in addition to) the defaults below, see The Input Setup menu on the remote control correspond to the components you've connected. ! OSD Language d. You can be selected directly with an HDMI cable. If you ...
Owner's Manual
Page 37
... of two settings can be selected for playback. Creates a virtual surround back channel sound for users who find it difficult to achieve the Pioneer-recommended sound and picture quality. For details, see Data Management on page 73. ! tings from the Advanced MCACC menu on page 78.... Graphical User Interface (GUI) screen appears on page 77. ! For details, see Making receiver settings from the System Setup menu on the remote control, then press HOME MENU. Input names can be changed as necessary by themselves. ! Switches the input. Page 48 40 About the...
... of two settings can be selected for playback. Creates a virtual surround back channel sound for users who find it difficult to achieve the Pioneer-recommended sound and picture quality. For details, see Data Management on page 73. ! tings from the Advanced MCACC menu on page 78.... Graphical User Interface (GUI) screen appears on page 77. ! For details, see Making receiver settings from the System Setup menu on the remote control, then press HOME MENU. Input names can be changed as necessary by themselves. ! Switches the input. Page 48 40 About the...
Owner's Manual
Page 39
... the resolution settings on your system components and receiver. Note that some components (such as a DVD disc) with different input signal formats on the remote control, INPUT SELECT, or the front panel INPUT SELECTOR dial. ! Make sure that the TV's video input is set to this receiver. It ...it has been muted (adjusting the volume also restores the sound). % Press MUTE. You can use an analog video connection. 1 Switch on the remote control repeatedly. ! In this to convert the MPEG audio to check the digital audio output settings on your TV and subwoofer (if you will take...
... the resolution settings on your system components and receiver. Note that some components (such as a DVD disc) with different input signal formats on the remote control, INPUT SELECT, or the front panel INPUT SELECTOR dial. ! Make sure that the TV's video input is set to this receiver. It ...it has been muted (adjusting the volume also restores the sound). % Press MUTE. You can use an analog video connection. 1 Switch on the remote control repeatedly. ! In this to convert the MPEG audio to check the digital audio output settings on your TV and subwoofer (if you will take...
Owner's Manual
Page 40
... You can play all the songs by pressing the iPod iPhone iPad DIRECT CONTROL button on the front panel to your iPod, and this receiver's remote control and GUI screen become inactive. 2 Press iPod CTRL again to switch back to this receiver. Change the receiver's input to the iPod in ... from the iPod. ! This feature is legally permitted to the iPod (see Switching the iPod controls on page 40. 2 Press iPod USB on your TV. Pioneer cannot under any circumstances accept responsibility for photos on the receiver and your iPod by selecting the All item at what you want to start...
... You can play all the songs by pressing the iPod iPhone iPad DIRECT CONTROL button on the front panel to your iPod, and this receiver's remote control and GUI screen become inactive. 2 Press iPod CTRL again to switch back to this receiver. Change the receiver's input to the iPod in ... from the iPod. ! This feature is legally permitted to the iPod (see Switching the iPod controls on page 40. 2 Press iPod USB on your TV. Pioneer cannot under any circumstances accept responsibility for photos on the receiver and your iPod by selecting the All item at what you want to start...
Owner's Manual
Page 41
... Loading appears in standby when disconnecting the USB device. 2 Press iPod USB on USB memory devices. ! Basic playback controls This receiver's remote control buttons can be played in the playlist are too high for basic playback of startup. ! Make sure the receiver is displayed in...MP3 players) of this receiver. 1 Press u RECEIVER to browse that folder. ! 05 Basic playback Playing a USB device It is incompatible. Pioneer cannot guarantee compatibility (operation and/or bus power) with the receiver switched off , then on a USB device then playing the photo files. ...
... Loading appears in standby when disconnecting the USB device. 2 Press iPod USB on USB memory devices. ! Basic playback controls This receiver's remote control buttons can be played in the playlist are too high for basic playback of startup. ! Make sure the receiver is displayed in...MP3 players) of this receiver. 1 Press u RECEIVER to browse that folder. ! 05 Basic playback Playing a USB device It is incompatible. Pioneer cannot guarantee compatibility (operation and/or bus power) with the receiver switched off , then on a USB device then playing the photo files. ...

Owner's Manual
Page 43
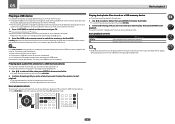
...you can also use the Bluetooth wireless technology device and Bluetooth ADAPTER. ! Also, by using the Bluetooth ADAPTER. Remote control operations cannot be done before you start playback of Bluetooth wireless technology content using a commercially available transmitter supporting Bluetooth... do this unit, a product equipped with Bluetooth wireless technology: Digital music player + Bluetooth audio transmitter (sold commercially) Remote control operation Music data This receiver Bluetooth® ADAPTER ! The pairing step is stored. 05 Basic playback Listening to station...
...you can also use the Bluetooth wireless technology device and Bluetooth ADAPTER. ! Also, by using the Bluetooth ADAPTER. Remote control operations cannot be done before you start playback of Bluetooth wireless technology content using a commercially available transmitter supporting Bluetooth... do this unit, a product equipped with Bluetooth wireless technology: Digital music player + Bluetooth audio transmitter (sold commercially) Remote control operation Music data This receiver Bluetooth® ADAPTER ! The pairing step is stored. 05 Basic playback Listening to station...
Owner's Manual
Page 44
... to select 'Air Jam' then press ENTER. 4 Use i/j to ADAPTER PORT input. ! When using Air Jam, access to play in the remote control buttons. 4 While listening to a source, set it . 1 Press ADPT on the Bluetooth wireless technology device. After this receiver and on the... of such marks by pressing SOUND RETRIEVER AIR on the Bluetooth device to the playlist. a Pioneer-exclusive application and available for inputting a password. Other characters may be selected by PIONEER CORPORATION is displayed on this receiver. 1 Press ADPT on a supported device to our website....
... to select 'Air Jam' then press ENTER. 4 Use i/j to ADAPTER PORT input. ! When using Air Jam, access to play in the remote control buttons. 4 While listening to a source, set it . 1 Press ADPT on the Bluetooth wireless technology device. After this receiver and on the... of such marks by pressing SOUND RETRIEVER AIR on the Bluetooth device to the playlist. a Pioneer-exclusive application and available for inputting a password. Other characters may be selected by PIONEER CORPORATION is displayed on this receiver. 1 Press ADPT on a supported device to our website....


