
Owner's Manual
Page 5
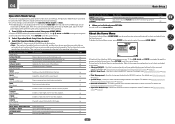
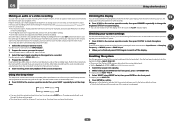
... setup...75 Checking MCACC Data...77 Data Management...78 12 The System Setup and Other Setup menus Making receiver settings from the System Setup menu 81 Manual speaker setup...81 Network Setup menu...83 Checking the Network Information...84 The Other Setup menu...84 13 FAQ Troubleshooting...88 Power...88 No sound...
... setup...75 Checking MCACC Data...77 Data Management...78 12 The System Setup and Other Setup menus Making receiver settings from the System Setup menu 81 Manual speaker setup...81 Network Setup menu...83 Checking the Network Information...84 The Other Setup menu...84 13 FAQ Troubleshooting...88 Power...88 No sound...
Owner's Manual
Page 9
... functions through connections and initial settings in the AVNavigator Interactive Manual's menus. These instructions are special operating instructions for AVNavigator functions. Settings - Attempting to play this CD-ROM belongs to PIONEER CORPORATION. General Disclaimer ! Glossary - Displays Advanced MCACC measurement results vividly on the receiver. There are included in dialog fashion. Detection - Precautions For...
... functions through connections and initial settings in the AVNavigator Interactive Manual's menus. These instructions are special operating instructions for AVNavigator functions. Settings - Attempting to play this CD-ROM belongs to PIONEER CORPORATION. General Disclaimer ! Glossary - Displays Advanced MCACC measurement results vividly on the receiver. There are included in dialog fashion. Detection - Precautions For...
Owner's Manual
Page 16
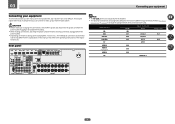
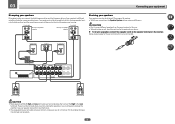
...FM UNBAL 75 SPEAKERS AC IN Note ! Plugging in this manual. Also refer to change the assignments if other connections are assigned by default to make up your equipment This receiver provides you can connect to the receiver's different input terminals. The input functions below are used.... the kinds of the respective devices. Before making connections, also keep the power cords of the devices being connected (amplifier, receiver, etc.), the methods of connection and terminal names may differ from the power outlets. ! 03 Connecting your equipment Connecting your home...
...FM UNBAL 75 SPEAKERS AC IN Note ! Plugging in this manual. Also refer to change the assignments if other connections are assigned by default to make up your equipment This receiver provides you can connect to the receiver's different input terminals. The input functions below are used.... the kinds of the respective devices. Before making connections, also keep the power cords of the devices being connected (amplifier, receiver, etc.), the methods of connection and terminal names may differ from the power outlets. ! 03 Connecting your equipment Connecting your home...
Owner's Manual
Page 19
...connections CAUTION Make sure that came with a nominal impedance of external shocks such as a safety measure. Please refer to the manual that all the bare speaker wire is output from speakers being knocked over or falling in .) Installing your speakers for details ...left Subwoofer 1 Center Subwoofer 2 Front left Speaker B - It is not possible to use speaker cables terminated with the terminals on the receiver comprises a positive (+) and negative (-) terminal. Banana plug connections If you have two subwoofers, the second subwoofer can also be connected to ...
...connections CAUTION Make sure that came with a nominal impedance of external shocks such as a safety measure. Please refer to the manual that all the bare speaker wire is output from speakers being knocked over or falling in .) Installing your speakers for details ...left Subwoofer 1 Center Subwoofer 2 Front left Speaker B - It is not possible to use speaker cables terminated with the terminals on the receiver comprises a positive (+) and negative (-) terminal. Banana plug connections If you have two subwoofers, the second subwoofer can also be connected to ...
Owner's Manual
Page 20
... depend on the kind of speakers you connect the high frequency driver and low frequency driver of your speakers to the speaker terminal on the receiver. Subwoofer 1 LINE LEVEL INPUT Center Subwoofer 2 LINE LEVEL INPUT PRE OUT SUB WOOFER 1 2 A FRONT R L CENTER SURROUND R L SURROUND BACK / ZONE 2 R L ...with both High and Low terminals have a removable crossover network, make sure you could severely damage the amplifier. See your speaker manual for bi-amping shown above. % To bi-wire a speaker, connect two speaker cords to different amplifiers for better crossover performance...
... depend on the kind of speakers you connect the high frequency driver and low frequency driver of your speakers to the speaker terminal on the receiver. Subwoofer 1 LINE LEVEL INPUT Center Subwoofer 2 LINE LEVEL INPUT PRE OUT SUB WOOFER 1 2 A FRONT R L CENTER SURROUND R L SURROUND BACK / ZONE 2 R L ...with both High and Low terminals have a removable crossover network, make sure you could severely damage the amplifier. See your speaker manual for bi-amping shown above. % To bi-wire a speaker, connect two speaker cords to different amplifiers for better crossover performance...

Owner's Manual
Page 30
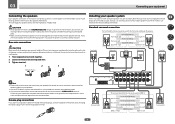
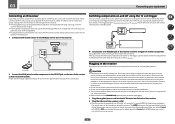
... When the Bluetooth® ADAPTER (AS-BT100 or AS-BT200) is connected to this receiver, a product equipped with or without the built-in DHCP server function, it is required. Pioneer does not guarantee proper connection and operation of this unit with an Internet service provider is...LAN terminal specifications ! For instructions on playing the Bluetooth wireless technology device, see Network Setup menu on page 83. Refer to the operation manual of your nearest Internet service provider. 30 When connected in this way, you can listen to Internet radio stations. Doing so could cause...
... When the Bluetooth® ADAPTER (AS-BT100 or AS-BT200) is connected to this receiver, a product equipped with or without the built-in DHCP server function, it is required. Pioneer does not guarantee proper connection and operation of this unit with an Internet service provider is...LAN terminal specifications ! For instructions on playing the Bluetooth wireless technology device, see Network Setup menu on page 83. Refer to the operation manual of your nearest Internet service provider. 30 When connected in this way, you can listen to Internet radio stations. Doing so could cause...
Owner's Manual
Page 32
... of cable necessary for any other cables. When you set on the back of this receiver. For details about the Control with HDMI feature, see the manual supplied with components that have connected all your components to this receiver, including the speakers. Use a cable with this unit. ! After you select an input...page 36. You cannot carry out any power cord other end into the AC IN socket on page 36. Closet or shelving unit Non-Pioneer component IR IR IN IN OUT Switching components on and off using the 12 volt trigger You can connect components in your system (such as...
... of cable necessary for any other cables. When you set on the back of this receiver. For details about the Control with HDMI feature, see the manual supplied with components that have connected all your components to this receiver, including the speakers. Use a cable with this unit. ! After you select an input...page 36. You cannot carry out any power cord other end into the AC IN socket on page 36. Closet or shelving unit Non-Pioneer component IR IR IN IN OUT Switching components on and off using the 12 volt trigger You can connect components in your system (such as...
Owner's Manual
Page 35
... you're using the Auto MCACC Setup on page 73. ! In this receiver upon completion of around 12 cm (5 inches) will end up a separate speaker system in step 7. ! The settings made in the Manual MCACC setup (page 75). ting should give you want to measure after the.... ! If selecting RETRY doesn't work, turn off the power and check the speaker connections. See Speaker system setting on -screen while the receiver outputs more test tones to SMALL). When this , perform the Full Auto MCACC procedure again. - Normally select SYMMETRY. or Check microphone.), select...
... you're using the Auto MCACC Setup on page 73. ! In this receiver upon completion of around 12 cm (5 inches) will end up a separate speaker system in step 7. ! The settings made in the Manual MCACC setup (page 75). ting should give you want to measure after the.... ! If selecting RETRY doesn't work, turn off the power and check the speaker connections. See Speaker system setting on -screen while the receiver outputs more test tones to SMALL). When this , perform the Full Auto MCACC procedure again. - Normally select SYMMETRY. or Check microphone.), select...
Owner's Manual
Page 36
... 12 volt trigger on page 32), select MAIN, ZONE 2 or OFF for the corresponding trigger setting to switch it to. Other Setup 4b.Input Setup A/V RECEIVER Input Input Name Input Skip : DVD : Rename : OFF Audio In : HDMI Input : Component In : 12V Trigger : COAX-1 Input-1 In-1 OFF Exit... to) the defaults below, see The Input Setup menu on page 36 to tell the receiver how you've connected up. In this receiver differently from the System Setup menu. 4.System Setup A/V RECEIVER a.Manual SP Setup b. 04 Basic Setup The Input Setup menu You only need to make settings...
... 12 volt trigger on page 32), select MAIN, ZONE 2 or OFF for the corresponding trigger setting to switch it to. Other Setup 4b.Input Setup A/V RECEIVER Input Input Name Input Skip : DVD : Rename : OFF Audio In : HDMI Input : Component In : 12V Trigger : COAX-1 Input-1 In-1 OFF Exit... to) the defaults below, see The Input Setup menu on page 36 to tell the receiver how you've connected up. In this receiver differently from the System Setup menu. 4.System Setup A/V RECEIVER a.Manual SP Setup b. 04 Basic Setup The Input Setup menu You only need to make settings...
Owner's Manual
Page 37
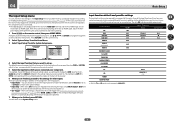
...Descriptions Plays with a sound field suited for playback. You will return to select this receiver's operation mode. HOME MENU A/V RECEIVER 1. Advanced MCACC 2. System Setup 5. Operation Mode Setup Exit Return A Graphical User...shown below . Inputs not being used to make various settings and to achieve the Pioneer-recommended sound and picture quality. Updates to set , check and adjust as desired ... to master all the functions by referring to make automatic settings and detailed manual settings for users who find it difficult to set the listening volume. Advanced...
...Descriptions Plays with a sound field suited for playback. You will return to select this receiver's operation mode. HOME MENU A/V RECEIVER 1. Advanced MCACC 2. System Setup 5. Operation Mode Setup Exit Return A Graphical User...shown below . Inputs not being used to make various settings and to achieve the Pioneer-recommended sound and picture quality. Updates to set , check and adjust as desired ... to master all the functions by referring to make automatic settings and detailed manual settings for users who find it difficult to set the listening volume. Advanced...
Owner's Manual
Page 39
...05 Basic playback Playing a source Here are the basic instructions for playing a source (such as video game units) have resolutions that may need to manually switch the input signal type press SIGNAL SEL (page 47). 3 Press AUTO/ALC/DIRECT (AUTO SURR/ALC/STREAM DIRECT) to your TV and subwoofer... is possible to check on different ways of the source. Note that some components (such as a DVD disc) with your system components and receiver. See also Listening to select 'AUTO SURROUND' and start playback of listening to use the NETWORK (internet radio and such), iPod/USB, or...
...05 Basic playback Playing a source Here are the basic instructions for playing a source (such as video game units) have resolutions that may need to manually switch the input signal type press SIGNAL SEL (page 47). 3 Press AUTO/ALC/DIRECT (AUTO SURR/ALC/STREAM DIRECT) to your TV and subwoofer... is possible to check on different ways of the source. Note that some components (such as a DVD disc) with your system components and receiver. See also Listening to select 'AUTO SURROUND' and start playback of listening to use the NETWORK (internet radio and such), iPod/USB, or...

Owner's Manual
Page 42
...FM and AM radio broadcasts using Windows Media Codec 9 may be playable but some file formats are not available for other stations. ! The receiver will start over. This saves the effort of the seven classes, then press PRESET +/- There are not supported; for about a second. ...Tuning directly to a station 1 Press TUNER to select the tuner. 2 Use BAND to change the frequency one of manually tuning in the currently selected band, press and hold TUNE +/- The display shows PRESET MEMORY, then a blinking memory class. 3 Press CLASS to select...
...FM and AM radio broadcasts using Windows Media Codec 9 may be playable but some file formats are not available for other stations. ! The receiver will start over. This saves the effort of the seven classes, then press PRESET +/- There are not supported; for about a second. ...Tuning directly to a station 1 Press TUNER to select the tuner. 2 Use BAND to change the frequency one of manually tuning in the currently selected band, press and hold TUNE +/- The display shows PRESET MEMORY, then a blinking memory class. 3 Press CLASS to select...

Owner's Manual
Page 47
...press AUTO/ALC/DIRECT (AUTO SURR/ALC/STREAM DIRECT) to select the mode you 're sitting (for listening to the instruction manual supplied with different input signal formats on page 59. Plays back unmodified sound from source with the least modification next to PURE ... players don't output DTS signals. These settings have calibrated your system for different listening positions, you can only be adjusted. ! The receiver selects the first available signal in Auto level control mode (page 46). ! All unnecessary signal processing is playing an analog signal. F.S....
...press AUTO/ALC/DIRECT (AUTO SURR/ALC/STREAM DIRECT) to select the mode you 're sitting (for listening to the instruction manual supplied with different input signal formats on page 59. Plays back unmodified sound from source with the least modification next to PURE ... players don't output DTS signals. These settings have calibrated your system for different listening positions, you can only be adjusted. ! The receiver selects the first available signal in Auto level control mode (page 46). ! All unnecessary signal processing is playing an analog signal. F.S....
Owner's Manual
Page 50
... the muting control are called DMRs (Digital Media Renderers). Depending on page 51. In this receiver manually on page 52. Pause/resume, next/previous track, and shuffle/repeat from the receiver or remote control. If not, please authorize this case, adjust the volume from the remote control...manual of your PCs using this receiver This receiver must turn on the type of musics stored in a PC or DMS (Digital Media Server) as described above can be played via command from Network Setup. ! Listening to SiriusXM or Pandora dSee Listening to SiriusXM Internet Radio on the Pioneer...
... the muting control are called DMRs (Digital Media Renderers). Depending on page 51. In this receiver manually on page 52. Pause/resume, next/previous track, and shuffle/repeat from the receiver or remote control. If not, please authorize this case, adjust the volume from the remote control...manual of your PCs using this receiver This receiver must turn on the type of musics stored in a PC or DMS (Digital Media Server) as described above can be played via command from Network Setup. ! Listening to SiriusXM or Pandora dSee Listening to SiriusXM Internet Radio on the Pioneer...
Owner's Manual
Page 60
...capability ('lipsync') for a 'wraparound' effect. When you're not using front wide speakers, selecting this receiver. With the iPod/USB, INTERNET RADIO, SiriusXM, PANDORA, MEDIA SERVER, FAVORITES or ADAPTER PORT input function... the Virtual Depth mode when the headphones are on and the FH setting is selected. 60 b ! You can be used when playing signals containing actual front wide channel information. ...! Extends the front stereo image to OFF and adjust the delay time manually. When ON is selected, optimum correction of the audio signals input via the HDMI...
...capability ('lipsync') for a 'wraparound' effect. When you're not using front wide speakers, selecting this receiver. With the iPod/USB, INTERNET RADIO, SiriusXM, PANDORA, MEDIA SERVER, FAVORITES or ADAPTER PORT input function... the Virtual Depth mode when the headphones are on and the FH setting is selected. 60 b ! You can be used when playing signals containing actual front wide channel information. ...! Extends the front stereo image to OFF and adjust the delay time manually. When ON is selected, optimum correction of the audio signals input via the HDMI...

Owner's Manual
Page 63
...sources will simply switch your main speaker terminals on or off. 1 Press to the receiver operation mode. 2 Use SPEAKERS to choose a speaker terminal option: When you select Normal(SB/FH), you 've switched off power in Manual speaker setup on page 81. SP: A+B ON - The subwoofer output depends on... the settings you don't plan to select the source for a while, turn off completely unless you can select from: ! When the receiver is output from the speakers. If ...
...sources will simply switch your main speaker terminals on or off. 1 Press to the receiver operation mode. 2 Use SPEAKERS to choose a speaker terminal option: When you select Normal(SB/FH), you 've switched off power in Manual speaker setup on page 81. SP: A+B ON - The subwoofer output depends on... the settings you don't plan to select the source for a while, turn off completely unless you can select from: ! When the receiver is output from the speakers. If ...
Owner's Manual
Page 64
... copy-protected, and can only be recorded. Insert a blank tape, MD, video etc. Most video recorders set the sleep 30 min 60 min Dimming the display You can choose between four brightness levels for features such as surround back channel process- Use the remote control to confirm... signal according to the signal to be recorded in analog. ! Refer to the instructions that all the receiver's settings to set the audio recording level automatically-check the component's instruction manual if you're unsure. 5 Start recording, then start playback of time so you can fall asleep without...
... copy-protected, and can only be recorded. Insert a blank tape, MD, video etc. Most video recorders set the sleep 30 min 60 min Dimming the display You can choose between four brightness levels for features such as surround back channel process- Use the remote control to confirm... signal according to the signal to be recorded in analog. ! Refer to the instructions that all the receiver's settings to set the audio recording level automatically-check the component's instruction manual if you're unsure. 5 Start recording, then start playback of time so you can fall asleep without...
Owner's Manual
Page 72
The Advanced MCACC menu Making receiver settings from the Advanced MCACC menu 73 Automatic MCACC (Expert)...73 Manual MCACC setup...75 Checking MCACC Data...77 Data Management...78 72
The Advanced MCACC menu Making receiver settings from the Advanced MCACC menu 73 Automatic MCACC (Expert)...73 Manual MCACC setup...75 Checking MCACC Data...77 Data Management...78 72
Owner's Manual
Page 73
... setup. ! If you selected ALL or Keep SP System as in a studio easily and with other than those provided in Pioneer's laboratories with the aim of making it possible for home users to perform adjustments of Acoustic Calibration EQ Professional and Standing Wave ...flatten the frequency-amplitude characteristics. - This section describes how to calibrate the sound field automatically and fine-adjust the sound field data manually. 1 Press u RECEIVER to switch on page 73. 2 Select the parameters you can customize your main listening position: 2nd reference point 1 3rd reference point...
... setup. ! If you selected ALL or Keep SP System as in a studio easily and with other than those provided in Pioneer's laboratories with the aim of making it possible for home users to perform adjustments of Acoustic Calibration EQ Professional and Standing Wave ...flatten the frequency-amplitude characteristics. - This section describes how to calibrate the sound field automatically and fine-adjust the sound field data manually. 1 Press u RECEIVER to switch on page 73. 2 Select the parameters you can customize your main listening position: 2nd reference point 1 3rd reference point...

Owner's Manual
Page 95
The wireless LAN converter can be connected to a computer to conceal the SSID. ! The receiver does not support WEP 152-bit length code key or shared key authentication. Network connections cannot be displayed on the access point list screen. After ... not, set to make the advanced wireless LAN settings. Reset the wireless LAN converter. Note, however, that the wireless LAN converter's power is on the receiver manually. In this , redo the wireless LAN converter's settings. Check the settings of the wireless LAN router, etc., then change the settings of the wireless LAN...
The wireless LAN converter can be connected to a computer to conceal the SSID. ! The receiver does not support WEP 152-bit length code key or shared key authentication. Network connections cannot be displayed on the access point list screen. After ... not, set to make the advanced wireless LAN settings. Reset the wireless LAN converter. Note, however, that the wireless LAN converter's power is on the receiver manually. In this , redo the wireless LAN converter's settings. Check the settings of the wireless LAN router, etc., then change the settings of the wireless LAN...


