
Owner's Manual
Page 1
...CHANNEL RECEIVER RECEPTEUR AUDIOVISUEL A VOIES MULTI-CANAUX VSX-518 Register your product at: www.pioneerelectronics.com (US) www.pioneerelectronics.ca (Canada) • Protect your new investment The details of your purchase will be on file for reference in the event of an insurance claim such as loss or theft. • Receive... free tips, updates and service bulletins on your new product • Improve product development Your input helps us continue to design products that meet your needs. • Receive a free Pioneer newsletter Registered customers can opt in to receive a ...
...CHANNEL RECEIVER RECEPTEUR AUDIOVISUEL A VOIES MULTI-CANAUX VSX-518 Register your product at: www.pioneerelectronics.com (US) www.pioneerelectronics.ca (Canada) • Protect your new investment The details of your purchase will be on file for reference in the event of an insurance claim such as loss or theft. • Receive... free tips, updates and service bulletins on your new product • Improve product development Your input helps us continue to design products that meet your needs. • Receive a free Pioneer newsletter Registered customers can opt in to receive a ...
Owner's Manual
Page 2
...against harmful interference in accordance with the instructions, may cause undesired operation. Increase the separation between the equipment and receiver. - Connect the equipment into an outlet on proposition 65 known to the State of California and other governmental entities...by turning the equipment off plug can be disconnected by one fitted. Product Name: AUDIO/VIDEO MULTI-CHANNEL RECEIVER Model Number: VSX-518-K, VSX-518-S Responsible Party Name: PIONEER ELECTRONICS SERVICE INC. Make sure it to country or region. D3-4-2-2-1a_A_En WARNING: Handling the cord ...
...against harmful interference in accordance with the instructions, may cause undesired operation. Increase the separation between the equipment and receiver. - Connect the equipment into an outlet on proposition 65 known to the State of California and other governmental entities...by turning the equipment off plug can be disconnected by one fitted. Product Name: AUDIO/VIDEO MULTI-CHANNEL RECEIVER Model Number: VSX-518-K, VSX-518-S Responsible Party Name: PIONEER ELECTRONICS SERVICE INC. Make sure it to country or region. D3-4-2-2-1a_A_En WARNING: Handling the cord ...
Owner's Manual
Page 4
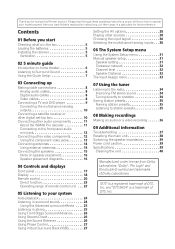
...Using Phase Control 27 Using Virtual Surround Back (VSB 27 Setting the AV options 28 Playing other video components 12 Using the component video jacks ...these operating instructions so you start Checking what's in the box 5 Loading the batteries 5 Installing the receiver 5 Ventilation 5 02 5 minute guide Introduction to home theater 6 Listening to Surround Sound 6 Using...System Setup menu 31 Manual speaker setup 31 Speaker setting 31 Crossover network 32 Channel level 32 Speaker Distance 32 The Input Assign menu 33 07 Using the ... place for buying this Pioneer product.
...Using Phase Control 27 Using Virtual Surround Back (VSB 27 Setting the AV options 28 Playing other video components 12 Using the component video jacks ...these operating instructions so you start Checking what's in the box 5 Loading the batteries 5 Installing the receiver 5 Ventilation 5 02 5 minute guide Introduction to home theater 6 Listening to Surround Sound 6 Using...System Setup menu 31 Manual speaker setup 31 Speaker setting 31 Crossover network 32 Channel level 32 Speaker Distance 32 The Input Assign menu 33 07 Using the ... place for buying this Pioneer product.
Owner's Manual
Page 6
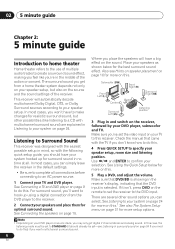
... listening mode must be set the video input on your speakers as shown below for more on this . The surround sound you get digital 2 channel stereo and analog sound. See Connecting the speakers on page 31 for the best surround sound effect. Note 1 Depending on page 9 to do this... a surround sound effect, making you feel like listening to a CD with multichannel surround sound) are several other possibilities (like you're in the receiver's display, indicating that the DVD input is showing in the middle of the action or concert. For surround sound, you won't have a big ...
... listening mode must be set the video input on your speakers as shown below for more on this . The surround sound you get digital 2 channel stereo and analog sound. See Connecting the speakers on page 31 for the best surround sound effect. Note 1 Depending on page 9 to do this... a surround sound effect, making you feel like listening to a CD with multichannel surround sound) are several other possibilities (like you're in the receiver's display, indicating that the DVD input is showing in the middle of the action or concert. For surround sound, you won't have a big ...

Owner's Manual
Page 10
... Connecting the multichannel analog outputs For DVD Audio and SACD playback, your set-top box has a digital output, connect it to a digital input on this receiver. SUB TER WOOFER IN CD-R / TAPE / MD OUT IN IN (ASSIGNABLE) DIGITAL IN COAX 2 IN (DVR / VCR) COAX 1 OUT (DVD / BD) ...channel analog output jacks 1 Connect a set of audio/video outputs on the set-top box component to the TV/SAT AUDIO and VIDEO inputs on this receiver.2 Use a stereo RCA phono cable for the audio connection and a standard RCA video cable for the video connection.3 2 If your DVD player may have 5.1 channel...
... Connecting the multichannel analog outputs For DVD Audio and SACD playback, your set-top box has a digital output, connect it to a digital input on this receiver. SUB TER WOOFER IN CD-R / TAPE / MD OUT IN IN (ASSIGNABLE) DIGITAL IN COAX 2 IN (DVR / VCR) COAX 1 OUT (DVD / BD) ...channel analog output jacks 1 Connect a set of audio/video outputs on the set-top box component to the TV/SAT AUDIO and VIDEO inputs on this receiver.2 Use a stereo RCA phono cable for the audio connection and a standard RCA video cable for the video connection.3 2 If your DVD player may have 5.1 channel...
Owner's Manual
Page 16
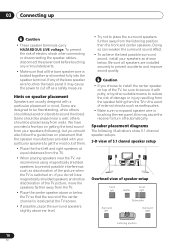
... speakers to get the most out of the picture when the TV is touching the rear panel, this may cause the receiver to prevent accidents and improve sound quality. others should also follow the guidelines on speaker placement Speakers are installed securely to turn.... • To achieve the best possible surround sound, install your speakers (following illustrations show 5.1 channel speaker setups. 3-D view of 5.1 channel speaker setup Overhead view of the center channel is twisted together and inserted fully into the speaker terminal. Some are designed to place the surround ...
... speakers to get the most out of the picture when the TV is touching the rear panel, this may cause the receiver to prevent accidents and improve sound quality. others should also follow the guidelines on speaker placement Speakers are installed securely to turn.... • To achieve the best possible surround sound, install your speakers (following illustrations show 5.1 channel speaker setups. 3-D view of 5.1 channel speaker setup Overhead view of the center channel is twisted together and inserted fully into the speaker terminal. Some are designed to place the surround ...
Owner's Manual
Page 17
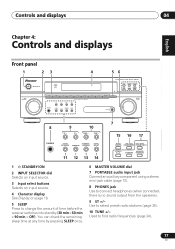
...;ais Italiano Nederlands Español Chapter 4: Controls and displays Front panel 1 23 STANDBY/ON PHASE CONTROL 4 56 AUDIO/VIDEO MULTI-CHANNEL RECEIVER VSX-518 PHASE DIALOGUE AUTO SURR / CONTROL ENHANCEMENT STREAM DIRECT STEREO / A.L.C. You can check the remaining sleep time at any time by pressing SLEEP...jack Connect an auxiliary component using a stereo mini-jack cable (page 12). 8 PHONES jack Use to change the amount of time before the receiver switches into standby (30 min - 60 min - 90 min - STANDARD ADVANCED SURROUND 1 STANDBY/ON 2 INPUT SELECTOR dial Selects an input ...
...;ais Italiano Nederlands Español Chapter 4: Controls and displays Front panel 1 23 STANDBY/ON PHASE CONTROL 4 56 AUDIO/VIDEO MULTI-CHANNEL RECEIVER VSX-518 PHASE DIALOGUE AUTO SURR / CONTROL ENHANCEMENT STREAM DIRECT STEREO / A.L.C. You can check the remaining sleep time at any time by pressing SLEEP...jack Connect an auxiliary component using a stereo mini-jack cable (page 12). 8 PHONES jack Use to change the amount of time before the receiver switches into standby (30 min - 60 min - 90 min - STANDARD ADVANCED SURROUND 1 STANDBY/ON 2 INPUT SELECTOR dial Selects an input ...
Owner's Manual
Page 20
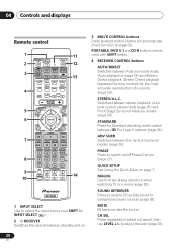
...MIDNIGHT ANALOG ATT DIMMER ENTER DISC SLEEP +10 SIGNAL SEL INFO TV CONTROL SHIFT INPUT SELECT TV CH TV VOL 14 RECEIVER 1 INPUT SELECT Use to select a channel, then use SHIFT for Standard decoding and to compressed audio sources (page 26). QUICK SETUP See Using the Quick Setup...DVD 5.1 DVD TV DVR TV CTRL 3 CD-R CD FM AM RECEIVER 13 AUTO/DIRECT STEREO/ A.L.C. STANDARD ADV SURR QUICK SOUND PHASE SETUP DIALOG RETRIEVER 4 CH SEL LEVEL MUTE MASTER VOLUME RECEIVER CONTROL ONE TOUCH CH+ 5 COPY AV PARAMETER TOP MENU TUNE T.EDIT MENU 6 ST ST ENTER GUIDE TUNE...
...MIDNIGHT ANALOG ATT DIMMER ENTER DISC SLEEP +10 SIGNAL SEL INFO TV CONTROL SHIFT INPUT SELECT TV CH TV VOL 14 RECEIVER 1 INPUT SELECT Use to select a channel, then use SHIFT for Standard decoding and to compressed audio sources (page 26). QUICK SETUP See Using the Quick Setup...DVD 5.1 DVD TV DVR TV CTRL 3 CD-R CD FM AM RECEIVER 13 AUTO/DIRECT STEREO/ A.L.C. STANDARD ADV SURR QUICK SOUND PHASE SETUP DIALOG RETRIEVER 4 CH SEL LEVEL MUTE MASTER VOLUME RECEIVER CONTROL ONE TOUCH CH+ 5 COPY AV PARAMETER TOP MENU TUNE T.EDIT MENU 6 ST ST ENTER GUIDE TUNE...
Owner's Manual
Page 21
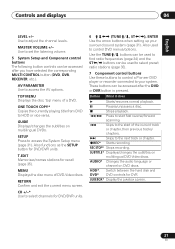
...fast reverse/forward scanning. SUBTITLE* Displays/changes the subtitles on multilingual DVD-Video discs. AV PARAMETER Use to the next track or chapter. ìREC* Starts recording. Stops playback.../ buttons can be accessed after you have selected the corresponding MULTI CONTROL button (DVD, DVR, RECEIVER, etc.). Also functions as the SETUP button for DVD/DVR units. 6 (TUNE / , ST...page 35). 7 Component control buttons Use these buttons to control a Pioneer DVD player or recorder connected to select channels for DVD/DVR units. Button What it does Starts/resumes normal ...
...fast reverse/forward scanning. SUBTITLE* Displays/changes the subtitles on multilingual DVD-Video discs. AV PARAMETER Use to the next track or chapter. ìREC* Starts recording. Stops playback.../ buttons can be accessed after you have selected the corresponding MULTI CONTROL button (DVD, DVR, RECEIVER, etc.). Also functions as the SETUP button for DVD/DVR units. 6 (TUNE / , ST...page 35). 7 Component control buttons Use these buttons to control a Pioneer DVD player or recorder connected to select channels for DVD/DVR units. Button What it does Starts/resumes normal ...
Owner's Manual
Page 22
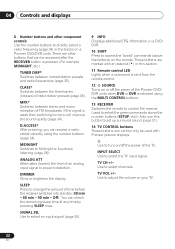
...surround sound (page 31). 14 TV CONTROL buttons These buttons can access a radio station directly using the MULTI CONTROL buttons. 13 RECEIVER Switches the remote to control the receiver (used with an asterisk (* ) in this button to turn on or off the power of an analog input signal to ...Use to mono will improve the sound quality (page 34). Use to select the TV input signal. There are marked with Pioneer plasma displays. INPUT SELECT Use to select channels. MIDNIGHT Switches to directly select a radio frequency (page 34) or the tracks on your TV. 22 En DIMMER Dims or...
...surround sound (page 31). 14 TV CONTROL buttons These buttons can access a radio station directly using the MULTI CONTROL buttons. 13 RECEIVER Switches the remote to control the receiver (used with an asterisk (* ) in this button to turn on or off the power of an analog input signal to ...Use to mono will improve the sound quality (page 34). Use to select the TV input signal. There are marked with Pioneer plasma displays. INPUT SELECT Use to select channels. MIDNIGHT Switches to directly select a radio frequency (page 34) or the tracks on your TV. 22 En DIMMER Dims or...
Owner's Manual
Page 24
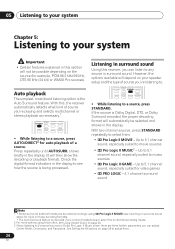
...features explained in this section will not be selected and shows in the display. With two channel sources, press STANDARD repeatedly to adjust them. 24 En See Setting the AV options on these decoding formats). • The Auto Surround feature is the Auto Surround feature.... Listening in surround sound Using this receiver, you 're playing and selects multichannel or stereo playback as necessary.1 AUTO/DIRECT STEREO/ A.L.C. With this, the receiver automatically detects...
...features explained in this section will not be selected and shows in the display. With two channel sources, press STANDARD repeatedly to adjust them. 24 En See Setting the AV options on these decoding formats). • The Auto Surround feature is the Auto Surround feature.... Listening in surround sound Using this receiver, you 're playing and selects multichannel or stereo playback as necessary.1 AUTO/DIRECT STEREO/ A.L.C. With this, the receiver automatically detects...

Owner's Manual
Page 27
...VSB ON - AUTO/DIRECT STEREO/ A.L.C. STANDARD ADV SURR QUICK SOUND PHASE SETUP DIALOG RETRIEVER • Press PHASE (PHASE CONTROL) to select a virtual surround back channel option. It is also unavailable if the surround speaker is not effective when using headphones, Stream Direct, Stereo, Auto level control stereo mode, Front Stage... the sound signal. Listening to your system 05 English Deutsch Français Italiano Nederlands Español Using Phase Control This receiver's Phase Control feature uses phase correction measures to NO in Speaker setting on page 31. 27 En
...VSB ON - AUTO/DIRECT STEREO/ A.L.C. STANDARD ADV SURR QUICK SOUND PHASE SETUP DIALOG RETRIEVER • Press PHASE (PHASE CONTROL) to select a virtual surround back channel option. It is also unavailable if the surround speaker is not effective when using headphones, Stream Direct, Stereo, Auto level control stereo mode, Front Stage... the sound signal. Listening to your system 05 English Deutsch Français Italiano Nederlands Español Using Phase Control This receiver's Phase Control feature uses phase correction measures to NO in Speaker setting on page 31. 27 En
Owner's Manual
Page 28
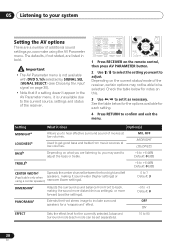
...Depending on the remote control, then press AV PARAMETER button. 2 Use / to select the setting you want to adjust the bass or treble. -6 to +6 (dB) Default: 0 (dB) TREBLEb -6 to +6 (dB) Default: 0 (dB) CENTER WIDTHc Spreads the center channel between the front right and left (Applicable... bold. ON EFFECT Sets the effect level for a 'wraparound' effect. Important • The AV Parameter menu is unavailable due to the current source, settings and status of the receiver, certain options may want to adjust. Check the table below for the options available for each ...
...Depending on the remote control, then press AV PARAMETER button. 2 Use / to select the setting you want to adjust the bass or treble. -6 to +6 (dB) Default: 0 (dB) TREBLEb -6 to +6 (dB) Default: 0 (dB) CENTER WIDTHc Spreads the center channel between the front right and left (Applicable... bold. ON EFFECT Sets the effect level for a 'wraparound' effect. Important • The AV Parameter menu is unavailable due to the current source, settings and status of the receiver, certain options may want to adjust. Check the table below for the options available for each ...
Owner's Manual
Page 30
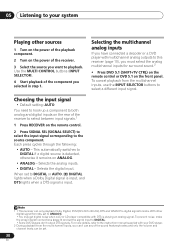
... signal formats. Choosing the input signal • Default setting: AUTO You need to hook up a component to playback. Note 1 • This receiver can only playback Dolby Digital, PCM (32 kHz to DIGITAL. • Some DVD players don't output DTS signals. To cancel playback from the ... select between input signals.1 1 Press RECEIVER on the front panel. Use the MULTI CONTROL buttons (INPUT SELECTOR). 4 Start playback of the sound features/modes and only the volume and channel levels can 't use the INPUT SELECTOR buttons to DIGITAL if a digital source is input. Each press cycles through ...
... signal formats. Choosing the input signal • Default setting: AUTO You need to hook up a component to playback. Note 1 • This receiver can only playback Dolby Digital, PCM (32 kHz to DIGITAL. • Some DVD players don't output DTS signals. To cancel playback from the ... select between input signals.1 1 Press RECEIVER on the front panel. Use the MULTI CONTROL buttons (INPUT SELECTOR). 4 Start playback of the sound features/modes and only the volume and channel levels can 't use the INPUT SELECTOR buttons to DIGITAL if a digital source is input. Each press cycles through ...
Owner's Manual
Page 31
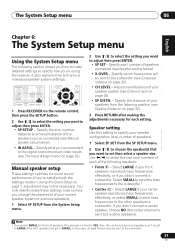
...sent to LARGE if the front speakers are set then select a speaker size. RETURN 1 Press RECEIVER on page 7, adjustment may not be set to the subwoofer. 31 En Specify size / number ...and surround speakers can't be necessary). STANDARD ADV SURR C ONE TOUCH COPY CO O CH+ AV PARAMETER TOP MENU ST TUNE ENTER T.EDIT MENU ST GUIDE SETUP TUNE CH- You only need ...speakers reproduce bass frequencies effectively, or if you didn't connect a center speaker, choose NO (the center channel is fixed to YES. It also explains how to the subwoofer.1 • Center (C) - Adjust ...
...sent to LARGE if the front speakers are set then select a speaker size. RETURN 1 Press RECEIVER on page 7, adjustment may not be set to the subwoofer. 31 En Specify size / number ...and surround speakers can't be necessary). STANDARD ADV SURR C ONE TOUCH COPY CO O CH+ AV PARAMETER TOP MENU ST TUNE ENTER T.EDIT MENU ST GUIDE SETUP TUNE CH- You only need ...speakers reproduce bass frequencies effectively, or if you didn't connect a center speaker, choose NO (the center channel is fixed to YES. It also explains how to the subwoofer.1 • Center (C) - Adjust ...
Owner's Manual
Page 32
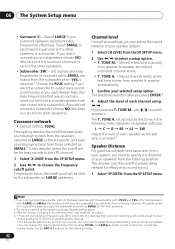
...frequencies of your ears judge which sounds best. TONE M. - TONE M., use / to the other speakers). • Subwoofer (SW) - The receiver can then add the proper delay needed for bass sounds in the following order (depends on the remote control. Crossover network • Default setting: 100Hz...Surround (S) - Select LARGE if your selected setup option. Select SMALL to send bass frequencies to switch speakers. setup outputs test tones in the LFE channel. 1 Select 'X.OVER' from those selected as LARGE, or the subwoofer, and bass sounds playing back from the SP SETUP menu. 2 Use /...
...frequencies of your ears judge which sounds best. TONE M. - TONE M., use / to the other speakers). • Subwoofer (SW) - The receiver can then add the proper delay needed for bass sounds in the following order (depends on the remote control. Crossover network • Default setting: 100Hz...Surround (S) - Select LARGE if your selected setup option. Select SMALL to send bass frequencies to switch speakers. setup outputs test tones in the LFE channel. 1 Select 'X.OVER' from those selected as LARGE, or the subwoofer, and bass sounds playing back from the SP SETUP menu. 2 Use /...
Owner's Manual
Page 37
...8226; Refer to Speaker setting on page 31 to check the speaker settings. • Refer to Channel level on . • Disconnect the power plug from the outlet, and insert again. •...the component is something wrong with this component, check the points below , ask your nearest Pioneer authorized service center or your dealer for servicing. If you think that there is connected correctly ... after exercising the checks listed below . Considerable noise in another component. This could cause the receiver to Connecting up on page 8). • Press MUTE on page 8). • Select the...
...8226; Refer to Speaker setting on page 31 to check the speaker settings. • Refer to Channel level on . • Disconnect the power plug from the outlet, and insert again. •...the component is something wrong with this component, check the points below , ask your nearest Pioneer authorized service center or your dealer for servicing. If you think that there is connected correctly ... after exercising the checks listed below . Considerable noise in another component. This could cause the receiver to Connecting up on page 8). • Press MUTE on page 8). • Select the...
Owner's Manual
Page 38
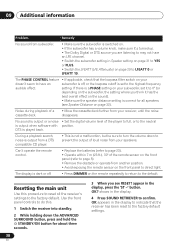
... the neutral is output when software with position. OK? setting. If there is a PHASE setting on your receiver, until the noise disappears. Resetting the main unit Use this . 1 Switch the receiver into standby. 2 While holding down to prevent the output of the player to full, or to the default... check that the receiver has been reset to the factory default settings. OK appears in the display. 4 Press SOUND RETRIEVER to direct light. No sound is output or a noise • Set the digital volume level of loud noise from your doesn't seem to have an LFE channel. • Switch...
... the neutral is output when software with position. OK? setting. If there is a PHASE setting on your receiver, until the noise disappears. Resetting the main unit Use this . 1 Switch the receiver into standby. 2 While holding down to prevent the output of the player to full, or to the default... check that the receiver has been reset to the factory default settings. OK appears in the display. 4 Press SOUND RETRIEVER to direct light. No sound is output or a noise • Set the digital volume level of loud noise from your doesn't seem to have an LFE channel. • Switch...

Owner's Manual
Page 39
...knot in the cord or tie it with a 6 Ω impedance rating. • With the receiver in a while. A damaged power cord can cause a fire or give you switch between the impedance...CD, CD-R/TAPE/MD, DVD/BD, TV/SAT, DVR/VCR 79 dB Note 1 Continuous average power output of 95 watts* per channel, min., at 8 Ω or more than 0.2 %** total harmonic distortion (front). * Measured pursuant to the Federal Trade Commission..., you an electrical shock. When you find it damaged, ask your nearest Pioneer authorized service center or your speakers are rated at 8 ohms, from 20 Hz to 20 000 Hz ...
...knot in the cord or tie it with a 6 Ω impedance rating. • With the receiver in a while. A damaged power cord can cause a fire or give you switch between the impedance...CD, CD-R/TAPE/MD, DVD/BD, TV/SAT, DVR/VCR 79 dB Note 1 Continuous average power output of 95 watts* per channel, min., at 8 Ω or more than 0.2 %** total harmonic distortion (front). * Measured pursuant to the Federal Trade Commission..., you an electrical shock. When you find it damaged, ask your nearest Pioneer authorized service center or your speakers are rated at 8 ohms, from 20 Hz to 20 000 Hz ...


