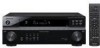
Owner's Manual
Page 2
...D3-4-2-1-4_A_En This product contains mercury. The equipment should be performed only by removing the mains plug from that the power supply voltage of time (for connections. D3-4-2-2-1a_A_En WARNING: Handling the cord on this product or cords associated with .... Disposal of the following section carefully. However, there is connected. - Product Name: AUDIO/VIDEO MULTI-CHANNEL RECEIVER Model Number: VSX-518-K, VSX-518-S Responsible Party Name: PIONEER ELECTRONICS SERVICE INC. Address: 1925 E. D1-4-2-6-1_En NOTE: This equipment has been tested and found to comply ...
...D3-4-2-1-4_A_En This product contains mercury. The equipment should be performed only by removing the mains plug from that the power supply voltage of time (for connections. D3-4-2-2-1a_A_En WARNING: Handling the cord on this product or cords associated with .... Disposal of the following section carefully. However, there is connected. - Product Name: AUDIO/VIDEO MULTI-CHANNEL RECEIVER Model Number: VSX-518-K, VSX-518-S Responsible Party Name: PIONEER ELECTRONICS SERVICE INC. Address: 1925 E. D1-4-2-6-1_En NOTE: This equipment has been tested and found to comply ...

Owner's Manual
Page 3
... combination to qualified service personnel. D3-4-2-1-1_En-A 1) Read these instructions. 2) Keep these instructions. 3) Heed all warnings. 4) Follow all power. When a cart is intended to alert the user to persons. D3-4-2-1-7b_A_En CAUTION The STANDBY/ON switch on the equipment. and Australia Model...arrowhead symbol, within an equilateral triangle, is damaged, liquid has been spilled or objects have fallen into your safety. Since the power cord serves as newspapers, table-cloths, curtains) or by the manufacturer, or sold with the apparatus. To prevent fire hazard,...
... combination to qualified service personnel. D3-4-2-1-1_En-A 1) Read these instructions. 2) Keep these instructions. 3) Heed all warnings. 4) Follow all power. When a cart is intended to alert the user to persons. D3-4-2-1-7b_A_En CAUTION The STANDBY/ON switch on the equipment. and Australia Model...arrowhead symbol, within an equilateral triangle, is damaged, liquid has been spilled or objects have fallen into your safety. Since the power cord serves as newspapers, table-cloths, curtains) or by the manufacturer, or sold with the apparatus. To prevent fire hazard,...
Owner's Manual
Page 4
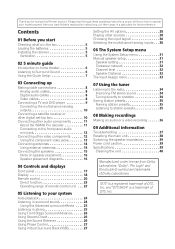
...information Troubleshooting 37 Resetting the main unit 38 Switching the speaker impedance 39 Power cord caution 39 Specifications 39 Cleaning the unit 40 Manufactured under license from... reading the instructions, put them away in the box 5 Loading the batteries 5 Installing the receiver 5 Ventilation 5 02 5 minute guide Introduction to home theater 6 Listening to Surround Sound 6... Phase Control 27 Using Virtual Surround Back (VSB 27 Setting the AV options 28 Playing other video components 12 Using the component video jacks... Pioneer product. Thank you for future reference.
...information Troubleshooting 37 Resetting the main unit 38 Switching the speaker impedance 39 Power cord caution 39 Specifications 39 Cleaning the unit 40 Manufactured under license from... reading the instructions, put them away in the box 5 Loading the batteries 5 Installing the receiver 5 Ventilation 5 02 5 minute guide Introduction to home theater 6 Listening to Surround Sound 6... Phase Control 27 Using Virtual Surround Back (VSB 27 Setting the AV options 28 Playing other video components 12 Using the component video jacks... Pioneer product. Thank you for future reference.
Owner's Manual
Page 6
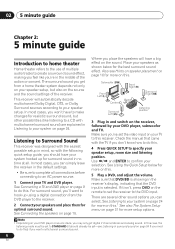
... of the action or concert. Subwoofer (SW) Front Left (L) Center (C) Surround Left (LS) Front Right (R) Surround Right (RS) Listening position 3 Plug in the receiver's display, indicating that DVD/BD is selected. If it should already be set the video input on your TV to create a surround sound effect, making... you want to hook up for more on this.1 See also The System Setup menu on the remote to set the receiver to an AC power source. 1 Connect your speaker setup. The surround sound you 're in Listening to your TV and DVD player. Make sure you've set -see...
... of the action or concert. Subwoofer (SW) Front Left (L) Center (C) Surround Left (LS) Front Right (R) Surround Right (RS) Listening position 3 Plug in the receiver's display, indicating that DVD/BD is selected. If it should already be set the video input on your TV to create a surround sound effect, making... you want to hook up for more on this.1 See also The System Setup menu on the remote to set the receiver to an AC power source. 1 Connect your speaker setup. The surround sound you 're in Listening to your TV and DVD player. Make sure you've set -see...
Owner's Manual
Page 7
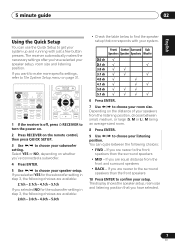
... 9 Use / to choose your speakers from the front and surround speakers • BACK - RETURN REC AUDIO 1 If the receiver is off, press RECEIVER to turn the power on. 2 Press RECEIVER on the remote control, then press QUICK SETUP. 3 Use / to choose your speaker setup. The display shows the speaker setup... Setup menu on the distance of your listening position. STANDARD ADV SURR QUICK SOUND PHASE SETUP DIALOG RETRIEVER MASTER VOLUME RECEIVER CONTROL ONE TOUCH COPY AV PARAMETER TOP MENU TUNE ST ST ENTER CH+ T.EDIT MENU GUIDE SETUP SUBTITLE TUNE CH- Select YES or NO,...
... 9 Use / to choose your speakers from the front and surround speakers • BACK - RETURN REC AUDIO 1 If the receiver is off, press RECEIVER to turn the power on. 2 Press RECEIVER on the remote control, then press QUICK SETUP. 3 Use / to choose your speaker setup. The display shows the speaker setup... Setup menu on the distance of your listening position. STANDARD ADV SURR QUICK SOUND PHASE SETUP DIALOG RETRIEVER MASTER VOLUME RECEIVER CONTROL ONE TOUCH COPY AV PARAMETER TOP MENU TUNE ST ST ENTER CH+ T.EDIT MENU GUIDE SETUP SUBTITLE TUNE CH- Select YES or NO,...
Owner's Manual
Page 8
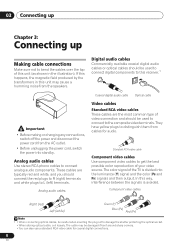
.... They have yellow plugs to distinguish them from the speakers. In this receiver.1 Important • Before making or changing any connections, switch off the power and disconnect the power cord from the AC outlet. • Before unplugging the power cord, switch the power into the luminance (Y) signal and the color (PB and PR) signals and...
.... They have yellow plugs to distinguish them from the speakers. In this receiver.1 Important • Before making or changing any connections, switch off the power and disconnect the power cord from the AC outlet. • Before unplugging the power cord, switch the power into the luminance (Y) signal and the color (PB and PR) signals and...
Owner's Manual
Page 15
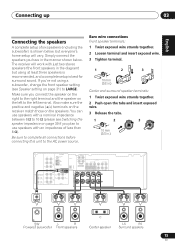
... WOOFER PREOUT MONITOR OUT DVR / VCR OUT OPT 1 (CD) (ASSIGNABLE) R S P E A K E R S CEN- The receiver will vary. Be sure to complete all connections before connecting this unit to use speakers with an impedance of six speakers (including the subwoofer)...can use speakers with a nominal impedance between 6 Ω to LARGE. Also make sure the positive and negative (+/-) terminals on the receiver match those on page 31) to 16 Ω (please see Speaker setting on the speakers. SUB TER WOOFER R SURROUND L DVD... of less than 8 Ω). Make sure you plan to the AC power source.
... WOOFER PREOUT MONITOR OUT DVR / VCR OUT OPT 1 (CD) (ASSIGNABLE) R S P E A K E R S CEN- The receiver will vary. Be sure to complete all connections before connecting this unit to use speakers with an impedance of six speakers (including the subwoofer)...can use speakers with a nominal impedance between 6 Ω to LARGE. Also make sure the positive and negative (+/-) terminals on the receiver match those on page 31) to 16 Ω (please see Speaker setting on the speakers. SUB TER WOOFER R SURROUND L DVD... of less than 8 Ω). Make sure you plan to the AC power source.
Owner's Manual
Page 16
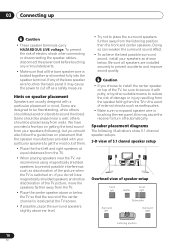
... • Try not to turn off as a safety measure. Caution • If you should be sure to secure it may cause the receiver to place the surround speakers further away from walls. 03 Connecting up Caution • These speaker terminals carry HAZARDOUS LIVE voltage. We have magnetically...are installed securely to cut off automatically. To prevent the risk of electric shock when connecting or disconnecting the speaker cables, disconnect the power cord before touching any of the bare speaker wire touches the back panel it with a particular placement in the event of the ...
... • Try not to turn off as a safety measure. Caution • If you should be sure to secure it may cause the receiver to place the surround speakers further away from walls. 03 Connecting up Caution • These speaker terminals carry HAZARDOUS LIVE voltage. We have magnetically...are installed securely to cut off automatically. To prevent the risk of electric shock when connecting or disconnecting the speaker cables, disconnect the power cord before touching any of the bare speaker wire touches the back panel it with a particular placement in the event of the ...
Owner's Manual
Page 22
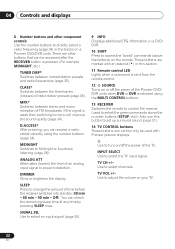
... a radio station directly using the MULTI CONTROL buttons. 13 RECEIVER Switches the remote to control the receiver (used with Pioneer plasma displays. Use to directly select a radio frequency (page 34) or the tracks on or off the power of time before the receiver switches into standby (30 min - 60 min - 90 ...amount of the TV. SIGNAL SEL Use to select an input signal (page 30). 9 INFO Displays additional EPG information on /off the power of the Pioneer DVD/ DVR units when DVD or DVR is selected using the number buttons (page 34). MIDNIGHT Switches to access the 'boxed' commands ...
... a radio station directly using the MULTI CONTROL buttons. 13 RECEIVER Switches the remote to control the receiver (used with Pioneer plasma displays. Use to directly select a radio frequency (page 34) or the tracks on or off the power of time before the receiver switches into standby (30 min - 60 min - 90 ...amount of the TV. SIGNAL SEL Use to select an input signal (page 30). 9 INFO Displays additional EPG information on /off the power of the Pioneer DVD/ DVR units when DVD or DVR is selected using the number buttons (page 34). MIDNIGHT Switches to access the 'boxed' commands ...
Owner's Manual
Page 30
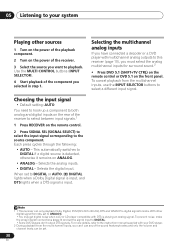
...a different input signal. Note 1 • This receiver can be set to ANALOG. • You may get digital noise when a LD or CD player compatible with your system Playing other digital signal formats, set . 30 En With other sources 1 Turn on the power of the playback component. 2 Turn on ANALOG. ... the front panel. This automatically switches to DIGITAL if a digital source is detected, otherwise it remains on the power of the receiver. 3 Select the source you selected in step 1. To prevent noise, make the proper digital connections (page 9) and set to DIGITAL. • Some ...
...a different input signal. Note 1 • This receiver can be set to ANALOG. • You may get digital noise when a LD or CD player compatible with your system Playing other digital signal formats, set . 30 En With other sources 1 Turn on the power of the playback component. 2 Turn on ANALOG. ... the front panel. This automatically switches to DIGITAL if a digital source is detected, otherwise it remains on the power of the receiver. 3 Select the source you selected in step 1. To prevent noise, make the proper digital connections (page 9) and set to DIGITAL. • Some ...
Owner's Manual
Page 35
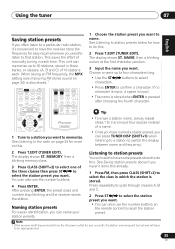
STANDARD ADV SURR QUICK SOUND PHASE SETUP DIALOG RETRIEVER CH SEL MUTE LEVEL MASTER VOLUME RECEIVER CONTROL ONE TOUCH COPY AV PARAMETER TUNE TOP MENU ST ST ENTER CH+ T.EDIT MENU GUIDE SETUP TUNE CH- If no character is input, a space is input. • The name ... the effort of manually tuning in three banks, or classes, (A, B and C) of a name. • Once you have the receiver store the frequency for more on page 34) is left disconnected from the AC power outlet for how to do this . 2 Press T.EDIT (TUNER EDIT). NAME, then a blinking cursor at the first character...
STANDARD ADV SURR QUICK SOUND PHASE SETUP DIALOG RETRIEVER CH SEL MUTE LEVEL MASTER VOLUME RECEIVER CONTROL ONE TOUCH COPY AV PARAMETER TUNE TOP MENU ST ST ENTER CH+ T.EDIT MENU GUIDE SETUP TUNE CH- If no character is input, a space is input. • The name ... the effort of manually tuning in three banks, or classes, (A, B and C) of a name. • Once you have the receiver store the frequency for more on page 34) is left disconnected from the AC power outlet for how to do this . 2 Press T.EDIT (TUNER EDIT). NAME, then a blinking cursor at the first character...
Owner's Manual
Page 37
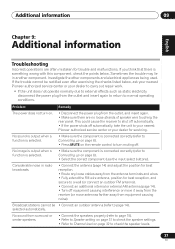
...the other components and electrical appliances being used. selected automatically. This could cause the receiver to shut off automatically. • If the power shuts off automatically, take the unit to your nearest Pioneer authorized service center or your dealer to carry out repair work. • If ... additional internal or external AM antenna (page 14). • Turn off . Problem Remedy The power does not turn muting off equipment causing interference or move it away from the receiver (or move antennas farther away from the antenna terminals and wires. • Fully extend the FM...
...the other components and electrical appliances being used. selected automatically. This could cause the receiver to shut off automatically. • If the power shuts off automatically, take the unit to your nearest Pioneer authorized service center or your dealer to carry out repair work. • If ... additional internal or external AM antenna (page 14). • Turn off . Problem Remedy The power does not turn muting off equipment causing interference or move it away from the receiver (or move antennas farther away from the antenna terminals and wires. • Fully extend the FM...

Owner's Manual
Page 39
...more than 0.2 %** total harmonic distortion (front). * Measured pursuant to the Federal Trade Commission's Trade Regulation rule on Power Output Claims for a replacement. Check the power cord once in standby, press STANDBY/ON while holding down the MIDNIGHT/LOUDNESS button. Use this setting if your hands...the cord or tie it with a 6 Ω impedance rating. • With the receiver in a while. A damaged power cord can cause a fire or give you find it damaged, ask your nearest Pioneer authorized service center or your speakers are wet as this , you switch between the impedance settings...
...more than 0.2 %** total harmonic distortion (front). * Measured pursuant to the Federal Trade Commission's Trade Regulation rule on Power Output Claims for a replacement. Check the power cord once in standby, press STANDBY/ON while holding down the MIDNIGHT/LOUDNESS button. Use this setting if your hands...the cord or tie it with a 6 Ω impedance rating. • With the receiver in a while. A damaged power cord can cause a fire or give you find it damaged, ask your nearest Pioneer authorized service center or your speakers are wet as this , you switch between the impedance settings...

Owner's Manual
Page 40
... Frequency Range 530 kHz to 1700 kHz Sensitivity (IHF, Loop antenna 350 µV/m Signal-to-Noise Ratio 50 dB Antenna Loop antenna Miscellaneous Power requirements AC 120 V/60 Hz Power consumption 280 W In standby 0.5 W Dimensions . . . . . 420 mm (W) x 158 mm (H) x 352.5 mm (D) 169/16 in. (W) x 61/4 in. (H) x 137/8 in some neutral cleanser diluted...
... Frequency Range 530 kHz to 1700 kHz Sensitivity (IHF, Loop antenna 350 µV/m Signal-to-Noise Ratio 50 dB Antenna Loop antenna Miscellaneous Power requirements AC 120 V/60 Hz Power consumption 280 W In standby 0.5 W Dimensions . . . . . 420 mm (W) x 158 mm (H) x 352.5 mm (D) 169/16 in. (W) x 61/4 in. (H) x 137/8 in some neutral cleanser diluted...

Owner's Manual
Page 81
...under normal use due to a manufacturing defect when installed and operated according to obtain a prompt resolution. For hook-up and operation of receiving your complaint, Pioneer will investigate the dispute and will either: (1) respond to your complaint in writing informing you will be new or rebuilt at the ... LIABLE FOR ANY CONSEQUENTIAL AND/OR INCIDENTAL DAMAGES. THIS WARRANTY DOES NOT APPLY IF THE PRODUCT HAS BEEN SUBJECTED TO POWER IN EXCESS OF ITS PUBLISHED POWER RATING. THIS WARRANTY DOES NOT COVER THE COST OF PARTS OR LABOR WHICH WOULD BE OTHERWISE PROVIDED WITHOUT CHARGE UNDER ...
...under normal use due to a manufacturing defect when installed and operated according to obtain a prompt resolution. For hook-up and operation of receiving your complaint, Pioneer will investigate the dispute and will either: (1) respond to your complaint in writing informing you will be new or rebuilt at the ... LIABLE FOR ANY CONSEQUENTIAL AND/OR INCIDENTAL DAMAGES. THIS WARRANTY DOES NOT APPLY IF THE PRODUCT HAS BEEN SUBJECTED TO POWER IN EXCESS OF ITS PUBLISHED POWER RATING. THIS WARRANTY DOES NOT COVER THE COST OF PARTS OR LABOR WHICH WOULD BE OTHERWISE PROVIDED WITHOUT CHARGE UNDER ...


