
Owner's Manual
Page 1
Operating Instructions Mode d'emploi AUDIO/VIDEO MULTI-CHANNEL RECEIVER RECEPTEUR AUDIOVISUEL A VOIES MULTI-CANAUX VSX-517 Register your product at: www.pioneerelectronics.com (US) www.pioneerelectronics.ca (Canada) • Protect your new investment The details of your purchase ... the event of an insurance claim such as loss or theft. • Receive free tips, updates and service bulletins on your new product • Improve product development Your input helps us continue to design products that meet your needs. • Receive a free Pioneer newsletter Registered customers can opt in to...
Operating Instructions Mode d'emploi AUDIO/VIDEO MULTI-CHANNEL RECEIVER RECEPTEUR AUDIOVISUEL A VOIES MULTI-CANAUX VSX-517 Register your product at: www.pioneerelectronics.com (US) www.pioneerelectronics.ca (Canada) • Protect your new investment The details of your purchase ... the event of an insurance claim such as loss or theft. • Receive free tips, updates and service bulletins on your new product • Improve product development Your input helps us continue to design products that meet your needs. • Receive a free Pioneer newsletter Registered customers can opt in to...
Owner's Manual
Page 2
...this unit should be removed and appropriate one or more of the FCC Rules. Increase the separation between the equipment and receiver. - D8-10-1-3_EF Information to User Alteration or modifications carried out without appropriate authorization may not cause harmful interference, ... UNLESS THE BLADES CAN BE FULLY INSERTED TO PREVENT BLADE EXPOSURE. Product Name: AUDIO/VIDEO MULTI-CHANNEL RECEIVER Model Number: VSX-517-K, VSX-517-S Responsible Party Name: PIONEER ELECTRONICS SERVICE INC. D8-10-1-2_En This Class B digital apparatus complies with part 15 of time (for...
...this unit should be removed and appropriate one or more of the FCC Rules. Increase the separation between the equipment and receiver. - D8-10-1-3_EF Information to User Alteration or modifications carried out without appropriate authorization may not cause harmful interference, ... UNLESS THE BLADES CAN BE FULLY INSERTED TO PREVENT BLADE EXPOSURE. Product Name: AUDIO/VIDEO MULTI-CHANNEL RECEIVER Model Number: VSX-517-K, VSX-517-S Responsible Party Name: PIONEER ELECTRONICS SERVICE INC. D8-10-1-2_En This Class B digital apparatus complies with part 15 of time (for...
Owner's Manual
Page 4
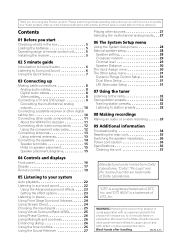
... the tone controls 26 Using the Sound Retriever 27 Manufactured under license from Dolby Laboratories. WARNING: Handling the cord on this Pioneer product. After you will know how to operate your system Auto playback 22 Listening in surround sound 22 Using the Advanced surround...diagrams 15 Playing other reproductive harm. and "DTS 96/24" is a registered trademark of remote control unit. . . . . . 5 Installing the receiver 5 02 5 minute guide Introduction to home theater 6 Listening to Surround Sound 6 Using the Quick Setup 7 03 Connecting up Making cable connections 8 ...
... the tone controls 26 Using the Sound Retriever 27 Manufactured under license from Dolby Laboratories. WARNING: Handling the cord on this Pioneer product. After you will know how to operate your system Auto playback 22 Listening in surround sound 22 Using the Advanced surround...diagrams 15 Playing other reproductive harm. and "DTS 96/24" is a registered trademark of remote control unit. . . . . . 5 Installing the receiver 5 02 5 minute guide Introduction to home theater 6 Listening to Surround Sound 6 Using the Quick Setup 7 03 Connecting up Making cable connections 8 ...
Owner's Manual
Page 5
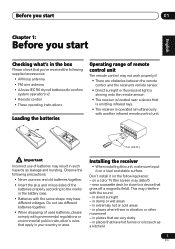
... 01 English Deutsch Français Italiano Nederlands Español Chapter 1: Before you start Checking what's in the box Please check that you've received the following supplied accessories: • AM loop antenna • FM wire antenna • AA size IEC R6 dry cell batteries (to confirm system operation) ...remote control unit The remote control may not work properly if: • There are very dusty - Do not use of batteries may distort) - Installing the receiver • When installing this unit, make sure to put it on a color TV (the screen may result in damp or wet areas -
... 01 English Deutsch Français Italiano Nederlands Español Chapter 1: Before you start Checking what's in the box Please check that you've received the following supplied accessories: • AM loop antenna • FM wire antenna • AA size IEC R6 dry cell batteries (to confirm system operation) ...remote control unit The remote control may not work properly if: • There are very dusty - Do not use of batteries may distort) - Installing the receiver • When installing this unit, make sure to put it on a color TV (the screen may result in damp or wet areas -
Owner's Manual
Page 6
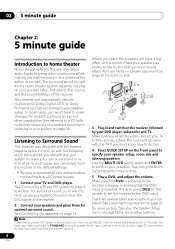
... connections before connecting to an AC power source. 1 Connect your TV and DVD player. Use the MULTI JOG dial to select and ENTER to the receiver. 2 Connect your selection. If it should have your system hooked up using a digital connection from a home theater system depends not only on your speaker ...'ve set the video input on your system on this . 5 Play a DVD, and adjust the volume. There are explained in and switch on the receiver, followed by your speakers as shown below for more on page 22. See Listening to specify your system on this ) if you can simply leave...
... connections before connecting to an AC power source. 1 Connect your TV and DVD player. Use the MULTI JOG dial to select and ENTER to the receiver. 2 Connect your selection. If it should have your system hooked up using a digital connection from a home theater system depends not only on your speaker ...'ve set the video input on your system on this . 5 Play a DVD, and adjust the volume. There are explained in and switch on the receiver, followed by your speakers as shown below for more on page 22. See Listening to specify your system on this ) if you can simply leave...
Owner's Manual
Page 7
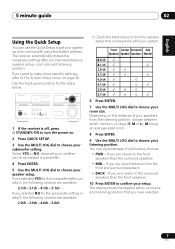
... your system up and running with your system. 6 Press ENTER. 7 Use the MULTI JOG dial to turn the power on page 28. The receiver automatically makes the necessary settings after you selected NO for the subwoofer setting in step 3, the following choices are available: 2.0ch - 3.0ch - ... MODE TONE SIGNAL SELECT DIMMER TUNER EDIT QUICK SETUP SETUP RETURN MULTI JOG ENTER VSX-517 MULTI JOG TUNING STATION STEREO/ ADVANCED F.S.SURR STANDARD SURROUND LISTENING MODE MASTER VOLUME DOWN UP 1 If the receiver is off, press STANDBY/ON to choose your speaker setup, room ...
... your system up and running with your system. 6 Press ENTER. 7 Use the MULTI JOG dial to turn the power on page 28. The receiver automatically makes the necessary settings after you selected NO for the subwoofer setting in step 3, the following choices are available: 2.0ch - 3.0ch - ... MODE TONE SIGNAL SELECT DIMMER TUNER EDIT QUICK SETUP SETUP RETURN MULTI JOG ENTER VSX-517 MULTI JOG TUNING STATION STEREO/ ADVANCED F.S.SURR STANDARD SURROUND LISTENING MODE MASTER VOLUME DOWN UP 1 If the receiver is off, press STANDBY/ON to choose your speaker setup, room ...
Owner's Manual
Page 8
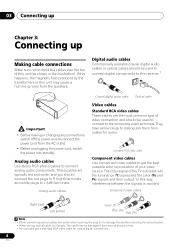
... cables to this happens, the magnetic field produced by the transformers in the illustration). The cable may cause a humming noise from the speakers. If this receiver.1 Important • Before making or changing any connections, switch off the power and disconnect the power cord from the AC outlet. • Before unplugging the...
... cables to this happens, the magnetic field produced by the transformers in the illustration). The cable may cause a humming noise from the speakers. If this receiver.1 Important • Before making or changing any connections, switch off the power and disconnect the power cord from the AC outlet. • Before unplugging the...
Owner's Manual
Page 9
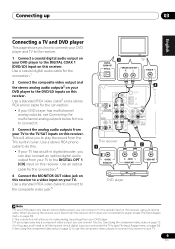
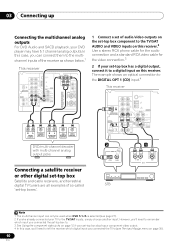
... The Input Assign menu on page 30). 5 See Using the component video jacks on page 12 to use the component video outputs to connect this receiver to your TV. 9 En Use a standard RCA video cable to connect to the composite video jack.5 DIGITAL AUDIO OUT OPTICAL 3 TV ANALOG AUDIO OUT R L...TV / SAT IN DVD / LD FRONT PLAY CD-R D V D 5.1CH INPUT IN / TAPE / MD REC L AM LOOP VIDEO ANTENNA OUT MONITOR OUT SUB WOOFER PREOUT This receiver 2 1 COAXIAL DIGITAL OUT R AUDIO L ANALOG OUT VIDEO OUT DVD player Note 1 If your DVD player only has an optical digital output, you can connect it...
... The Input Assign menu on page 30). 5 See Using the component video jacks on page 12 to use the component video outputs to connect this receiver to your TV. 9 En Use a standard RCA video cable to connect to the composite video jack.5 DIGITAL AUDIO OUT OPTICAL 3 TV ANALOG AUDIO OUT R L...TV / SAT IN DVD / LD FRONT PLAY CD-R D V D 5.1CH INPUT IN / TAPE / MD REC L AM LOOP VIDEO ANTENNA OUT MONITOR OUT SUB WOOFER PREOUT This receiver 2 1 COAXIAL DIGITAL OUT R AUDIO L ANALOG OUT VIDEO OUT DVD player Note 1 If your DVD player only has an optical digital output, you can connect it...
Owner's Manual
Page 10
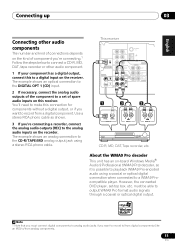
... other digital set-top box Satellite and cable receivers, and terrestrial digital TV tuners are all examples of so-called 'set-top boxes'. 2 DIGITAL OUT OPTICAL COAXIAL 1 R AUDIO L AV OUT VIDEO STB Note 1 The multichannel input can connect them to the multichannel inputs of audio/video outputs on... the set-top box component to the TV/SAT AUDIO and VIDEO inputs on this receiver.2 Use a stereo RCA phono cable for the audio...
... other digital set-top box Satellite and cable receivers, and terrestrial digital TV tuners are all examples of so-called 'set-top boxes'. 2 DIGITAL OUT OPTICAL COAXIAL 1 R AUDIO L AV OUT VIDEO STB Note 1 The multichannel input can connect them to the multichannel inputs of audio/video outputs on... the set-top box component to the TV/SAT AUDIO and VIDEO inputs on this receiver.2 Use a stereo RCA phono cable for the audio...
Owner's Manual
Page 11
... to analog audio jacks if you want to record from analog components. 11 En About the WMA9 Pro decoder This unit has an on the receiver. However, the connected DVD player, set of component you want to record to/from digital components (like an MD) to/from a digital component. ...to the analog audio inputs on this connection for components without a digital output, or if you 're connecting.1 Follow the steps below to make this receiver. You'll need to connect a CD-R, MD, DAT, tape recorder or other audio components The number and kind of connections depends on the kind of...
... to analog audio jacks if you want to record from analog components. 11 En About the WMA9 Pro decoder This unit has an on the receiver. However, the connected DVD player, set of component you want to record to/from digital components (like an MD) to/from a digital component. ...to the analog audio inputs on this connection for components without a digital output, or if you 're connecting.1 Follow the steps below to make this receiver. You'll need to connect a CD-R, MD, DAT, tape recorder or other audio components The number and kind of connections depends on the kind of...
Owner's Manual
Page 12
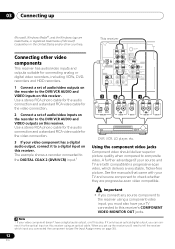
... video jacks Component video should deliver superior picture quality when compared to the optical input on this receiver. A further advantage (if your TV connected to the DIGITAL COAX 2 (DVR/VCR) input.1 This receiver FM UNBAL 75 Ω IN CD IN OPT 1 (CD) OUT ASSIGNABLE DIGITAL IN IN ... and TV are progressive-scan video compatible. When you set of Microsoft Corporation in the United States and/or other video components This receiver has audio/video inputs and outputs suitable for the video connection. 3 If your TV and source component to check whether they are both...
... video jacks Component video should deliver superior picture quality when compared to the optical input on this receiver. A further advantage (if your TV connected to the DIGITAL COAX 2 (DVR/VCR) input.1 This receiver FM UNBAL 75 Ω IN CD IN OPT 1 (CD) OUT ASSIGNABLE DIGITAL IN IN ... and TV are progressive-scan video compatible. When you set of Microsoft Corporation in the United States and/or other video components This receiver has audio/video inputs and outputs suitable for the video connection. 3 If your TV and source component to check whether they are both...

Owner's Manual
Page 13
This only needs to be done if you didn't connect according to the component video inputs on this receiver. DVR See Assigning the component video inputs on page 30. 3 Connect the COMPONENT VIDEO MONITOR OUT jacks on your source to the input ...improve reception and sound quality, connect external antennas (see Using external antennas below . Make sure the reception is clear. 4 Place the AM antenna on this receiver to the following defaults: • COMP 1 - Don't drape loosely or leave coiled up 03 English Deutsch Français Italiano Nederlands Español 1...
This only needs to be done if you didn't connect according to the component video inputs on this receiver. DVR See Assigning the component video inputs on page 30. 3 Connect the COMPONENT VIDEO MONITOR OUT jacks on your source to the input ...improve reception and sound quality, connect external antennas (see Using external antennas below . Make sure the reception is clear. 4 Place the AM antenna on this receiver to the following defaults: • COMP 1 - Don't drape loosely or leave coiled up 03 English Deutsch Français Italiano Nederlands Español 1...
Owner's Manual
Page 14
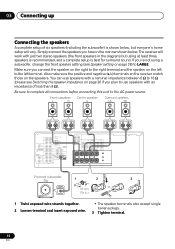
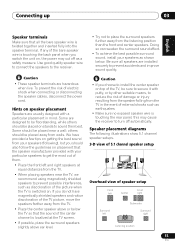
... on the right to the right terminal and the speaker on the left terminal. Also make sure the positive and negative (+/-) terminals on the receiver match those on page 36 if you 're not using at least three speakers is recommended, and a complete setup is shown below . You...speaker impedance on the speakers. If you plan to LARGE. 03 Connecting up Connecting the speakers A complete setup of less than 8 Ω). The receiver will vary. Be sure to complete all connections before connecting this unit to the left to the AC power source. 1 Twist exposed wire strands together...
... on the right to the right terminal and the speaker on the left terminal. Also make sure the positive and negative (+/-) terminals on the receiver match those on page 36 if you 're not using at least three speakers is recommended, and a complete setup is shown below . You...speaker impedance on the speakers. If you plan to LARGE. 03 Connecting up Connecting the speakers A complete setup of less than 8 Ω). The receiver will vary. Be sure to complete all connections before connecting this unit to the left to the AC power source. 1 Twist exposed wire strands together...
Owner's Manual
Page 15
... above or below . Speaker placement diagrams The following ), but you do not have provided a few tips on , the power may cause the receiver to turn off as discoloration of the picture when the TV is touching the back panel when you choose to install the center speaker on...should be placed away from the listening position than the front and center speakers. Use good quality speaker wire to connect the speakers to the receiver. • Try not to prevent accidents and improve sound quality. To prevent the risk of electric shock when connecting or disconnecting the speaker ...
... above or below . Speaker placement diagrams The following ), but you do not have provided a few tips on , the power may cause the receiver to turn off as discoloration of the picture when the TV is touching the back panel when you choose to install the center speaker on...should be placed away from the listening position than the front and center speakers. Use good quality speaker wire to connect the speakers to the receiver. • Try not to prevent accidents and improve sound quality. To prevent the risk of electric shock when connecting or disconnecting the speaker ...
Owner's Manual
Page 18
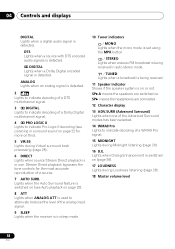
... when an analog signal is in surround sound on page 22 for the most accurate reproduction of the analog input signal. 9 SLEEP Lights when the receiver is in sleep mode. 10 Tuner indicators / MONO Lights when the mono mode is set using the MPX button. / STEREO Lights when a stereo FM... broadcast is being received in auto stereo mode. / TUNED Lights when a broadcast is being received. 11 Speaker indicator Shows if the speaker system is on this). 5 VIR.SB Lights during Midnight listening (page 26). 16...
... when an analog signal is in surround sound on page 22 for the most accurate reproduction of the analog input signal. 9 SLEEP Lights when the receiver is in sleep mode. 10 Tuner indicators / MONO Lights when the mono mode is set using the MPX button. / STEREO Lights when a stereo FM... broadcast is being received in auto stereo mode. / TUNED Lights when a broadcast is being received. 11 Speaker indicator Shows if the speaker system is on this). 5 VIR.SB Lights during Midnight listening (page 26). 16...
Owner's Manual
Page 19
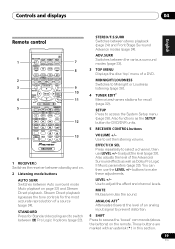
...the LEVEL +/- Controls and displays 04 English Deutsch Français Italiano Nederlands Español Remote control RECEIVER SLEEP DIMMER PHASE 1 INPUT SELECTOR DVD 5.1 DVD TV DVR RECEIVER CD CD-R FM AM STEREO/ 2 AUTOSURR F.S.SURR STANDARD ADV.SURR TOP MENU S.RETRIEVER MENU 3 MIDNIGHT...SUBTITLE CH GUIDE REC AUDIO TIMERREC INFO RECSTOP JUKEBOX DISPLAY CLASS DVD/DVR SHIFT MPX TUNING STATION 6 TUNER RECEIVER 7 8 9 10 11 12 13 1 RECEIVER Switches the receiver between standby and on. 2 Listening mode buttons AUTO SURR Switches between Auto surround mode (Auto playback ...
...the LEVEL +/- Controls and displays 04 English Deutsch Français Italiano Nederlands Español Remote control RECEIVER SLEEP DIMMER PHASE 1 INPUT SELECTOR DVD 5.1 DVD TV DVR RECEIVER CD CD-R FM AM STEREO/ 2 AUTOSURR F.S.SURR STANDARD ADV.SURR TOP MENU S.RETRIEVER MENU 3 MIDNIGHT...SUBTITLE CH GUIDE REC AUDIO TIMERREC INFO RECSTOP JUKEBOX DISPLAY CLASS DVD/DVR SHIFT MPX TUNING STATION 6 TUNER RECEIVER 7 8 9 10 11 12 13 1 RECEIVER Switches the receiver between standby and on. 2 Listening mode buttons AUTO SURR Switches between Auto surround mode (Auto playback ...

Owner's Manual
Page 20
...TOUCH COPY* Copies the currently playing title from DVD to HDD or vice-versa. 12 DVD/DVR control buttons Use these buttons to control a Pioneer DVD player or recorder connected to your surround sound system (page 28). HDD/ Switch between the three banks (classes) of the current track... chapter, then previous tracks/chapters. Skips to the next track or chapter. Switches channels. Off). PHASE Press to switch on/off . RECEIVER Use to switch to select an input source. SUBTITLE Displays/changes the subtitles on page 32). AUDIO Changes audio language or channel. Starts...
...TOUCH COPY* Copies the currently playing title from DVD to HDD or vice-versa. 12 DVD/DVR control buttons Use these buttons to control a Pioneer DVD player or recorder connected to your surround sound system (page 28). HDD/ Switch between the three banks (classes) of the current track... chapter, then previous tracks/chapters. Skips to the next track or chapter. Switches channels. Off). PHASE Press to switch on/off . RECEIVER Use to switch to select an input source. SUBTITLE Displays/changes the subtitles on page 32). AUDIO Changes audio language or channel. Starts...
Owner's Manual
Page 22
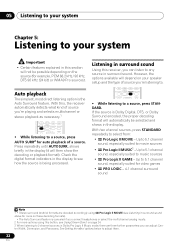
...Pro Logic II MUSIC3 - Press repeatedly until AUTOSURR. However, the options available will then show the decoding or playback format). With this receiver, you 're playing and selects multichannel or stereo playback as necessary.1 CD CD-R FM AM STEREO/ AUTOSURR F.S.SURR STANDARD ADV.SURR ... S.RETRIEVER MENU • While listening to music sources • 2 Pro Logic II GAME - Listening in surround sound Using this , the receiver automatically detects what kind of source you can adjust: Center Width, Dimension, and Panorama. Up to 5.1 channel sound, especially suited to a ...
...Pro Logic II MUSIC3 - Press repeatedly until AUTOSURR. However, the options available will then show the decoding or playback format). With this receiver, you 're playing and selects multichannel or stereo playback as necessary.1 CD CD-R FM AM STEREO/ AUTOSURR F.S.SURR STANDARD ADV.SURR ... S.RETRIEVER MENU • While listening to music sources • 2 Pro Logic II GAME - Listening in surround sound Using this , the receiver automatically detects what kind of source you can adjust: Center Width, Dimension, and Panorama. Up to 5.1 channel sound, especially suited to a ...
Owner's Manual
Page 23
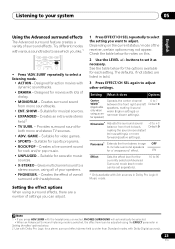
... system 05 English Deutsch Français Italiano Nederlands Español Using the Advanced surround effects The Advanced surround feature creates a variety of the receiver, certain options may not appear. GAME - Suitable for rock and/or pop music. • UNPLUGED - Depending on this. 2 Use the LEVEL +/- Setting the effect options...
... system 05 English Deutsch Français Italiano Nederlands Español Using the Advanced surround effects The Advanced surround feature creates a variety of the receiver, certain options may not appear. GAME - Suitable for rock and/or pop music. • UNPLUGED - Depending on this. 2 Use the LEVEL +/- Setting the effect options...
Owner's Manual
Page 25
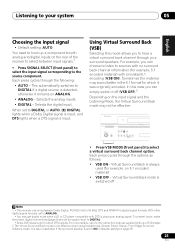
Using Virtual Surround Back (VSB) Selecting this case you can simply switch it off Note 1 • This receiver can choose to listen to ANALOG. • You may sound better in Speaker setting on 5.1 encoded material) • VSB OFF - Each press cycles ... mode. Selects the digital input. This automatically switches to DIGITAL if a digital source is switched off (VSB OFF).2 Depending on the rear of the receiver to select between input signals.1 • Press SIGNAL SELECT (front panel) to select the input signal corresponding to hear a virtual surround back channel through...
Using Virtual Surround Back (VSB) Selecting this case you can simply switch it off Note 1 • This receiver can choose to listen to ANALOG. • You may sound better in Speaker setting on 5.1 encoded material) • VSB OFF - Each press cycles ... mode. Selects the digital input. This automatically switches to DIGITAL if a digital source is switched off (VSB OFF).2 Depending on the rear of the receiver to select between input signals.1 • Press SIGNAL SELECT (front panel) to select the input signal corresponding to hear a virtual surround back channel through...


