Operating Instructions
Page 5
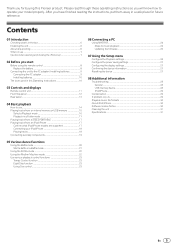
...proofing 6 When in use 14 Playing tracks from an internal memory or USB memory 15 Select a Playback mode 16 Playback in this Pioneer product. Thank you have finished reading the instructions, put them away in a safe place for buying this Operating Instructions 10 03 Controls ...supported 17 Connecting your model properly. After you for future reference. Please read through these operating instructions so you start Before using the remote control 8 Replace the battery 8 Connecting the unit to music playback 24 Updating the firmware 25 07 Using the Setup menu Configure ...
...proofing 6 When in use 14 Playing tracks from an internal memory or USB memory 15 Select a Playback mode 16 Playback in this Pioneer product. Thank you have finished reading the instructions, put them away in a safe place for buying this Operating Instructions 10 03 Controls ...supported 17 Connecting your model properly. After you for future reference. Please read through these operating instructions so you start Before using the remote control 8 Replace the battery 8 Connecting the unit to music playback 24 Updating the firmware 25 07 Using the Setup menu Configure ...
Operating Instructions
Page 6
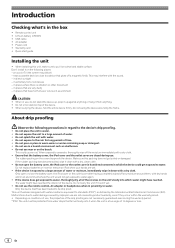
... amount of time. ! If the device does get exposed to water, thoroughly dry all of the device. Do not use , the properties of the device. ! Remote control unit ! in extremely hot or cold areas - If the rubber packing does become soiled, wipe it on conditions of use the... remote control, AC adapter or headphones when in which water might have hot fumes or oils (such as a kitchen) CAUTION ! If the device is still wet. ! ...
... amount of time. ! If the device does get exposed to water, thoroughly dry all of the device. Do not use , the properties of the device. ! Remote control unit ! in extremely hot or cold areas - If the rubber packing does become soiled, wipe it on conditions of use the... remote control, AC adapter or headphones when in which water might have hot fumes or oils (such as a kitchen) CAUTION ! If the device is still wet. ! ...
Operating Instructions
Page 8
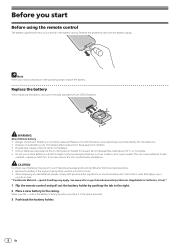
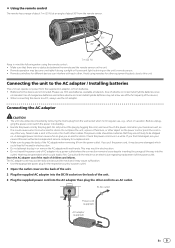
... heater. " Perchlorate Material - Replace the battery When replacing the battery, use of used battery cells immediately after replacement. Before you start Before using the remote control The battery supplied with this unit is incorrectly replaced. Observe the following precautions: ! Make sure the + side of used batteries, please comply with ... is facing up when you notice a decrease in the casing. See www.dtsc.ca.gov/hazardouswaste/perchlorate. (Applicable to California, U.S.A.) " 1 Flip the remote control and pull out the battery holder by the manufacturer. !
... heater. " Perchlorate Material - Replace the battery When replacing the battery, use of used battery cells immediately after replacement. Before you start Before using the remote control The battery supplied with this unit is incorrectly replaced. Observe the following precautions: ! Make sure the + side of used batteries, please comply with ... is facing up when you notice a decrease in the casing. See www.dtsc.ca.gov/hazardouswaste/perchlorate. (Applicable to California, U.S.A.) " 1 Flip the remote control and pull out the battery holder by the manufacturer. !
Operating Instructions
Page 9
...this could cause a short circuit or electric shock. Use the appropriate power plug for a replacement. ! Connecting the AC adapter CAUTION ! Remote operation may be stepped on vacation. Use of alkaline or nickel-metal hydride batteries is shining on the power cord or pinch the cord ...or nickel-metal hydride batteries may result in any other object on the unit's remote sensor. ! Handle the power cord by tugging the cord, and never touch the power cord when your nearest Pioneer authorized independent service company for the respective country's power outlet. 1 Open the ...
...this could cause a short circuit or electric shock. Use the appropriate power plug for a replacement. ! Connecting the AC adapter CAUTION ! Remote operation may be stepped on vacation. Use of alkaline or nickel-metal hydride batteries is shining on the power cord or pinch the cord ...or nickel-metal hydride batteries may result in any other object on the unit's remote sensor. ! Handle the power cord by tugging the cord, and never touch the power cord when your nearest Pioneer authorized independent service company for the respective country's power outlet. 1 Open the ...
Operating Instructions
Page 11
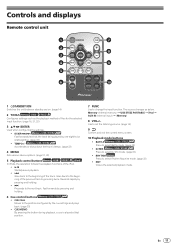
... 11 RHYTHM Memory Press to set the listening volume. (page 14) 9 Confirm and exit the current menu screen. 10 Playback mode buttons ! Controls and displays Remote control unit 1 STANDBY/ON FUNC 7 2 TOOLS TEMPO VOL 8 3 8 SKIP ENTER 8 SKIP 4 MENU TEMPO 9 5 CALL 6 CUE MEMO BATTLE DJ MIX 10 RHYTHM EXIT 1 uSTANDBY/ON Switches...
... 11 RHYTHM Memory Press to set the listening volume. (page 14) 9 Confirm and exit the current menu screen. 10 Playback mode buttons ! Controls and displays Remote control unit 1 STANDBY/ON FUNC 7 2 TOOLS TEMPO VOL 8 3 8 SKIP ENTER 8 SKIP 4 MENU TEMPO 9 5 CALL 6 CUE MEMO BATTLE DJ MIX 10 RHYTHM EXIT 1 uSTANDBY/ON Switches...
Operating Instructions
Page 12
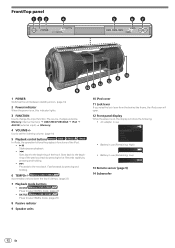
... by pressing and holding . ! Use to the beginning of the previous track by pressing and holding . 6 TEMPO+/- AC adapter in use (Remaining: Low) Playlist 13 Remote sensor (page 9) 14 Subwoofer 12 En Front/Top panel 123 4 POWER FUNCTION VOLUME 5 67 TEMPO DJ MIX BATTLE 14 9 13 8 10 11 12 9 1 POWER Switches...
... by pressing and holding . ! Use to the beginning of the previous track by pressing and holding . 6 TEMPO+/- AC adapter in use (Remaining: Low) Playlist 13 Remote sensor (page 9) 14 Subwoofer 12 En Front/Top panel 123 4 POWER FUNCTION VOLUME 5 67 TEMPO DJ MIX BATTLE 14 9 13 8 10 11 12 9 1 POWER Switches...
Operating Instructions
Page 14
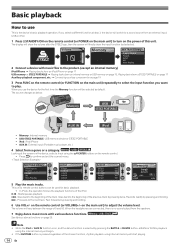
...pressed regardless of the previous track by pressing and holding . 6 Use VOL+/- d Connecting auxiliary components on page 19 3 Press FUNC on the remote control (or FUNCTION on the main unit) repeatedly to select the input function you select a different function at the screen on the device, select ... selected. AUX IN: External input (Portable music player, etc.) 4 Select from an external input, USB or iPod. 1 Press uSTANDBY/ON on the remote control (or POWER on the power of 0 and 50. Starts/pauses playback. If you want to the next track. Memory: Internal memory ! on...
...pressed regardless of the previous track by pressing and holding . 6 Use VOL+/- d Connecting auxiliary components on page 19 3 Press FUNC on the remote control (or FUNCTION on the main unit) repeatedly to select the input function you select a different function at the screen on the device, select ... selected. AUX IN: External input (Portable music player, etc.) 4 Select from an external input, USB or iPod. 1 Press uSTANDBY/ON on the remote control (or POWER on the power of 0 and 50. Starts/pauses playback. If you want to the next track. Memory: Internal memory ! on...
Operating Instructions
Page 17
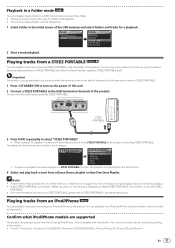
... playback tracks stored in STEEZ PORTABLE and New Five Stars Playlists created by STEEZ PORTABLE itself. You can enjoy various dance functions by using the remote control provided by selecting a folder. ! When STEEZ PORTABLE is connected, "Battle" as shown in the initial screen of the USB memory and select folders and...
... playback tracks stored in STEEZ PORTABLE and New Five Stars Playlists created by STEEZ PORTABLE itself. You can enjoy various dance functions by using the remote control provided by selecting a folder. ! When STEEZ PORTABLE is connected, "Battle" as shown in the initial screen of the USB memory and select folders and...
Operating Instructions
Page 24
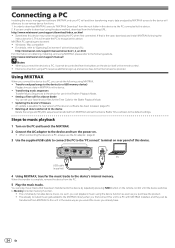
...! Windows / Mac compatible ! Transfer analyzed songs to the device (or a USB memory device) Playback music data in MIXTRAX on the remote control until the device switches to download using the above method, download from MIXTRAX and set your PC will and then transferring music data ...connect the PC to the following URL: http://mixtraxnet.com/support/manual/en/section1_2_en.html For information on the device itself or the remote control. ! When you already have been transferred to the device for the Battle Playback Mode. ! Transferring music sequences Transfer Music...
...! Windows / Mac compatible ! Transfer analyzed songs to the device (or a USB memory device) Playback music data in MIXTRAX on the remote control until the device switches to download using the above method, download from MIXTRAX and set your PC will and then transferring music data ...connect the PC to the following URL: http://mixtraxnet.com/support/manual/en/section1_2_en.html For information on the device itself or the remote control. ! When you already have been transferred to the device for the Battle Playback Mode. ! Transferring music sequences Transfer Music...
Operating Instructions
Page 26
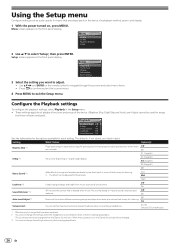
Use abcd and ENTER on the remote control to exit the Setup menu. Press to confirm and exit the current menu. 4 Press MENU to navigate through the screens and select menu items. ! ...
Use abcd and ENTER on the remote control to exit the Setup menu. Press to confirm and exit the current menu. 4 Press MENU to navigate through the screens and select menu items. ! ...
Operating Instructions
Page 28
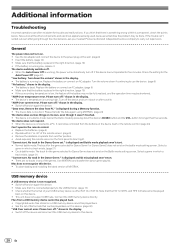
.... ! "Cannot start . ! Select a genre in which a track exists. (page 21) ! Try downloading and installing the latest version of the remote sensor. (page 9) ! USB memory device A USB memory device is running low, replace it is something wrong with this component, check the points below... (page 24) Can't operate the remote control. ! Remove the obstacle or operate from the buttons on after going through the checks below . is placed in the right direction. (page 10) ! Check whether the format of your nearest Pioneer authorized independent service company to the USB ...
.... ! "Cannot start . ! Select a genre in which a track exists. (page 21) ! Try downloading and installing the latest version of the remote sensor. (page 9) ! USB memory device A USB memory device is running low, replace it is something wrong with this component, check the points below... (page 24) Can't operate the remote control. ! Remove the obstacle or operate from the buttons on after going through the checks below . is placed in the right direction. (page 10) ! Check whether the format of your nearest Pioneer authorized independent service company to the USB ...
Operating Instructions
Page 31
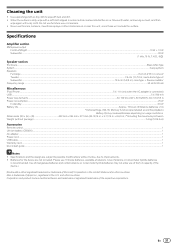
...) USB...5 V, 500 mA Power requirements...AC 100 V to improvements. ! Use a polishing cloth or dry cloth to possible modifications without package)...7.4 kg (16 lb 6 oz) Accessories Remote control...1 Lithium battery (CR2025)...1 AC adapter...1 Power cord...1 USB cable...1 Warranty card...1 Quick start guide...1 Notes ! Cleaning the unit ! Batteries for the device are subject...
...) USB...5 V, 500 mA Power requirements...AC 100 V to improvements. ! Use a polishing cloth or dry cloth to possible modifications without package)...7.4 kg (16 lb 6 oz) Accessories Remote control...1 Lithium battery (CR2025)...1 AC adapter...1 Power cord...1 USB cable...1 Warranty card...1 Quick start guide...1 Notes ! Cleaning the unit ! Batteries for the device are subject...


