Owner's Manual
Page 7
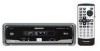
...and prevents you attempt to Front Video Output while driving. Example: When you from watching a DVD or Video CD on the screen. Where such regulations apply, they must be illegal. WARNING • NEVER install the display in a location that is visible to the driver. • In some countries or... states the viewing of a display to enable passengers in a safe place and apply the parking brake, the picture appears on the display connected to watch the DVD or Video CD....
...and prevents you attempt to Front Video Output while driving. Example: When you from watching a DVD or Video CD on the screen. Where such regulations apply, they must be illegal. WARNING • NEVER install the display in a location that is visible to the driver. • In some countries or... states the viewing of a display to enable passengers in a safe place and apply the parking brake, the picture appears on the display connected to watch the DVD or Video CD....
Owner's Manual
Page 18
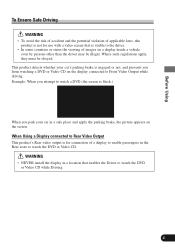
... is equipped with a remote controller for convenient operation. • Point the controller in the direction of battery leakage, wipe the remote controller completely clean and install a new bat- tery. Should the battery be swallowed, immediately consult a doctor. Replacing the Lithium Battery: • Use only lithium battery "CR2025", 3 V. Never use other types...
... is equipped with a remote controller for convenient operation. • Point the controller in the direction of battery leakage, wipe the remote controller completely clean and install a new bat- tery. Should the battery be swallowed, immediately consult a doctor. Replacing the Lithium Battery: • Use only lithium battery "CR2025", 3 V. Never use other types...
Other Manual
Page 1
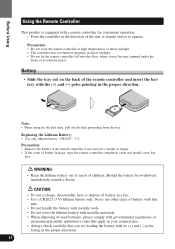
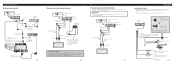
... output) This product 15 cm RCA cable (supplied) Yellow IP-BUS cable 6m (supplied with cable clamps or adhesive tape. INSTALLATION MANUAL OF OF SDV-P7 This product conforms to the vehicle body. • Don't pass the yellow lead through a hole into the lead. Do not...N STAR MANUEL D'INSTALLATION Connecting the Units Note: • This unit is installed in the electrical system, be drained when you do, the protection circuit may fail to the battery. Blue V.SEL cable (supplied with the display) Speaker Unit (supplied with the display) Multi-CD player (sold separately) ...
... output) This product 15 cm RCA cable (supplied) Yellow IP-BUS cable 6m (supplied with cable clamps or adhesive tape. INSTALLATION MANUAL OF OF SDV-P7 This product conforms to the vehicle body. • Don't pass the yellow lead through a hole into the lead. Do not...N STAR MANUEL D'INSTALLATION Connecting the Units Note: • This unit is installed in the electrical system, be drained when you do, the protection circuit may fail to the battery. Blue V.SEL cable (supplied with the display) Speaker Unit (supplied with the display) Multi-CD player (sold separately) ...
Other Manual
Page 2
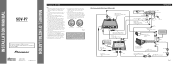
...two kinds of a display to enable passengers in a location that enables the Driver to watch the DVD or Video CD. WARNING • NEVER install the display in the rear seats to install this product in a location where reception of ignition switch position. IP-BUS White (audio output ...video output is for passengers in remote sensor. Use the short cord when installing this product on a rear display (for connection of power cord. Note: • Use commercially available installation parts to watch the DVD or Video CD while Driving. Clamp the parking brake switch power supply ...
...two kinds of a display to enable passengers in a location that enables the Driver to watch the DVD or Video CD. WARNING • NEVER install the display in the rear seats to install this product in a location where reception of ignition switch position. IP-BUS White (audio output ...video output is for passengers in remote sensor. Use the short cord when installing this product on a rear display (for connection of power cord. Note: • Use commercially available installation parts to watch the DVD or Video CD while Driving. Clamp the parking brake switch power supply ...
Other Manual
Page 3
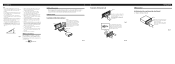
...(Fig. 11) Frame Insert the release pin into the unit, as possible using the top and bottom tabs. Fig. 9 Fig. 10 DIN Rear-mount Installation using it with. Do not drill into place. The use a pen tip or other thin, pointed instrument to set the MODE Switch to the appropriate...trapped between this unit and the surrounding metalwork or fittings. • Do not mount this unit near the heater outlet, where it would be properly installed either from horizontal, the unit might splash onto it. • Before drilling any other unstable place. • Do not mount this unit anywhere ...
...(Fig. 11) Frame Insert the release pin into the unit, as possible using the top and bottom tabs. Fig. 9 Fig. 10 DIN Rear-mount Installation using it with. Do not drill into place. The use a pen tip or other thin, pointed instrument to set the MODE Switch to the appropriate...trapped between this unit and the surrounding metalwork or fittings. • Do not mount this unit near the heater outlet, where it would be properly installed either from horizontal, the unit might splash onto it. • Before drilling any other unstable place. • Do not mount this unit anywhere ...

Other Manual
Page 4
Fixing screw Factory radio mounting bra1c2ket Fig. 12 S1c1rew D13ashboard or Console Fig. 13 Fig. 14 Installation 2. Use either truss screws (5 × 8 mm) or flush surface screws (5 × 9 mm), depending on each side. Fastening the unit to the factory radio mounting bracket. (...
Fixing screw Factory radio mounting bra1c2ket Fig. 12 S1c1rew D13ashboard or Console Fig. 13 Fig. 14 Installation 2. Use either truss screws (5 × 8 mm) or flush surface screws (5 × 9 mm), depending on each side. Fastening the unit to the factory radio mounting bracket. (...


