Owner's Manual
Page 5
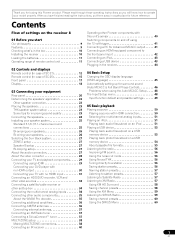
... speakers 26 Bi-wiring your speakers 26 Selecting the Surr Back system 27 ZONE 2 setup 27 Speaker B setup 27 Bi-Amping setup 27 About the audio connection 27 About the video converter 28 Connecting your TV and playback components . . . . . 29 Connecting using HDMI 29 Connecting your DVD player with no HDMI output 30 Connecting your model properly. Thank you have finished reading the instructions, put them away in the receiver 44 04 Basic Setup Changing the OSD display language (OSD Language 45 Automatically setting up for surround sound (Auto...
... speakers 26 Bi-wiring your speakers 26 Selecting the Surr Back system 27 ZONE 2 setup 27 Speaker B setup 27 Bi-Amping setup 27 About the audio connection 27 About the video converter 28 Connecting your TV and playback components . . . . . 29 Connecting using HDMI 29 Connecting your DVD player with no HDMI output 30 Connecting your model properly. Thank you have finished reading the instructions, put them away in the receiver 44 04 Basic Setup Changing the OSD display language (OSD Language 45 Automatically setting up for surround sound (Auto...

Owner's Manual
Page 6
... speaker system 91 Using the MULTI-ZONE controls 91 Making an audio or a video recording 92 Reducing the level of an analog signal 93 Using the sleep timer 93 Dimming the display 93 Switching the HDMI output 94 Checking your system settings 94 Resetting the system 95 Default system settings 95 10 Controlling the rest of your system (In case of SC-27) Operating multiple receivers 96 Setting the remote to control other components . . . . 96 Selecting preset codes directly 96 Programming signals from other remote controls...
... speaker system 91 Using the MULTI-ZONE controls 91 Making an audio or a video recording 92 Reducing the level of an analog signal 93 Using the sleep timer 93 Dimming the display 93 Switching the HDMI output 94 Checking your system settings 94 Resetting the system 95 Default system settings 95 10 Controlling the rest of your system (In case of SC-27) Operating multiple receivers 96 Setting the remote to control other components . . . . 96 Selecting preset codes directly 96 Programming signals from other remote controls...

Owner's Manual
Page 8
... receiver (page 44) 5 Power On 6 Changing the OSD display language (OSD Language) (page 45) 7 Surround back speaker setting (page 124) 8 MCACC speaker settings • Automatically setting up for surround sound (Auto MCACC & Full Band Phase Control) (page 46) 9 The Input Setup menu (page 48) (When using connections other than the recommended connections) 10 Basic playback (page 50) 11 Switching the HDMI output (page 94) 12 Adjusting...
... receiver (page 44) 5 Power On 6 Changing the OSD display language (OSD Language) (page 45) 7 Surround back speaker setting (page 124) 8 MCACC speaker settings • Automatically setting up for surround sound (Auto MCACC & Full Band Phase Control) (page 46) 9 The Input Setup menu (page 48) (When using connections other than the recommended connections) 10 Basic playback (page 50) 11 Switching the HDMI output (page 94) 12 Adjusting...
Owner's Manual
Page 10
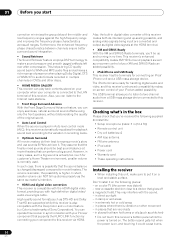
... loop antenna • FM wire antenna • iPod cable • Power cord • Warranty card • These operating instructions Installing the receiver • When installing this receiver is also compatible with high-definition digital video/ audio via HDMI. The bottom panel gets hot when the power is on, and touching it on a color TV (the screen may interfere with your XM and SIRIUS Radio an added possibility. • iPod/iPhone and USB Ready This receiver...
... loop antenna • FM wire antenna • iPod cable • Power cord • Warranty card • These operating instructions Installing the receiver • When installing this receiver is also compatible with high-definition digital video/ audio via HDMI. The bottom panel gets hot when the power is on, and touching it on a color TV (the screen may interfere with your XM and SIRIUS Radio an added possibility. • iPod/iPhone and USB Ready This receiver...
Owner's Manual
Page 12
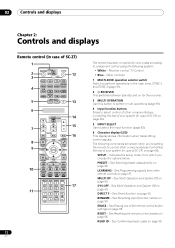
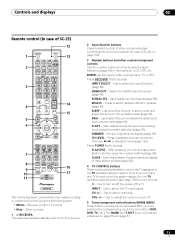
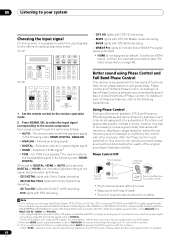
... 3 MULTI OPERATION DVD BD TV DVR HOME MEDIA VIDEO1 VIDEO2 HDMI GALLERY 4 USB iPod CD CD-R TUNER MULTI CH PHONO IN XM SIRIUS INPUT SELECT 5 13 6 7 8 9 10 11 TV SOURCE RECEIVER CH VOL VOL 14 15 TV CONTROL INPUT MUTE AUDIO PARAMETER LIST TUNE MUTE VIDEO PARAMETER TOOLS TOP MENU BAND PRESET ENTER T.EDIT GUIDE PRESET CATEGORY HOME MENU iPod CTRL TUNE STATUS PHASE CTRL RETURN CH LEVEL THX MPX PQLS MEMORY AUTO/ALC/ DIRECT STEREO STANDARD ADV SURR PGM MENU 16 SIGNAL...
... 3 MULTI OPERATION DVD BD TV DVR HOME MEDIA VIDEO1 VIDEO2 HDMI GALLERY 4 USB iPod CD CD-R TUNER MULTI CH PHONO IN XM SIRIUS INPUT SELECT 5 13 6 7 8 9 10 11 TV SOURCE RECEIVER CH VOL VOL 14 15 TV CONTROL INPUT MUTE AUDIO PARAMETER LIST TUNE MUTE VIDEO PARAMETER TOOLS TOP MENU BAND PRESET ENTER T.EDIT GUIDE PRESET CATEGORY HOME MENU iPod CTRL TUNE STATUS PHASE CTRL RETURN CH LEVEL THX MPX PQLS MEMORY AUTO/ALC/ DIRECT STEREO STANDARD ADV SURR PGM MENU 16 SIGNAL...
Owner's Manual
Page 15
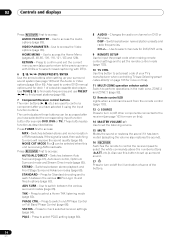
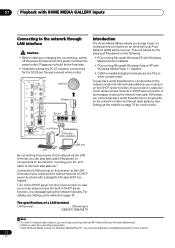
... SIRIUS INPUT SELECT 12 HDMI OUT 3 SIGNAL SEL MCACC 45 SLEEP 6 SBch A.ATT DIMMER 789 D.ACCESS CH LEVEL /CLR 0 CLASS ENTER INPUT MASTER VOLUME TV CONTROL CH VOL MUTE AUDIO PARAMETER LIST VIDEO PARAMETER TUNE TOOLS TOP MENU BAND T.EDIT GUIDE PRESET ENTER PRESET CATEGORY HOME MENU TUNE iPod CTRL RETURN AUTO/ALC/ MENU DIRECT STEREO STANDARD ADV SURR PGM HDD DVD THX PHASE CTRL STATUS ANT MPX PQLS MEMORY AUDIO INFO CH DISP MULTI OPE TV CTRL RECEIVER REMOTE SETUP ZONE 2 ZONE...
... SIRIUS INPUT SELECT 12 HDMI OUT 3 SIGNAL SEL MCACC 45 SLEEP 6 SBch A.ATT DIMMER 789 D.ACCESS CH LEVEL /CLR 0 CLASS ENTER INPUT MASTER VOLUME TV CONTROL CH VOL MUTE AUDIO PARAMETER LIST VIDEO PARAMETER TUNE TOOLS TOP MENU BAND T.EDIT GUIDE PRESET ENTER PRESET CATEGORY HOME MENU TUNE iPod CTRL RETURN AUTO/ALC/ MENU DIRECT STEREO STANDARD ADV SURR PGM HDD DVD THX PHASE CTRL STATUS ANT MPX PQLS MEMORY AUDIO INFO CH DISP MULTI OPE TV CTRL RECEIVER REMOTE SETUP ZONE 2 ZONE...
Owner's Manual
Page 16
.... 9 REMOTE SETUP Use to input the preset code when making remote control settings and to set up your TV's manufacturer when controlling TV (see Selecting preset codes directly on page 103 for example DVD, DVR or TV). Use to select PQLS setting (page 86). 8 AUDIO - Switches between named station presets and radio frequencies. Press RECEIVER first to access: MPX - STANDARD - STATUS - PQLS - Use to mono will improve the sound quality (page 56). The controls above the number buttons (A.ATT, etc.)). STEREO - Press TUNER first...
.... 9 REMOTE SETUP Use to input the preset code when making remote control settings and to set up your TV's manufacturer when controlling TV (see Selecting preset codes directly on page 103 for example DVD, DVR or TV). Use to select PQLS setting (page 86). 8 AUDIO - Switches between named station presets and radio frequencies. Press RECEIVER first to access: MPX - STANDARD - STATUS - PQLS - Use to mono will improve the sound quality (page 56). The controls above the number buttons (A.ATT, etc.)). STEREO - Press TUNER first...
Owner's Manual
Page 18
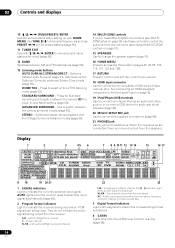
...). 2 Program format indicators Light to compatible HDMI device (Video camera, etc.). Press for Standard decoding and to indicate the currently selected input signal. Switches between stereo playback and Front Stage Surround Advance modes (page 65). 14 MULTI-ZONE controls If you've made MULTI-ZONE connections (see MULTIZONE setup on page 38) use PRESET / to find radio frequencies and use these controls to control the sub zone from the main zone (see Using the MULTI-ZONE controls on page 42. 19 iPod/iPhone/USB...
...). 2 Program format indicators Light to compatible HDMI device (Video camera, etc.). Press for Standard decoding and to indicate the currently selected input signal. Switches between stereo playback and Front Stage Surround Advance modes (page 65). 14 MULTI-ZONE controls If you've made MULTI-ZONE connections (see MULTIZONE setup on page 38) use PRESET / to find radio frequencies and use these controls to control the sub zone from the main zone (see Using the MULTI-ZONE controls on page 42. 19 iPod/iPhone/USB...
Owner's Manual
Page 21
...-amplifier outputs Use to connect separate amplifiers for front, center, surround, surround back and subwoofer channels. See Connecting additional amplifiers on page 36 (see also Installing your speaker system on page 25 for powered subwoofer connection). 19 Multichannel analog audio inputs 7.1 channel inputs for connection to a DVD player with no HDMI output on page 30. 12 SC-27 only: ZONE 2 component video output Use to connect monitors or TVs in a separate room. See MULTI-ZONE setup on page 38. 13 MULTI-ZONE audio/video outputs Use to connect a second or third amplifier...
...-amplifier outputs Use to connect separate amplifiers for front, center, surround, surround back and subwoofer channels. See Connecting additional amplifiers on page 36 (see also Installing your speaker system on page 25 for powered subwoofer connection). 19 Multichannel analog audio inputs 7.1 channel inputs for connection to a DVD player with no HDMI output on page 30. 12 SC-27 only: ZONE 2 component video output Use to connect monitors or TVs in a separate room. See MULTI-ZONE setup on page 38. 13 MULTI-ZONE audio/video outputs Use to connect a second or third amplifier...
Owner's Manual
Page 46
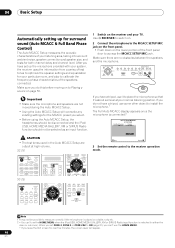
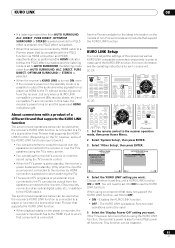
...account ambient noise, speaker connection and speaker size, and tests for both channel delay and channel level. AUDIO PARAMETER (TUNE) VIDEO CONTROL ON/OFF (PRESET) ENTER (TUNE) HOME MENU (PRESET) TUNER EDIT BAND AUTO SURR/ALC/ HOME STANDARD ADVANCED STEREO STREAM DIRECT THX SURROUND SURROUND RETURN HDMI 4 VIDEO CAMERA iPod iPhone USB MULTI-ZONE SPEAKERS MCACC SETUP MIC PHONES If you do not have a tripod, use some other object to install the microphone.1 The Full Auto MCACC display appears once the microphone is connected.2 1a.Full Auto MCACC A/V RECEIVER Surr Back System...
...account ambient noise, speaker connection and speaker size, and tests for both channel delay and channel level. AUDIO PARAMETER (TUNE) VIDEO CONTROL ON/OFF (PRESET) ENTER (TUNE) HOME MENU (PRESET) TUNER EDIT BAND AUTO SURR/ALC/ HOME STANDARD ADVANCED STEREO STREAM DIRECT THX SURROUND SURROUND RETURN HDMI 4 VIDEO CAMERA iPod iPhone USB MULTI-ZONE SPEAKERS MCACC SETUP MIC PHONES If you do not have a tripod, use some other object to install the microphone.1 The Full Auto MCACC display appears once the microphone is connected.2 1a.Full Auto MCACC A/V RECEIVER Surr Back System...
Owner's Manual
Page 47
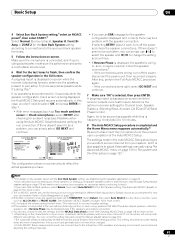
... the Auto MCACC Setup. Make sure the microphone is connected, and if you don't need to the surround back speaker terminals. 5 Follow the instructions on-screen. In this case, you 're using speakers that correction curves are used for storing surround sound settings for Channel Level, Speaker Distance, Standing Wave, Acoustic Cal EQ and Full Band Phase Control. Basic Setup 04 4 Select Surr Back System setting,1 select an MCACC preset2, then select START.3 Select Normal (Surround back), Speaker...
... the Auto MCACC Setup. Make sure the microphone is connected, and if you don't need to the surround back speaker terminals. 5 Follow the instructions on-screen. In this case, you 're using speakers that correction curves are used for storing surround sound settings for Channel Level, Speaker Distance, Standing Wave, Acoustic Cal EQ and Full Band Phase Control. Basic Setup 04 4 Select Surr Back System setting,1 select an MCACC preset2, then select START.3 Select Normal (Surround back), Speaker...
Owner's Manual
Page 48
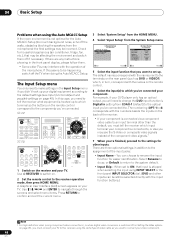
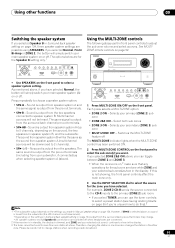
... User Interface (GUI) screen appears on . 2 Set the remote control to the receiver operation mode, then press HOME MENU. Other Setup 4b.Input Setup A/V RECEIVER Input Input Name Input Skip : DVD : Rename : OFF Digital In : HDMI Input : Component In : 12V Trigger1 : 12V Trigger2 : COAX-1 --- The default names correspond with the names next to the terminals on the rear panel (such as you used to connect your video component. 48 en SC-27: RECEIVER MAIN ZONE2 SOURCE 3 MULTI OPERATION DVD BD TV DVR HOME MEDIA VIDEO1 VIDEO2 HDMI GALLERY USB iPod...
... User Interface (GUI) screen appears on . 2 Set the remote control to the receiver operation mode, then press HOME MENU. Other Setup 4b.Input Setup A/V RECEIVER Input Input Name Input Skip : DVD : Rename : OFF Digital In : HDMI Input : Component In : 12V Trigger1 : 12V Trigger2 : COAX-1 --- The default names correspond with the names next to the terminals on the rear panel (such as you used to connect your video component. 48 en SC-27: RECEIVER MAIN ZONE2 SOURCE 3 MULTI OPERATION DVD BD TV DVR HOME MEDIA VIDEO1 VIDEO2 HDMI GALLERY USB iPod...
Owner's Manual
Page 50
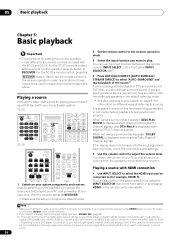
... the playback component (for playing a source (such as a DVD disc) with HDMI connection • Use INPUT SELECT to select the HDMI input you want multichannel surround sound. 50 en When using the INPUT SELECTOR dial on the front panel or by switching on the front panel display whether or not multi-channel playback is disconnected. 2 Set the remote control to the receiver operation mode. 3 Select the input function you 've connected to output Dolby Digital, DTS and 88.2 kHz / 96 kHz PCM (2 channel) audio, and if there is displayed when playing Dolby Digital 5.1 channel signals.
... the playback component (for playing a source (such as a DVD disc) with HDMI connection • Use INPUT SELECT to select the HDMI input you want multichannel surround sound. 50 en When using the INPUT SELECTOR dial on the front panel or by switching on the front panel display whether or not multi-channel playback is disconnected. 2 Set the remote control to the receiver operation mode. 3 Select the input function you 've connected to output Dolby Digital, DTS and 88.2 kHz / 96 kHz PCM (2 channel) audio, and if there is displayed when playing Dolby Digital 5.1 channel signals.
Owner's Manual
Page 68
... remote control to the receiver operation mode. 2 Press SIGNAL SEL to select the input signal corresponding to switch the input signals for instance. • When PCM is not assigned by the conflict with other digital signal formats, set to indicate that a WMA9 Pro signal is being decoded, as low-frequency signals in the following order: HDMI; ANALOG. • ANALOG - DIGITAL. Please select another input signal if this receiver can only play back Dolby Digital, PCM (32 kHz to DIGITAL. • Some DVD players don't output...
... remote control to the receiver operation mode. 2 Press SIGNAL SEL to select the input signal corresponding to switch the input signals for instance. • When PCM is not assigned by the conflict with other digital signal formats, set to indicate that a WMA9 Pro signal is being decoded, as low-frequency signals in the following order: HDMI; ANALOG. • ANALOG - DIGITAL. Please select another input signal if this receiver can only play back Dolby Digital, PCM (32 kHz to DIGITAL. • Some DVD players don't output...
Owner's Manual
Page 72
... audio files stored on components on the network or listen to Internet radio stations, you to play back audio files stored on components on the network or listen to the network through LAN interface Caution • Before making or changing the connections, switch off the power and disconnect the power cord from the power outlet. LAN cable (sold separately) Introduction The Home Media Gallery allows you must turn on the DHCP server function...
... audio files stored on components on the network or listen to Internet radio stations, you to play back audio files stored on components on the network or listen to the network through LAN interface Caution • Before making or changing the connections, switch off the power and disconnect the power cord from the power outlet. LAN cable (sold separately) Introduction The Home Media Gallery allows you must turn on the DHCP server function...
Owner's Manual
Page 85
...GUIDE PRESET CATEGORY HOME MENU iPod CTRL TUNE STATUS PHASE CTRL RETURN CH LEVEL RECEIVER SOURCE AUDIO PARAMETER LIST VIDEO PARAMETER TUNE TOOLS ANT MPX PQLS MEMORY DVD BD DVR HDMI TOP MENU BAND T.EDIT GUIDE AUDIO INFO CH DISP HOME MEDIA TV CD CD-R GALLERY iPod USB TUNER XM SIRIUS INPUT SELECT HDMI OUT PRESET ENTER CATEGORY HOME MENU TUNE iPod CTRL PRESET RETURN MULTI OPE TV CTRL RECEIVER REMOTE SETUP ZONE 2 ZONE 3 MAIN 123 1 Set the remote control to standby, the receiver's power is also turned off (all power off while using a component that support...
...GUIDE PRESET CATEGORY HOME MENU iPod CTRL TUNE STATUS PHASE CTRL RETURN CH LEVEL RECEIVER SOURCE AUDIO PARAMETER LIST VIDEO PARAMETER TUNE TOOLS ANT MPX PQLS MEMORY DVD BD DVR HDMI TOP MENU BAND T.EDIT GUIDE AUDIO INFO CH DISP HOME MEDIA TV CD CD-R GALLERY iPod USB TUNER XM SIRIUS INPUT SELECT HDMI OUT PRESET ENTER CATEGORY HOME MENU TUNE iPod CTRL PRESET RETURN MULTI OPE TV CTRL RECEIVER REMOTE SETUP ZONE 2 ZONE 3 MAIN 123 1 Set the remote control to standby, the receiver's power is also turned off (all power off while using a component that support...

Owner's Manual
Page 89
... need to use this feature when listening to back, making it only when sound wider (higher settings) or using this receiver (amp) or through to 10 (Center create a wider stereo effect with an HDMI cable. g.• HDMI Audio setting cannot be switched while performing synchronized amp mode operations. • The synchronized amp mode must be made only when TONE is set AUTO is automatically adjusted according to play the receiver's HDMI audio and video input signals from front to surround sound at low volumes). center speaker) 0 to 7 Default: 3 DIMENSIONi Adjusts...
... need to use this feature when listening to back, making it only when sound wider (higher settings) or using this receiver (amp) or through to 10 (Center create a wider stereo effect with an HDMI cable. g.• HDMI Audio setting cannot be switched while performing synchronized amp mode operations. • The synchronized amp mode must be made only when TONE is set AUTO is automatically adjusted according to play the receiver's HDMI audio and video input signals from front to surround sound at low volumes). center speaker) 0 to 7 Default: 3 DIMENSIONi Adjusts...
Owner's Manual
Page 91
...the receiver is output from speaker system B will simply switch your selected sub zone(s) continue to more than one zone also changes the station in the other functions 09 Switching the speaker system If you have selected. The options below are possible using SPEAKERS. AUDIO PARAMETER (TUNE) VIDEO CONTROL ON/OFF (PRESET) ENTER (TUNE) HOME MENU (PRESET) TUNER EDIT BAND AUTO SURR/ALC/ HOME STANDARD ADVANCED STEREO STREAM DIRECT THX SURROUND SURROUND RETURN HDMI 4 VIDEO CAMERA iPod iPhone USB MULTI-ZONE SPEAKERS MCACC SETUP MIC PHONES 1 Press MULTI-ZONE ON...
...the receiver is output from speaker system B will simply switch your selected sub zone(s) continue to more than one zone also changes the station in the other functions 09 Switching the speaker system If you have selected. The options below are possible using SPEAKERS. AUDIO PARAMETER (TUNE) VIDEO CONTROL ON/OFF (PRESET) ENTER (TUNE) HOME MENU (PRESET) TUNER EDIT BAND AUTO SURR/ALC/ HOME STANDARD ADVANCED STEREO STREAM DIRECT THX SURROUND SURROUND RETURN HDMI 4 VIDEO CAMERA iPod iPhone USB MULTI-ZONE SPEAKERS MCACC SETUP MIC PHONES 1 Press MULTI-ZONE ON...

Owner's Manual
Page 135
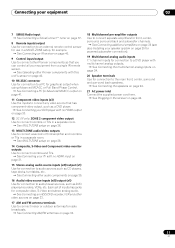
... sound). • Make sure the speaker distance setting is set it to the same power source are not output from the component terminal. • When a monitor only compatible with different cords (in Setting the Video options on remote control. If this receiver. Noisy, intermittent, or distorted • Sometimes a video deck may also depend on the Input Setup menu cannot be selected using the same type of video cable is used to the component terminal. Turn off the video...
... sound). • Make sure the speaker distance setting is set it to the same power source are not output from the component terminal. • When a monitor only compatible with different cords (in Setting the Video options on remote control. If this receiver. Noisy, intermittent, or distorted • Sometimes a video deck may also depend on the Input Setup menu cannot be selected using the same type of video cable is used to the component terminal. Turn off the video...
Owner's Manual
Page 138
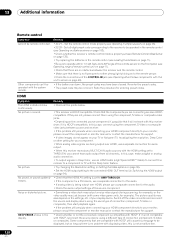
... preset code may output a noisy video signal (during scanning, for your TV or flat panel TV, try adjusting the resolution, Deep Color or other Pioneer components with this unit's sensor on page 94). • Check that it will not work with this is properly set to AMP/THROUGH. • If the component is a DVI device, use a separate connection for example). Set the remote control mode properly (see Operating multiple receivers on...
... preset code may output a noisy video signal (during scanning, for your TV or flat panel TV, try adjusting the resolution, Deep Color or other Pioneer components with this unit's sensor on page 94). • Check that it will not work with this is properly set to AMP/THROUGH. • If the component is a DVI device, use a separate connection for example). Set the remote control mode properly (see Operating multiple receivers on...


