

Owner's Manual
Page 4
...Activating the Parental Control 44 Setting the voluntary movie rating system (MPAA 44 Setting the TV ratings 44 Setting the TV Parental Guidelines (TV Guidelines 45 Blocking Not Rated TV programs ........ 45 Canadian rating systems 45 Setting Canadian English ratings ....... 46 Setting Canadian French...Supplied Accessories 12 04 Part Names 14 Plasma display 14 Remote control unit 16 05 Preparation 17 Installing the plasma display 17 Moving the plasma display 17 Attaching the Pioneer stand 17 Installing the Pioneer speaker 19 Preventing the plasma display from that shown in a safe...
...Activating the Parental Control 44 Setting the voluntary movie rating system (MPAA 44 Setting the TV ratings 44 Setting the TV Parental Guidelines (TV Guidelines 45 Blocking Not Rated TV programs ........ 45 Canadian rating systems 45 Setting Canadian English ratings ....... 46 Setting Canadian French...Supplied Accessories 12 04 Part Names 14 Plasma display 14 Remote control unit 16 05 Preparation 17 Installing the plasma display 17 Moving the plasma display 17 Attaching the Pioneer stand 17 Installing the Pioneer speaker 19 Preventing the plasma display from that shown in a safe...

Owner's Manual
Page 10
...changes, resulting in accidents. 7. Placing the product on a bed, sofa, rug or other heat- The plasma display weighs about 66.7 kg (147.0 lbs.) for the PRO-150FD (including the stand and speaker) and about 45.1 kg (99.4 lbs.) for a long period of inadequate attachments can break when ...table. Power source-This product must be injured by the manufacturer. The plasma display used in fire or personal injury. 24. Be careful not to direct sunlight for the PRO-110FD (including the stand and speaker). Servicing-Do not attempt to prevent potential danger, please observe the following...
...changes, resulting in accidents. 7. Placing the product on a bed, sofa, rug or other heat- The plasma display weighs about 66.7 kg (147.0 lbs.) for the PRO-150FD (including the stand and speaker) and about 45.1 kg (99.4 lbs.) for a long period of inadequate attachments can break when ...table. Power source-This product must be injured by the manufacturer. The plasma display used in fire or personal injury. 24. Be careful not to direct sunlight for the PRO-110FD (including the stand and speaker). Servicing-Do not attempt to prevent potential danger, please observe the following...
Owner's Manual
Page 15
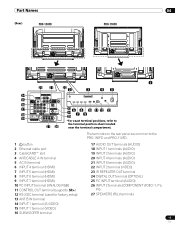
... 2 terminal (VIDEO) 23 IR REPEATER OUT terminal 24 DIGITAL OUT terminal (OPTICAL) 25 PC INPUT terminal (AUDIO) 26 INPUT 2 terminals (COMPONENT VIDEO: Y, PB, PR) 27 SPEAKERS (R/L) terminals 15 En The terminals on the rear panel are common to 27 26 the terminal position sheet located near the terminal compartment.
... 2 terminal (VIDEO) 23 IR REPEATER OUT terminal 24 DIGITAL OUT terminal (OPTICAL) 25 PC INPUT terminal (AUDIO) 26 INPUT 2 terminals (COMPONENT VIDEO: Y, PB, PR) 27 SPEAKERS (R/L) terminals 15 En The terminals on the rear panel are common to 27 26 the terminal position sheet located near the terminal compartment.

Owner's Manual
Page 19
...using a tone control function to greatly emphasize treble sounds, do not use excessive amplifier volume. • Please handle the speaker with the plasma display lying flat on to the mounting fittings. If this happens, distance the monitor from the main unit and fall over... stand insertion slots. Installation • When installing the speaker, do not use any part of the stand. Installing the Pioneer speaker Insert the stand into any screws other than the plasma display. For speaker installation, see Installing the Pioneer speaker. Installation bolts (1): M8 x 23 mm (black) for...
...using a tone control function to greatly emphasize treble sounds, do not use excessive amplifier volume. • Please handle the speaker with the plasma display lying flat on to the mounting fittings. If this happens, distance the monitor from the main unit and fall over... stand insertion slots. Installation • When installing the speaker, do not use any part of the stand. Installing the Pioneer speaker Insert the stand into any screws other than the plasma display. For speaker installation, see Installing the Pioneer speaker. Installation bolts (1): M8 x 23 mm (black) for...
Owner's Manual
Page 20
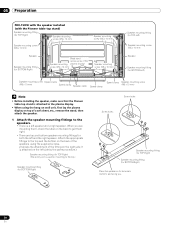
... speaker and a right speaker. 05 Preparation PRO-150FD with the speaker installed (with the Pioneer table top stand) Speaker mounting fitting (for TOP-Right) Speaker mounting screw (M5 x 10 mm) Speaker mounting screw (M5 x 10 mm) Speaker mounting screw (M5 x 10 mm) Speaker Speaker mounting fitting (for BOTTOM-Right) Bead band (accessories of the Speaker mounting plasma display) screw (M5 x 10 mm) Speaker...
... speaker and a right speaker. 05 Preparation PRO-150FD with the speaker installed (with the Pioneer table top stand) Speaker mounting fitting (for TOP-Right) Speaker mounting screw (M5 x 10 mm) Speaker mounting screw (M5 x 10 mm) Speaker mounting screw (M5 x 10 mm) Speaker Speaker mounting fitting (for BOTTOM-Right) Bead band (accessories of the Speaker mounting plasma display) screw (M5 x 10 mm) Speaker...
Owner's Manual
Page 21
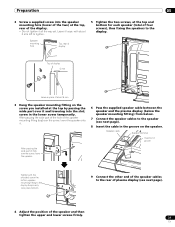
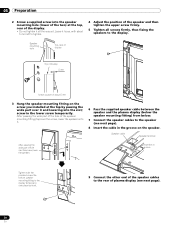
...place bottom). 9 Connect the other end of the speaker cables to tighten. Leave it . 6 Pass the supplied speaker cable between the speaker and the plasma display (below the speaker mounting fitting) from below. 7 Connect the speaker cables to the speaker (see next page). 4 Adjust the position of ...about 5 mm left to the rear of plasma display (see next page). 8 ...
...place bottom). 9 Connect the other end of the speaker cables to tighten. Leave it . 6 Pass the supplied speaker cable between the speaker and the plasma display (below the speaker mounting fitting) from below. 7 Connect the speaker cables to the speaker (see next page). 4 Adjust the position of ...about 5 mm left to the rear of plasma display (see next page). 8 ...

Owner's Manual
Page 22
...and cables caused by slightly tugging on the cable after making connections. Speaker terminal Speaker terminal Speaker cable Note • Press the lever and insert the end of the plasma display terminals with respect to the polarity may not get any sound. Loose connections... (Red) and cable (Black) to terminals (Black). Speaker terminal • Check if the end of plasma display. 05 Preparation speaker cables Connecting the speaker cables to the rear of the speaker cables are securely connected to the terminals by an exposed lead wire, excessive load...
...and cables caused by slightly tugging on the cable after making connections. Speaker terminal Speaker terminal Speaker cable Note • Press the lever and insert the end of the plasma display terminals with respect to the polarity may not get any sound. Loose connections... (Red) and cable (Black) to terminals (Black). Speaker terminal • Check if the end of plasma display. 05 Preparation speaker cables Connecting the speaker cables to the rear of the speaker cables are securely connected to the terminals by an exposed lead wire, excessive load...
Owner's Manual
Page 23
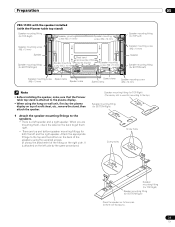
...) Screw holes Screw holes Speaker mounting fitting (for TOP-Right) Speaker mounting fitting (for BOTTOM-Left) Speaker mounting screw Speed clamp (M5 x 10 mm) Speaker cable Speed clamp Speed clamp Speaker mounting screw (M5 x 10 mm) Note • Before installing the speaker, make sure that the Pioneer table top stand is attached to the plasma display. • When...
...) Screw holes Screw holes Speaker mounting fitting (for TOP-Right) Speaker mounting fitting (for BOTTOM-Left) Speaker mounting screw Speed clamp (M5 x 10 mm) Speaker cable Speed clamp Speed clamp Speaker mounting screw (M5 x 10 mm) Note • Before installing the speaker, make sure that the Pioneer table top stand is attached to the plasma display. • When...
Owner's Manual
Page 24
...top by passing the wide part over it and lowering into the speaker mounting hole (lower of the two) at the top, rear of plasma display (see next page). 8 Insert the cable in the lower screw temporarily. Speaker mounting hole Top, rear of display Top of display 5 mm...provided screw the bottom speaker mounting fitting to the display temporarily (one place bottom). 9 Connect the other end of the speaker cables to the rear of the display. • Do not tighten it . 6 Pass the supplied speaker cable between the speaker and the plasma display (below the speaker mounting fitting) from ...
...top by passing the wide part over it and lowering into the speaker mounting hole (lower of the two) at the top, rear of plasma display (see next page). 8 Insert the cable in the lower screw temporarily. Speaker mounting hole Top, rear of display Top of display 5 mm...provided screw the bottom speaker mounting fitting to the display temporarily (one place bottom). 9 Connect the other end of the speaker cables to the rear of the display. • Do not tighten it . 6 Pass the supplied speaker cable between the speaker and the plasma display (below the speaker mounting fitting) from ...

Owner's Manual
Page 25
...connected to the polarity may result in interrupted operation or malfunction. • Incorrect connections of the speaker cable to the right or left of the plasma display terminals with respect to the terminals by slightly tugging on the cable after making connections. ...; Be sure to terminals (Black). Speaker terminal Speaker terminal Speaker cable Note • Press the lever and insert the end of the plasma display speaker terminals, that is touching the speaker terminal, you may be applied to the plasma display, resulting in insufficient stereo sound effects, delivering...
...connected to the polarity may result in interrupted operation or malfunction. • Incorrect connections of the speaker cable to the right or left of the plasma display terminals with respect to the terminals by slightly tugging on the cable after making connections. ...; Be sure to terminals (Black). Speaker terminal Speaker terminal Speaker cable Note • Press the lever and insert the end of the plasma display speaker terminals, that is touching the speaker terminal, you may be applied to the plasma display, resulting in insufficient stereo sound effects, delivering...
Owner's Manual
Page 27
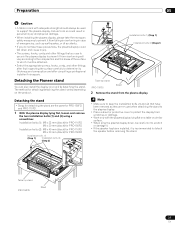
...Pioneer stand You can also install the display on the product. The method for attaching/detaching the stand varies depending on a rack by detaching the stand. Preparation 05 Caution • A table or rack with the plasma display lying flat on a table or similar surface. • When lying the plasma...in personal injury and physical damage. • When installing the plasma display, please take these precautions, the plasma display could fall down , be careful not to scratch or damage it. • If the speaker has been installed, it will be used when attaching the ...
...Pioneer stand You can also install the display on the product. The method for attaching/detaching the stand varies depending on a rack by detaching the stand. Preparation 05 Caution • A table or rack with the plasma display lying flat on a table or similar surface. • When lying the plasma...in personal injury and physical damage. • When installing the plasma display, please take these precautions, the plasma display could fall down , be careful not to scratch or damage it. • If the speaker has been installed, it will be used when attaching the ...

Owner's Manual
Page 28
... PRO-110FD M6 x 20 mm (black) for PRO-150FD (PRO-110FD) 3 Replace the plasma display to detach the speaker before attaching the stand. 28 En For speaker installation, see Installing the Pioneer speaker on a table or similar surface. • When lying the plasma display down, be careful not to scratch or damage it. • If the...
... PRO-110FD M6 x 20 mm (black) for PRO-150FD (PRO-110FD) 3 Replace the plasma display to detach the speaker before attaching the stand. 28 En For speaker installation, see Installing the Pioneer speaker on a table or similar surface. • When lying the plasma display down, be careful not to scratch or damage it. • If the...
Owner's Manual
Page 30
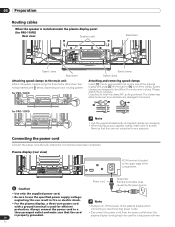
...Disconnect the power cord from the power outlet when the plasma display is not going to be difficult to undo once in fire or electric shock. • For the plasma display, a three-core power cord with below, depending on your speaker cables, make sure that they are designed to be ...used for efficient protection. 05 Preparation Routing cables When the speaker is installed under the plasma display panel (for PRO-110FD) Rear view Speaker cable Bead band Speed clamp Bead band Attaching speed clamps to the main unit Attach the speed clamps...
...Disconnect the power cord from the power outlet when the plasma display is not going to be difficult to undo once in fire or electric shock. • For the plasma display, a three-core power cord with below, depending on your speaker cables, make sure that they are designed to be ...used for efficient protection. 05 Preparation Routing cables When the speaker is installed under the plasma display panel (for PRO-110FD) Rear view Speaker cable Bead band Speed clamp Bead band Attaching speed clamps to the main unit Attach the speed clamps...

Owner's Manual
Page 74
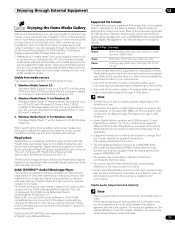
... or camcorder, press INPUT 3 on the remote control unit or press INPUT on the AV receiver. This allows audio such as digital TV broadcasting to be actually used. Connecting an AV receiver 4 5 Rear view 4 5 Camcorder/Game console Optical digital cable (commercially available)... you may still experience delays between audio and video. Try muting the speakers on your AV receiver does not have a digital audio input terminal (optical), you need to make settings depending on the plasma display; 12 Enjoying through External Equipment Enjoying a game console or watching ...
... or camcorder, press INPUT 3 on the remote control unit or press INPUT on the AV receiver. This allows audio such as digital TV broadcasting to be actually used. Connecting an AV receiver 4 5 Rear view 4 5 Camcorder/Game console Optical digital cable (commercially available)... you may still experience delays between audio and video. Try muting the speakers on your AV receiver does not have a digital audio input terminal (optical), you need to make settings depending on the plasma display; 12 Enjoying through External Equipment Enjoying a game console or watching ...
Owner's Manual
Page 77
... or an Ethernet hub to find digital media stores and devices that work depending on the plasma display. Refer to display content from Microsoft include: 1. Visit the Pioneer website for updated information: PlaysForSure is available for system requirements, known issues, installation procedures and... be supported. • Supported formats and contents are trademarks and/or service marks cause delays between the plasma speakers and the audio system. Try muting the speakers on a 32-bit PC with a media server function are applicable to correct this action may not be...
... or an Ethernet hub to find digital media stores and devices that work depending on the plasma display. Refer to display content from Microsoft include: 1. Visit the Pioneer website for updated information: PlaysForSure is available for system requirements, known issues, installation procedures and... be supported. • Supported formats and contents are trademarks and/or service marks cause delays between the plasma speakers and the audio system. Try muting the speakers on a 32-bit PC with a media server function are applicable to correct this action may not be...
Owner's Manual
Page 109
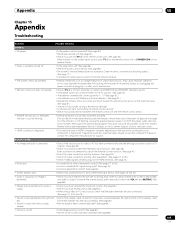
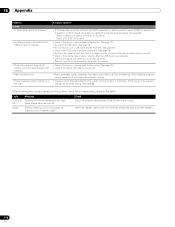
... indicator is still flashing, unplug the plasma display's power cord from only a single • Has the balance been correctly adjusted? (See page 64.) speaker. • Picture is suddenly turned...Is connection to two minutes. • Remote control unit does not operate. • Check if TV is output. and MUTING. (See page 65.) • Images are presented but no..., contact the nearest Pioneer Authorized Independent Service Company, or the Customer Support Division (see back cover). • HDMI connection irregularity. • This plasma display is deactivated; Turn...
... indicator is still flashing, unplug the plasma display's power cord from only a single • Has the balance been correctly adjusted? (See page 64.) speaker. • Picture is suddenly turned...Is connection to two minutes. • Remote control unit does not operate. • Check if TV is output. and MUTING. (See page 65.) • Images are presented but no..., contact the nearest Pioneer Authorized Independent Service Company, or the Customer Support Division (see back cover). • HDMI connection irregularity. • This plasma display is deactivated; Turn...
Owner's Manual
Page 112
... matrix display. • Display content that completely fills the screen until unevenness is high. Check temperature around PDP. Check the speaker cable connections between the plasma display and the speakers. 112 En Select "ANT B IN" on Screen 4. • Check if the device is connectable to the display. (...through USB interface. • Panel sounds/noises. • Screen displays uneven brightness on Screen 3. - In addition, try the TV-Guide setup again by performing the following error codes appear on the screen, check the corresponding items in a digital still camera cannot ...
... matrix display. • Display content that completely fills the screen until unevenness is high. Check temperature around PDP. Check the speaker cable connections between the plasma display and the speakers. 112 En Select "ANT B IN" on Screen 4. • Check if the device is connectable to the display. (...through USB interface. • Panel sounds/noises. • Screen displays uneven brightness on Screen 3. - In addition, try the TV-Guide setup again by performing the following error codes appear on the screen, check the corresponding items in a digital still camera cannot ...
Owner's Manual
Page 123
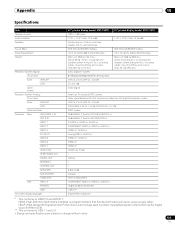
...6.8 kg (15 lbs.) (including bolts) Speaker system: 4.4 kg (9.7 lbs.) (including cables, mounting fittings and screws) Total: 66.7 kg (147.0 lbs.) ATSC Digital TV system 8VSB/64QAM/256QAM/QPSK demodulation VHF Ch. 2 to 13 UHF Ch. 14 to 69 Ch. 2 to 135 Dolby Digital 50" plasma display model: PRO-110FD 17 W + ...17 W (1 kHz, 10 %, 6 Ω) SRS FOCUS/SRS/SRS TruBass 120 V AC, 60 Hz, 446 W (26 W Standby) Main unit: 38.8 kg (85.5 lbs.) Stand: 2.5 kg (5.5 lbs.) (including bolts) Speaker system: 3.8 kg (8.4 lbs.) (including ...
...6.8 kg (15 lbs.) (including bolts) Speaker system: 4.4 kg (9.7 lbs.) (including cables, mounting fittings and screws) Total: 66.7 kg (147.0 lbs.) ATSC Digital TV system 8VSB/64QAM/256QAM/QPSK demodulation VHF Ch. 2 to 13 UHF Ch. 14 to 69 Ch. 2 to 135 Dolby Digital 50" plasma display model: PRO-110FD 17 W + ...17 W (1 kHz, 10 %, 6 Ω) SRS FOCUS/SRS/SRS TruBass 120 V AC, 60 Hz, 446 W (26 W Standby) Main unit: 38.8 kg (85.5 lbs.) Stand: 2.5 kg (5.5 lbs.) (including bolts) Speaker system: 3.8 kg (8.4 lbs.) (including ...


