
Owner's Manual
Page 5
...Control 65 parameters 49 Energy Save 65 Clock Setting 49 No Signal off (AV source only 65 10 TV Guide On Screen™ System Operation 50 Using the TV Guide On Screen™ system 50 Screen components 50 The Listings screen 51 Setting program reminders 51 Searching for programs 53 Searching ... screen (Side Mask 69 Room Light Sensor 70 Blue LED Dimmer 70 Orbiter 70 Video Pattern 70 11 Adjustments and Settings 59 AV Selection 59 Basic picture adjustments 60 Advanced picture adjustments 61 Using PureCinema 61 Using Intelligent Mode 61 Using the Picture Detail 61 Using...
...Control 65 parameters 49 Energy Save 65 Clock Setting 49 No Signal off (AV source only 65 10 TV Guide On Screen™ System Operation 50 Using the TV Guide On Screen™ system 50 Screen components 50 The Listings screen 51 Setting program reminders 51 Searching for programs 53 Searching ... screen (Side Mask 69 Room Light Sensor 70 Blue LED Dimmer 70 Orbiter 70 Video Pattern 70 11 Adjustments and Settings 59 AV Selection 59 Basic picture adjustments 60 Advanced picture adjustments 61 Using PureCinema 61 Using Intelligent Mode 61 Using the Picture Detail 61 Using...

Owner's Manual
Page 7
...will automatically power off in order to prevent the unit from this Pioneer PRO150FD/PRO-110FD plasma display, please first read and follow the usage guidelines below , you can ensure longer and satisfactory results from a TV, VCR, DVD player or any still image, it is Important ... a game, the "GAME" mode setting within "AV Selection" is best to view a normal moving pictures (e.g. After viewing masked content, it is strongly recommended. With the Pioneer PRO-150FD/PRO-110FD, you can be placed in front of the plasma panel, which have static portions). • Avoid ...
...will automatically power off in order to prevent the unit from this Pioneer PRO150FD/PRO-110FD plasma display, please first read and follow the usage guidelines below , you can ensure longer and satisfactory results from a TV, VCR, DVD player or any still image, it is Important ... a game, the "GAME" mode setting within "AV Selection" is best to view a normal moving pictures (e.g. After viewing masked content, it is strongly recommended. With the Pioneer PRO-150FD/PRO-110FD, you can be placed in front of the plasma panel, which have static portions). • Avoid ...
Owner's Manual
Page 16
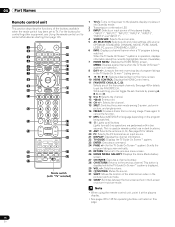
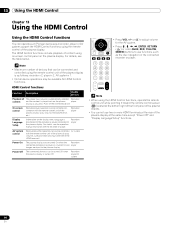
... mode. 2 Transmission confirmation LED 3 INPUT: Selects an input source of the plasma display. ("INPUT 1", "INPUT 2", "INPUT 3", "INPUT 4", "INPUT 5", "INPUT 6" and "INPUT 7") 4 SCREEN SIZE: Selects the screen size. 5 AV SELECTION: Selects audio and video settings. (AV source: OPTIMUM, STANDARD, DYNAMIC, MOVIE, PURE, GAME, USER. This is ... performed within five seconds. Note • When using the remote control unit, point it at the plasma display. • See pages 98 to 108 for the TV Guide On Screen™ system): Scrolls the program listing screen vertically. 25 RETURN: Returns to the ...
... mode. 2 Transmission confirmation LED 3 INPUT: Selects an input source of the plasma display. ("INPUT 1", "INPUT 2", "INPUT 3", "INPUT 4", "INPUT 5", "INPUT 6" and "INPUT 7") 4 SCREEN SIZE: Selects the screen size. 5 AV SELECTION: Selects audio and video settings. (AV source: OPTIMUM, STANDARD, DYNAMIC, MOVIE, PURE, GAME, USER. This is ... performed within five seconds. Note • When using the remote control unit, point it at the plasma display. • See pages 98 to 108 for the TV Guide On Screen™ system): Scrolls the program listing screen vertically. 25 RETURN: Returns to the ...
Owner's Manual
Page 41
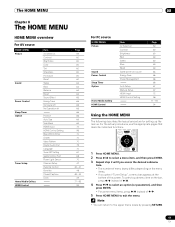
...RETURN. 41 En The HOME MENU Chapter 8 The HOME MENU HOME MENU overview For AV source HOME MENU Picture Sound Power Control Sleep Timer Option Tuner Setup Home Media Gallery HDMI Control Item AV Selection Contrast Brightness Color Tint Sharpness Pro Adjust Reset Treble Bass Balance Reset Sound Effect ...08 For PC source HOME MENU Picture Sound Power Control Sleep Timer Option Home Media Gallery HDMI Control Item AV Selection Contrast Brightness Red Green Blue Reset Same as the AV source Energy Save Power Management Auto Setup Manual Setup HDMI Input HDMI Control Setting Page 59 60 60 60...
...RETURN. 41 En The HOME MENU Chapter 8 The HOME MENU HOME MENU overview For AV source HOME MENU Picture Sound Power Control Sleep Timer Option Tuner Setup Home Media Gallery HDMI Control Item AV Selection Contrast Brightness Color Tint Sharpness Pro Adjust Reset Treble Bass Balance Reset Sound Effect ...08 For PC source HOME MENU Picture Sound Power Control Sleep Timer Option Home Media Gallery HDMI Control Item AV Selection Contrast Brightness Red Green Blue Reset Same as the AV source Energy Save Power Management Auto Setup Manual Setup HDMI Input HDMI Control Setting Page 59 60 60 60...
Owner's Manual
Page 59
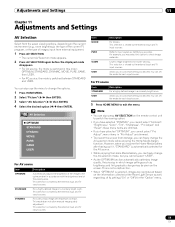
...damage, you cannot select "Pro Adjust"; This selection is shared by the external input and TV input sources. This is not a malfunction. • When "OPTIMUM" is automatically selected for the AV source. • While enjoying the Home Media Gallery, you can set the mode for... easier viewing. This selection is shared by the external input and TV input sources. You can freely change the options. 1 Press HOME MENU. 2 Select "Picture" ( / then ENTER). 3 Select "AV Selection" ( / then ENTER). 4 Select the desired option ( / then ENTER). This ...
...damage, you cannot select "Pro Adjust"; This selection is shared by the external input and TV input sources. This is not a malfunction. • When "OPTIMUM" is automatically selected for the AV source. • While enjoying the Home Media Gallery, you can set the mode for... easier viewing. This selection is shared by the external input and TV input sources. You can freely change the options. 1 Press HOME MENU. 2 Select "Picture" ( / then ENTER). 3 Select "AV Selection" ( / then ENTER). 4 Select the desired option ( / then ENTER). This ...

Owner's Manual
Page 60
..., you open the "Picture" menu. • When an adjustment screen is displayed. A confirmation screen appears. Contrast 40 For AV source Item Contrast Brightness Color Tint Sharpness button For less contrast For less brightness For less color intensity Skin tones become purplish For ...step 3 and then press ENTER. For the subsequent procedures see Advanced picture adjustments on page 61. • To restore the factory defaults for the chosen AV Selection option (except DYNAMIC). 1 Press HOME MENU. 2 Select "Picture" ( / then ENTER). 3 Select an item to be adjusted, by pressing...
..., you open the "Picture" menu. • When an adjustment screen is displayed. A confirmation screen appears. Contrast 40 For AV source Item Contrast Brightness Color Tint Sharpness button For less contrast For less brightness For less color intensity Skin tones become purplish For ...step 3 and then press ENTER. For the subsequent procedures see Advanced picture adjustments on page 61. • To restore the factory defaults for the chosen AV Selection option (except DYNAMIC). 1 Press HOME MENU. 2 Select "Picture" ( / then ENTER). 3 Select an item to be adjusted, by pressing...

Owner's Manual
Page 64
..."Yes", and then press ENTER. 64 En A warning message appears. • When you switch to another parameter, make sure to change the "AV Selection" parameter, the new entry in the current parameter is stored in the memory and the button continues to work. • You cannot compare ...Shifts the audio balance to Shifts the audio balance to the left the right 5 Press HOME MENU to "After" first, otherwise you select "AV Selection", - 11 Adjustments and Settings Comparing picture adjustments on the screen During picture adjustments, you can adjust the sound quality to your preference ...
..."Yes", and then press ENTER. 64 En A warning message appears. • When you switch to another parameter, make sure to change the "AV Selection" parameter, the new entry in the current parameter is stored in the memory and the button continues to work. • You cannot compare ...Shifts the audio balance to Shifts the audio balance to the left the right 5 Press HOME MENU to "After" first, otherwise you select "AV Selection", - 11 Adjustments and Settings Comparing picture adjustments on the screen During picture adjustments, you can adjust the sound quality to your preference ...

Owner's Manual
Page 65
... the system is recommended for 15 minutes. 1 Press HOME MENU. 2 Select "Power Control" ( / then ENTER). 3 Select "No Signal off (AV source only) The system will become effective as soon as you change in the panel sound. To restore the screen display, press any button other... desired parameter ( / ). Note • (WOW) denotes a status where SRS FOCUS®, SRS® and SRS TruBass® are present at the plasma display after a TV program finishes. 65 En SRS FOCUS Selections Off On Deactivates SRS FOCUS® Activates SRS FOCUS® Shifts the apparent direction of the three...
... the system is recommended for 15 minutes. 1 Press HOME MENU. 2 Select "Power Control" ( / then ENTER). 3 Select "No Signal off (AV source only) The system will become effective as soon as you change in the panel sound. To restore the screen display, press any button other... desired parameter ( / ). Note • (WOW) denotes a status where SRS FOCUS®, SRS® and SRS TruBass® are present at the plasma display after a TV program finishes. 65 En SRS FOCUS Selections Off On Deactivates SRS FOCUS® Activates SRS FOCUS® Shifts the apparent direction of the three...
Owner's Manual
Page 66
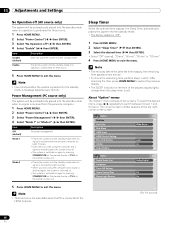
... remaining time appears every minute. • To check the remaining time, perform steps 1 and 2. 11 Adjustments and Settings No Operation off (AV source only) The system will be automatically placed into the standby mode when no operation is set. After checking the time, press HOME MENU ... "Power Control" ( / then ENTER). 3 Select "No Operation off . • The system is switched on again by pressing STANDBY/ON on the plasma display or TV on the front of two screens. Sleep Timer When the selected time elapses, the Sleep Timer automatically places the system into the standby mode...
... remaining time appears every minute. • To check the remaining time, perform steps 1 and 2. 11 Adjustments and Settings No Operation off (AV source only) The system will be automatically placed into the standby mode when no operation is set. After checking the time, press HOME MENU ... "Power Control" ( / then ENTER). 3 Select "No Operation off . • The system is switched on again by pressing STANDBY/ON on the plasma display or TV on the front of two screens. Sleep Timer When the selected time elapses, the Sleep Timer automatically places the system into the standby mode...
Owner's Manual
Page 67
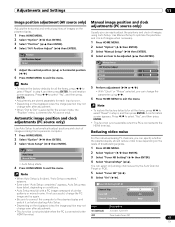
... to exit the menu. A confirmation screen appears. Reducing video noise For the individual analog TV channels, you can easily adjust the positions and clock of images using / . 6 Press... Select "Tuner NR" ( / ). • When Auto Setup is connected to the plasma display and Tuner NR Channel Keep/Skip On Keep switch it on before starting Auto Setup.... / ). Manual Setup H/V Position Adjust Clock 0 Phase 0 Reset Note • To restore the factory defaults for AV source only). You can change even after adjustment. • This function is not selectable when the PC is finished, ...
... to exit the menu. A confirmation screen appears. Reducing video noise For the individual analog TV channels, you can easily adjust the positions and clock of images using / . 6 Press... Select "Tuner NR" ( / ). • When Auto Setup is connected to the plasma display and Tuner NR Channel Keep/Skip On Keep switch it on before starting Auto Setup.... / ). Manual Setup H/V Position Adjust Clock 0 Phase 0 Reset Note • To restore the factory defaults for AV source only). You can change even after adjustment. • This function is not selectable when the PC is finished, ...
Owner's Manual
Page 68
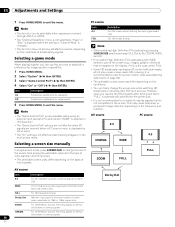
...FULL Description Fills the screen without altering the input signal aspect ratio Full 16:9 screen display Note • While watching High Definition TV broadcasting, pressing SCREEN SIZE switches among the selectable options for the type of video signals currently received. • The selectable screen ...Note • The "Game Control Pref" is only available when using an external input (except a PC source) and "GAME" is selected in "AV Selection". • The "Game Control Pref" options are not effective when PC signals are received (when a PC source menu is displayed on the conditions...
...FULL Description Fills the screen without altering the input signal aspect ratio Full 16:9 screen display Note • While watching High Definition TV broadcasting, pressing SCREEN SIZE switches among the selectable options for the type of video signals currently received. • The selectable screen ...Note • The "Game Control Pref" is only available when using an external input (except a PC source) and "GAME" is selected in "AV Selection". • The "Game Control Pref" options are not effective when PC signals are received (when a PC source menu is displayed on the conditions...
Owner's Manual
Page 70
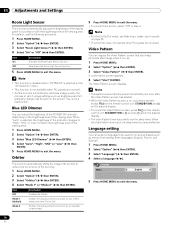
... To cancel the Video Pattern screen, press TVa on the remote control unit, STANDBY/ON or a (or slide a up) on the plasma display. • The Video Pattern timer has priority over the sleep timer. The Video Pattern screen displays. Note • The system is ..." ( / then ENTER). 4 Select a language ( / ). Orbiter This function automatically shifts the image little by Dot mode, see Selecting a screen size manually on the "AV Selection" menu. • This function is not available when PC signals are received. When the Video Pattern timer is not a malfunction. Blue LED Dimmer You...
... To cancel the Video Pattern screen, press TVa on the remote control unit, STANDBY/ON or a (or slide a up) on the plasma display. • The Video Pattern timer has priority over the sleep timer. The Video Pattern screen displays. Note • The system is ..." ( / then ENTER). 4 Select a language ( / ). Orbiter This function automatically shifts the image little by Dot mode, see Selecting a screen size manually on the "AV Selection" menu. • This function is not available when PC signals are received. When the Video Pattern timer is not a malfunction. Blue LED Dimmer You...

Owner's Manual
Page 71
.... 4 5 Rear view S-Video cable (commercially available) AV cable (commercially available) AV cable (commercially available) DVD player VCR Displaying a VCR image To watch a DVD image, press INPUT 2 on the remote control unit or press INPUT on the plasma display to select "INPUT 2". Note • The INPUT...commercially available) Displaying a DVD image To watch a VCR image, press INPUT 1 on the remote control unit or press INPUT on the plasma display. Watching a DVD image Connecting a DVD player Use the INPUT 2 terminals when connecting a DVD player and other external equipment. Use...
.... 4 5 Rear view S-Video cable (commercially available) AV cable (commercially available) AV cable (commercially available) DVD player VCR Displaying a VCR image To watch a DVD image, press INPUT 2 on the remote control unit or press INPUT on the plasma display to select "INPUT 2". Note • The INPUT...commercially available) Displaying a DVD image To watch a VCR image, press INPUT 1 on the remote control unit or press INPUT on the plasma display. Watching a DVD image Connecting a DVD player Use the INPUT 2 terminals when connecting a DVD player and other external equipment. Use...

Owner's Manual
Page 74
... the speakers on the rear of the plasma display. This allows audio such as digital TV broadcasting to a subwoofer. However, this system can output Dolby Digital signals. Use the desired connection for the audio equipment to make settings depending on the plasma display. AV cable (commercially available) Subwoofer AV receiver Note • When using the...
... the speakers on the rear of the plasma display. This allows audio such as digital TV broadcasting to a subwoofer. However, this system can output Dolby Digital signals. Use the desired connection for the audio equipment to make settings depending on the plasma display. AV cable (commercially available) Subwoofer AV receiver Note • When using the...

Owner's Manual
Page 75
... Use the PC terminals to use . 4 5 Rear view Viewed from the personal computer, press PC on the remote control unit or press INPUT on your AV receiver. 1 Press HOME MENU. 2 Select "Option" ( / then ENTER). 3 Select "Digital Audio Out" ( / then ENTER). 4 Select "Dolby Digital" or "PCM" ( ...use Auto Setup. If the personal computer image does not come in the PCM format regardless of the types of the plasma display RGB cable (commercially available) AV cable with a mini plug (commercially available) (When PC audio is automatically identified. Note • The PC terminals cannot...
... Use the PC terminals to use . 4 5 Rear view Viewed from the personal computer, press PC on the remote control unit or press INPUT on your AV receiver. 1 Press HOME MENU. 2 Select "Option" ( / then ENTER). 3 Select "Digital Audio Out" ( / then ENTER). 4 Select "Dolby Digital" or "PCM" ( ...use Auto Setup. If the personal computer image does not come in the PCM format regardless of the types of the plasma display RGB cable (commercially available) AV cable with a mini plug (commercially available) (When PC audio is automatically identified. Note • The PC terminals cannot...

Owner's Manual
Page 76
.... Note • Make sure that supports SR+. About SR+ The CONTROL OUT terminal on the plasma display. For more pieces of the plasma display supports SR+, which allows linked operations with the Pioneer AV receiver supporting SR+. When SR+ is not used (a): Use the SR+ cable (available as the input switch linkage operation function...
.... Note • Make sure that supports SR+. About SR+ The CONTROL OUT terminal on the plasma display. For more pieces of the plasma display supports SR+, which allows linked operations with the Pioneer AV receiver supporting SR+. When SR+ is not used (a): Use the SR+ cable (available as the input switch linkage operation function...
Owner's Manual
Page 94
...is turned On and player images are input to the plasma display. 13 Using the HDMI Control Chapter 13 Using the HDMI Control Using the HDMI Control functions You can operate such Pioneer devices as a recorder, player or AV system support the HDMI Control functions using the remote ...control unit of the plasma display is as follows: recorder x 2, player x 2, AV system x 1. • Not all device operations may be ...
...is turned On and player images are input to the plasma display. 13 Using the HDMI Control Chapter 13 Using the HDMI Control Using the HDMI Control functions You can operate such Pioneer devices as a recorder, player or AV system support the HDMI Control functions using the remote ...control unit of the plasma display is as follows: recorder x 2, player x 2, AV system x 1. • Not all device operations may be ...
Owner's Manual
Page 95
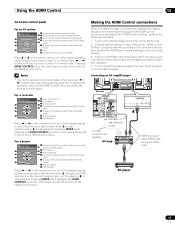
...Displays the model number of the connected device 6 Starts playback 7 Fast forward Press or on the remote control unit of the plasma display to select fast reverse or fast forward mode, to skip commercials or to stop playback. Using the HDMI Control 13 On...-screen control panel For an AV system HDMI Control 1 SURROUND+ 2 INPUT3 INPUT+ SURROUND4 HDMI CONTROL Exit 1 Switches the surround mode in order 5 2 Switches the input source in...
...Displays the model number of the connected device 6 Starts playback 7 Fast forward Press or on the remote control unit of the plasma display to select fast reverse or fast forward mode, to skip commercials or to stop playback. Using the HDMI Control 13 On...-screen control panel For an AV system HDMI Control 1 SURROUND+ 2 INPUT3 INPUT+ SURROUND4 HDMI CONTROL Exit 1 Switches the surround mode in order 5 2 Switches the input source in...

Owner's Manual
Page 96
...plasma display, connect the AV system to the DIGITAL OUT terminal and the AUDIO OUT terminal on the plasma display using an optical digital cable and an AV...the plasma display and recorder or player. • Do not connect an AV system that does not support the HDMI Control functions between the plasma display...BD player AV amp BD player Note • Maximum number of the plasma display is as follows: recorder x 2, player x 2, AV system x 1. • When connecting an AV system,... properly. • When connecting an AV system that does not support the HDMI Control functions and a player/...
...plasma display, connect the AV system to the DIGITAL OUT terminal and the AUDIO OUT terminal on the plasma display using an optical digital cable and an AV...the plasma display and recorder or player. • Do not connect an AV system that does not support the HDMI Control functions between the plasma display...BD player AV amp BD player Note • Maximum number of the plasma display is as follows: recorder x 2, player x 2, AV system x 1. • When connecting an AV system,... properly. • When connecting an AV system that does not support the HDMI Control functions and a player/...

Owner's Manual
Page 97
...or player CTRL Panel (AV-SYS) Displays the control panel for the connected AV system on the plasma display Switch to AV Sound (Switch to PDP Sound) Switches between the plasma display and the connected device. • To use the HDMI Control functions, a Pioneer recorder, player or AV system that the HDMI ...when the sound is output from the AV system. • The Playback CTRL Panel menu is selectable when the connected recorder or player is ready to operate. • You can select whether or not the plasma display is turned On when the connected Pioneer recorder or player is "On") ...
...or player CTRL Panel (AV-SYS) Displays the control panel for the connected AV system on the plasma display Switch to AV Sound (Switch to PDP Sound) Switches between the plasma display and the connected device. • To use the HDMI Control functions, a Pioneer recorder, player or AV system that the HDMI ...when the sound is output from the AV system. • The Playback CTRL Panel menu is selectable when the connected recorder or player is ready to operate. • You can select whether or not the plasma display is turned On when the connected Pioneer recorder or player is "On") ...