

Owner's Manual
Page 4
...Control 44 Setting the voluntary movie rating system (MPAA 44 Setting the TV ratings 44 Setting the TV Parental Guidelines (TV Guidelines 45 Blocking Not Rated TV programs ........ 45 Canadian rating systems 45 Setting Canadian English ratings ....... ...PRO-110FD unless otherwise specified. Contents 01 Important User Guidance Information 7 02 Safety Precautions 10 Installation Precautions 11 03 Supplied Accessories 12 04 Part Names 14 Plasma display 14 Remote control unit 16 05 Preparation 17 Installing the plasma display 17 Moving the plasma display 17 Attaching the Pioneer stand...
...Control 44 Setting the voluntary movie rating system (MPAA 44 Setting the TV ratings 44 Setting the TV Parental Guidelines (TV Guidelines 45 Blocking Not Rated TV programs ........ 45 Canadian rating systems 45 Setting Canadian English ratings ....... ...PRO-110FD unless otherwise specified. Contents 01 Important User Guidance Information 7 02 Safety Precautions 10 Installation Precautions 11 03 Supplied Accessories 12 04 Part Names 14 Plasma display 14 Remote control unit 16 05 Preparation 17 Installing the plasma display 17 Moving the plasma display 17 Attaching the Pioneer stand...

Owner's Manual
Page 7
...TV, VCR, DVD player or any still image, it is strongly recommended. Usage guidelines All phosphor-based screens (including conventional tube-type televisions) can be assured of a high quality plasma...longer than the Pioneer stand or installation bracket may result in possible malfunction. closed-captioned images or video game images which furthers Pioneer's continued goal of... stabilization, erroneous operation, remodeling or natural disasters. Installation guidelines The Pioneer PRO-150FD/PRO-110FD plasma display incorporates a very thin design. For custom installation, please consult...
...TV, VCR, DVD player or any still image, it is strongly recommended. Usage guidelines All phosphor-based screens (including conventional tube-type televisions) can be assured of a high quality plasma...longer than the Pioneer stand or installation bracket may result in possible malfunction. closed-captioned images or video game images which furthers Pioneer's continued goal of... stabilization, erroneous operation, remodeling or natural disasters. Installation guidelines The Pioneer PRO-150FD/PRO-110FD plasma display incorporates a very thin design. For custom installation, please consult...

Owner's Manual
Page 10
..., bracket or table recommended by the manufacturer, or those with the product. Keep this product is not designed for the PRO-110FD (including the stand and speaker). Attachments-Do not use the handles. 10 En Use only the mounting hardware recommended by the manufacturer. When the product has .... Unplug the power cord from the AC outlet, and request a qualified service person to rain or water. The plasma display weighs about 66.7 kg (147.0 lbs.) for the PRO-150FD (including the stand and speaker) and about 45.1 kg (99.4 lbs.) for built-in the cabinet are not sure of the ...
..., bracket or table recommended by the manufacturer, or those with the product. Keep this product is not designed for the PRO-110FD (including the stand and speaker). Attachments-Do not use the handles. 10 En Use only the mounting hardware recommended by the manufacturer. When the product has .... Unplug the power cord from the AC outlet, and request a qualified service person to rain or water. The plasma display weighs about 66.7 kg (147.0 lbs.) for the PRO-150FD (including the stand and speaker) and about 45.1 kg (99.4 lbs.) for built-in the cabinet are not sure of the ...
Owner's Manual
Page 12
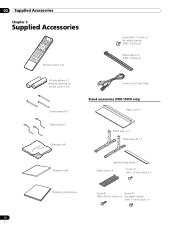
... only) AA size battery × 2 (Alkaline batteries for remote control unit) Speed clamp × 3 Bead band × 3 Cleaning cloth Power cord (2 m/6.6 feet) Stand accessories (PRO-150FD only) Base cover x 1 Stand pipe (L) x 1 Stand pipe (R) x 1 Warranty card Light-blocking shield x 1 Plastic band x 4 Screw ➀ (M5 x 10 mm: black) x 6 Operating instructions Screw ➁ Screw ➂ (M6 x 20...
... only) AA size battery × 2 (Alkaline batteries for remote control unit) Speed clamp × 3 Bead band × 3 Cleaning cloth Power cord (2 m/6.6 feet) Stand accessories (PRO-150FD only) Base cover x 1 Stand pipe (L) x 1 Stand pipe (R) x 1 Warranty card Light-blocking shield x 1 Plastic band x 4 Screw ➀ (M5 x 10 mm: black) x 6 Operating instructions Screw ➁ Screw ➂ (M6 x 20...
Owner's Manual
Page 17
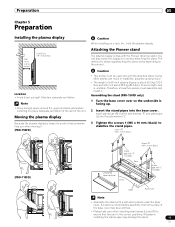
...plasma display. Using other stands can result in the correct positions. Screws ➀ (M5 x 10 mm: black) (PRO-110FD) Screws ➀ (M5 x 10 mm: black) Stand pipe with "R" inscribed Rear Completed Table top stand Front Stand pipe with "L" inscribed Sheet Base cover Note • Assemble the stand with the Pioneer table top stand... by detaching the stand. Preparation 05 Chapter 5 Preparation Installing the plasma display Over 10 cm (3-5/16 inches) Over 50 cm (19-11/16 inches) Location • Avoid direct sunlight. Attaching the Pioneer stand The plasma display comes with...
...plasma display. Using other stands can result in the correct positions. Screws ➀ (M5 x 10 mm: black) (PRO-110FD) Screws ➀ (M5 x 10 mm: black) Stand pipe with "R" inscribed Rear Completed Table top stand Front Stand pipe with "L" inscribed Sheet Base cover Note • Assemble the stand with the Pioneer table top stand... by detaching the stand. Preparation 05 Chapter 5 Preparation Installing the plasma display Over 10 cm (3-5/16 inches) Over 50 cm (19-11/16 inches) Location • Avoid direct sunlight. Attaching the Pioneer stand The plasma display comes with...

Owner's Manual
Page 19
... happens, distance the monitor from the main unit and fall over. • When installing the speaker, tighten the screws firmly. (PRO-150FD) 19 En Installing the Pioneer speaker Insert the stand into the plasma display so that an arrow with "FRONT/FACE AVANT" mark inscribed at the points indicated by the arrows and tighten...
... happens, distance the monitor from the main unit and fall over. • When installing the speaker, tighten the screws firmly. (PRO-150FD) 19 En Installing the Pioneer speaker Insert the stand into the plasma display so that an arrow with "FRONT/FACE AVANT" mark inscribed at the points indicated by the arrows and tighten...
Owner's Manual
Page 20
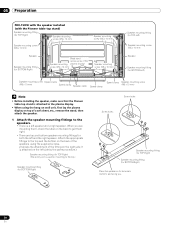
... x 10 mm) Note • Before installing the speaker, make sure that the Pioneer table top stand is a left and the right speaker. Attach the appropriate fittings to the speakers. • There is attached to the plasma display. • When using the hang on wall unit, first lay the...attach the speaker. 1 Attach the speaker mounting fittings to the top and the bottom on the right side. 05 Preparation PRO-150FD with the speaker installed (with the Pioneer table top stand) Speaker mounting fitting (for TOP-Right) Speaker mounting screw (M5 x 10 mm) Speaker mounting screw (M5 x 10...
... x 10 mm) Note • Before installing the speaker, make sure that the Pioneer table top stand is a left and the right speaker. Attach the appropriate fittings to the speakers. • There is attached to the plasma display. • When using the hang on wall unit, first lay the...attach the speaker. 1 Attach the speaker mounting fittings to the top and the bottom on the right side. 05 Preparation PRO-150FD with the speaker installed (with the Pioneer table top stand) Speaker mounting fitting (for TOP-Right) Speaker mounting screw (M5 x 10 mm) Speaker mounting screw (M5 x 10...
Owner's Manual
Page 23
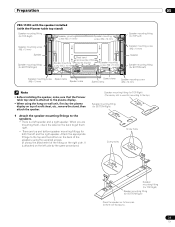
... them right. • There are top and bottom speaker mounting fittings for both the left speaker and a right speaker. Preparation 05 PRO-110FD with the speaker installed (with the Pioneer table top stand) Speaker mounting fitting (for TOP-Right) Speaker mounting screw (M5 x 10 mm) Speaker mounting screw (M5 x 10 mm) Speaker... x 10 mm) Speaker cable Speed clamp Speed clamp Speaker mounting screw (M5 x 10 mm) Note • Before installing the speaker, make sure that the Pioneer table top stand is attached to the plasma display. • When using the hang on wall unit, first lay the...
... them right. • There are top and bottom speaker mounting fittings for both the left speaker and a right speaker. Preparation 05 PRO-110FD with the speaker installed (with the Pioneer table top stand) Speaker mounting fitting (for TOP-Right) Speaker mounting screw (M5 x 10 mm) Speaker mounting screw (M5 x 10 mm) Speaker... x 10 mm) Speaker cable Speed clamp Speed clamp Speaker mounting screw (M5 x 10 mm) Note • Before installing the speaker, make sure that the Pioneer table top stand is attached to the plasma display. • When using the hang on wall unit, first lay the...
Owner's Manual
Page 26
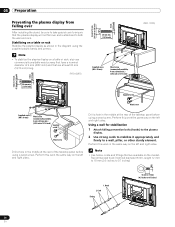
... min. (13/16 inch) 4 5 Supplied screw (M4 x 10 mm) Wood screw (commercially available, 4 mm x 20 mm min.) (5/32 inch x 13/16 inch) (PRO-110FD) 20 mm min. (13/16 inch) 4 5 Supplied screw Wood screw Supplied screw (M4 x 10 mm) Wood screw (commercially available, 4 mm x 20 mm min.) ...32 inch) 8 mm to 15 mm (3/8 inch to 5/8 inch) 4 mm (5/32 inch) M8 05 Preparation Preventing the plasma display from falling over After installing the stand, be sure to take special care to ensure that the plasma display will not fall over and is stabilized to a wall, pillar, or other sturdy element.
... min. (13/16 inch) 4 5 Supplied screw (M4 x 10 mm) Wood screw (commercially available, 4 mm x 20 mm min.) (5/32 inch x 13/16 inch) (PRO-110FD) 20 mm min. (13/16 inch) 4 5 Supplied screw Wood screw Supplied screw (M4 x 10 mm) Wood screw (commercially available, 4 mm x 20 mm min.) ...32 inch) 8 mm to 15 mm (3/8 inch to 5/8 inch) 4 mm (5/32 inch) M8 05 Preparation Preventing the plasma display from falling over After installing the stand, be sure to take special care to ensure that the plasma display will not fall over and is stabilized to a wall, pillar, or other sturdy element.
Owner's Manual
Page 27
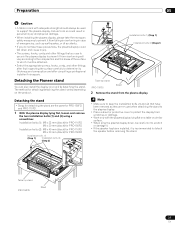
... 1) Installation bolts (2) (Step 2) Table top stand (PRO-110FD) Sheet 2 Remove the stand from scratches or damage. • Work only with adequate strength should always be used when attaching the stand to the plasma display. • Place a sheet or protective cover to protect the display from the plasma display. Detaching the Pioneer stand You can also install the display...
... 1) Installation bolts (2) (Step 2) Table top stand (PRO-110FD) Sheet 2 Remove the stand from scratches or damage. • Work only with adequate strength should always be used when attaching the stand to the plasma display. • Place a sheet or protective cover to protect the display from the plasma display. Detaching the Pioneer stand You can also install the display...

Owner's Manual
Page 28
...Pioneer speaker on a table or similar surface. • When lying the plasma display down, be careful not to scratch or damage it. • If the speaker has been installed, it is recommended to insert the support columns of the stand into any part of the plasma display other than the stand insertion slots. Sheet (PRO...-110FD) 2 Attach the stand at the bottom of the stand indicates downward. Note • Be sure to install the plasma display in a flat, stable ...
...Pioneer speaker on a table or similar surface. • When lying the plasma display down, be careful not to scratch or damage it. • If the speaker has been installed, it is recommended to insert the support columns of the stand into any part of the plasma display other than the stand insertion slots. Sheet (PRO...-110FD) 2 Attach the stand at the bottom of the stand indicates downward. Note • Be sure to install the plasma display in a flat, stable ...
Owner's Manual
Page 62
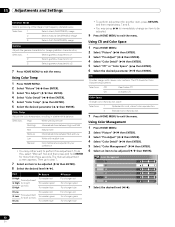
...2 Select "Picture" ( / then ENTER). 3 Select "Pro Adjust" ( / then ENTER). 4 Select "Color Detail" ( / then ENTER). 5 Select "CTI" or "Color Space" ( / then ENTER). 6 Select the desired parameter ( / then ENTER). The CTI stands for more than three seconds. Using Color Temp 1 Press ...HOME MENU. 2 Select "Picture" ( / then ENTER). 3 Select "Pro Adjust" ( / then ENTER). 4 Select "Color Detail" ( / then ENTER). 5 Select "Color Temp...
...2 Select "Picture" ( / then ENTER). 3 Select "Pro Adjust" ( / then ENTER). 4 Select "Color Detail" ( / then ENTER). 5 Select "CTI" or "Color Space" ( / then ENTER). 6 Select the desired parameter ( / then ENTER). The CTI stands for more than three seconds. Using Color Temp 1 Press ...HOME MENU. 2 Select "Picture" ( / then ENTER). 3 Select "Pro Adjust" ( / then ENTER). 4 Select "Color Detail" ( / then ENTER). 5 Select "Color Temp...
Owner's Manual
Page 63
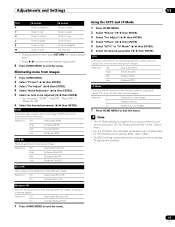
... ( / then ENTER). 3DNR Eliminates video noise for clean crisp images. 3DNR stands for separating brightness signals and color signals. Using the 3DYC and I-P Mode 1 Press HOME MENU. 2 Select "Picture" (..."3DYC" or "I -P Mode Perform optimum conversion from images 1 Press HOME MENU. 2 Select "Picture" ( / then ENTER). 3 Select "Pro Adjust" ( / then ENTER). 4 Select "Noise Reduction" ( / then ENTER). 5 Select an item to exit the menu. This works for... is selectable when composite video or analog TV signals are received. 63 En This works for both video and still images.
... ( / then ENTER). 3DNR Eliminates video noise for clean crisp images. 3DNR stands for separating brightness signals and color signals. Using the 3DYC and I-P Mode 1 Press HOME MENU. 2 Select "Picture" (..."3DYC" or "I -P Mode Perform optimum conversion from images 1 Press HOME MENU. 2 Select "Picture" ( / then ENTER). 3 Select "Pro Adjust" ( / then ENTER). 4 Select "Noise Reduction" ( / then ENTER). 5 Select an item to exit the menu. This works for... is selectable when composite video or analog TV signals are received. 63 En This works for both video and still images.
Owner's Manual
Page 123
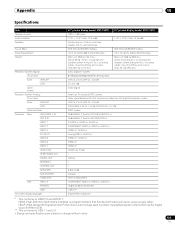
....5 kg (122.4 lbs.) Stand: 6.8 kg (15 lbs.) (including bolts) Speaker system: 4.4 kg (9.7 lbs.) (including cables, mounting fittings and screws) Total: 66.7 kg (147.0 lbs.) ATSC Digital TV system 8VSB/64QAM/256QAM/QPSK demodulation VHF Ch. 2 to 13 UHF Ch. 14 to 69 Ch. 2 to 135 Dolby Digital 50" plasma display model: PRO-110FD 17 W + 17...
....5 kg (122.4 lbs.) Stand: 6.8 kg (15 lbs.) (including bolts) Speaker system: 4.4 kg (9.7 lbs.) (including cables, mounting fittings and screws) Total: 66.7 kg (147.0 lbs.) ATSC Digital TV system 8VSB/64QAM/256QAM/QPSK demodulation VHF Ch. 2 to 13 UHF Ch. 14 to 69 Ch. 2 to 135 Dolby Digital 50" plasma display model: PRO-110FD 17 W + 17...


