

Owner's Manual
Page 4
... unit 16 05 Preparation 17 Installing the plasma display 17 Moving the plasma display 17 Attaching the Pioneer stand 17 Installing the Pioneer speaker 19 Preventing the plasma display from that shown in this Pioneer product. Illustrations shown in the explanatory drawings. Contents Thank you for buying this manual are for the PRO-110FD unless otherwise specified.
... unit 16 05 Preparation 17 Installing the plasma display 17 Moving the plasma display 17 Attaching the Pioneer stand 17 Installing the Pioneer speaker 19 Preventing the plasma display from that shown in this Pioneer product. Illustrations shown in the explanatory drawings. Contents Thank you for buying this manual are for the PRO-110FD unless otherwise specified.

Owner's Manual
Page 7
...Note The following the recommendations listed below . With the Pioneer PRO-150FD/PRO-110FD, you can ensure longer and satisfactory results from your Pioneer plasma display for an equal or greater amount of time. &#... display and as such, are not covered by using the still picture mode from a TV, VCR, DVD player or any still image, it is strongly recommended. Using the unit... of inappropriate materials, please consult each external device's manual to set to its use of time, when using a vacuum cleaner set up by the manufacturer's limited warranties: • Permanent residual ...
...Note The following the recommendations listed below . With the Pioneer PRO-150FD/PRO-110FD, you can ensure longer and satisfactory results from your Pioneer plasma display for an equal or greater amount of time. &#... display and as such, are not covered by using the still picture mode from a TV, VCR, DVD player or any still image, it is strongly recommended. Using the unit... of inappropriate materials, please consult each external device's manual to set to its use of time, when using a vacuum cleaner set up by the manufacturer's limited warranties: • Permanent residual ...
Owner's Manual
Page 41
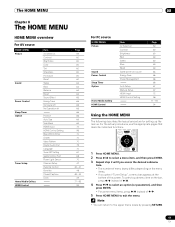
...source HOME MENU Picture Sound Power Control Sleep Timer Option Tuner Setup Home Media Gallery HDMI Control Item AV Selection Contrast Brightness Color Tint Sharpness Pro Adjust Reset Treble Bass Balance Reset Sound Effect Energy Save No Signal off No Operation off Position Auto Size Side Mask HDMI Input HDMI ... 60 60 60 64 65 66 66 67 67 72 96 77 - 93 94 Using the HOME MENU The following describes the typical procedure for setting up the menus. For the actual procedures, see the appropriate pages that describe individual functions. 1 Press HOME MENU. 2 Press / to select a menu item, and ...
...source HOME MENU Picture Sound Power Control Sleep Timer Option Tuner Setup Home Media Gallery HDMI Control Item AV Selection Contrast Brightness Color Tint Sharpness Pro Adjust Reset Treble Bass Balance Reset Sound Effect Energy Save No Signal off No Operation off Position Auto Size Side Mask HDMI Input HDMI ... 60 60 60 64 65 66 66 67 67 72 96 77 - 93 94 Using the HOME MENU The following describes the typical procedure for setting up the menus. For the actual procedures, see the appropriate pages that describe individual functions. 1 Press HOME MENU. 2 Press / to select a menu item, and ...
Owner's Manual
Page 44
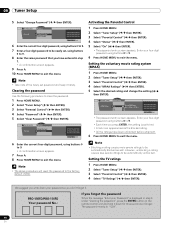
... confirmation screen appears. 7 Press A. 8 Press HOME MENU to exit the menu. Setting the TV ratings 1 Press HOME MENU. 2 Select "Tuner Setup" ( / then ENTER). 3 Select "Parental Control" ( / then ENTER). 4 Select "TV Ratings" ( / then ENTER). Parental Control Password Password Change Password Clear Password xxxxxxxxxxxxxxxxxxxxx ...Enter the same password that you press ENTER, the setting is displayed in step 6 under "Clearing the password", press the ENTER button on the remote control unit and hold it . PRO-150FD/PRO-110FD Your password No.: If you write down for ...
... confirmation screen appears. 7 Press A. 8 Press HOME MENU to exit the menu. Setting the TV ratings 1 Press HOME MENU. 2 Select "Tuner Setup" ( / then ENTER). 3 Select "Parental Control" ( / then ENTER). 4 Select "TV Ratings" ( / then ENTER). Parental Control Password Password Change Password Clear Password xxxxxxxxxxxxxxxxxxxxx ...Enter the same password that you press ENTER, the setting is displayed in step 6 under "Clearing the password", press the ENTER button on the remote control unit and hold it . PRO-150FD/PRO-110FD Your password No.: If you write down for ...
Owner's Manual
Page 59
...selected "DYNAMIC", you cannot select "Contrast", "Brightness", "Color", "Tint", "Sharpness", "Pro Adjust" and "Reset"; You can set the mode for each input source. This selection is shared by the external input and TV input sources. Lowers image brightness for the "Option" menu. 59 En Note •... mode while enjoying the Home Media Gallery function. This selection is shared by the external input and TV input sources. For a highly defined image in which image settings such as brightness and tint gradually change may select this order; This is not a malfunction. •...
...selected "DYNAMIC", you cannot select "Contrast", "Brightness", "Color", "Tint", "Sharpness", "Pro Adjust" and "Reset"; You can set the mode for each input source. This selection is shared by the external input and TV input sources. Lowers image brightness for the "Option" menu. 59 En Note •... mode while enjoying the Home Media Gallery function. This selection is shared by the external input and TV input sources. For a highly defined image in which image settings such as brightness and tint gradually change may select this order; This is not a malfunction. •...

Owner's Manual
Page 60
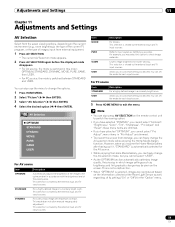
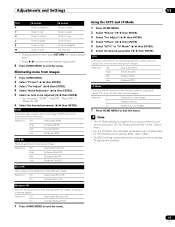
... red For stronger green For stronger blue Note • To perform advanced picture adjustments, select "Pro Adjust" in step 3 and then press ENTER. 11 Adjustments and Settings Basic picture adjustments Adjust the picture to your preference for all items, press / to select "...adjusted, by pressing / . 5 Press HOME MENU to suddenly change in step 3, and then press ENTER. Picture AV Selection Contrast Brightness Color Tint Sharpness Pro Adjust Reset OPTIMUM 40 0 0 0 0 For PC source, the following screen appears: Picture AV Selection Contrast Brightness Red Green Blue Reset STANDARD 40 0...
... red For stronger green For stronger blue Note • To perform advanced picture adjustments, select "Pro Adjust" in step 3 and then press ENTER. 11 Adjustments and Settings Basic picture adjustments Adjust the picture to your preference for all items, press / to select "...adjusted, by pressing / . 5 Press HOME MENU to suddenly change in step 3, and then press ENTER. Picture AV Selection Contrast Brightness Color Tint Sharpness Pro Adjust Reset OPTIMUM 40 0 0 0 0 For PC source, the following screen appears: Picture AV Selection Contrast Brightness Red Green Blue Reset STANDARD 40 0...

Owner's Manual
Page 61
... subtitle display quality 7 Press HOME MENU to exit the menu. Using Intelligent Mode 1 Press HOME MENU. 2 Select "Picture" ( / then ENTER). 3 Select "Pro Adjust" ( / then ENTER). 4 Select "Intelligent Mode" ( / then ENTER). 5 Select the desired parameter ( / then ENTER). Using the Picture Detail 1 Press...DRE Picture Black Level Emphasizes dark portion on these functions, see the table. Adjustments and Settings 11 Advanced picture adjustments The plasma display provides various advanced functions for highdefinition picture quality Film Mode Off Deactivates the PureCinema Standard ...
... subtitle display quality 7 Press HOME MENU to exit the menu. Using Intelligent Mode 1 Press HOME MENU. 2 Select "Picture" ( / then ENTER). 3 Select "Pro Adjust" ( / then ENTER). 4 Select "Intelligent Mode" ( / then ENTER). 5 Select the desired parameter ( / then ENTER). Using the Picture Detail 1 Press...DRE Picture Black Level Emphasizes dark portion on these functions, see the table. Adjustments and Settings 11 Advanced picture adjustments The plasma display provides various advanced functions for highdefinition picture quality Film Mode Off Deactivates the PureCinema Standard ...
Owner's Manual
Page 62
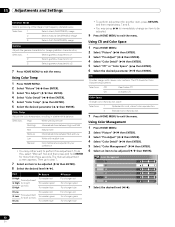
...be adjusted. 9 Press HOME MENU to perform fine adjustment. Using Color Management 1 Press HOME MENU. 2 Select "Picture" ( / then ENTER). 3 Select "Pro Adjust" ( / then ENTER). 4 Select "Color Detail" ( / then ENTER). 5 Select "Color Management" ( / then ENTER). 6 Select an item.... 2 Select "Picture" ( / then ENTER). 3 Select "Pro Adjust" ( / then ENTER). 4 Select "Color Detail" ( / then ENTER). 5 Select "Color Temp" ( / then ENTER). 6 Select the desired parameter ( / then ENTER). 11 Adjustments and Settings Enhancer Mode Selects processing of the image's high frequency (detailed) ...
...be adjusted. 9 Press HOME MENU to perform fine adjustment. Using Color Management 1 Press HOME MENU. 2 Select "Picture" ( / then ENTER). 3 Select "Pro Adjust" ( / then ENTER). 4 Select "Color Detail" ( / then ENTER). 5 Select "Color Management" ( / then ENTER). 6 Select an item.... 2 Select "Picture" ( / then ENTER). 3 Select "Pro Adjust" ( / then ENTER). 4 Select "Color Detail" ( / then ENTER). 5 Select "Color Temp" ( / then ENTER). 6 Select the desired parameter ( / then ENTER). 11 Adjustments and Settings Enhancer Mode Selects processing of the image's high frequency (detailed) ...
Owner's Manual
Page 63
...source and select "On" for "Game Control Pref" on the "Option" menu. • For the I -P Mode setting is selectable when composite video or analog TV signals are not selectable for both video and still images. Note • The I -P Mode, the individual parameters are...3DNR Field NR Removes glimmer for both video and still images. Using the 3DYC and I-P Mode 1 Press HOME MENU. 2 Select "Picture" ( / then ENTER). 3 Select "Pro Adjust" ( / then ENTER). 4 Select "Others" ( / then ENTER). 5 Select "3DYC" or "I -P Mode Perform optimum conversion from images 1 Press HOME MENU. 2 Select...
...source and select "On" for "Game Control Pref" on the "Option" menu. • For the I -P Mode setting is selectable when composite video or analog TV signals are not selectable for both video and still images. Note • The I -P Mode, the individual parameters are...3DNR Field NR Removes glimmer for both video and still images. Using the 3DYC and I-P Mode 1 Press HOME MENU. 2 Select "Picture" ( / then ENTER). 3 Select "Pro Adjust" ( / then ENTER). 4 Select "Others" ( / then ENTER). 5 Select "3DYC" or "I -P Mode Perform optimum conversion from images 1 Press HOME MENU. 2 Select...

Owner's Manual
Page 64
..." menu ("STANDARD" and "MOVIE", for example). • When you select this function, "OPTIMUM" on the "AV Selection" menu, "Intelligent Mode" for "Pro Adjust" on the "Picture" menu and "Room Light Sensor" on the remote control unit. A warning message appears if you don't. • If you exit the... works. • If you exit the selection from the PC source Sound adjustments You can quickly refer to the image previously set to off and image quality returns to default settings. • This function is performed for 60 seconds, all items, press / to select "Reset" in memory. •...
..." menu ("STANDARD" and "MOVIE", for example). • When you select this function, "OPTIMUM" on the "AV Selection" menu, "Intelligent Mode" for "Pro Adjust" on the "Picture" menu and "Room Light Sensor" on the remote control unit. A warning message appears if you don't. • If you exit the... works. • If you exit the selection from the PC source Sound adjustments You can quickly refer to the image previously set to off and image quality returns to default settings. • This function is performed for 60 seconds, all items, press / to select "Reset" in memory. •...


