

Owner's Manual
Page 1
PLASMA DISPLAY PRO-1000HDI PRO-800HDI Register Your Product on www.pioneerelectronics.com Operating Instructions
PLASMA DISPLAY PRO-1000HDI PRO-800HDI Register Your Product on www.pioneerelectronics.com Operating Instructions

Owner's Manual
Page 2
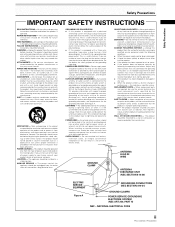
... California and other governmental entities to the product. IMPORTANT NOTICE The serial number for your enclosed warranty card and keep it in a secure area. ii PRO-1000HDI / PRO-800HDI The following symbols are found on your security. Please write this serial number on labels attached to cause cancer and birth defects or other reproductive...
... California and other governmental entities to the product. IMPORTANT NOTICE The serial number for your enclosed warranty card and keep it in a secure area. ii PRO-1000HDI / PRO-800HDI The following symbols are found on your security. Please write this serial number on labels attached to cause cancer and birth defects or other reproductive...
Owner's Manual
Page 3
... situated away from heat sources such as they may touch dangerous voltage points or shortout parts that they may cause hazards. NATIONAL ELECTRICAL CODE iii PRO-1000HDI / PRO-800HDI FOLLOW INSTRUCTIONS - Do not use a mounting accessory recommended by items placed upon or against voltage surges and built-up static charges. CART - NONUSE PERIODS - If...
... situated away from heat sources such as they may touch dangerous voltage points or shortout parts that they may cause hazards. NATIONAL ELECTRICAL CODE iii PRO-1000HDI / PRO-800HDI FOLLOW INSTRUCTIONS - Do not use a mounting accessory recommended by items placed upon or against voltage surges and built-up static charges. CART - NONUSE PERIODS - If...
Owner's Manual
Page 4
Product Name: Plasma Display Model Number: PRO-1000HDI / PRO-800HDI Product Category: Class B Personal Computers & Peripherals Responsible Party Name: PIONEER ELECTRONICS [USA] INC. Pioneer Electronics [USA] Inc. O. BOX 1760, Long Beach, CA 90801-1760, U.S.A. Customer Support Division Address:...BEACH, CA., 90801-1760 U.S.A. Customer Support Division P. Operation is subject to Pioneer without first calling the Customer Support Division at the above listed number for assistance. iivi PRO-1000HDI / PRO-800HDI Phone: (800)421-1625 URL http://www.Pioneerelectronics.com Please do not ship...
Product Name: Plasma Display Model Number: PRO-1000HDI / PRO-800HDI Product Category: Class B Personal Computers & Peripherals Responsible Party Name: PIONEER ELECTRONICS [USA] INC. Pioneer Electronics [USA] Inc. O. BOX 1760, Long Beach, CA 90801-1760, U.S.A. Customer Support Division Address:...BEACH, CA., 90801-1760 U.S.A. Customer Support Division P. Operation is subject to Pioneer without first calling the Customer Support Division at the above listed number for assistance. iivi PRO-1000HDI / PRO-800HDI Phone: (800)421-1625 URL http://www.Pioneerelectronics.com Please do not ship...
Owner's Manual
Page 5
... OUT 34 Additional Information 35 Cleaning 35 Troubleshooting 35 Specifications 38 Supplement 1 39 Supplement 2 41 Supplement 3 41 Supplement 4 42 Explanation of Terms 42 1 PRO-1000HDI / PRO-800HDI Contents Safety Precautions i Before Proceeding 2 How to Use This Manual 2 Checking Supplied Accessories 3 Part Names and Functions 4 Main Unit 4 Remote Control Unit ...is installed by mistake in the future. Note for damage caused by qualified personnel with enough skill and competence. PIONEER cannot assume liabilities for Dealers: After installation, be sure to deliver this...
... OUT 34 Additional Information 35 Cleaning 35 Troubleshooting 35 Specifications 38 Supplement 1 39 Supplement 2 41 Supplement 3 41 Supplement 4 42 Explanation of Terms 42 1 PRO-1000HDI / PRO-800HDI Contents Safety Precautions i Before Proceeding 2 How to Use This Manual 2 Checking Supplied Accessories 3 Part Names and Functions 4 Main Unit 4 Remote Control Unit ...is installed by mistake in the future. Note for damage caused by qualified personnel with enough skill and competence. PIONEER cannot assume liabilities for Dealers: After installation, be sure to deliver this...
Owner's Manual
Page 6
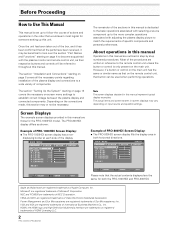
... connections made, this manual. E NHANCE V. NEC and PC-9800 are trademarks of HDMI Licensing LLC. 2 PRO-1000HDI / PRO-800HDI Once the unit has been taken out of the box, and it may be beneficial to look over the ..., Inc. VESA and DDC are registered trademarks of Video Electronics Standards Association. About operations in this manual Operations in both the PRO-1000HDI and PRO-800HDI. The PRO-800HDI display differs as their respective buttons and controls will be referred to match the requirements of specific components and personal preferences. ENHANCE ...
... connections made, this manual. E NHANCE V. NEC and PC-9800 are trademarks of HDMI Licensing LLC. 2 PRO-1000HDI / PRO-800HDI Once the unit has been taken out of the box, and it may be beneficial to look over the ..., Inc. VESA and DDC are registered trademarks of Video Electronics Standards Association. About operations in this manual Operations in both the PRO-1000HDI and PRO-800HDI. The PRO-800HDI display differs as their respective buttons and controls will be referred to match the requirements of specific components and personal preferences. ENHANCE ...
Owner's Manual
Page 7
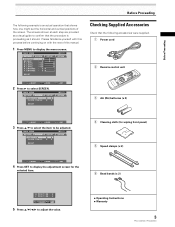
... : CL OCK / PHASE : SET UP 0/ 0 0/ 0 INPUT1 OPTION RE S ET SELECT SET ENTER MENU EXIT 4 Press SET to adjust the value. ÷ Operating Instructions ÷ Warranty 3 PRO-1000HDI / PRO-800HDI POS I T I GHT . POS I T I ON : CL OCK / PHASE : SET UP 0/ 0 0/ 0 RE S ET INPUT1 OPTION Checking Supplied Accessories Check that the following example is proceeding as a visual...
... : CL OCK / PHASE : SET UP 0/ 0 0/ 0 INPUT1 OPTION RE S ET SELECT SET ENTER MENU EXIT 4 Press SET to adjust the value. ÷ Operating Instructions ÷ Warranty 3 PRO-1000HDI / PRO-800HDI POS I T I GHT . POS I T I ON : CL OCK / PHASE : SET UP 0/ 0 0/ 0 RE S ET INPUT1 OPTION Checking Supplied Accessories Check that the following example is proceeding as a visual...

Owner's Manual
Page 8
... screen size (page 24). 9 AUTO SET UP button When using computer signal input, automatically sets the POSITION and CLOCK/PHASE to optimum values (page 28). 4 PRO-1000HDI / PRO-800HDI Usage of cursor buttons within operations is clearly indicated in the operation mode (page 22). Part Names and Functions Main Unit Main unit 1 Operation panel...
... screen size (page 24). 9 AUTO SET UP button When using computer signal input, automatically sets the POSITION and CLOCK/PHASE to optimum values (page 28). 4 PRO-1000HDI / PRO-800HDI Usage of cursor buttons within operations is clearly indicated in the operation mode (page 22). Part Names and Functions Main Unit Main unit 1 Operation panel...
Owner's Manual
Page 9
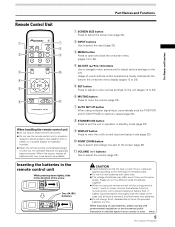
... disposing of used ones. ¶ The voltage of batteries may differ even if they are aligned according to adjust the volume (page 23). H048 En 5 PRO-1000HDI / PRO-800HDI Two AA (R6) batteries CAUTION ¶ Insert batteries so that apply in the direction of battery fluid. Usage of time (1 month or more), remove the...
... disposing of used ones. ¶ The voltage of batteries may differ even if they are aligned according to adjust the volume (page 23). H048 En 5 PRO-1000HDI / PRO-800HDI Two AA (R6) batteries CAUTION ¶ Insert batteries so that apply in the direction of battery fluid. Usage of time (1 month or more), remove the...

Owner's Manual
Page 10
... two video output terminals. Part Names and Functions Connection Panel The connection panel is provided with a CONTROL IN/OUT connector for connecting to PIONEER components bearing the Î mark. Connect a speaker whose impedance is 8 -16 Ω (page 14). 2 CONTROL IN/OUT (monaural mini ... to 12). 6 OUTPUT (INPUT1) (mini D-sub 15 pin) Use the OUTPUT (INPUT1) terminal to output the video signal to the picture displayed. 6 PRO-1000HDI / PRO-800HDI 7 m (23 feet) 30˚ 30˚ Remote Sensor Make sure that bear the Î mark. If you are having difficulty with operation of ...
... two video output terminals. Part Names and Functions Connection Panel The connection panel is provided with a CONTROL IN/OUT connector for connecting to PIONEER components bearing the Î mark. Connect a speaker whose impedance is 8 -16 Ω (page 14). 2 CONTROL IN/OUT (monaural mini ... to 12). 6 OUTPUT (INPUT1) (mini D-sub 15 pin) Use the OUTPUT (INPUT1) terminal to output the video signal to the picture displayed. 6 PRO-1000HDI / PRO-800HDI 7 m (23 feet) 30˚ 30˚ Remote Sensor Make sure that bear the Î mark. If you are having difficulty with operation of ...

Owner's Manual
Page 11
...the audio output connectors of the selected source component connected to this unit to obtain sound when INPUT4 is selected. Illustration depicts PRO-1000HDI model. Connect the audio output terminal of components connected to INPUT1 or INPUT2 to this unit (page 15). 0 AUDIO OUTPUT... audio channel (L) jack is not compatible with monaural input sources. # INPUT4 (BNC jack) For connection of 8 -16 Ω (page 14). 7 PRO-1000HDI / PRO-800HDI R 8Ω ~16Ω S+PEAKE-R 1 CONTROL IN OUT COMBINATION IN OUT RS-232C 23 4 Part Names and Functions INPUT1 (ON SYNC) ANALOG RGB...
...the audio output connectors of the selected source component connected to this unit to obtain sound when INPUT4 is selected. Illustration depicts PRO-1000HDI model. Connect the audio output terminal of components connected to INPUT1 or INPUT2 to this unit (page 15). 0 AUDIO OUTPUT... audio channel (L) jack is not compatible with monaural input sources. # INPUT4 (BNC jack) For connection of 8 -16 Ω (page 14). 7 PRO-1000HDI / PRO-800HDI R 8Ω ~16Ω S+PEAKE-R 1 CONTROL IN OUT COMBINATION IN OUT RS-232C 23 4 Part Names and Functions INPUT1 (ON SYNC) ANALOG RGB...
Owner's Manual
Page 12
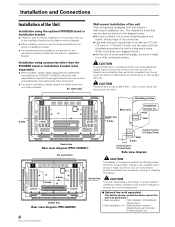
... used are not blocked when installing. Center line Rear view diagram (PRO-800HDI) 7 Optional line (sold separately) ÷ When possible, please install using parts and accessories manufactured by PIONEER. Also, as hot air is constructed with bolt holes for securing the unit. 8 PRO-1000HDI / PRO-800HDI Installation and Connections Installation of the Unit Installation using the optional...
... used are not blocked when installing. Center line Rear view diagram (PRO-800HDI) 7 Optional line (sold separately) ÷ When possible, please install using parts and accessories manufactured by PIONEER. Also, as hot air is constructed with bolt holes for securing the unit. 8 PRO-1000HDI / PRO-800HDI Installation and Connections Installation of the Unit Installation using the optional...

Owner's Manual
Page 13
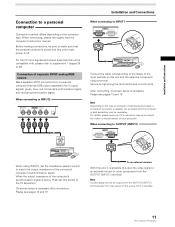
... SYNC B R Personal computer (PC) with RGB output G B R H/V SYNC G B R HD VD Video component with INPUT2. On-screen setup is necessary after connection. Please see page 18. 9 PRO-1000HDI / PRO-800HDI When making connections to a plasma display (pages 9 to AV component that INPUT1 and INPUT2 are also compatible with component video output Y CB/PB CR/PR...
... SYNC B R Personal computer (PC) with RGB output G B R H/V SYNC G B R HD VD Video component with INPUT2. On-screen setup is necessary after connection. Please see page 18. 9 PRO-1000HDI / PRO-800HDI When making connections to a plasma display (pages 9 to AV component that INPUT1 and INPUT2 are also compatible with component video output Y CB/PB CR/PR...

Owner's Manual
Page 14
...) G B INPUT2 (H/V SYNC) R HD VD 7Ω5Ô2k.Ω2 On-screen setup is necessary after connection. When connecting to , the picture may be displayed properly. 10 PRO-1000HDI / PRO-800HDI If connections are made, the picture may not be not displayed normally. If connected to INPUT1 INPUT1 OUTPUT ANALOG RGB (ANALOG RGB) On screen setup...
...) G B INPUT2 (H/V SYNC) R HD VD 7Ω5Ô2k.Ω2 On-screen setup is necessary after connection. When connecting to , the picture may be displayed properly. 10 PRO-1000HDI / PRO-800HDI If connections are made, the picture may not be not displayed normally. If connected to INPUT1 INPUT1 OUTPUT ANALOG RGB (ANALOG RGB) On screen setup...
Owner's Manual
Page 15
... or consult the maker or nearest dealer of your computer. Secure by tightening the terminal screws on -screen setup is off or in standby. 11 PRO-1000HDI / PRO-800HDI For details, please read the computer's instruction manual. Please see pages 18 and 19. For the PC input signals and screen sizes that has RGB...
... or consult the maker or nearest dealer of your computer. Secure by tightening the terminal screws on -screen setup is off or in standby. 11 PRO-1000HDI / PRO-800HDI For details, please read the computer's instruction manual. Please see pages 18 and 19. For the PC input signals and screen sizes that has RGB...

Owner's Manual
Page 16
... displayed properly. ÷ On some types of Macintosh® components, G ON SYNC and composite SYNC are made, the picture may be not displayed normally. 12 PRO-1000HDI / PRO-800HDI When using the G ON SYNC connection. Installation and Connections Connection of G ON SYNC analog RGB source Make G ON SYNC connections for a personal computer with output...
... displayed properly. ÷ On some types of Macintosh® components, G ON SYNC and composite SYNC are made, the picture may be not displayed normally. 12 PRO-1000HDI / PRO-800HDI When using the G ON SYNC connection. Installation and Connections Connection of G ON SYNC analog RGB source Make G ON SYNC connections for a personal computer with output...
Owner's Manual
Page 17
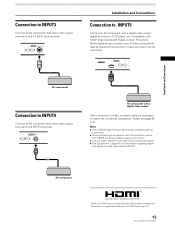
... 3 (page 41) for connection. ÷ When connecting a component with HDCP (High-brandwidth Digital Content Protection). Before attempting to connect one of HDMI Licensing LLC. 13 PRO-1000HDI / PRO-800HDI AUDIO INPUT3 S-VIDEO R L Installation and Connections Connection to INPUT5 Connect an AV component with a digital video output (digital set top box, DVD player, etc.) compatible...
... 3 (page 41) for connection. ÷ When connecting a component with HDCP (High-brandwidth Digital Content Protection). Before attempting to connect one of HDMI Licensing LLC. 13 PRO-1000HDI / PRO-800HDI AUDIO INPUT3 S-VIDEO R L Installation and Connections Connection to INPUT5 Connect an AV component with a digital video output (digital set top box, DVD player, etc.) compatible...

Owner's Manual
Page 18
... unit's main power is compatible with a 2W+2W internal amplifier. If the polarity is output from the • SPEAKER terminals • Stereo mini jack (L/R). 14 PRO-1000HDI / PRO-800HDI Video input INPUT1 INPUT2 INPUT3 INPUT4 INPUT5 Audio input terminal Stereo mini jack (L/R) Pin jacks (L/R) Pin jacks (L/R) Pin jacks (L/R) Sound output Sound of the speaker...
... unit's main power is compatible with a 2W+2W internal amplifier. If the polarity is output from the • SPEAKER terminals • Stereo mini jack (L/R). 14 PRO-1000HDI / PRO-800HDI Video input INPUT1 INPUT2 INPUT3 INPUT4 INPUT5 Audio input terminal Stereo mini jack (L/R) Pin jacks (L/R) Pin jacks (L/R) Pin jacks (L/R) Sound output Sound of the speaker...

Owner's Manual
Page 19
... is output from both the AUDIO OUTPUT terminal (stereo mini jack) and the SPEAKER terminals according to ANALOG (or AUTO). Please see page 21. 15 PRO-1000HDI / PRO-800HDI
... is output from both the AUDIO OUTPUT terminal (stereo mini jack) and the SPEAKER terminals according to ANALOG (or AUTO). Please see page 21. 15 PRO-1000HDI / PRO-800HDI

Owner's Manual
Page 20
... the connected component at the remote control sensor on this unit to a three-pronged grounded outlet and make sure that component will no resistance). 16 PRO-1000HDI / PRO-800HDI If you use a power source converter plug, use a power supply voltage other than that bear the Î logo mark is used for efficiency protection. ... sure to connect the power cord to control. Point the remote control unit of that the cord is made , remote control operation of connected PIONEER components that indicated (AC 120 V, 60 Hz) as this unit. 2 Plug the power cord into a power outlet.
... the connected component at the remote control sensor on this unit to a three-pronged grounded outlet and make sure that component will no resistance). 16 PRO-1000HDI / PRO-800HDI If you use a power source converter plug, use a power supply voltage other than that bear the Î logo mark is used for efficiency protection. ... sure to connect the power cord to control. Point the remote control unit of that the cord is made , remote control operation of connected PIONEER components that indicated (AC 120 V, 60 Hz) as this unit. 2 Plug the power cord into a power outlet.


