Pioneer PRO-1000HDi Support and Manuals
Get Help and Manuals for this Pioneer item

View All Support Options Below
Free Pioneer PRO-1000HDi manuals!
Problems with Pioneer PRO-1000HDi?
Ask a Question
Free Pioneer PRO-1000HDi manuals!
Problems with Pioneer PRO-1000HDi?
Ask a Question
Popular Pioneer PRO-1000HDi Manual Pages
Owner's Manual - Page 3
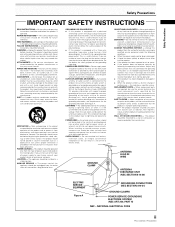
...product on the product. Never spill liquid of the grounding type plug.
Refer all servicing to a wall or ceiling only as to overturn. The product should be situated away from the outlet when left unattended and unused for service. WALL OR CEILING MOUNTING - The product should be mounted to qualified service personnel. NATIONAL ELECTRICAL CODE
iii
PRO-1000HDI / PRO-800HDI
Owner's Manual - Page 4
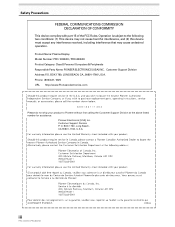
Customer Support Division P. O.
Customer Support Division Address: P.O. Product Name: Plasma Display Model Number: PRO-1000HDI / PRO-800HDI Product Category: Class B Personal Computers & Peripherals Responsible Party Name: PIONEER ELECTRONICS [USA] INC. BOX 1760, Long Beach, CA 90801-1760, U.S.A. iivi
PRO-1000HDI / PRO-800HDI BOX 1760, LONG BEACH, CA., 90801-1760 U.S.A. Phone: (...
Owner's Manual - Page 5
... of Terms 42
1
PRO-1000HDI / PRO-800HDI
Thank you will find it is marketed assuming that it useful in installation or mounting, misuse, modification or a natural disaster. PIONEER cannot assume liabilities for damage caused by qualified personnel with enough skill and competence.
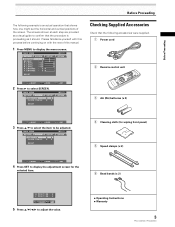
You will know how to Use This Manual 2 Checking Supplied Accessories 3
Part Names and Functions...
Owner's Manual - Page 6
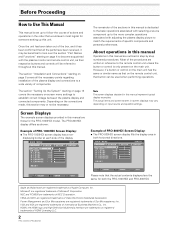
... complex operations associated with the plasma monitor and remote control unit, as shown:
Example of PRO-1000HDI Screen Display:
÷ The PRO-1000HDI screen display has a nondisplaying border at each side of HDMI Licensing LLC.
2
PRO-1000HDI / PRO-800HDI Note The screen displays depicted in this manual are the same for the PRO-1000HDI model. R. Microsoft is a registered trademark of...
Owner's Manual - Page 7
...247; Operating Instructions ÷ Warranty
3
PRO-1000HDI / PRO-800HDI R. E NHANCE V.
L EVEL G. MAIN MENU
PICTURE SCREEN
POS I T I ON
:
CL OCK / PHASE :
SET UP
0/ 0 0/ 0
INPUT1 OPTION
RE S ET
SELECT
SET ENTER
MENU EXIT
4 Press SET to confirm that the procedure is an actual operation that the following example is proceeding as a visual guide to display the adjustment screen...
Owner's Manual - Page 9
... settings on the unit. When this occurs, replace all liquid is clearly indicated at the bottom the on-screen menu display (pages 18 to 34).
5 SET ...instruction's rules that the plus (+) and minus (-) sides are the same
shape. H048 En
5
PRO-1000HDI / PRO-800HDI
If battery liquid has leaked, thoroughly wipe the inside of the arrow.
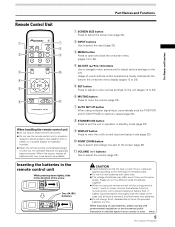
VOLUME (+/-) buttons
Use to select and enlarge one part...
Owner's Manual - Page 10

... PIONEER components that the connection made at INPUT2, it at the remote sensor (Î) located on the installation surroundings, this unit's remote control unit may be necessary to set this... when the main power of this unit as the batteries begin to wear out, replace weak batteries with a CONTROL IN/OUT connector for connecting to the picture displayed.
6
PRO-1000HDI / PRO-800HDI
7 m ...
Owner's Manual - Page 15
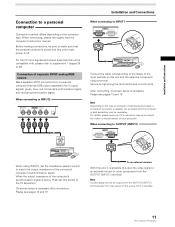
...set the impedance selector switch to match the output impedance of separate SYNC analog RGB source Make separate SYNC connections for a personal computer that the personal computer's power and this unit is off or in standby.
11
PRO-1000HDI / PRO-800HDI When the output impedance of computer model..., please read the computer's instruction manual. On-screen setup is possible to output the ...
Owner's Manual - Page 30
... I NG
: VGA
SELECT
SET ENTER
MENU EXIT
26
PRO-1000HDI / PRO-800HDI
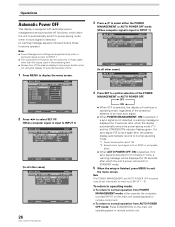
3 Press 5/∞ to select either operate the computer, or press INPUT on the main unit operating panel or remote control unit. Note The POWER MANAGEMENT and AUTO POWER OFF functions must be set individually for 8 seconds, after which the display automatically enters the power-saving mode (*1) and...
Owner's Manual - Page 35
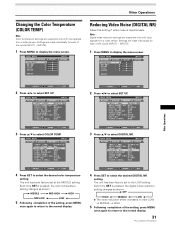
...setting, press MENU
once again to return to select the desired color temperature
setting. INPUT5).
1 Press MENU to display the menu screen. CO LOR T I GNAL : RGB
SELECT
SET CHANGE
MENU EXIT
4 Press SET to the normal display.
31
PRO-1000HDI / PRO-800HDI INPUT5).
1 Press MENU to display...SELECT
SET ENTER
MENU EXIT
2 Press 2/3 to the LOW setting. Settings are supported only ...
Owner's Manual - Page 37
... MENU to
return to normal screen display.
33
PRO-1000HDI / PRO-800HDI
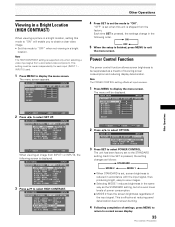
"OFF" is set the mode to "ON".
R.
CO LOR T I GNAL : RGB
3 Press 5/∞ to select HIGH CONTRAST.
MAIN MENU
INPUT1
PICTURE SCREEN
CONT RAST BR I XED
3 Press SET to select POWER CONTROL. MAIN MENU
INPUT1
PICTURE SCREEN SET UP
OPTION
POWER CONT R OL : S T A NDA RD
AUT O F U NCT...
Owner's Manual - Page 39
... DOWN
¶ Turn off main power, wait for cleaner. Use of dust buildup (set the computer's output signal appropriately.
¶ Turn off power, remove power plug from its outlet, and consult a Pioneer service center or your dealer.
35
PRO-1000HDI / PRO-800HDI
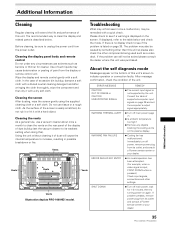
Additional Information Cleaning the screen After dusting, wipe the screen gently using the supplied cleaning cloth or a soft...
Owner's Manual - Page 40

... POWER MANAGEMENT or AUTO POWER OFF function set to ON? (page 26). • Condensation has formed on screen.
• A sharp sound is heard from the cabinet. Switch to another screen size (page 24). • Are SCREEN mode adjustments such as breakdown
Problem • The screen is displayed in a
small size. • Letter breakup on internal parts...
Owner's Manual - Page 41
... and the time they had been displayed.
2. Such images may occur in event of internal electronic parts, or other than 4:3 whenever possible, unless necessary to burning of about three minutes. When viewing at intervals of the fluorescent materials. Additional Information
37
PRO-1000HDI / PRO-800HDI Additional cautions • If the power is caused by itself, or...
Owner's Manual - Page 42
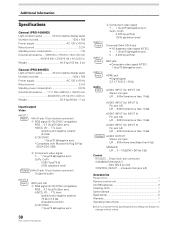
Additional Information
Specifications
General (PRO-1000HDI)
Light emission panel 50 inch plasma display panel Number of pixels 1024 x 768 Power supply AC 120 V, 60 Hz Rated current 2.5 A Standby power consumption 0.9 W External dimensions ...... 1111 (W) x 692 (H) x 104 (D) mm 43-3/4 (W) x 27-1/4 (H) x 4 (D) in . HD/CS, VD ... C . . . 0.286 Vp-p/75 Ω
BNC jack • Composite ...
Pioneer PRO-1000HDi Reviews
We have not received any reviews for Pioneer yet.