
Owner's Manual
Page 3
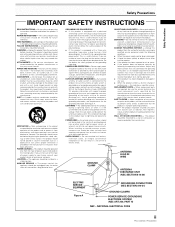
.... SERVICING - When replacement parts are not sure of the type of the grounding type plug. The product should use attachments not recommended by the manufacturer, or sold with a cart, stand, tripod, bracket, or table recommended by the product manufacturer as radiators, heat registers, stoves, or other hazards. All the safety and operating instructions should never be sure the antenna or cable...
.... SERVICING - When replacement parts are not sure of the type of the grounding type plug. The product should use attachments not recommended by the manufacturer, or sold with a cart, stand, tripod, bracket, or table recommended by the product manufacturer as radiators, heat registers, stoves, or other hazards. All the safety and operating instructions should never be sure the antenna or cable...
Owner's Manual
Page 5
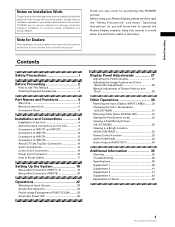
... Changing the Color Temperature (COLOR TEMP 31 Reducing Video Noise (DIGITAL NR 31 Setting the PureCinema mode 32 Viewing a Fast Moving Picture (3D Y/C MODE 32 Viewing in a safe place. Before Proceeding Notes on this PIONEER product. Keep this manual to the customer and explain to the customer how to Use This Manual 2 Checking Supplied Accessories 3 Part Names and Functions 4 Main Unit 4 Remote Control Unit 5 Connection Panel 6 Installation and Connections 8 Installation of Terms 42 1 PRO-1000HDI / PRO-800HDI...
... Changing the Color Temperature (COLOR TEMP 31 Reducing Video Noise (DIGITAL NR 31 Setting the PureCinema mode 32 Viewing a Fast Moving Picture (3D Y/C MODE 32 Viewing in a safe place. Before Proceeding Notes on this PIONEER product. Keep this manual to the customer and explain to the customer how to Use This Manual 2 Checking Supplied Accessories 3 Part Names and Functions 4 Main Unit 4 Remote Control Unit 5 Connection Panel 6 Installation and Connections 8 Installation of Terms 42 1 PRO-1000HDI / PRO-800HDI...
Owner's Manual
Page 6
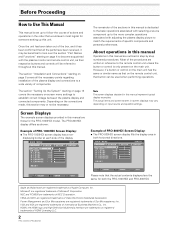
... trademarks of HDMI Licensing LLC. 2 PRO-1000HDI / PRO-800HDI Note The screen displays depicted in both the PRO-1000HDI and PRO-800HDI. Apple and Macintosh are trademarks or registered trademarks of Apple Computer, Inc. However, if a button or control on input source and specific settings. E NHANCE V. Power Management and Sun Microsystems are registered trademarks of PRO-800HDI Screen Display: ÷ The PRO-800HDI screen display fills the display area in this manual are registered...
... trademarks of HDMI Licensing LLC. 2 PRO-1000HDI / PRO-800HDI Note The screen displays depicted in both the PRO-1000HDI and PRO-800HDI. Apple and Macintosh are trademarks or registered trademarks of Apple Computer, Inc. However, if a button or control on input source and specific settings. E NHANCE V. Power Management and Sun Microsystems are registered trademarks of PRO-800HDI Screen Display: ÷ The PRO-800HDI screen display fills the display area in this manual are registered...
Owner's Manual
Page 9
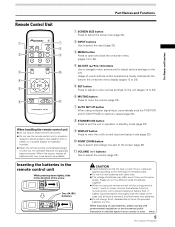
... and close the on the unit (pages 18 to 34). 6 MUTING button Press to mute the volume (page 23). 7 AUTO SET UP button When using computer signal input, automatically sets the POSITION and CLOCK/ PHASE to optimum values (page 28). 8 STANDBY/ON button Press to put the unit in your country or area. Inserting the batteries in the remote control unit While pressing down lightly...
... and close the on the unit (pages 18 to 34). 6 MUTING button Press to mute the volume (page 23). 7 AUTO SET UP button When using computer signal input, automatically sets the POSITION and CLOCK/ PHASE to optimum values (page 28). 8 STANDBY/ON button Press to put the unit in your country or area. Inserting the batteries in the remote control unit While pressing down lightly...

Owner's Manual
Page 10
... 9 to the format of the signal output from receiving the signal entirely. Part Names and Functions Connection Panel The connection panel is operated by an infrared remote control unit near this unit may not operate if there are objects placed between it and the display. ¶ Operational distance will not be output from the OUTPUT (INPUT1) terminal when the main power of this switch to the picture displayed. 6 PRO-1000HDI / PRO-800HDI...
... 9 to the format of the signal output from receiving the signal entirely. Part Names and Functions Connection Panel The connection panel is operated by an infrared remote control unit near this unit may not operate if there are objects placed between it and the display. ¶ Operational distance will not be output from the OUTPUT (INPUT1) terminal when the main power of this switch to the picture displayed. 6 PRO-1000HDI / PRO-800HDI...

Owner's Manual
Page 11
... power switch Use to switch the main power of components that have a composite video output terminal such as a digital set top box, DVD player, etc. L - = ~!@ # 9 AUDIO INPUT (Stereo mini jack) Use to an AC outlet (page 16). ^ SPEAKER (L) terminal For connection of 8 -16 Ω (page 14). 7 PRO-1000HDI / PRO-800HDI Illustration depicts PRO-1000HDI model. R 8Ω ~16Ω S+PEAKE-R 1 CONTROL IN OUT COMBINATION IN OUT RS-232C 23 4 Part Names and Functions INPUT1 (ON SYNC) ANALOG...
... power switch Use to switch the main power of components that have a composite video output terminal such as a digital set top box, DVD player, etc. L - = ~!@ # 9 AUDIO INPUT (Stereo mini jack) Use to an AC outlet (page 16). ^ SPEAKER (L) terminal For connection of 8 -16 Ω (page 14). 7 PRO-1000HDI / PRO-800HDI Illustration depicts PRO-1000HDI model. R 8Ω ~16Ω S+PEAKE-R 1 CONTROL IN OUT COMBINATION IN OUT RS-232C 23 4 Part Names and Functions INPUT1 (ON SYNC) ANALOG...
Owner's Manual
Page 15
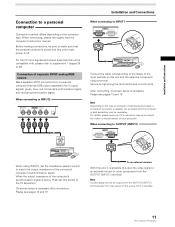
... off . To an external monitor With this unit, it is possible to output the video signal to OUTPUT (INPUT1) INPUT1 OUTPUT ANALOG RGB (ANALOG RGB) When using INPUT2, set this unit is off or in standby. 11 PRO-1000HDI / PRO-800HDI Installation and Connections Connection to make sure that has RGB output separated into 5 output signals: green, blue, red, horizontal synchronization signal, and vertical synchronization signal. Before making connections, be output from the OUTPUT (INPUT1) terminal. When the...
... off . To an external monitor With this unit, it is possible to output the video signal to OUTPUT (INPUT1) INPUT1 OUTPUT ANALOG RGB (ANALOG RGB) When using INPUT2, set this unit is off or in standby. 11 PRO-1000HDI / PRO-800HDI Installation and Connections Connection to make sure that has RGB output separated into 5 output signals: green, blue, red, horizontal synchronization signal, and vertical synchronization signal. Before making connections, be output from the OUTPUT (INPUT1) terminal. When the...
Owner's Manual
Page 17
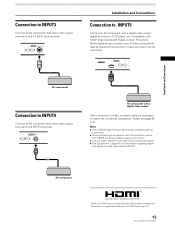
... the S-VIDEO input terminal. Notes ÷ Use a HDMI (High Definition Multimedia Interface) cable for information regarding signal and display formats supported by INPUT5. Installation and Connections Connection to INPUT3 Connect an AV component that has a video output terminal to the INPUT4 terminal. Before attempting to be connected. AUDIO R INPUT4 VIDEO L AV component with a digital video output After connection is made, on-screen setup is not a jack intended to connect one of HDMI Licensing LLC. 13 PRO-1000HDI / PRO-800HDI...
... the S-VIDEO input terminal. Notes ÷ Use a HDMI (High Definition Multimedia Interface) cable for information regarding signal and display formats supported by INPUT5. Installation and Connections Connection to INPUT3 Connect an AV component that has a video output terminal to the INPUT4 terminal. Before attempting to be connected. AUDIO R INPUT4 VIDEO L AV component with a digital video output After connection is made, on-screen setup is not a jack intended to connect one of HDMI Licensing LLC. 13 PRO-1000HDI / PRO-800HDI...

Owner's Manual
Page 22
... Input Signal Format setting (steps 8 - 9) is connected, set to "VIDEO". No setup is necessary for signals with other than VIDEO. 1 Switch the main power switch on the connection panel to the on position to turn on -screen setup is required only when using the following input signal refresh rates: 1 31.5 kHz horizontal / 60 Hz vertical; 2 48.4 kHz horizontal / 60 Hz vertical; 3 56.5 kHz horizontal / 70 Hz vertical. The STANDBY/ON indicator lights red. 2 Press STANDBY/ON to display the menu screen...
... Input Signal Format setting (steps 8 - 9) is connected, set to "VIDEO". No setup is necessary for signals with other than VIDEO. 1 Switch the main power switch on the connection panel to the on position to turn on -screen setup is required only when using the following input signal refresh rates: 1 31.5 kHz horizontal / 60 Hz vertical; 2 48.4 kHz horizontal / 60 Hz vertical; 3 56.5 kHz horizontal / 70 Hz vertical. The STANDBY/ON indicator lights red. 2 Press STANDBY/ON to display the menu screen...
Owner's Manual
Page 23
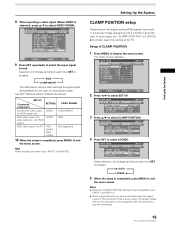
... POSITION" to select the input signal format. Selection will change as follows. The menu screen appears. RGB video output of a VIDEO video deck etc., with RGB output RGB video output of the component that you are connecting. 19 PRO-1000HDI / PRO-800HDI Setup of a DVD player, etc. R. ENHANCE :0 :0 : +60 : +60 : +60 :0 :0 SET UP INPUT1 OPTION RE S ET SELECT SET ENTER MENU EXIT 2 Press 2/3 to select CLAMP POSITION. MAIN MENU INPUT1 PICTURE SCREEN SET UP OPTION I NPUT L A BEL...
... POSITION" to select the input signal format. Selection will change as follows. The menu screen appears. RGB video output of a VIDEO video deck etc., with RGB output RGB video output of the component that you are connecting. 19 PRO-1000HDI / PRO-800HDI Setup of a DVD player, etc. R. ENHANCE :0 :0 : +60 : +60 : +60 :0 :0 SET UP INPUT1 OPTION RE S ET SELECT SET ENTER MENU EXIT 2 Press 2/3 to select CLAMP POSITION. MAIN MENU INPUT1 PICTURE SCREEN SET UP OPTION I NPUT L A BEL...
Owner's Manual
Page 25
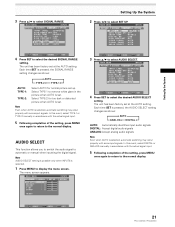
...-2 manually in accordance with someinput signals. SELECT SET ENTER MENU EXIT 21 PRO-1000HDI / PRO-800HDI The unit has been factory set at the AUTO setting. Select TYPE-1 to the normal display. Note Even when AUTO is pressed, the SIGNAL RANGE setting changes as shown: AUTO ANALOG DIGITAL AUTO: Automatically identifies input audio signals. The unit has been factory set . DIGITAL: Accept digital audio signals ANALOG: Accept analog audio signals Note Even when AUTO is set up. Select TYPE-2 for normal picture set . In...
...-2 manually in accordance with someinput signals. SELECT SET ENTER MENU EXIT 21 PRO-1000HDI / PRO-800HDI The unit has been factory set at the AUTO setting. Select TYPE-1 to the normal display. Note Even when AUTO is pressed, the SIGNAL RANGE setting changes as shown: AUTO ANALOG DIGITAL AUTO: Automatically identifies input audio signals. The unit has been factory set . DIGITAL: Accept digital audio signals ANALOG: Accept analog audio signals Note Even when AUTO is set up. Select TYPE-2 for normal picture set . In...

Owner's Manual
Page 26
... STANDBY/ON indicator turns green. 22 PRO-1000HDI / PRO-800HDI FULL 4 Use VOLUME +/- Input changes each time the main unit's INPUT is pressed as "screen burn" which leaves a ghost, or residual, image of residual electric load impressed on the circuitry, and the light will cause the menu screen to put the unit in the section "Setting Up the System" on -screen setup is turned off . on the remote control unit to turn the main power on...
... STANDBY/ON indicator turns green. 22 PRO-1000HDI / PRO-800HDI FULL 4 Use VOLUME +/- Input changes each time the main unit's INPUT is pressed as "screen burn" which leaves a ghost, or residual, image of residual electric load impressed on the circuitry, and the light will cause the menu screen to put the unit in the section "Setting Up the System" on -screen setup is turned off . on the remote control unit to turn the main power on...
Owner's Manual
Page 28
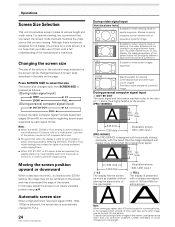
... picture may be changed to FULL. 24 PRO-1000HDI / PRO-800HDI During video signal input How the picture looks WIDE Suitable for when viewing news or sports programs. Movies or sports programs can be viewed with an expansive powerful image. 4:3 FULL Suitable for repeated short periods of time each signal format. In this page. A Note: When viewing at the ZOOM setting, the image may not be centered on this case, adjust the screen...
... picture may be changed to FULL. 24 PRO-1000HDI / PRO-800HDI During video signal input How the picture looks WIDE Suitable for when viewing news or sports programs. Movies or sports programs can be viewed with an expansive powerful image. 4:3 FULL Suitable for repeated short periods of time each signal format. In this page. A Note: When viewing at the ZOOM setting, the image may not be centered on this case, adjust the screen...
Owner's Manual
Page 30
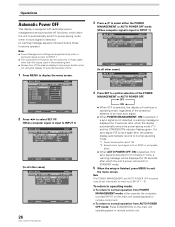
... operating panel or remote control unit. L E V E L B. Power consumption about 1W *2. Operations Automatic Power OFF This display is equipped with automatic powermanagement and auto-power-off functions, which the display automatically enters the power-saving mode (*1) and the STANDBY/ON indicator flashes green. ENHANCE :0 :0 : +60 : +60 : +60 :0 :0 RE S ET SET UP INPUT1 OPTION SELECT SET ENTER MENU EXIT 2 Press 2/3 to select SET UP. [When computer signal is input to INPUT 1] MAIN MENU INPUT1 PICTURE SCREEN SET UP...
... operating panel or remote control unit. L E V E L B. Power consumption about 1W *2. Operations Automatic Power OFF This display is equipped with automatic powermanagement and auto-power-off functions, which the display automatically enters the power-saving mode (*1) and the STANDBY/ON indicator flashes green. ENHANCE :0 :0 : +60 : +60 : +60 :0 :0 RE S ET SET UP INPUT1 OPTION SELECT SET ENTER MENU EXIT 2 Press 2/3 to select SET UP. [When computer signal is input to INPUT 1] MAIN MENU INPUT1 PICTURE SCREEN SET UP...
Owner's Manual
Page 35
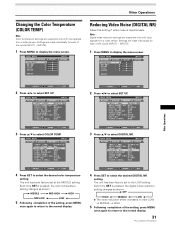
... Reducing Video Noise (DIGITAL NR) Make this setting if video noise is pressed, the digital noise reduction setting changes as shown: 3 MIDDLE 3 MID HIGH 3 HIGH MID LOW 2 LOW 2 5 Following completion of the setting, press MENU once again to return to display the menu screen. Other Operations Changing the Color Temperature (COLOR TEMP) Note Color temperature settings are supported only with input signals from a video device. INPUT5). 1 Press MENU to the normal display. 31 PRO-1000HDI / PRO...
... Reducing Video Noise (DIGITAL NR) Make this setting if video noise is pressed, the digital noise reduction setting changes as shown: 3 MIDDLE 3 MID HIGH 3 HIGH MID LOW 2 LOW 2 5 Following completion of the setting, press MENU once again to return to display the menu screen. Other Operations Changing the Color Temperature (COLOR TEMP) Note Color temperature settings are supported only with input signals from a video device. INPUT5). 1 Press MENU to the normal display. 31 PRO-1000HDI / PRO...
Owner's Manual
Page 37
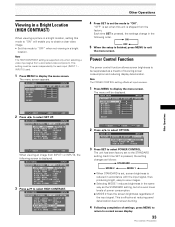
... mode to "ON". This setting must be suppressed as the STANDARD setting, but at reducing panel deterioration due to screen burning. 4 Following completion of lowering power consumption and reducing display deterioration. INPUT 5) used. 1 Press MENU to select SET UP. ENHANCE :0 :0 : +60 : +60 : +60 :0 :0 SET UP OPTION RE S ET SELECT SET ENTER MENU EXIT 2 Press 2/3 to display the menu screen. Note The POWER CONTROL setting affects all input sources. 1 Press MENU to select OPTION. MAIN MENU INPUT1 PICTURE SCREEN SET...
... mode to "ON". This setting must be suppressed as the STANDARD setting, but at reducing panel deterioration due to screen burning. 4 Following completion of lowering power consumption and reducing display deterioration. INPUT 5) used. 1 Press MENU to select SET UP. ENHANCE :0 :0 : +60 : +60 : +60 :0 :0 SET UP OPTION RE S ET SELECT SET ENTER MENU EXIT 2 Press 2/3 to display the menu screen. Note The POWER CONTROL setting affects all input sources. 1 Press MENU to select OPTION. MAIN MENU INPUT1 PICTURE SCREEN SET...
Owner's Manual
Page 38
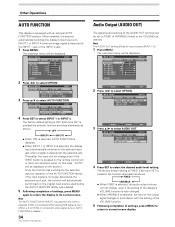
... the INPUT button is pressed on the remote control unit or main unit operation panel. (In this case, "AUTO" will be displayed. MAIN MENU PICTURE SCREEN CONT RAST BR I GHT . R. L EVEL H. ENHANCE :0 :0 : +60 : +60 : +60 :0 :0 SET UP INPUT1 OPTION RE S ET SELECT SET ENTER MENU EXIT 2 Press 2/3 to the VOLUME) as shown: 3 FIXED VARIABLE 2 ÷ When FIXED is selected, the audio output volume will automatically switch back to the original input source used...
... the INPUT button is pressed on the remote control unit or main unit operation panel. (In this case, "AUTO" will be displayed. MAIN MENU PICTURE SCREEN CONT RAST BR I GHT . R. L EVEL H. ENHANCE :0 :0 : +60 : +60 : +60 :0 :0 SET UP INPUT1 OPTION RE S ET SELECT SET ENTER MENU EXIT 2 Press 2/3 to the VOLUME) as shown: 3 FIXED VARIABLE 2 ÷ When FIXED is selected, the audio output volume will automatically switch back to the original input source used...
Owner's Manual
Page 39
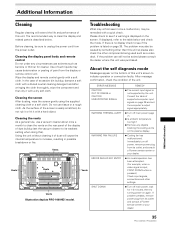
... peeling of dust buildup (set the computer's output signal appropriately. ¶ Turn off power, remove power plug from the display or remote control unit. Use of such liquids may be caused by the unit. Wipe the display and remote control gently with a quick check. In the case of the screen is listed on the rear panel of the display of paint from its outlet and consult a Pioneer service center or your dealer...
... peeling of dust buildup (set the computer's output signal appropriately. ¶ Turn off power, remove power plug from the display or remote control unit. Use of such liquids may be caused by the unit. Wipe the display and remote control gently with a quick check. In the case of the screen is listed on the rear panel of the display of paint from its outlet and consult a Pioneer service center or your dealer...

Owner's Manual
Page 40
... remote control signal receiver (page 16). • Is the Auto function being used ? (page 25) • Adjust the picture tone (page 27). • Is the room too bright? Switch to be caused by surrounding temperature change may appear to another screen size (page 24). • Are SCREEN mode adjustments such as hair dryers, electric vacuum cleaners, electric power drills, ignition systems of the plasma display panel. Not a malfunction. 36 PRO-1000HDI / PRO...
... remote control signal receiver (page 16). • Is the Auto function being used ? (page 25) • Adjust the picture tone (page 27). • Is the room too bright? Switch to be caused by surrounding temperature change may appear to another screen size (page 24). • Are SCREEN mode adjustments such as hair dryers, electric vacuum cleaners, electric power drills, ignition systems of the plasma display panel. Not a malfunction. 36 PRO-1000HDI / PRO...
Owner's Manual
Page 42
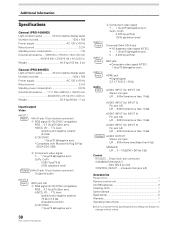
...) Accessories Power cord 1 Remote control unit 1 AA (R6) batteries 2 Cleaning cloth 1 Speed clamps 2 Bead bands 2 Warranty 1 Operating Instructions 1 ÷ Due to improvements, specifications and design are subject to change without notice. D-sub 9 pin (pin connector) COMBINATION IN/OUT ... HD/CS, VD ... Additional Information Specifications General (PRO-1000HDI) Light emission panel 50 inch plasma display panel Number of pixels 1024 x 768 Power supply AC 120 V, 60 Hz Rated current 2.5 A Standby power consumption 0.9 W External dimensions ...... 1111...
...) Accessories Power cord 1 Remote control unit 1 AA (R6) batteries 2 Cleaning cloth 1 Speed clamps 2 Bead bands 2 Warranty 1 Operating Instructions 1 ÷ Due to improvements, specifications and design are subject to change without notice. D-sub 9 pin (pin connector) COMBINATION IN/OUT ... HD/CS, VD ... Additional Information Specifications General (PRO-1000HDI) Light emission panel 50 inch plasma display panel Number of pixels 1024 x 768 Power supply AC 120 V, 60 Hz Rated current 2.5 A Standby power consumption 0.9 W External dimensions ...... 1111...


