
Owner's Manual
Page 5
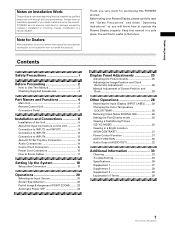
...PIONEER product. Before using your dealer install and set up the product. Contents Safety Precautions i Before Proceeding 2 How to Use This Manual 2 Checking Supplied Accessories 3 Part Names and Functions 4 Main Unit 4 Remote Control Unit 5 Connection Panel 6 Installation and Connections 8 Installation of Terms 39 1 PRO-1000HD / PRO...Partial Image Enlargement (POINT ZOOM) ......... 23 Automatic Power OFF 24 Display Panel Adjustments 25 Adjusting the Picture Quality 25 Adjusting the Image Position and Clock (Automatic Adjustment 26 Manual Adjustment of Screen Position and ...
...PIONEER product. Before using your dealer install and set up the product. Contents Safety Precautions i Before Proceeding 2 How to Use This Manual 2 Checking Supplied Accessories 3 Part Names and Functions 4 Main Unit 4 Remote Control Unit 5 Connection Panel 6 Installation and Connections 8 Installation of Terms 39 1 PRO-1000HD / PRO...Partial Image Enlargement (POINT ZOOM) ......... 23 Automatic Power OFF 24 Display Panel Adjustments 25 Adjusting the Picture Quality 25 Adjusting the Image Position and Clock (Automatic Adjustment 26 Manual Adjustment of Screen Position and ...
Owner's Manual
Page 6
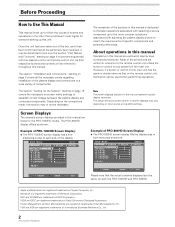
... MENU PICTURE SCREEN CONT RAST BR I GHT . L EVEL H. E NHANCE V. L EV EL G. L E V E L B. VESA and DDC are written in screen displays may vary depending on -screen menu settings to establish correct linkage between the plasma display and connected components. Power Management and Sun Microsystems are trademarks of International Business Machines Co., Inc. 2 PRO-1000HD / PRO-800HD...
... MENU PICTURE SCREEN CONT RAST BR I GHT . L EVEL H. E NHANCE V. L EV EL G. L E V E L B. VESA and DDC are written in screen displays may vary depending on -screen menu settings to establish correct linkage between the plasma display and connected components. Power Management and Sun Microsystems are trademarks of International Business Machines Co., Inc. 2 PRO-1000HD / PRO-800HD...

Owner's Manual
Page 7
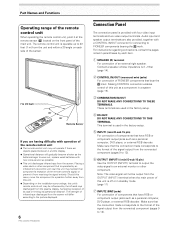
...a visual guide to display the menu screen. MAIN MENU PICTURE SCREEN POS I T I GHT . The screens shown at each step are provided as it should. L E V E L B. MAIN MENU PICTURE SCREEN CONT RAST BR I ON : CL OCK / PHASE... L EVEL G. POS I T I ON : 0 ADJUST MENU SET EXIT SET 5 Press 5/∞/2/3 to adjust the value. ÷ Operating Instructions ÷ Warranty 3 PRO-1000HD / PRO-800HD Before Proceeding Before Proceeding The following accessories were supplied. 1 Power cord 2 Remote control unit 3 AA (R6) batteries (x 2) VIDEO S-VIDEO SELECT SET ENTER MENU EXIT...
...a visual guide to display the menu screen. MAIN MENU PICTURE SCREEN POS I T I GHT . The screens shown at each step are provided as it should. L E V E L B. MAIN MENU PICTURE SCREEN CONT RAST BR I ON : CL OCK / PHASE... L EVEL G. POS I T I ON : 0 ADJUST MENU SET EXIT SET 5 Press 5/∞/2/3 to adjust the value. ÷ Operating Instructions ÷ Warranty 3 PRO-1000HD / PRO-800HD Before Proceeding Before Proceeding The following accessories were supplied. 1 Power cord 2 Remote control unit 3 AA (R6) batteries (x 2) VIDEO S-VIDEO SELECT SET ENTER MENU EXIT...
Owner's Manual
Page 10
Placing a video deck or other component. The strength of infrared rays discharged from the screen will differ according to the picture displayed. 6 PRO-1000HD / PRO-800HD Connection Panel The connection panel is off or in standby mode. (page 11) 7 INPUT2 (BNC jacks) For connection of components... in a system (page 15). 3 COMBINATION IN/OUT DO NOT MAKE ANY CONNECTIONS TO THESE TERMINALS. Make sure that the connection made corresponds to PIONEER components bearing the Î mark. This terminal is operable up to 23 feet (7 m) from the unit and within a 30 angle on the ...
Placing a video deck or other component. The strength of infrared rays discharged from the screen will differ according to the picture displayed. 6 PRO-1000HD / PRO-800HD Connection Panel The connection panel is off or in standby mode. (page 11) 7 INPUT2 (BNC jacks) For connection of components... in a system (page 15). 3 COMBINATION IN/OUT DO NOT MAKE ANY CONNECTIONS TO THESE TERMINALS. Make sure that the connection made corresponds to PIONEER components bearing the Î mark. This terminal is operable up to 23 feet (7 m) from the unit and within a 30 angle on the ...
Owner's Manual
Page 14
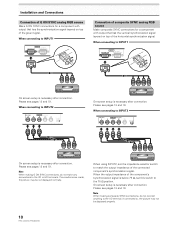
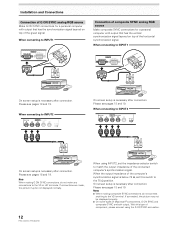
... Please see pages 18 and 19. Note When making G ON SYNC connections, do not connect anything to , the picture may be displayed properly. 10 PRO-1000HD / PRO-800HD If connected to the VD terminal. Note When making composite SYNC connections, do not make any connections to INPUT2 (...connecting to the 75 Ω position. When the output impedance of the connected component's synchronization signal. If connections are made, the picture may not be not displayed normally. Installation and Connections Connection of G ON SYNC analog RGB source Make G ON SYNC connections for ...
... Please see pages 18 and 19. Note When making G ON SYNC connections, do not connect anything to , the picture may be displayed properly. 10 PRO-1000HD / PRO-800HD If connected to the VD terminal. Note When making composite SYNC connections, do not make any connections to INPUT2 (...connecting to the 75 Ω position. When the output impedance of the connected component's synchronization signal. If connections are made, the picture may not be not displayed normally. Installation and Connections Connection of G ON SYNC analog RGB source Make G ON SYNC connections for ...
Owner's Manual
Page 16
... not be displayed properly. ÷ On some types of Macintosh® components, G ON SYNC and composite SYNC are made, the picture may be not displayed normally. 12 PRO-1000HD / PRO-800HD When using the G ON SYNC connection. When connecting to the 75 Ω position. Installation and Connections Connection of G ON SYNC analog RGB source...
... not be displayed properly. ÷ On some types of Macintosh® components, G ON SYNC and composite SYNC are made, the picture may be not displayed normally. 12 PRO-1000HD / PRO-800HD When using the G ON SYNC connection. When connecting to the 75 Ω position. Installation and Connections Connection of G ON SYNC analog RGB source...

Owner's Manual
Page 22
... other than a personal computer is necessary. The STANDBY/ON indicator lights red. 2 Press STANDBY/ON to the type of components connected. L EVEL H. MAIN MENU INPUT1 PICTURE SET UP OPTION I NPUT L ABEL : I NPUT 1 AUT O P OWER OF F : OF F COL OR T EMP : M I DDL E D I G I T AL NR : L OW H I...only when inputting a video signal. ENHANCE :0 :0 : +60 : +60 : +60 :0 :0 SET UP INPUT1 OPTION RE S ET SELECT 18 PRO-1000HD / PRO-800HD SET ENTER MENU EXIT 5 Press 2/3 to display the menu screen. The menu screen appears. E NHANCE V. Setting Up the System Setup after ...
... other than a personal computer is necessary. The STANDBY/ON indicator lights red. 2 Press STANDBY/ON to the type of components connected. L EVEL H. MAIN MENU INPUT1 PICTURE SET UP OPTION I NPUT L ABEL : I NPUT 1 AUT O P OWER OF F : OF F COL OR T EMP : M I DDL E D I G I T AL NR : L OW H I...only when inputting a video signal. ENHANCE :0 :0 : +60 : +60 : +60 :0 :0 SET UP INPUT1 OPTION RE S ET SELECT 18 PRO-1000HD / PRO-800HD SET ENTER MENU EXIT 5 Press 2/3 to display the menu screen. The menu screen appears. E NHANCE V. Setting Up the System Setup after ...
Owner's Manual
Page 23
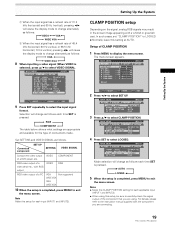
... POSITION" to LOCKED. ÷ Normally, leave this setup for each input (INPUT1 and INPUT2). The menu screen appears. R. E NHANCE V. L EVEL G. MAIN MENU INPUT1 PICTURE SCREEN SET UP OPTION I NPUT L ABEL : I NPUT 1 POWE R MA NAGEME NT : OF F CL AMP P OS I T I ON : A U TO SETT... of the component that you are using. For details, please refer to the instruction manual supplied with the component you are connecting. 19 PRO-1000HD / PRO-800HD MAIN MENU INPUT1 PICTURE SET UP OPTION I NPUT L ABEL : I NPUT 1 AUT O P O WER OF F : OF F COL OR T EMP : M I DDL E D I G I T...
... POSITION" to LOCKED. ÷ Normally, leave this setup for each input (INPUT1 and INPUT2). The menu screen appears. R. E NHANCE V. L EVEL G. MAIN MENU INPUT1 PICTURE SCREEN SET UP OPTION I NPUT L ABEL : I NPUT 1 POWE R MA NAGEME NT : OF F CL AMP P OS I T I ON : A U TO SETT... of the component that you are using. For details, please refer to the instruction manual supplied with the component you are connecting. 19 PRO-1000HD / PRO-800HD MAIN MENU INPUT1 PICTURE SET UP OPTION I NPUT L ABEL : I NPUT 1 AUT O P O WER OF F : OF F COL OR T EMP : M I DDL E D I G I T...

Owner's Manual
Page 24
... the remote control unit or the main unit to select the input. The STANDBY/ON indicator turns green. 20 PRO-1000HD / PRO-800HD FULL 4 Use VOLUME +/- CAUTION Please do not leave the same picture displayed on the circuitry, and the light will blink and then remain lit (red) indicating that the standby mode is...
... the remote control unit or the main unit to select the input. The STANDBY/ON indicator turns green. 20 PRO-1000HD / PRO-800HD FULL 4 Use VOLUME +/- CAUTION Please do not leave the same picture displayed on the circuitry, and the light will blink and then remain lit (red) indicating that the standby mode is...

Owner's Manual
Page 26
...Definition Television signal (1080i, 720p, 1080p) is detected, the screen size is automatically changed to FULL. 22 PRO-1000HD / PRO-800HD During video signal input How the picture looks WIDE Suitable for when viewing news or sports programs. Movies or sports programs can be slightly different each ...ratio of 1:1 and is thus highly faithful to the source. [PRO-1000HD] A 480 lines 768 lines 640 dots 1280 dots (Illustration shows 640 x 480 input.) [PRO-800HD] * The PRO-800HD is used to display a non-wide screen 4:3 picture fully on this case, adjust the screen to select the size...
...Definition Television signal (1080i, 720p, 1080p) is detected, the screen size is automatically changed to FULL. 22 PRO-1000HD / PRO-800HD During video signal input How the picture looks WIDE Suitable for when viewing news or sports programs. Movies or sports programs can be slightly different each ...ratio of 1:1 and is thus highly faithful to the source. [PRO-1000HD] A 480 lines 768 lines 640 dots 1280 dots (Illustration shows 640 x 480 input.) [PRO-800HD] * The PRO-800HD is used to display a non-wide screen 4:3 picture fully on this case, adjust the screen to select the size...

Owner's Manual
Page 28
... CHANGE MENU EXIT [In all other cases] MAIN MENU INPUT2 PICTURE SCREEN SET UP OPTION I NPUT L A BEL : I NPUT 2 A UTO POWE R OF F : OF F CL AMP P OS I T I ON : AU T O SETT I NG : VGA SELECT SET ENTER MENU EXIT 24 PRO-1000HD / PRO-800HD 3 Press 5/∞ to select either operate the computer,... normal operation from POWER MANAGEMENT mode: either the POWER MANAGEMENT or AUTO POWER OFF mode. [When computer signal is input to INPUT 1] MAIN MENU INPUT1 PICTURE SCREEN SET UP OPTION I NPUT L A BEL : I NPUT 1 POWE R MA NAGEME NT : OF F CL AMP P OS I T I ON : AU T O SETT I NG...
... CHANGE MENU EXIT [In all other cases] MAIN MENU INPUT2 PICTURE SCREEN SET UP OPTION I NPUT L A BEL : I NPUT 2 A UTO POWE R OF F : OF F CL AMP P OS I T I ON : AU T O SETT I NG : VGA SELECT SET ENTER MENU EXIT 24 PRO-1000HD / PRO-800HD 3 Press 5/∞ to select either operate the computer,... normal operation from POWER MANAGEMENT mode: either the POWER MANAGEMENT or AUTO POWER OFF mode. [When computer signal is input to INPUT 1] MAIN MENU INPUT1 PICTURE SCREEN SET UP OPTION I NPUT L A BEL : I NPUT 1 POWE R MA NAGEME NT : OF F CL AMP P OS I T I ON : AU T O SETT I NG...

Owner's Manual
Page 29
... setup is input] CONTRAST Adjust according to select the adjustment item, then press SET. SHARP Normally set default. 25 PRO-1000HD /PRO-800HD BRIGHT Adjust so that the dark parts of blue in the PICTURE mode. [When video signal is finished, press MENU to the center position. G. LEVEL Adjust the amount of green in...
... setup is input] CONTRAST Adjust according to select the adjustment item, then press SET. SHARP Normally set default. 25 PRO-1000HD /PRO-800HD BRIGHT Adjust so that the dark parts of blue in the PICTURE mode. [When video signal is finished, press MENU to the center position. G. LEVEL Adjust the amount of green in...
Owner's Manual
Page 30
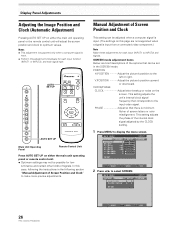
...unit will adjust the screen position and clock to make more precise adjustments. MAIN MENU PICTURE SCREEN CONT RAST BR I ON : CL OCK / PHASE : SET UP 0/ 0 0/ 0 RE S ET INPUT1 OPTION 26 PRO-1000HD / PRO-800HD SELECT SET ENTER MENU EXIT L EVEL G. L EVEL H. This setting adjusts ...is minimum flicker of Screen Position and Clock" to optimum values. This setting adjusts the phase of signals. V.POSITION Adjust the picture's position upward or downward. CLOCK/PHASE CLOCK Adjust letter breakup or noise on this case, following section "Manual Adjustment of ...
...unit will adjust the screen position and clock to make more precise adjustments. MAIN MENU PICTURE SCREEN CONT RAST BR I ON : CL OCK / PHASE : SET UP 0/ 0 0/ 0 RE S ET INPUT1 OPTION 26 PRO-1000HD / PRO-800HD SELECT SET ENTER MENU EXIT L EVEL G. L EVEL H. This setting adjusts ...is minimum flicker of Screen Position and Clock" to optimum values. This setting adjusts the phase of signals. V.POSITION Adjust the picture's position upward or downward. CLOCK/PHASE CLOCK Adjust letter breakup or noise on this case, following section "Manual Adjustment of ...

Owner's Manual
Page 31
... returned to the factory set default. NO SELECT SET SET MENU EXIT 2 Press 2/3 to select the adjustment item, then press SET. Display Panel Adjustments 27 PRO-1000HD /PRO-800HD POS I T I ON : CL OCK / PHASE : SET UP 0/ 0 0/ 0 INPUT1 OPTION RE S ET Display Panel Adjustments To reset SCREEN ...mode settings to the default If settings have to be displayed properly. All SCREEN mode settings are adjusted excessively, the picture may prove more beneficial to reset the SCREEN mode to select RESET, then press SET. SCREE N YES RESET ? Pressing SET ...
... returned to the factory set default. NO SELECT SET SET MENU EXIT 2 Press 2/3 to select the adjustment item, then press SET. Display Panel Adjustments 27 PRO-1000HD /PRO-800HD POS I T I ON : CL OCK / PHASE : SET UP 0/ 0 0/ 0 INPUT1 OPTION RE S ET Display Panel Adjustments To reset SCREEN ...mode settings to the default If settings have to be displayed properly. All SCREEN mode settings are adjusted excessively, the picture may prove more beneficial to reset the SCREEN mode to select RESET, then press SET. SCREE N YES RESET ? Pressing SET ...

Owner's Manual
Page 32
... SET MENU EXIT 6 After setting all inputs as desired, press 2/3/5/∞ to select END , followed by SET. MAIN MENU PICTURE SCREEN CONT RAST BR I NG : VGA SELECT SET ENTER MENU EXIT 4 Press SET to maximum of the screen contents displayed ...rewrite the default "INPUT 1" message to display "COMPUTER" instead. 1 Press INPUT and set input to INPUT 1. 2 Press MENU to select SET UP. MAIN MENU COMPUTER PICTURE SCREEN SET UP OPTION I NPUT L A BEL : COMP U T E R POWE R MA NAGEME NT : OF F CL AMP P OS I T I ON... display to the normal display screen. 28 PRO-1000HD / PRO-800HD
... SET MENU EXIT 6 After setting all inputs as desired, press 2/3/5/∞ to select END , followed by SET. MAIN MENU PICTURE SCREEN CONT RAST BR I NG : VGA SELECT SET ENTER MENU EXIT 4 Press SET to maximum of the screen contents displayed ...rewrite the default "INPUT 1" message to display "COMPUTER" instead. 1 Press INPUT and set input to INPUT 1. 2 Press MENU to select SET UP. MAIN MENU COMPUTER PICTURE SCREEN SET UP OPTION I NPUT L A BEL : COMP U T E R POWE R MA NAGEME NT : OF F CL AMP P OS I T I ON... display to the normal display screen. 28 PRO-1000HD / PRO-800HD
Owner's Manual
Page 33
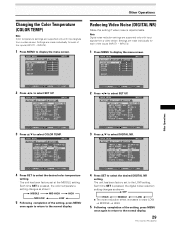
... pressed, the digital noise reduction setting changes as shown: 3 MIDDLE 3 MID HIGH 3 HIGH MID LOW 2 LOW 2 5 Following completion of the inputs (INPUT1 - MAIN MENU INPUT1 PICTURE SET UP OPTION I NPUT L ABEL : I NPUT 1 AUT O P OWER OF F : OF F COL OR T EMP : M I DDL E D I G I T AL NR : L OW H I GH CON TRAS T...reduction settings are made individually for each of the setting, press MENU once again to return to the normal display. 29 PRO-1000HD / PRO-800HD The unit has been factory set to select DIGITAL NR. INPUT4). 1 Press MENU to select the desired color ...
... pressed, the digital noise reduction setting changes as shown: 3 MIDDLE 3 MID HIGH 3 HIGH MID LOW 2 LOW 2 5 Following completion of the inputs (INPUT1 - MAIN MENU INPUT1 PICTURE SET UP OPTION I NPUT L ABEL : I NPUT 1 AUT O P OWER OF F : OF F COL OR T EMP : M I DDL E D I G I T AL NR : L OW H I GH CON TRAS T...reduction settings are made individually for each of the setting, press MENU once again to return to the normal display. 29 PRO-1000HD / PRO-800HD The unit has been factory set to select DIGITAL NR. INPUT4). 1 Press MENU to select the desired color ...

Owner's Manual
Page 34
... : V I DEO V I DEO S I O N 4 Press SET to set to OFF, only standard progressive conversion is used . 1 Press MENU to select the desired PureCinema mode. MAIN MENU INPUT4 PICTURE SET UP OPTION I NPUT L ABEL : I NPUT 4 AUT O P OWER OF F : OF F COL OR T EMP : M I DDL E D I G I T AL NR : LOW H I GH CON TRAS T... time SET is shipped from the factory. MAIN MENU INPUT4 PICTURE CONT RAST BR I NT S H ARP :0 :0 :0 :0 :0 OPTION INPUT1 RE S ET 2 Press 2/3 to the normal display. 30 PRO-1000HD / PRO-800HD Viewing a Fast Moving Picture (3D Y/C MODE) When viewing a fast moving...
... : V I DEO V I DEO S I O N 4 Press SET to set to OFF, only standard progressive conversion is used . 1 Press MENU to select the desired PureCinema mode. MAIN MENU INPUT4 PICTURE SET UP OPTION I NPUT L ABEL : I NPUT 4 AUT O P OWER OF F : OF F COL OR T EMP : M I DDL E D I G I T AL NR : LOW H I GH CON TRAS T... time SET is shipped from the factory. MAIN MENU INPUT4 PICTURE CONT RAST BR I NT S H ARP :0 :0 :0 :0 :0 OPTION INPUT1 RE S ET 2 Press 2/3 to the normal display. 30 PRO-1000HD / PRO-800HD Viewing a Fast Moving Picture (3D Y/C MODE) When viewing a fast moving...
Owner's Manual
Page 35
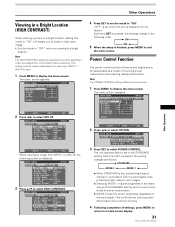
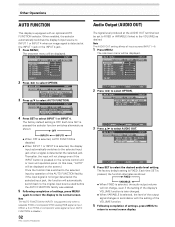
... consumption. ÷ MODE 2 fixes the screen brightness regardless of settings, press MENU to return to normal screen display. 31 PRO-1000HD / PRO-800HD The menu screen appears. Each time SET is pressed, the settings change in a bright location. Power Control Function The ... OF F P URE C I NEMA : OFF 3 D Y / C MODE : MOT I O N SELECT SET ENTER MENU EXIT When viewing an image from the factory. E NHANCE V. MAIN MENU INPUT1 PICTURE SCREEN SET UP OPTION POWER CONT R OL : S T A NDA RD AUT O F U NCT I ON : OF F AUD I O OUT :F I GNAL : RGB 3 Press 5/∞ to select...
... consumption. ÷ MODE 2 fixes the screen brightness regardless of settings, press MENU to return to normal screen display. 31 PRO-1000HD / PRO-800HD The menu screen appears. Each time SET is pressed, the settings change in a bright location. Power Control Function The ... OF F P URE C I NEMA : OFF 3 D Y / C MODE : MOT I O N SELECT SET ENTER MENU EXIT When viewing an image from the factory. E NHANCE V. MAIN MENU INPUT1 PICTURE SCREEN SET UP OPTION POWER CONT R OL : S T A NDA RD AUT O F U NCT I ON : OF F AUD I O OUT :F I GNAL : RGB 3 Press 5/∞ to select...
Owner's Manual
Page 36
... completion of the display's VOLUME function is later changed. ÷ When VARIABLE is disable.) 32 PRO-1000HD / PRO-800HD Audio Output (AUDIO OUT) The signal level produced at the AUDIO OUT terminal can be displayed. MAIN MENU INPUT1 PICTURE SCREEN SET UP OPTION POWER CONT R OL : S T A NDA RD AUT O F U NCT I ON : OF F AUD I O OUT...
... completion of the display's VOLUME function is later changed. ÷ When VARIABLE is disable.) 32 PRO-1000HD / PRO-800HD Audio Output (AUDIO OUT) The signal level produced at the AUDIO OUT terminal can be displayed. MAIN MENU INPUT1 PICTURE SCREEN SET UP OPTION POWER CONT R OL : S T A NDA RD AUT O F U NCT I ON : OF F AUD I O OUT...
Owner's Manual
Page 38
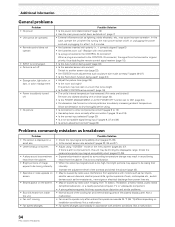
..., etc., may cause improper operation. Not a malfunction. 34 PRO-1000HD / PRO-800HD Additional Information General problems Problem • No power • Unit cannot be operated. • Remote control does not operate. • INPUT is not changed. • Picture is cut off. • Strange color, light color, or... thus disabling the remote control signal receiver (page 15). • Is the Auto function being used ? (page 23) • Adjust the picture tone (page 25). • Is the room too bright? If there is sometimes heard from TV station, FM station, amateur radios, public...
..., etc., may cause improper operation. Not a malfunction. 34 PRO-1000HD / PRO-800HD Additional Information General problems Problem • No power • Unit cannot be operated. • Remote control does not operate. • INPUT is not changed. • Picture is cut off. • Strange color, light color, or... thus disabling the remote control signal receiver (page 15). • Is the Auto function being used ? (page 23) • Adjust the picture tone (page 25). • Is the room too bright? If there is sometimes heard from TV station, FM station, amateur radios, public...


