Pioneer PDA-5004 - Monitor Terminal Expansion Board Support and Manuals
Get Help and Manuals for this Pioneer item
View All Support Options Below
Free Pioneer PDA-5004 manuals!
Problems with Pioneer PDA-5004?
Ask a Question
Free Pioneer PDA-5004 manuals!
Problems with Pioneer PDA-5004?
Ask a Question
Most Recent Pioneer PDA-5004 Questions

I'm Looking For A Pda-5003/pda-5004 Pioneer To Buy !?
(Posted by trygveth 10 years ago)
Popular Pioneer PDA-5004 Manual Pages
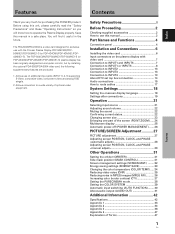
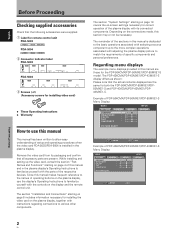
Operating Instructions - Page 2
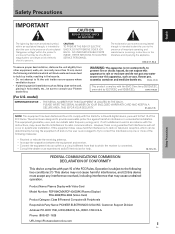
NO USER-SERVICEABLE PARTS INSIDE. Avoid the following installations which will not occur in a particular installation.
D3-4-2-1-9b_En
[For U.S. D8-10-1-2_En
FEDERAL COMMUNICATIONS COMMISSION DECLARATION OF CONFORMITY
This device complies with Video Card
Model Number: PDP-504CMX/PDP-434CMX (Plasma Display) PDA-5003/PDA-5004 (Video Card)
Product Category: Class B Personal Computers & ...
Operating Instructions - Page 4
The PDA-5003/PDA-5004 is a video card designed for purchasing this manual in the future. The PDP-504CMX/PDP-50MXE1/PDP-50MXE1-S (or PDP-434CMX/PDP-43MXE1/PDP-43MXE1-S) plasma display has been originally designed as a computer monitor, but by installing the optional PDA-5003/PDA-5004 video card, the following supplementary features are produced:
1. Allows connection to a wide variety of ...
Operating Instructions - Page 5
... has been written to match the requirements of setup and operating procedures when the video card PDA-5003/PDA-5004 is installed in the plasma display's Operating Instructions to familiarize yourself with the parts of operating buttons on the plasma display, use this manual are the same for installing the video card on page 6 includes information necessary for both the PDP-504CMX/PDP...
Operating Instructions - Page 7
... jack to these connectors without first consulting your Pioneer installation technician. English
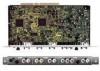
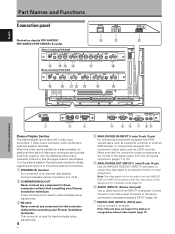
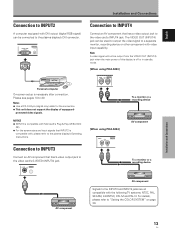
Part Names and Functions
Connection panel
POWER
OFF
ON
AC IN
Illustration depicts PDP-504CMX/ PDP-50MXE1/PDP-50MXE1-S model. ANALOG RGB
INPUT5
AUDIO
IN
OUT
R
L
G(ON SYNC)
B
R
HD (H/V SYNC) VD
R
L
~ !@ #
When installing PDA-5004
S-VIDEO
INPUT3
AUDIO VIDEO
INPUT4
$
COMPONENT...
Operating Instructions - Page 8
...end to obtain sound when INPUT5 is selected. Video Card Section The video card is provided with 3 video input connectors, 1 video output connector, and 3 audio input connectors. Connect a speaker that have component video output jacks such as a video deck, video camera, laser disc player, or DVD recorder (page 11).
& AUDIO R/L (INPUT3) (RCA Pin jacks)
Use to obtain sound when INPUT4...
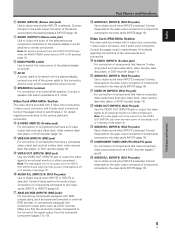
Operating Instructions - Page 9
...(ON SYNC) G
ANALOG RGB
(H/V SYNC)
B
R
HD
VD
AUDIO
R
L
PDA-5003 PDA-5004
RGB (BNC) COMPONENT
Note Use a soft cloth to secure the card in
alignment with the two rails visible inside the plasma display, immediately consult your body.
Installation and Connections
English
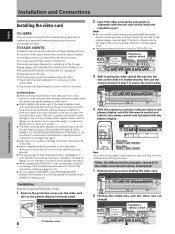
Installation and Connections
Installing the video card
TO USERS:
This component is sold with the understanding...
Operating Instructions - Page 10
... the plasma display's Operating Instructions. After connections are also compatible with INPUT5.
Please see pages 18 to 20 for information regarding signals and display formats supported by INPUT1 and INPUT5.
*1 Although INPUT1 and INPUT5 are compatible with various kinds of the computer, this video card (pages 7 to 16). I When using PDA-5004
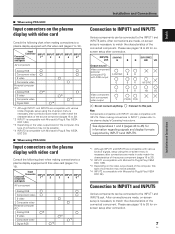
Input connectors on the plasma display...
Operating Instructions - Page 16
... device
[When using PDA-5004]
VIDEO
INPUT4
IN
OUT
AV component
To a monitor or a recording device
Installation and Connections
AV component
AV component
Signals to the INPUT3 and INPUT4 jacks are all compatible with , please refer to the plasma display's DVI connector.
Note A video signal will not be connected to the plasma display's Operating Instructions. Please see...
Operating Instructions - Page 23
... COMPONENT2 RGB
Not supported
9 When the setup is pressed:
3 RGB 3 COMPONENT1
COMPONENT22
The table below shows what settings are appropriate and available for each time the SET button is completed, press MENU to exit
the menu screen. For details, please refer to the instruction manual supplied with the component you are connecting.
Component video output from digital...
Operating Instructions - Page 29
... INPUT5 (PDA-5003 only), or when INPUT2 is displayed on the remote control unit.
INPUT MENU
INPUT
2/3 SET
MENU 2/3
SET
Display operating panel
Remote control unit
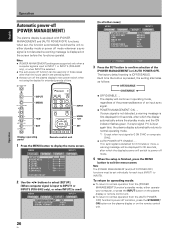
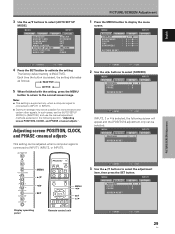
1 Press the MENU button to confirm selection of the
[POWER MANAGEMENT] or [AUTO POWER OFF]. E N H A N C E
:
SETUP
0 0 0 0 0 0 0
INPUT1 OPTION
PICTURE RESET
2 Use the 2/3 buttons to select [SETUP].
[When computer signal is...
Operating Instructions - Page 31
...COLOR
:
TINT
:
SHARPNESS
:
SETUP
0 0 0 0 0
INPUT1 OPTION
PICTURE RESET
SET ENTER
MENU EXIT
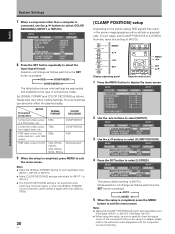
2 Use the 2/3 buttons to display the menu
screen. MENU 5/∞
2/3 SET
MENU 2/3
SET 5/∞
Display operating panel
...SET UP button on either the display or remote control unit. AUTO SET UP
Notes ÷ This setting is supported only when a computer signal is pressed, the optimum settings...
Operating Instructions - Page 32
... RESET
Display operating panel
Remote control unit
SET ENTER
MENU EXIT
29
En MENU
INPUT1
PICTURE SCREEN
SETUP
OPTION
LANGUAGE ENERGY SAVE SCREEN MGT. Each time the button is [INACTIVE]. Notes ÷ This setting is supported only when a computer signal is
connected to [INACTIVE], and use the manual adjustment methods explained in the following screen will...
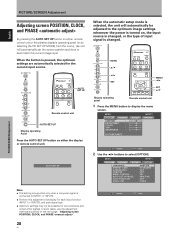
Operating Instructions - Page 38
... input signal from a video component.
Note [COLOR TEMP.] settings are supported only for each input (INPUT1, INPUT3 to display the menu screen.
MENU
INPUT1
PICTURE SCREEN
SETUP
OPTION
AUTO POWER OFF COLOR TEMP. MENU
INPUT1
PICTURE SCREEN
SETUP
OPTION
AUTO POWER OFF COLOR TEMP. Other Operations
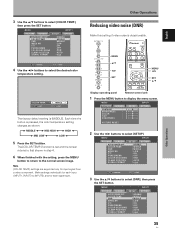
Reducing video noise (DNR)
Make this setting if video noise is pressed...
Operating Instructions - Page 39
...
MENU EXIT
3 Use the 5/∞ buttons to display the menu screen.
Note [DNR] settings are supported only for input signal from a video component. Note [MPEG NR] settings are supported only for input signal from a video component. MENU
INPUT3
PICTURE SCREEN
SETUP
OPTION
AUTO POWER OFF COLOR TEMP. MENU
PICTURE SCREEN
AUTO POWER OFF COLOR TEMP.
Other Operations...
Operating Instructions - Page 40

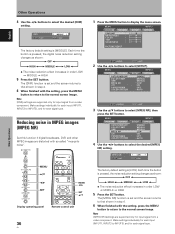
... PURECINEMA COLOR SYSTEM
INPUT3
SETUP
OPTION
: DISABLE
: MIDDLE : MIDDLE
: LOW : ON
: OFF : AUTO
CTI SET S E T
:
ON
MENU E X I T
The factory default setting is set and the screen returns to that shown in step 4.
6 When finished with the setting, press the MENU
button to return to select the desired [CTI]
setting. Note [CTI] settings are supported only for each input...
Pioneer PDA-5004 Reviews
We have not received any reviews for Pioneer yet.