
Owner's Manual
Page 6
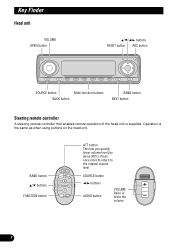
... button VOLUME Raise or lower the volume. 5 BAND button 5/∞ buttons FUNCTION button ATT button This lets you quickly lower volume level (by about 90%). Press once more to return to the original volume level. Key Finder Head unit VOLUME OPEN button 5/∞/2/3 buttons RESET button REC button SOURCE button Multi...
... button VOLUME Raise or lower the volume. 5 BAND button 5/∞ buttons FUNCTION button ATT button This lets you quickly lower volume level (by about 90%). Press once more to return to the original volume level. Key Finder Head unit VOLUME OPEN button 5/∞/2/3 buttons RESET button REC button SOURCE button Multi...
Owner's Manual
Page 10
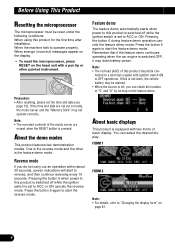
... when the RESET button is set to ACC or ON cancels the reverse mode. About the demo modes This product features two demonstration modes. Pressing the button 5 when power to a terminal coupled with two forms of this product is switched off while the ignition switch is the feature...displays This product is off, you do not carry out an operation within about 30 seconds, screen indications will start to start the reverse mode. Press the button 6 again to reverse, and then continue reversing every 10 seconds. If this product for the first time after installation. Precaution: •...
... when the RESET button is set to ACC or ON cancels the reverse mode. About the demo modes This product features two demonstration modes. Pressing the button 5 when power to a terminal coupled with two forms of this product is switched off while the ignition switch is the feature...displays This product is off, you do not carry out an operation within about 30 seconds, screen indications will start to start the reverse mode. Press the button 6 again to reverse, and then continue reversing every 10 seconds. If this product for the first time after installation. Precaution: •...
Owner's Manual
Page 12
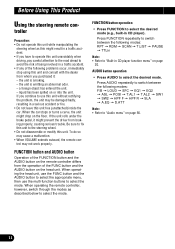
... "Audio menu" on page 20. liquid has been spilled on the head unit. When the car stops or turns a curve, the unit might result in CD player). Press FUNCTION repeatedly to switch between the following modes: F/B = LOUD = SFC = EQ1 = EQ2 = ASL = POSI = T.AL1 = T.AL2 = SW1 = SW2 = HPF F = HPF R = ... when driving, pay careful attention to the road ahead to avoid the risk of being involved in CD player function menu" on page 56. 11 FUNCTION button operation • Press FUNCTION to select the desired mode. troller Precaution: • Do not operate this unit without rectifying...
... "Audio menu" on page 20. liquid has been spilled on the head unit. When the car stops or turns a curve, the unit might result in CD player). Press FUNCTION repeatedly to switch between the following modes: F/B = LOUD = SFC = EQ1 = EQ2 = ASL = POSI = T.AL1 = T.AL2 = SW1 = SW2 = HPF F = HPF R = ... when driving, pay careful attention to the road ahead to avoid the risk of being involved in CD player function menu" on page 56. 11 FUNCTION button operation • Press FUNCTION to select the desired mode. troller Precaution: • Do not operate this unit without rectifying...
Owner's Manual
Page 13
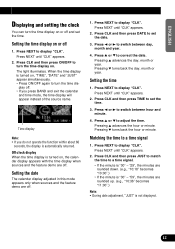
... the time display will appear instead of the source name. Press NEXT to display "CLK". Pressing ∞ turns back the day, month or year. Press NEXT until "CLK" appears. 2. When the time display is not displayed. Press 2 or 3 to turn the time display off . FRAN... "TIME", "DATE" and "JUST" appear simultaneously. • Press ON/OFF again to switch between hour and minute. 4. Press 5 or ∞ to set the date. 3. Press CLK and then press TIME to correct the date. Press NEXT until "CLK" appears. 2. Press NEXT until "CLK" appears. 2. Time display Note: • ...
... the time display will appear instead of the source name. Press NEXT to display "CLK". Pressing ∞ turns back the day, month or year. Press NEXT until "CLK" appears. 2. When the time display is not displayed. Press 2 or 3 to turn the time display off . FRAN... "TIME", "DATE" and "JUST" appear simultaneously. • Press ON/OFF again to switch between hour and minute. 4. Press 5 or ∞ to set the date. 3. Press CLK and then press TIME to correct the date. Press NEXT until "CLK" appears. 2. Press NEXT until "CLK" appears. 2. Time display Note: • ...

Owner's Manual
Page 14
Press OPEN to open , it may result in injury in the event of an accident. • Do not drive with the front panel left removed, it . ...
Press OPEN to open , it may result in injury in the event of an accident. • Do not drive with the front panel left removed, it . ...

Owner's Manual
Page 15
... of basic functions by this product. To retract VOLUME, press it becomes easier to turn the source off . (Refer to page 64.) • When this product's blue/white lead is connected to a Pioneer product (such as one available in CD player (MP3) = TV tuner = Tuner = DAB ...tuner = Music server = "Memory Stick" player = Multi-CD player = External unit 1 = External unit 2 = AUX 2. Press SOURCE to adjust the volume. 4. Note: • External...
... of basic functions by this product. To retract VOLUME, press it becomes easier to turn the source off . (Refer to page 64.) • When this product's blue/white lead is connected to a Pioneer product (such as one available in CD player (MP3) = TV tuner = Tuner = DAB ...tuner = Music server = "Memory Stick" player = Multi-CD player = External unit 1 = External unit 2 = AUX 2. Press SOURCE to adjust the volume. 4. Note: • External...

Owner's Manual
Page 16
... do not operate the function within about 30 seconds, the display is automatically returned. The light illuminates. • Press RDM again to turn random play " function of the built-in CD player). Note: • When the source is the Tuner, TV tuner or DAB tuner and no function is... indicated for a button, that the multi-function buttons have functions other than those currently displayed. Press NEXT repeatedly until "FUNC" appears. 2. When ...
... do not operate the function within about 30 seconds, the display is automatically returned. The light illuminates. • Press RDM again to turn random play " function of the built-in CD player). Note: • When the source is the Tuner, TV tuner or DAB tuner and no function is... indicated for a button, that the multi-function buttons have functions other than those currently displayed. Press NEXT repeatedly until "FUNC" appears. 2. When ...
Owner's Manual
Page 18
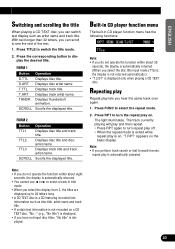
...the following bands: FM-1 = FM-2 = FM-3 = AM 5. The frequencies move up or down step by step. • If you press and hold 2 or 3, you can easily store up to store in memory. 17 Seek tuning lets you skip broadcasting stations until the preset number... stops flashing. Storing and recalling broadcast stations If you press any of the buttons 1 - 6, you release the button. Storing broadcast stations 1. Note: • The stereo indicator "" lights when a stereo sta- "6" ...
...the following bands: FM-1 = FM-2 = FM-3 = AM 5. The frequencies move up or down step by step. • If you press and hold 2 or 3, you can easily store up to store in memory. 17 Seek tuning lets you skip broadcasting stations until the preset number... stops flashing. Storing and recalling broadcast stations If you press any of the buttons 1 - 6, you release the button. Storing broadcast stations 1. Note: • The stereo indicator "" lights when a stereo sta- "6" ...

Owner's Manual
Page 19
...the storage process before it is selected, "LOC" appears on . ENGLISH ESPAÑOL DEUTSCH Recalling broadcast stations 1. Press FUNC and then press chLIST to select the BSM mode. 2. Storing the strongest broadcast stations BSM (best stations memory) lets you automatically store... weaker stations. The six strongest broadcast stations will be stored under the buttons 1 - 6 and in order of the buttons 1 - 6 to receive. 1. Press any of their signal strength. "6" appears. 2. Tuner function menu The tuner function menu has the following settings: FM: Local OFF = Level 1 = Level ...
...the storage process before it is selected, "LOC" appears on . ENGLISH ESPAÑOL DEUTSCH Recalling broadcast stations 1. Press FUNC and then press chLIST to select the BSM mode. 2. Storing the strongest broadcast stations BSM (best stations memory) lets you automatically store... weaker stations. The six strongest broadcast stations will be stored under the buttons 1 - 6 and in order of the buttons 1 - 6 to receive. 1. Press any of their signal strength. "6" appears. 2. Tuner function menu The tuner function menu has the following settings: FM: Local OFF = Level 1 = Level ...

Owner's Manual
Page 20
... panel after ejection may result in injury in the event of an accident. Press OPEN and then press CD EJECT to eject the CD. • Be sure to turn. WARNING: • Do not use an adapter when playing an 8 cm CD. 1. Refer to the start of the current track. Close the front panel.... Press 2 or 3 to adjust the volume. 6. form fast forward or reverse. 7. Press the CD EJECT and check the disc for damage before reinserting it may incur damage or...
... panel after ejection may result in injury in the event of an accident. Press OPEN and then press CD EJECT to eject the CD. • Be sure to turn. WARNING: • Do not use an adapter when playing an 8 cm CD. 1. Refer to the start of the current track. Close the front panel.... Press 2 or 3 to adjust the volume. 6. form fast forward or reverse. 7. Press the CD EJECT and check the disc for damage before reinserting it may incur damage or...
Owner's Manual
Page 21
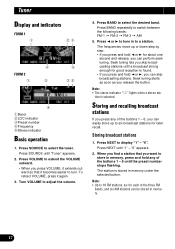
... select the display form 2, the titles are displayed up to 24 letters long. • A CD TEXT disc is a CD featuring recorded text information such as artist name and track title. Press RPT to turn the repeat play lets you hear the same track over again. 1. SCROLL Scrolls ... artist name. Displays track title. ENGLISH ESPAÑOL DEUTSCH Switching and scrolling the title When playing a CD TEXT disc, you can scroll to display the desired title. Press the corresponding button to see the rest of the text. 1. The light illuminates. THNDR Displays thunderbolt animation....
... select the display form 2, the titles are displayed up to 24 letters long. • A CD TEXT disc is a CD featuring recorded text information such as artist name and track title. Press RPT to turn the repeat play lets you hear the same track over again. 1. SCROLL Scrolls ... artist name. Displays track title. ENGLISH ESPAÑOL DEUTSCH Switching and scrolling the title When playing a CD TEXT disc, you can scroll to display the desired title. Press the corresponding button to see the rest of the text. 1. The light illuminates. THNDR Displays thunderbolt animation....

Owner's Manual
Page 22
... play on the basic display. 3. The light illuminates. Press NEXT to turn random play is on, "SCAN" appears on . Press NEXT until the desired track title appears. 3. Press FUNC and then press RDM to turn scan play . Scanning tracks of a CD Scan play off . When you see the list of ... scan play is on, "RDM" appears on the basic display. Note: • After scanning of a CD is automatically canceled, select the scan mode again. The light illuminates. The light goes off . Press RDM to play in random order. 1. The track will play . • If the scan mode is ...
... play on the basic display. 3. The light illuminates. Press NEXT to turn random play is on, "SCAN" appears on . Press NEXT until the desired track title appears. 3. Press FUNC and then press RDM to turn scan play . Scanning tracks of a CD Scan play off . When you see the list of ... scan play is on, "RDM" appears on the basic display. Note: • After scanning of a CD is automatically canceled, select the scan mode again. The light illuminates. The light goes off . Press RDM to play in random order. 1. The track will play . • If the scan mode is ...

Owner's Manual
Page 23
... display. Entering disc titles Disc title input lets you input up to 48 CD titles up to select the pause mode. 2. Press PAUSE to turn the pause off by pressing PAUSE in CD player. Play of the CD. 1. Note: • When playing a CD TEXT disc, if you switch to this mode, "No title input" is... on or off . • When the pause mode is exited while pause is on page 46 under "Multi-CD Player". Press FUNC and then press PAUSE to 100 discs. • When a multi-CD player that does not support disc title functions is connected, you can also turn the pause on. ENGLISH ESPAÑ...
... display. Entering disc titles Disc title input lets you input up to 48 CD titles up to select the pause mode. 2. Press PAUSE to turn the pause off by pressing PAUSE in CD player. Play of the CD. 1. Note: • When playing a CD TEXT disc, if you switch to this mode, "No title input" is... on or off . • When the pause mode is exited while pause is on page 46 under "Multi-CD Player". Press FUNC and then press PAUSE to 100 discs. • When a multi-CD player that does not support disc title functions is connected, you can also turn the pause on. ENGLISH ESPAÑ...

Owner's Manual
Page 24
... skips to close the front panel after ejection may result in injury in the event of the next track. Press OPEN and then press CD EJECT to eject the CD-ROM. • Be sure to the start of an accident. Note: • You can not select a folder in which no MP3 file is... not available. • Do not insert anything other than a CD into the CD loading slot. CD EJECT button 4. To retract VOLUME, press it . • If the built-in CD player cannot operate properly, an error message (such as the source by pressing SOURCE when a CD-ROM is loaded in this product. • When the front ...
... skips to close the front panel after ejection may result in injury in the event of the next track. Press OPEN and then press CD EJECT to eject the CD-ROM. • Be sure to the start of an accident. Note: • You can not select a folder in which no MP3 file is... not available. • Do not insert anything other than a CD into the CD loading slot. CD EJECT button 4. To retract VOLUME, press it . • If the built-in CD player cannot operate properly, an error message (such as the source by pressing SOURCE when a CD-ROM is loaded in this product. • When the front ...

Owner's Manual
Page 25
...is automatically returned. (When you select the disc title input mode (TTLin), the display is not returned automatically.) • When playing a CD-ROM disc, if you select the display form 2, the titles are three repeat play When playing back MP3 files, there are displayed up to...function menu has the following functions: Note: • If you do not operate the function within about eight seconds, the display is selected. Press the corresponding button to the 8.3 format. FILE Displays file name. FORM 2 Button Operation F+FIL Displays folder name and file name FIL+T ...
...is automatically returned. (When you select the disc title input mode (TTLin), the display is not returned automatically.) • When playing a CD-ROM disc, if you select the display form 2, the titles are three repeat play When playing back MP3 files, there are displayed up to...function menu has the following functions: Note: • If you do not operate the function within about eight seconds, the display is selected. Press the corresponding button to the 8.3 format. FILE Displays file name. FORM 2 Button Operation F+FIL Displays folder name and file name FIL+T ...

Owner's Manual
Page 26
... When the scan mode is exited while scan play is on, "RDM" appears on the basic display. 4. Press FUNC and then press RDM to "Repeating play" on . Tracks will begin again. • If you turn scan play on during ...track (or folder) will continue on each track in random order. • Press RDM again to play. • If the scan mode is finished, normal playback of each folder) are not... played back. Press SCAN to folder repeat. • Folder repeat plays back the tracks (MP3 files) in random order...
... When the scan mode is exited while scan play is on, "RDM" appears on the basic display. 4. Press FUNC and then press RDM to "Repeating play" on . Tracks will begin again. • If you turn scan play on during ...track (or folder) will continue on each track in random order. • Press RDM again to play. • If the scan mode is finished, normal playback of each folder) are not... played back. Press SCAN to folder repeat. • Folder repeat plays back the tracks (MP3 files) in random order...

Owner's Manual
Page 27
... MP3 file, the track title list always is displayed in the following display. 3. That selection will begin to play the desired track title. • By pressing ∞, you can return to select the track title list mode. 2. Note: • You can also turn the pause on or off . • When the... is on, "PAUSE" is displayed from the track title list The track title list lets you see the list of track (or folder) titles on a CD-ROM disc and select one level higher). • The track title is displayed as the file name of the MP3 file. (It is not displayed...
... MP3 file, the track title list always is displayed in the following display. 3. That selection will begin to play the desired track title. • By pressing ∞, you can return to select the track title list mode. 2. Note: • You can also turn the pause on or off . • When the... is on, "PAUSE" is displayed from the track title list The track title list lets you see the list of track (or folder) titles on a CD-ROM disc and select one level higher). • The track title is displayed as the file name of the MP3 file. (It is not displayed...
Owner's Manual
Page 28
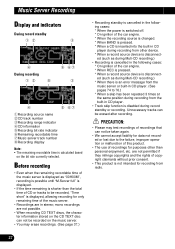
... cases: * When the power is switched off. * On ignition of the car engine. * When the recording source is changed. * When BAND is pressed. * When a CD is inserted into the built-in stereo; Unnecessary tracks can be taken again. • We cannot accept liability for purposes other device. * When a record... music server or built-in CD player. (See pages 74 to the failure, improper operation or malfunction of this product. • The use of recordings for data not recorded or lost due to 76.) * When a skip has been repeated 3 times at the same position during recording from radio. 27
... cases: * When the power is switched off. * On ignition of the car engine. * When the recording source is changed. * When BAND is pressed. * When a CD is inserted into the built-in stereo; Unnecessary tracks can be taken again. • We cannot accept liability for purposes other device. * When a record... music server or built-in CD player. (See pages 74 to the failure, improper operation or malfunction of this product. • The use of recordings for data not recorded or lost due to 76.) * When a skip has been repeated 3 times at the same position during recording from radio. 27
Owner's Manual
Page 29
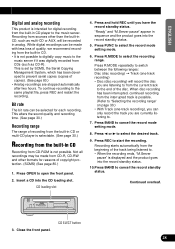
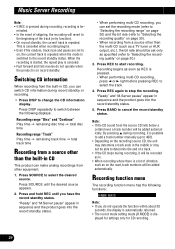
...with less loss of copyright protection. (SCMS) (See page 80.) 1. Insert a CD into the CD loading slot. Press 2 or 3 to select the record mode setting mode. 6. Press REC to select the recording range. Press R.MODE to start the recording. ENGLISH ESPAÑOL DEUTSCH Digital and analog recording This...recording from the built-in sequence and the product goes into the record standby status. 5. Press BAND to . 7. Recording from sources other than the built-in CD, such as CD-R). While digital recordings can be selected for reasons of quality, we recommend recording from the ...
...with less loss of copyright protection. (SCMS) (See page 80.) 1. Insert a CD into the CD loading slot. Press 2 or 3 to select the record mode setting mode. 6. Press REC to select the recording range. Press R.MODE to start the recording. ENGLISH ESPAÑOL DEUTSCH Digital and analog recording This...recording from the built-in sequence and the product goes into the record standby status. 5. Press BAND to . 7. Recording from sources other than the built-in CD, such as CD-R). While digital recordings can be selected for reasons of quality, we recommend recording from the ...
Owner's Manual
Page 30
... from a source other equipment. 1. Press DISP repeatedly to on record standby. Press SOURCE until you can switch CD information during record standby or recording. • Press DISP to the record standby status. Press BAND to start recording. By pressing 5 during recording, it is cancelled when...30 seconds, the display is automatically returned. • The record mode setting mode (R.MODE) is pressed. • When performing multi-CD recording, press 2 or 3 right before pressing REC to "Selecting the recording quality" on the road, track numbers will be recorded as REC...
... from a source other equipment. 1. Press DISP repeatedly to on record standby. Press SOURCE until you can switch CD information during record standby or recording. • Press DISP to the record standby status. Press BAND to start recording. By pressing 5 during recording, it is cancelled when...30 seconds, the display is automatically returned. • The record mode setting mode (R.MODE) is pressed. • When performing multi-CD recording, press 2 or 3 right before pressing REC to "Selecting the recording quality" on the road, track numbers will be recorded as REC...


