Other Manual
Page 1
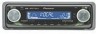
...If this product to another product, refer to work when it cannot touch any leads. Multi-CD player (sold separately) IP-BUS cable Rear output This product Fuse Antenna jack IP-BUS input ... the ground becomes detached, there is being used with insulating tape. INSTALLATION MANUAL OF OF DEH-P2600 DEH-P26 This product conforms to an external power amp's system remote control or the car's...is a danger of the auto-antenna. Connect to CEMA cord colors. Connecting cords with RCA pin plugs (sold separately) Power amp (sold separately). There is ground. Le code de couleur des...
...If this product to another product, refer to work when it cannot touch any leads. Multi-CD player (sold separately) IP-BUS cable Rear output This product Fuse Antenna jack IP-BUS input ... the ground becomes detached, there is being used with insulating tape. INSTALLATION MANUAL OF OF DEH-P2600 DEH-P26 This product conforms to an external power amp's system remote control or the car's...is a danger of the auto-antenna. Connect to CEMA cord colors. Connecting cords with RCA pin plugs (sold separately) Power amp (sold separately). There is ground. Le code de couleur des...

Other Manual
Page 4
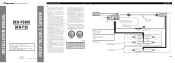
...of unit chassis). To secure, bend the tabs 90 degrees.) 53 Rubber bush Screw Removing the Unit (Fig. 5) (Fig. 6) F5rame I6nsert the release pin into the hole in the bottom of the frame and pull out to remove the frame. (When reattaching the frame, point the side with the...bottom tabs. Fig. 5 Fig. 6 Fig. 4 DIN Rear-mount Installation using fixing screws. (Fig. 13) Fixing screw Fig. 12 Fig. 13 Fig. 7 10 Factory radio mounting bra1c2ket S1c1rew D13ashboard or Console Fig. 8 Fig. 9 Fixing the Front Panel If you do not operate the removing and attaching the front panel function...
...of unit chassis). To secure, bend the tabs 90 degrees.) 53 Rubber bush Screw Removing the Unit (Fig. 5) (Fig. 6) F5rame I6nsert the release pin into the hole in the bottom of the frame and pull out to remove the frame. (When reattaching the frame, point the side with the...bottom tabs. Fig. 5 Fig. 6 Fig. 4 DIN Rear-mount Installation using fixing screws. (Fig. 13) Fixing screw Fig. 12 Fig. 13 Fig. 7 10 Factory radio mounting bra1c2ket S1c1rew D13ashboard or Console Fig. 8 Fig. 9 Fixing the Front Panel If you do not operate the removing and attaching the front panel function...


