Owner's Manual
Page 5
...sensitive hearing. After all supplied. We Want You Listening For A Lifetime Used wisely, your protection. S001_En What's in front of speakers, thunderclap 140 Gunshot blast, jet plane 180 Rocket launching pad Information courtesy of sound levels is included for your new sound equipment ...-skid pads (large) x4 (page 7) • Non-skid pads (large) x16 (page 7) • Non-skid pads (small) x4 (page 7) • Speaker stand bases x 4 (page 7) • Screws (for a lifetime. Since hearing damage from traffic 50 Light traffic, normal conversation, quiet office 60 Air conditioner at ...
...sensitive hearing. After all supplied. We Want You Listening For A Lifetime Used wisely, your protection. S001_En What's in front of speakers, thunderclap 140 Gunshot blast, jet plane 180 Rocket launching pad Information courtesy of sound levels is included for your new sound equipment ...-skid pads (large) x4 (page 7) • Non-skid pads (large) x16 (page 7) • Non-skid pads (small) x4 (page 7) • Speaker stand bases x 4 (page 7) • Screws (for a lifetime. Since hearing damage from traffic 50 Light traffic, normal conversation, quiet office 60 Air conditioner at ...
Owner's Manual
Page 6
... for optimal surround sound 20 Dimming the display 32 DTS CD setting 32 Resetting the system 32 Installation and maintenance 33 Hints on speaker placement 9 08 Surround sound settings 02 Connecting up the remote to control your model properly. Contents Thank you start Switching on 18...for Pioneer plasma displays 30 Using the SR+ mode with Acoustic Calibration EQ 23 Enhancing dialogue 24 Glossary 33 Setting up Using the Setup menu 27 Basic connections 10 Wall mounting the display unit 13 Using this system for TV audio 13 Channel level setting 27 Speaker distance ...
... for optimal surround sound 20 Dimming the display 32 DTS CD setting 32 Resetting the system 32 Installation and maintenance 33 Hints on speaker placement 9 08 Surround sound settings 02 Connecting up the remote to control your model properly. Contents Thank you start Switching on 18...for Pioneer plasma displays 30 Using the SR+ mode with Acoustic Calibration EQ 23 Enhancing dialogue 24 Glossary 33 Setting up Using the Setup menu 27 Basic connections 10 Wall mounting the display unit 13 Using this system for TV audio 13 Channel level setting 27 Speaker distance ...
Owner's Manual
Page 7
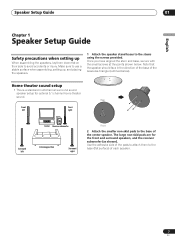
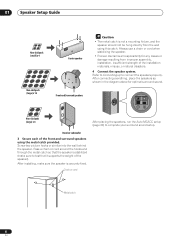
... Receiver subwoofer Listening position Surround right Front 2 Attach the smaller non-skid pads to the base (flat surface) of the center speaker. Use the adhesive side of the pads to attach them down flat on their side to the stems using the screws provided....; This is a standard multichannel surround sound speaker setup for the front and surround speakers, and the receiver subwoofer (as shown). Speaker Setup Guide 01 English Chapter 1 Speaker Setup Guide Safety precautions when setting up , and placing the speakers. 1 Attach the speaker stand bases to avoid accidents or injury. The...
... Receiver subwoofer Listening position Surround right Front 2 Attach the smaller non-skid pads to the base (flat surface) of the center speaker. Use the adhesive side of the pads to attach them down flat on their side to the stems using the screws provided....; This is a standard multichannel surround sound speaker setup for the front and surround speakers, and the receiver subwoofer (as shown). Speaker Setup Guide 01 English Chapter 1 Speaker Setup Guide Safety precautions when setting up , and placing the speakers. 1 Attach the speaker stand bases to avoid accidents or injury. The...
Owner's Manual
Page 8
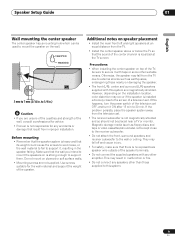
..., make sure to connect the speakers properly. Front and Surround speakers Non-skid pads (large) x 4 After placing the speakers, run the Auto MCACC setup (page 20) to complete your surround sound setup. 01 Speaker Setup Guide Non-skid pads (...speaker Caution • The metal catch is not a mounting fixture, and the speaker should not be hung directly from improper assembly, installation, insufficient strength of the installation materials, misuse, or natural disasters. 4 Connect the speaker system. Always use a chain or cord when stabilizing the speaker. • Pioneer...
..., make sure to connect the speakers properly. Front and Surround speakers Non-skid pads (large) x 4 After placing the speakers, run the Auto MCACC setup (page 20) to complete your surround sound setup. 01 Speaker Setup Guide Non-skid pads (...speaker Caution • The metal catch is not a mounting fixture, and the speaker should not be hung directly from improper assembly, installation, insufficient strength of the installation materials, misuse, or natural disasters. 4 Connect the speaker system. Always use a chain or cord when stabilizing the speaker. • Pioneer...
Owner's Manual
Page 9
...connect any other than those nearby or damaging the speaker. • The front (L/R), center and surround (L/R) speakers supplied with this system are unsure of the qualities and strength of the wall, consult a professional for advice. • Pioneer is not responsible for the wall material and support ...the weight of a television set. Otherwise, the speaker may occur if the speaker is installed extremely close to the receiver subwoofer. • Do not ...
...connect any other than those nearby or damaging the speaker. • The front (L/R), center and surround (L/R) speakers supplied with this system are unsure of the qualities and strength of the wall, consult a professional for advice. • Pioneer is not responsible for the wall material and support ...the weight of a television set. Otherwise, the speaker may occur if the speaker is installed extremely close to the receiver subwoofer. • Do not ...
Owner's Manual
Page 10
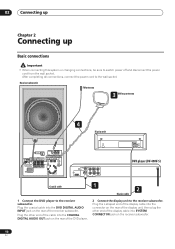
... all connections, connect the power cord to the receiver subwoofer. Receiver subwoofer FM antenna 3 AM loop antenna 4 Display unit MCACC CONTROL IN SETUP MIC CONTROL SPEAKERS SYSTEM CONNECTOR OUT SUB WOOFER R SURROUND L ANTENNA FM UNBAL 75Ω AM LOOP ANTENNA AUDIO INPUT DIGITAL DVD DTV PC/GAME (COAXIAL) (OPTICAL) (OPTICAL) ANALOG...
... all connections, connect the power cord to the receiver subwoofer. Receiver subwoofer FM antenna 3 AM loop antenna 4 Display unit MCACC CONTROL IN SETUP MIC CONTROL SPEAKERS SYSTEM CONNECTOR OUT SUB WOOFER R SURROUND L ANTENNA FM UNBAL 75Ω AM LOOP ANTENNA AUDIO INPUT DIGITAL DVD DTV PC/GAME (COAXIAL) (OPTICAL) (OPTICAL) ANALOG...

Owner's Manual
Page 11
...Connect the AM and FM antennas1. Plug this into one of the receiver subwoofer. English b Color-coded wire Color-coded connector (Connect to speaker) (Connect to connect correctly. c. The small lug at the other wire into contact with the supplied antenna is connected. Please make sure the... FM antenna is recommended that occurs when an antenna is poor, see the subwoofer connecting cable. Make sure to the speaker. insert the wire, then release to secure. 1 2 • Connect the wires to insert completely. It is not an electrical safety earth...
...Connect the AM and FM antennas1. Plug this into one of the receiver subwoofer. English b Color-coded wire Color-coded connector (Connect to speaker) (Connect to connect correctly. c. The small lug at the other wire into contact with the supplied antenna is connected. Please make sure the... FM antenna is recommended that occurs when an antenna is poor, see the subwoofer connecting cable. Make sure to the speaker. insert the wire, then release to secure. 1 2 • Connect the wires to insert completely. It is not an electrical safety earth...

Owner's Manual
Page 12
..., disconnect the power cord before touching any uninsulated parts. • Do not connect any speakers other than those supplied to this system. • Do not connect the supplied speakers to any purpose other than connecting to your TV. Receiver subwoofer Surround right (Gray) Surround left (...FRONT L AC IN 8 To AC outlet Front right (Red) Listening position Center (Green) Front left (Blue) MCACC CONTROL IN SETUP MIC 6 CONTROL SPEAKERS SYSTEM CONNECTOR OUT SUB WOOFER R SURROUND L ANTENNA FM UNBAL 75Ω AM LOOP ANTENNA 5 AUDIO INPUT DIGITAL DVD DTV PC/GAME (COAXIAL) (...
..., disconnect the power cord before touching any uninsulated parts. • Do not connect any speakers other than those supplied to this system. • Do not connect the supplied speakers to any purpose other than connecting to your TV. Receiver subwoofer Surround right (Gray) Surround left (...FRONT L AC IN 8 To AC outlet Front right (Red) Listening position Center (Green) Front left (Blue) MCACC CONTROL IN SETUP MIC 6 CONTROL SPEAKERS SYSTEM CONNECTOR OUT SUB WOOFER R SURROUND L ANTENNA FM UNBAL 75Ω AM LOOP ANTENNA 5 AUDIO INPUT DIGITAL DVD DTV PC/GAME (COAXIAL) (...

Owner's Manual
Page 13
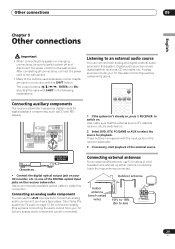
Use screws that are suitable for the wall material and that will support the weight of the display. • Pioneer bears no responsibility for this system and enjoy surround TV sound. Connecting up 02 English A/V IN TV White 7 DIGITAL COAXIAL AUDIO OUT VIDEO OUT AUDIO... fixtures, misuse or natural disasters. • If you can use the AUX input jacks for TV audio If your TV to this connection. CONTROL SPEAKERS SYSTEM CONNECTOR OUT SUB WOOFER R SURROUND L USE ONLY WITH DISPLAY UNIT. Before mounting: • Remember that the wall you want, such as a tape deck, ...
Use screws that are suitable for the wall material and that will support the weight of the display. • Pioneer bears no responsibility for this system and enjoy surround TV sound. Connecting up 02 English A/V IN TV White 7 DIGITAL COAXIAL AUDIO OUT VIDEO OUT AUDIO... fixtures, misuse or natural disasters. • If you can use the AUX input jacks for TV audio If your TV to this connection. CONTROL SPEAKERS SYSTEM CONNECTOR OUT SUB WOOFER R SURROUND L USE ONLY WITH DISPLAY UNIT. Before mounting: • Remember that the wall you want, such as a tape deck, ...

Owner's Manual
Page 15
...mode (page 31). 8 SURROUND Use to select a Surround mode (page 22). 9 ADVANCED Use to select a Pioneer original surround mode (page 23). 10 TOP MENU Press to display the top menu if a DVD-Video disc is...navigate many functions of the system. + SHIFT: TEST TONE Use to output the test tone (for speaker setup) (page 28). 14 RETURN Press to go back one level in radio tuner. 6 Numeric ... ENTER Use to navigate all DVD player on or into standby. 3 MUTE Press to mute all audio from the speakers. Press again to select the DTV input. DTV Press to cancel and restore the sound. 4 VOLUME +/- Press ...
...mode (page 31). 8 SURROUND Use to select a Surround mode (page 22). 9 ADVANCED Use to select a Pioneer original surround mode (page 23). 10 TOP MENU Press to display the top menu if a DVD-Video disc is...navigate many functions of the system. + SHIFT: TEST TONE Use to output the test tone (for speaker setup) (page 28). 14 RETURN Press to go back one level in radio tuner. 6 Numeric ... ENTER Use to navigate all DVD player on or into standby. 3 MUTE Press to mute all audio from the speakers. Press again to select the DTV input. DTV Press to cancel and restore the sound. 4 VOLUME +/- Press ...
Owner's Manual
Page 20
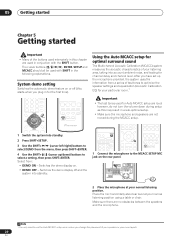
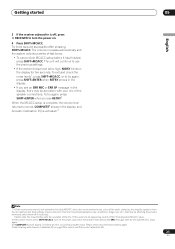
...button. System demo setting Switches the automatic demo feature on or off and the system into standby. MCACC CONTROL IN SETUP MIC CONTROL SPEAKERS SYSTEM CONNECTOR OUT SUB WOOFER R SURROUND L ANTENNA FM UNBAL 75Ω AM LOOP ANTENNA AUDIO INPUT DIGITAL DVD DTV PC/GAME...acoustic characteristics of your normal listening position using a table or chair. R SEE INSTRUCTION MANUAL. After you change the placement of your speakers or your normal listening position. 05 Getting started Chapter 5 Getting started Important • Many of the buttons used extensively in this ...
...button. System demo setting Switches the automatic demo feature on or off and the system into standby. MCACC CONTROL IN SETUP MIC CONTROL SPEAKERS SYSTEM CONNECTOR OUT SUB WOOFER R SURROUND L ANTENNA FM UNBAL 75Ω AM LOOP ANTENNA AUDIO INPUT DIGITAL DVD DTV PC/GAME...acoustic characteristics of your normal listening position using a table or chair. R SEE INSTRUCTION MANUAL. After you change the placement of your speakers or your normal listening position. 05 Getting started Chapter 5 Getting started Important • Many of the buttons used extensively in this ...
Owner's Manual
Page 21
... 3 If the receiver subwoofer is not optimal for the Auto MCACC setup (too much ambient noise, echo off the walls, obstacles blocking the speakers from the microphone) the final settings may be a problem with Acoustic Calibration EQ on page 23 to try again. 4 See Listening with your... mic or the speaker connections. The volume increases automatically and the system outputs a series of the mic. To try the Auto MCACC setup again. 3 If COMPLETE doesn't ...
... 3 If the receiver subwoofer is not optimal for the Auto MCACC setup (too much ambient noise, echo off the walls, obstacles blocking the speakers from the microphone) the final settings may be a problem with Acoustic Calibration EQ on page 23 to try again. 4 See Listening with your... mic or the speaker connections. The volume increases automatically and the system outputs a series of the mic. To try the Auto MCACC setup again. 3 If COMPLETE doesn't ...

Owner's Manual
Page 22
...multichannel sources in the following explanations. or PANORAMA then press SHIFT+ENTER. • C WIDTH (Center Width): Provides a better blend of the front speakers by spreading the center channel between the front right and left /right) to your system Chapter 6 Listening to select C WIDTH, DIMEN. If ... SOUND SETUP • Press SURROUND repeatedly to change the listening mode. • AUTO - If the source is generated from the speakers mirrors the channels in the source material. See Listening in stereo on page 23 SETUP Dolby Pro Logic II Music settings When listening ...
...multichannel sources in the following explanations. or PANORAMA then press SHIFT+ENTER. • C WIDTH (Center Width): Provides a better blend of the front speakers by spreading the center channel between the front right and left /right) to your system Chapter 6 Listening to select C WIDTH, DIMEN. If ... SOUND SETUP • Press SURROUND repeatedly to change the listening mode. • AUTO - If the source is generated from the speakers mirrors the channels in the source material. See Listening in stereo on page 23 SETUP Dolby Pro Logic II Music settings When listening ...

Owner's Manual
Page 23
...PLAY MODE ZOOM DISPLAY SLEEP TV INPUT • While listening to switch between: • RTRV ON - Switches the Sound Retriever off and speaker settings (channel delay and channel level) remains as it is set. • Acoustic Calibration EQ is set to on automatically after compression. ... optimal surround sound on . • RTRV OFF - When playing a multichannel source, all channels are downmixed to the front left/right speakers and the subwoofer. Using the Sound Retriever When audio data is used with Acoustic CalibraSEtTUPion EQ You can listen to any multichannel or stereo ...
...PLAY MODE ZOOM DISPLAY SLEEP TV INPUT • While listening to switch between: • RTRV ON - Switches the Sound Retriever off and speaker settings (channel delay and channel level) remains as it is set. • Acoustic Calibration EQ is set to on automatically after compression. ... optimal surround sound on . • RTRV OFF - When playing a multichannel source, all channels are downmixed to the front left/right speakers and the subwoofer. Using the Sound Retriever When audio data is used with Acoustic CalibraSEtTUPion EQ You can listen to any multichannel or stereo ...

Owner's Manual
Page 27
... Use the SHIFT+ / (cursor left/right) buttons to select DISTANCE, then press SHIFT+ENTER. 3 Use SHIFT+ / (cursor left/right) to select a speaker; SHIFT+ / (cursor up /down ) to adjust the distance. Adjust the following buttons to use the Auto MCACC feature again, it will overwrite the settings ... channel; However you may find that the channel level settings for stereo playback are used with the SHIFT button. Front right speaker • SR - Center speaker • R - See Adjusting the channel levels using the test tone on page 28 for more on this chapter are independent...
... Use the SHIFT+ / (cursor left/right) buttons to select DISTANCE, then press SHIFT+ENTER. 3 Use SHIFT+ / (cursor left/right) to select a speaker; SHIFT+ / (cursor up /down ) to adjust the distance. Adjust the following buttons to use the Auto MCACC feature again, it will overwrite the settings ... channel; However you may find that the channel level settings for stereo playback are used with the SHIFT button. Front right speaker • SR - Center speaker • R - See Adjusting the channel levels using the test tone on page 28 for more on this chapter are independent...

Owner's Manual
Page 28
.... 3 Use SHIFT+ / (cursor up/down) to adjust the center or surround channels. • Because of the settings for stereo sources are played through each speaker in turn , allowing you have made here. 28 En Using one of the Dynamic Range Control (DRC) settings can help by ± 10 dB. •...; You can adjust the level of each speaker. Dynamic Range Control works only with bilingual audio. 1 Press SHIFT+SETUP. 2 Use the SHIFT+ / (cursor left /right) buttons to select DRC, then press SHIFT...
.... 3 Use SHIFT+ / (cursor up/down) to adjust the center or surround channels. • Because of the settings for stereo sources are played through each speaker in turn , allowing you have made here. 28 En Using one of the Dynamic Range Control (DRC) settings can help by ± 10 dB. •...; You can adjust the level of each speaker. Dynamic Range Control works only with bilingual audio. 1 Press SHIFT+SETUP. 2 Use the SHIFT+ / (cursor left /right) buttons to select DRC, then press SHIFT...
Owner's Manual
Page 29
... and SR+ should all connections, connect the power cord to the wall socket. • Many of the external source. MCACC CONTROL IN SETUP MIC CONTROL SPEAKERS SYSTEM CONNECTOR OUT SUB WOOFER R SURROUND L ANTENNA FM UNBAL 75Ω AM LOOP ANTENNA AUDIO INPUT DIGITAL DVD DTV PC/GAME (COAXIAL) (OPTICAL) (OPTICAL) ANALOG...
... and SR+ should all connections, connect the power cord to the wall socket. • Many of the external source. MCACC CONTROL IN SETUP MIC CONTROL SPEAKERS SYSTEM CONNECTOR OUT SUB WOOFER R SURROUND L ANTENNA FM UNBAL 75Ω AM LOOP ANTENNA AUDIO INPUT DIGITAL DVD DTV PC/GAME (COAXIAL) (OPTICAL) (OPTICAL) ANALOG...
Owner's Manual
Page 30
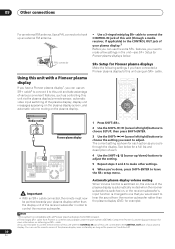
...FRONT L AC IN Important • With an SR+ cable connected, the remote must now be pointed towards your plasma display. Contact the Pioneer Customer Support division for example). R SEE INSTRUCTION MANUAL. Automatic plasma display volume muting When Volume Control is switched on, the volume of the ... to make a few settings in the unit-see SR+ Setup for a full list and description of each. MCACC CONTROL IN SETUP MIC CONTROL SPEAKERS SYSTEM CONNECTOR OUT SUB WOOFER R SURROUND L ANTENNA FM UNBAL 75Ω AM LOOP ANTENNA AUDIO INPUT DIGITAL ANALOG DVD DTV PC/GAME AUX (...
...FRONT L AC IN Important • With an SR+ cable connected, the remote must now be pointed towards your plasma display. Contact the Pioneer Customer Support division for example). R SEE INSTRUCTION MANUAL. Automatic plasma display volume muting When Volume Control is switched on, the volume of the ... to make a few settings in the unit-see SR+ Setup for a full list and description of each. MCACC CONTROL IN SETUP MIC CONTROL SPEAKERS SYSTEM CONNECTOR OUT SUB WOOFER R SURROUND L ANTENNA FM UNBAL 75Ω AM LOOP ANTENNA AUDIO INPUT DIGITAL ANALOG DVD DTV PC/GAME AUX (...
Owner's Manual
Page 35
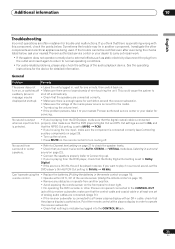
.... If you 're using the • Replace the batteries (Putting the batteries in surround sound on page 22). • Connect the speakers properly (refer to Connecting up the volume. • Press MUTE on the remote control to turn on page 16). Additional information 10 English...to normal operating conditions. • For audio-related problems, please also check the settings of the audio playback device. Investigate the other Pioneer component connected to the CONTROL OUT jack of this will be rectified even after exercising the checks listed below . No sound is output ...
.... If you 're using the • Replace the batteries (Putting the batteries in surround sound on page 22). • Connect the speakers properly (refer to Connecting up the volume. • Press MUTE on the remote control to turn on page 16). Additional information 10 English...to normal operating conditions. • For audio-related problems, please also check the settings of the audio playback device. Investigate the other Pioneer component connected to the CONTROL OUT jack of this will be rectified even after exercising the checks listed below . No sound is output ...
Owner's Manual
Page 36
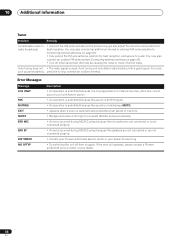
...The radio signal is too high to a wall. sensitive tuning, connect an outdoor antenna. If the error still appears, please contact a Pioneer authorized service center or your dealer for servicing. • Try switching the unit off other equipment that may also connect an additional internal or ... and secure to complete MCACC setup successfully. • An error occurred during MCACC setup because the speakers are not connected or are not connected properly. • Contact your Pioneer authorized service center or your dealer. 36 En You may be causing the noise or move it ...
...The radio signal is too high to a wall. sensitive tuning, connect an outdoor antenna. If the error still appears, please contact a Pioneer authorized service center or your dealer for servicing. • Try switching the unit off other equipment that may also connect an additional internal or ... and secure to complete MCACC setup successfully. • An error occurred during MCACC setup because the speakers are not connected or are not connected properly. • Contact your Pioneer authorized service center or your dealer. 36 En You may be causing the noise or move it ...


