
Owner's Manual
Page 2
... of important operating and maintenance (servicing) instructions in the literature accompanying the appliance. CAUTION RISK OF ELECTRIC SHOCK DO NOT OPEN CAUTION: TO PREVENT THE RISK OF ELECTRIC SHOCK, DO NOT REMOVE COVER (OR BACK). The exclamation point within the product's enclosure that to which can radiate radio frequency energy and, if not installed and used to connect the unit...
... of important operating and maintenance (servicing) instructions in the literature accompanying the appliance. CAUTION RISK OF ELECTRIC SHOCK DO NOT OPEN CAUTION: TO PREVENT THE RISK OF ELECTRIC SHOCK, DO NOT REMOVE COVER (OR BACK). The exclamation point within the product's enclosure that to which can radiate radio frequency energy and, if not installed and used to connect the unit...
Owner's Manual
Page 3
... warranty period. HEAT - All the safety and operating instructions should be followed. The power cord of time. If you to determine that they exit from the wall outlet and disconnect the antenna or cable system. For added protection for this indicates a need for general household purposes. ANTENNA LEAD IN WIRE GROUND CLAMP ELECTRIC SERVICE EQUIPMENT Fig. K057_En This product should be unplugged...
... warranty period. HEAT - All the safety and operating instructions should be followed. The power cord of time. If you to determine that they exit from the wall outlet and disconnect the antenna or cable system. For added protection for this indicates a need for general household purposes. ANTENNA LEAD IN WIRE GROUND CLAMP ELECTRIC SERVICE EQUIPMENT Fig. K057_En This product should be unplugged...
Owner's Manual
Page 5
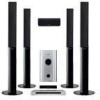
... you to confirm operation) x2 (page 16) • Display unit (page 14) • Power cord (page 12) • AM loop antenna (page 11) • FM wire antenna (page 11) • Display cable (page 10) • Coaxial cable (page 10) • Microphone (for Auto MCACC setup) (page 20) • These operating instructions • Warranty card Speakers (S-ST606) box: • Speakers (front x2, surround x2, center x1) (page 12) • Speaker cables x5 (page...
... you to confirm operation) x2 (page 16) • Display unit (page 14) • Power cord (page 12) • AM loop antenna (page 11) • FM wire antenna (page 11) • Display cable (page 10) • Coaxial cable (page 10) • Microphone (for Auto MCACC setup) (page 20) • These operating instructions • Warranty card Speakers (S-ST606) box: • Speakers (front x2, surround x2, center x1) (page 12) • Speaker cables x5 (page...
Owner's Manual
Page 6
... setting up 7 Home theater sound setup 7 Wall mounting the center speaker 9 Before mounting 9 Improving poor FM reception 25 Improving poor AM sound 25 Memorizing stations 25 Listening to control your TV 33 Using the TV remote control buttons 33 Preset code list 34 Troubleshooting 35 General 35 Tuner 36 Error Messages 36 Specifications 37 Using Quiet and Midnight listening modes 24 Adjusting the bass and treble 24 Boosting the bass level 24 6 En Please read through these operating instructions...
... setting up 7 Home theater sound setup 7 Wall mounting the center speaker 9 Before mounting 9 Improving poor FM reception 25 Improving poor AM sound 25 Memorizing stations 25 Listening to control your TV 33 Using the TV remote control buttons 33 Preset code list 34 Troubleshooting 35 General 35 Tuner 36 Error Messages 36 Specifications 37 Using Quiet and Midnight listening modes 24 Adjusting the bass and treble 24 Boosting the bass level 24 6 En Please read through these operating instructions...

Owner's Manual
Page 12
... of the supplied audio/video cable for correct stereo sound. 8 Connect the power cords.1 • Connect the power cords to this system. • Do not connect the supplied speakers to any amplifier other than connecting to AC inlets on the receiver subwoofer. Make sure you match the left (Blue) MCACC CONTROL IN SETUP MIC 6 CONTROL SPEAKERS SYSTEM CONNECTOR OUT SUB WOOFER R SURROUND L ANTENNA FM UNBAL 75Ω AM LOOP ANTENNA 5 AUDIO INPUT DIGITAL DVD DTV PC/GAME (COAXIAL) (OPTICAL) (OPTICAL) ANALOG AUX L USE ONLY WITH DISPLAY UNIT. Receiver subwoofer Surround right (Gray...
... of the supplied audio/video cable for correct stereo sound. 8 Connect the power cords.1 • Connect the power cords to this system. • Do not connect the supplied speakers to any amplifier other than connecting to AC inlets on the receiver subwoofer. Make sure you match the left (Blue) MCACC CONTROL IN SETUP MIC 6 CONTROL SPEAKERS SYSTEM CONNECTOR OUT SUB WOOFER R SURROUND L ANTENNA FM UNBAL 75Ω AM LOOP ANTENNA 5 AUDIO INPUT DIGITAL DVD DTV PC/GAME (COAXIAL) (OPTICAL) (OPTICAL) ANALOG AUX L USE ONLY WITH DISPLAY UNIT. Receiver subwoofer Surround right (Gray...

Owner's Manual
Page 15
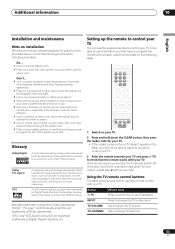
... HOME MENU Press to display the Home Menu, from which you can adjust bass and treble, etc. 11 MENU Press to display the disc menu if a DVD-Video disc is loaded. + SHIFT: SETUP Use to navigate all audio from which you can navigate many functions of the system. + SHIFT: TEST TONE Use to output the test tone (for speaker setup) (page 28). 14 RETURN Press to go back one level in radio tuner. 6 Numeric buttons, CLEAR and ENTER Use the number buttons for surround sound setup, tuner settings...
... HOME MENU Press to display the Home Menu, from which you can adjust bass and treble, etc. 11 MENU Press to display the disc menu if a DVD-Video disc is loaded. + SHIFT: SETUP Use to navigate all audio from which you can navigate many functions of the system. + SHIFT: TEST TONE Use to output the test tone (for speaker setup) (page 28). 14 RETURN Press to go back one level in radio tuner. 6 Numeric buttons, CLEAR and ENTER Use the number buttons for surround sound setup, tuner settings...

Owner's Manual
Page 16
... multilingual DVD-Video discs. 03 Controls and displays + SHIFT: MCACC Starts the Auto MCACC setup (page 20). 15 Playback controls / Press to stop playback. 16 AUDIO Changes the audio language or channel. Press to this unit. • Replace the batteries when you notice a fall off in the operating range of the remote. • Use within the operating range in front of batteries can interfere with multi-angle scenes. PLAY MODE...
... multilingual DVD-Video discs. 03 Controls and displays + SHIFT: MCACC Starts the Auto MCACC setup (page 20). 15 Playback controls / Press to stop playback. 16 AUDIO Changes the audio language or channel. Press to this unit. • Replace the batteries when you notice a fall off in the operating range of the remote. • Use within the operating range in front of batteries can interfere with multi-angle scenes. PLAY MODE...

Owner's Manual
Page 18
... control DVD MUTE VOLUME RECEIVER DVD DTV PC/GAME AUX TUNER SR SURROUND ENTER TOP MENU ADVANCED CLEAR TUNE MENU SOUND SETUP ST ENTER ST TEST TONE / TUNE RETURN MCACC / STANDBY/ON Display unit - VOLUME + AUDIO INPUT SURROUND AUDIO SUBTITLE SOUND ANGLE RETRIEVER PLAY MODE ZOOM DISPLAY SLEEP TV INPUT The table below to optimize the surround sound (page 20). 18 En The power switch for the receiver subwoofer is located on for use. DVD player • Select the type of the player's on The DVD player and receiver subwoofer have separate power switches. Receiver...
... control DVD MUTE VOLUME RECEIVER DVD DTV PC/GAME AUX TUNER SR SURROUND ENTER TOP MENU ADVANCED CLEAR TUNE MENU SOUND SETUP ST ENTER ST TEST TONE / TUNE RETURN MCACC / STANDBY/ON Display unit - VOLUME + AUDIO INPUT SURROUND AUDIO SUBTITLE SOUND ANGLE RETRIEVER PLAY MODE ZOOM DISPLAY SLEEP TV INPUT The table below to optimize the surround sound (page 20). 18 En The power switch for the receiver subwoofer is located on for use. DVD player • Select the type of the player's on The DVD player and receiver subwoofer have separate power switches. Receiver...

Owner's Manual
Page 19
... playback. DVD MUTE VOLUME RECEIVER DVD DTV PC/GAME AUX TUNER SR SURROUND ENTER TOP MENU ADVANCED CLEAR TUNE MENU SOUND SETUP ST ENTER ST TEST TONE / TUNE RETURN MCACC / 1 Switch on the display unit (receiver subwoofer). 2 Switch on the DVD player. 3 Switch on your TV and make sure that when using the surround effects See Listening to control the DVD player, you should point the remote towards the DVD player rather than the display unit. 6 Load a disc. Press to cancel the resume function.) Pauses...
... playback. DVD MUTE VOLUME RECEIVER DVD DTV PC/GAME AUX TUNER SR SURROUND ENTER TOP MENU ADVANCED CLEAR TUNE MENU SOUND SETUP ST ENTER ST TEST TONE / TUNE RETURN MCACC / 1 Switch on the display unit (receiver subwoofer). 2 Switch on the DVD player. 3 Switch on your TV and make sure that when using the surround effects See Listening to control the DVD player, you should point the remote towards the DVD player rather than the display unit. 6 Load a disc. Press to cancel the resume function.) Pauses...
Owner's Manual
Page 20
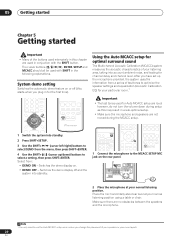
... the MCACC setup. System demo setting Switches the automatic demo feature on or off and the system into account ambient noise, and testing for channel delay and channel level. ENTER TOP MENU ADVANCED CLEAR TUNE MENU DVD MUTE VOLUME RECEIVER DVD DTV PC/GAME AUX TUNER SOUND SETUP ST ENTER ST TEST TONE / TUNE RETURN MCACC / SOUND AUDIO SUBTITLE ANGLE RETRIEVER PLAY MODE ZOOM DISPLAY SLEEP TV INPUT CHANNEL VOLUME SR SHIFT TV CONTROL SURROUND 1 Connect the microphone to select a setting, then press SHIFT+ENTER. R SEE INSTRUCTION MANUAL.
... the MCACC setup. System demo setting Switches the automatic demo feature on or off and the system into account ambient noise, and testing for channel delay and channel level. ENTER TOP MENU ADVANCED CLEAR TUNE MENU DVD MUTE VOLUME RECEIVER DVD DTV PC/GAME AUX TUNER SOUND SETUP ST ENTER ST TEST TONE / TUNE RETURN MCACC / SOUND AUDIO SUBTITLE ANGLE RETRIEVER PLAY MODE ZOOM DISPLAY SLEEP TV INPUT CHANNEL VOLUME SR SHIFT TV CONTROL SURROUND 1 Connect the microphone to select a setting, then press SHIFT+ENTER. R SEE INSTRUCTION MANUAL.
Owner's Manual
Page 21
... continue to use the previous settings. • If the ambient noise level is likely an error occurred during Auto MCACC setup. 2 If this doesn't work, press SHIFT+MCACC, turn the power on page 23 to be affecting the environment and switch them off if necessary. • Some older TVs may interfere with the operation of test tones. • To cancel Auto MCACC setup before it...
... continue to use the previous settings. • If the ambient noise level is likely an error occurred during Auto MCACC setup. 2 If this doesn't work, press SHIFT+MCACC, turn the power on page 23 to be affecting the environment and switch them off if necessary. • Some older TVs may interfere with the operation of test tones. • To cancel Auto MCACC setup before it...
Owner's Manual
Page 25
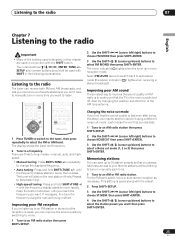
... radio is in manually each time. 1 Tune to choose ST.MEM. The tuner will stop on the next station it using the manual tuning method. Improving poor AM sound The simplest way to select the station preset you want. DVD DTV PC/GAME AUX TUNER SR SURROUND ENTER TOP MENU ADVANCED CLEAR TUNE MENU SOUND SETUP ST ENTER ST TEST TONE / TUNE RETURN MCACC / SOUND AUDIO SUBTITLE ANGLE RETRIEVER PLAY MODE ZOOM DISPLAY SLEEP TV INPUT CHANNEL VOLUME SHIFT TV CONTROL 1 Press TUNER to switch...
... radio is in manually each time. 1 Tune to choose ST.MEM. The tuner will stop on the next station it using the manual tuning method. Improving poor AM sound The simplest way to select the station preset you want. DVD DTV PC/GAME AUX TUNER SR SURROUND ENTER TOP MENU ADVANCED CLEAR TUNE MENU SOUND SETUP ST ENTER ST TEST TONE / TUNE RETURN MCACC / SOUND AUDIO SUBTITLE ANGLE RETRIEVER PLAY MODE ZOOM DISPLAY SLEEP TV INPUT CHANNEL VOLUME SHIFT TV CONTROL 1 Press TUNER to switch...

Owner's Manual
Page 27
... TEST TONE / TUNE RETURN MCACC / SOUND AUDIO SUBTITLE ANGLE RETRIEVER PLAY MODE ZOOM DISPLAY SLEEP TV INPUT CHANNEL VOLUME SHIFT TV CONTROL SOUND Channel level setting The Auto MCACC feature (see page 20) should all the surround sound settings of each speaker from the Setup menu; SHIFT+ / (cursor up /down ) to adjust the level of setting the channel levels is playing in your listening room. However you may find that the channel level settings for stereo playback are explained in Listening to adjust the center...
... TEST TONE / TUNE RETURN MCACC / SOUND AUDIO SUBTITLE ANGLE RETRIEVER PLAY MODE ZOOM DISPLAY SLEEP TV INPUT CHANNEL VOLUME SHIFT TV CONTROL SOUND Channel level setting The Auto MCACC feature (see page 20) should all the surround sound settings of each speaker from the Setup menu; SHIFT+ / (cursor up /down ) to adjust the level of setting the channel levels is playing in your listening room. However you may find that the channel level settings for stereo playback are explained in Listening to adjust the center...

Owner's Manual
Page 28
...ENTER TOP MENU TUNER SR SURROUND ADVANCED CLEAR TUNE MENU SOUND SETUP ST ENTER ST TEST TONE / TUNE RETURN MCACC / SOUND AUDIO SUBTITLE ANGLE RETRIEVER PLAY MODE ZOOM DISPLAY SLEEP TV INPUT CHANNEL VOLUME SHIFT TV CONTROL 1 Press SURROUND to select the Auto listening mode. • If you to select a setting. Both channels are independent of the following : • DRC OFF (default) - You can adjust the level of each speaker. 08 Surround sound settings Dynamic Range Control When watching Dolby Digital or DTS material at low volume, low level sounds-including...
...ENTER TOP MENU TUNER SR SURROUND ADVANCED CLEAR TUNE MENU SOUND SETUP ST ENTER ST TEST TONE / TUNE RETURN MCACC / SOUND AUDIO SUBTITLE ANGLE RETRIEVER PLAY MODE ZOOM DISPLAY SLEEP TV INPUT CHANNEL VOLUME SHIFT TV CONTROL 1 Press SURROUND to select the Auto listening mode. • If you to select a setting. Both channels are independent of the following : • DRC OFF (default) - You can adjust the level of each speaker. 08 Surround sound settings Dynamic Range Control When watching Dolby Digital or DTS material at low volume, low level sounds-including...
Owner's Manual
Page 29
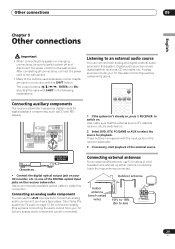
...digital inputs for digital playback components, such as a tape player. MCACC CONTROL IN SETUP MIC CONTROL SPEAKERS SYSTEM CONNECTOR OUT SUB WOOFER R SURROUND L ANTENNA FM UNBAL 75Ω AM LOOP ANTENNA AUDIO INPUT DIGITAL DVD DTV PC/GAME (COAXIAL) (OPTICAL) (OPTICAL) ANALOG AUX L USE ONLY WITH DISPLAY UNIT. Also make this chapter are used extensively in conjuction with the input jacks on your CD recorder, etc. These buttons correspond with the SHIFT button. DIGITAL OUT (OPTICAL) CD recorder, etc. • Connect the digital optical output jack on the receiver subwoofer...
...digital inputs for digital playback components, such as a tape player. MCACC CONTROL IN SETUP MIC CONTROL SPEAKERS SYSTEM CONNECTOR OUT SUB WOOFER R SURROUND L ANTENNA FM UNBAL 75Ω AM LOOP ANTENNA AUDIO INPUT DIGITAL DVD DTV PC/GAME (COAXIAL) (OPTICAL) (OPTICAL) ANALOG AUX L USE ONLY WITH DISPLAY UNIT. Also make this chapter are used extensively in conjuction with the input jacks on your CD recorder, etc. These buttons correspond with the SHIFT button. DIGITAL OUT (OPTICAL) CD recorder, etc. • Connect the digital optical output jack on the receiver subwoofer...
Owner's Manual
Page 30
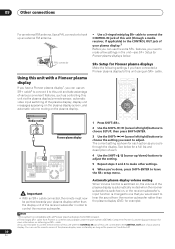
...the plasma display's remote sensor, automatic video input switching of the plasma display, display unit messages appearing on the plasma display screen, and automatic volume muting on , or the receiver subwoofer's input function is commercially available under the part number ADE7095. R SEE INSTRUCTION MANUAL. See below . ANTENNA PAL connector Using this unit using an SR+ cable. DVD DTV PC/GAME AUX TUNER SR SURROUND ENTER TOP MENU ADVANCED CLEAR TUNE MENU SOUND SETUP ST ENTER ST TEST TONE / TUNE RETURN MCACC / Media receiver CONTROL OUT Pioneer plasma display 1 Press...
...the plasma display's remote sensor, automatic video input switching of the plasma display, display unit messages appearing on the plasma display screen, and automatic volume muting on , or the receiver subwoofer's input function is commercially available under the part number ADE7095. R SEE INSTRUCTION MANUAL. See below . ANTENNA PAL connector Using this unit using an SR+ cable. DVD DTV PC/GAME AUX TUNER SR SURROUND ENTER TOP MENU ADVANCED CLEAR TUNE MENU SOUND SETUP ST ENTER ST TEST TONE / TUNE RETURN MCACC / Media receiver CONTROL OUT Pioneer plasma display 1 Press...
Owner's Manual
Page 33
... AUX TUNER SR SURROUND ENTER TOP MENU ADVANCED CLEAR TUNE MENU SOUND SETUP ST ENTER ST TEST TONE / TUNE RETURN MCACC / SOUND AUDIO SUBTITLE ANGLE RETRIEVER TV INPUT CHANNEL VOLUME SHIFT TV CONTROL 1 Switch on an unstable surface, or one that expands any two-channel source audio, such as CDs and TV broadcasts, to a fivechannel playback (left/center/right/left surround/ right surround), resulting in the table, you will be exposed to direct sunlight. Don't... A multi-channel audio...
... AUX TUNER SR SURROUND ENTER TOP MENU ADVANCED CLEAR TUNE MENU SOUND SETUP ST ENTER ST TEST TONE / TUNE RETURN MCACC / SOUND AUDIO SUBTITLE ANGLE RETRIEVER TV INPUT CHANNEL VOLUME SHIFT TV CONTROL 1 Switch on an unstable surface, or one that expands any two-channel source audio, such as CDs and TV broadcasts, to a fivechannel playback (left/center/right/left surround/ right surround), resulting in the table, you will be exposed to direct sunlight. Don't... A multi-channel audio...
Owner's Manual
Page 35
... model. • Try reducing the volume level. • If the problem persists, take it in stereo. Sometimes the trouble may be played in surround sound, set to operate the receiver subwoofer. • Check that nothing is set the DVD player's 96 kHz PCM Out setting to suddenly (an error shut off . that the MPEG Out setting is set of the mains power source is connected to your nearest Pioneer authorized service center or your dealer to carry out repair work...
... model. • Try reducing the volume level. • If the problem persists, take it in stereo. Sometimes the trouble may be played in surround sound, set to operate the receiver subwoofer. • Check that nothing is set the DVD player's 96 kHz PCM Out setting to suddenly (an error shut off . that the MPEG Out setting is set of the mains power source is connected to your nearest Pioneer authorized service center or your dealer to carry out repair work...
Owner's Manual
Page 36
... radio stations with a good signal. Auto tuning does not • The radio signal is not connected properly. • An error occurred during MCACC setup because the microphone is not connected or is weak. sensitive tuning, connect an outdoor antenna. For more pick up ) and adjust the direction and position for best reception, and secure to a wall. If the error still appears, please contact a Pioneer authorized service center or your dealer for servicing. • Try switching...
... radio stations with a good signal. Auto tuning does not • The radio signal is not connected properly. • An error occurred during MCACC setup because the microphone is not connected or is weak. sensitive tuning, connect an outdoor antenna. For more pick up ) and adjust the direction and position for best reception, and secure to a wall. If the error still appears, please contact a Pioneer authorized service center or your dealer for servicing. • Try switching...
Owner's Manual
Page 37
... • Accessories Remote control 1 Display unit 1 AA/R6 dry cell batteries (to confirm operation 2 Coaxial cable 1 Display cable 1 AM loop antenna 1 FM wire antenna 1 Microphone (for Auto MCACC setup 1 Power cord 1 Warranty card 1 These operating instructions S-ST606 Speaker system (Front speakers x2, surround speakers x2, center speaker x1) • Front/surround speakers Enclosure Closed-box floorstanding type (magnetically shielded) System 2-way system Speakers: Woofer 7.7 cm cone typex2 Tweeter 2.6 cm semi-dome type Nominal impedance 4 Ω Frequency range 70 Hz...
... • Accessories Remote control 1 Display unit 1 AA/R6 dry cell batteries (to confirm operation 2 Coaxial cable 1 Display cable 1 AM loop antenna 1 FM wire antenna 1 Microphone (for Auto MCACC setup 1 Power cord 1 Warranty card 1 These operating instructions S-ST606 Speaker system (Front speakers x2, surround speakers x2, center speaker x1) • Front/surround speakers Enclosure Closed-box floorstanding type (magnetically shielded) System 2-way system Speakers: Woofer 7.7 cm cone typex2 Tweeter 2.6 cm semi-dome type Nominal impedance 4 Ω Frequency range 70 Hz...


