
Owner's Manual
Page 11
... the display unit is difficult to view, the spacers can be sure to switch power off the protective paper from the wall socket. SEE INSTRUCTION MANUAL. After completing all connections, connect the power cord to the display unit and connect. Peel off and disconnect the power cord from the spacers and...
... the display unit is difficult to view, the spacers can be sure to switch power off the protective paper from the wall socket. SEE INSTRUCTION MANUAL. After completing all connections, connect the power cord to the display unit and connect. Peel off and disconnect the power cord from the spacers and...

Owner's Manual
Page 13
...) Front right (Red) Listening position Y-cable Center (Green) Front left (White) 7 To AC outlet • When connections are designed with the spiral wrap. SEE INSTRUCTION MANUAL. To prevent the risk of center, you should see the subwoofer connecting cable. Connection to any other than the one supplied with this into the...
...) Front right (Red) Listening position Y-cable Center (Green) Front left (White) 7 To AC outlet • When connections are designed with the spiral wrap. SEE INSTRUCTION MANUAL. To prevent the risk of center, you should see the subwoofer connecting cable. Connection to any other than the one supplied with this into the...
Owner's Manual
Page 14
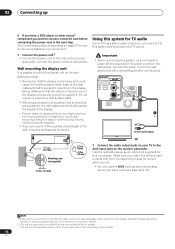
... 75 AM LOOP ANTENNA AUDIO INPUT DIGITAL DVD DTV PC/GAME (COAXIAL) (OPTICAL) (OPTICAL) ANALOG AUX L R USE ONLY WITH DISPLAY UNIT. SEE INSTRUCTION MANUAL. 02 Connecting up 6 If you have a DVD player or other connections. Connect the power cord to AC inlet on is heavy and could cause the...your TV or monitor for any power cord other than connecting to this system. 14 En Please refer to take advantage of the display. • Pioneer bears no responsibility for this system and enjoy surround TV sound. Note 1 Make sure to connect a TV or monitor (for video sources) to...
... 75 AM LOOP ANTENNA AUDIO INPUT DIGITAL DVD DTV PC/GAME (COAXIAL) (OPTICAL) (OPTICAL) ANALOG AUX L R USE ONLY WITH DISPLAY UNIT. SEE INSTRUCTION MANUAL. 02 Connecting up 6 If you have a DVD player or other connections. Connect the power cord to AC inlet on is heavy and could cause the...your TV or monitor for any power cord other than connecting to this system. 14 En Please refer to take advantage of the display. • Pioneer bears no responsibility for this system and enjoy surround TV sound. Note 1 Make sure to connect a TV or monitor (for video sources) to...

Owner's Manual
Page 18
... when you change the placement of your speakers or your listening area, taking into account ambient noise, and testing for the first time). SEE INSTRUCTION MANUAL. ENTER SETUP CLEAR SLEEP SR TUNE ST SOUND ST ENTER TUNE TEST TONE SOUND 1 Switch the system into standby. 2 Press SETUP. 3 Use the / (cursor left...
... when you change the placement of your speakers or your listening area, taking into account ambient noise, and testing for the first time). SEE INSTRUCTION MANUAL. ENTER SETUP CLEAR SLEEP SR TUNE ST SOUND ST ENTER TUNE TEST TONE SOUND 1 Switch the system into standby. 2 Press SETUP. 3 Use the / (cursor left...

Owner's Manual
Page 23
... up /down) buttons to select FM MONO then press ENTER. Listening to a frequency. The tuner will stop on the next station it using the manual tuning method. Keep the button held down until you reach the frequency you can improve the sound quality by switching to mono. 1 Tune to an... time you always have easy access to your favorite stations without having to tune in manually each time. 1 Tune to an AM or FM radio station. There are three tuning modes-manual, auto, and highspeed: • Manual tuning - Press and hold TUNE +/- until the frequency display starts to select the ...
... up /down) buttons to select FM MONO then press ENTER. Listening to a frequency. The tuner will stop on the next station it using the manual tuning method. Keep the button held down until you reach the frequency you can improve the sound quality by switching to mono. 1 Tune to an... time you always have easy access to your favorite stations without having to tune in manually each time. 1 Tune to an AM or FM radio station. There are three tuning modes-manual, auto, and highspeed: • Manual tuning - Press and hold TUNE +/- until the frequency display starts to select the ...

Owner's Manual
Page 27
SEE INSTRUCTION MANUAL. AC IN CENTER R FRONT L To digital audio or output (coaxial) STANDBY/ON MUTE VOLUME DVD DTV PC/GAME AUX TUNER 1 If the system isn't already ... L FM UNBAL 75 AM LOOP ANTENNA AUDIO INPUT DIGITAL DVD DTV PC/GAME (COAXIAL) (OPTICAL) (OPTICAL) ANALOG AUX L R USE ONLY WITH DISPLAY UNIT. SEE INSTRUCTION MANUAL. Also make this system. Connecting an analog audio component You can connect both analog and digital external audio sources to connect an analog audio component...
SEE INSTRUCTION MANUAL. AC IN CENTER R FRONT L To digital audio or output (coaxial) STANDBY/ON MUTE VOLUME DVD DTV PC/GAME AUX TUNER 1 If the system isn't already ... L FM UNBAL 75 AM LOOP ANTENNA AUDIO INPUT DIGITAL DVD DTV PC/GAME (COAXIAL) (OPTICAL) (OPTICAL) ANALOG AUX L R USE ONLY WITH DISPLAY UNIT. SEE INSTRUCTION MANUAL. Also make this system. Connecting an analog audio component You can connect both analog and digital external audio sources to connect an analog audio component...

Owner's Manual
Page 28
...ONLY WITH DISPLAY UNIT. When this unit is switched on, or the input function is changed to one that you would want to adjust. Pioneer plasma display Important • With an SR+ cable connected, the remote must now be able to use the remote sensor of this unit with... for example). • VOL.C ON - 08 Other connections Using this unit with a Pioneer plasma display If you have connected a Pioneer plasma display to this unit is heard. • VOL.C OFF - SEE INSTRUCTION MANUAL. Automatic plasma display volume muting When Volume Control is switched on, the volume of the plasma...
...ONLY WITH DISPLAY UNIT. When this unit is switched on, or the input function is changed to one that you would want to adjust. Pioneer plasma display Important • With an SR+ cable connected, the remote must now be able to use the remote sensor of this unit with... for example). • VOL.C ON - 08 Other connections Using this unit with a Pioneer plasma display If you have connected a Pioneer plasma display to this unit is heard. • VOL.C OFF - SEE INSTRUCTION MANUAL. Automatic plasma display volume muting When Volume Control is switched on, the volume of the plasma...

Owner's Manual
Page 67
... Col.Lomas de Chapultepec, Mexico,D.F. 11000 TEL: 55-9178-4270 K002_B_En and you wish to locate the nearest Pioneer Authorized Independent Service Company, or if you wish to purchase replacement parts, operating instructions, service manuals, or accessories, please call the number shown below. 8 0 0 - 4 2 1 - 1 4 0 ...TEL: (800) 421-1404 PIONEER ELECTRONICS OF CANADA, INC. 300 Allstate Parkway, Markham, Ontario L3R 0P2, Canada TEL: 1-877-283-5901, 905-479-4411 PIONEER EUROPE NV Haven 1087, Keetberglaan 1, B-9120 Melsele, Belgium TEL: 03/570.05.11 PIONEER ELECTRONICS ASIACENTRE PTE. Should this ...
... Col.Lomas de Chapultepec, Mexico,D.F. 11000 TEL: 55-9178-4270 K002_B_En and you wish to locate the nearest Pioneer Authorized Independent Service Company, or if you wish to purchase replacement parts, operating instructions, service manuals, or accessories, please call the number shown below. 8 0 0 - 4 2 1 - 1 4 0 ...TEL: (800) 421-1404 PIONEER ELECTRONICS OF CANADA, INC. 300 Allstate Parkway, Markham, Ontario L3R 0P2, Canada TEL: 1-877-283-5901, 905-479-4411 PIONEER EUROPE NV Haven 1087, Keetberglaan 1, B-9120 Melsele, Belgium TEL: 03/570.05.11 PIONEER ELECTRONICS ASIACENTRE PTE. Should this ...


