
Owner's Manual
Page 2
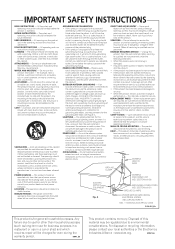
... used in accordance with electric appliances such as radios and televisions, use shielded cables and connectors for connections. THE SERIAL NUMBER FOR THIS EQUIPMENT IS LOCATED IN THE REAR. Consult the dealer or an experienced radio/TV technician for a Class B digital device, pursuant to operate the equipment. D8-10-2_En IMPORTANT NOTICE - Connect the equipment into an outlet on , the user is connected. - NO USER-SERVICEABLE PARTS...
... used in accordance with electric appliances such as radios and televisions, use shielded cables and connectors for connections. THE SERIAL NUMBER FOR THIS EQUIPMENT IS LOCATED IN THE REAR. Consult the dealer or an experienced radio/TV technician for a Class B digital device, pursuant to operate the equipment. D8-10-2_En IMPORTANT NOTICE - Connect the equipment into an outlet on , the user is connected. - NO USER-SERVICEABLE PARTS...
Owner's Manual
Page 3
... cloth or a soft dry cloth. Power-supply cords should be unplugged from overheating, and these openings must not be followed. See Figure A. LIGHTNING - Never push objects of the polarized plug. • If this product is equipped with care. When replacement parts are required, be operated only from the wall outlet and disconnect the antenna or cable system. SAFETY CHECK - HEAT...
... cloth or a soft dry cloth. Power-supply cords should be unplugged from overheating, and these openings must not be followed. See Figure A. LIGHTNING - Never push objects of the polarized plug. • If this product is equipped with care. When replacement parts are required, be operated only from the wall outlet and disconnect the antenna or cable system. SAFETY CHECK - HEAT...

Owner's Manual
Page 5
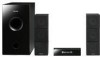
... sound. We Want You Listening For A Lifetime Used wisely, your hearing "comfort level" adapts to consider how you can be loud and harmful to confirm operation) x2 (page 17) • Display unit (page 15) • Power cord (page 14) • AM loop antenna (page 12) • FM wire antenna (page 12) • Display cable (page 11) • Coaxial cable (page 27) • Microphone (for Auto MCACC setup...
... sound. We Want You Listening For A Lifetime Used wisely, your hearing "comfort level" adapts to consider how you can be loud and harmful to confirm operation) x2 (page 17) • Display unit (page 15) • Power cord (page 14) • AM loop antenna (page 12) • FM wire antenna (page 12) • Display cable (page 11) • Coaxial cable (page 27) • Microphone (for Auto MCACC setup...
Owner's Manual
Page 6
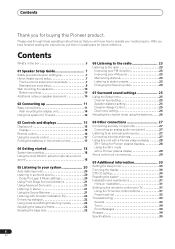
... listening modes 22 Adjusting the bass and treble 22 Boosting the bass level 22 08 Other connections 27 Connecting auxiliary components 27 Connecting an analog audio component 27 Listening to an external audio source 27 Connecting external antennas 27 Using this Pioneer product. Contents Thank you will know how to operate your TV 31 Using the TV remote control buttons 31 Preset code list 32 Troubleshooting 33 General 33 Tuner 34 Error Messages 34 Glossary 34 Specifications 35...
... listening modes 22 Adjusting the bass and treble 22 Boosting the bass level 22 08 Other connections 27 Connecting auxiliary components 27 Connecting an analog audio component 27 Listening to an external audio source 27 Connecting external antennas 27 Using this Pioneer product. Contents Thank you will know how to operate your TV 31 Using the TV remote control buttons 31 Preset code list 32 Troubleshooting 33 General 33 Tuner 34 Error Messages 34 Glossary 34 Specifications 35...
Owner's Manual
Page 9
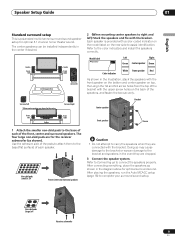
... in the diagram above for optimal 5.1 channel home theater sound. Non-skid pads (small) x 24 Front, Center and Surround speakers Caution • Do not attempt to the bracket and speakers in the event they are for the receiver subwoofer (as shown in the center. After connecting everything, place the speakers as shown). Speaker Setup Guide 01 English Standard surround setup This is provided with a color-coded indicator on the model label...
... in the diagram above for optimal 5.1 channel home theater sound. Non-skid pads (small) x 24 Front, Center and Surround speakers Caution • Do not attempt to the bracket and speakers in the event they are for the receiver subwoofer (as shown in the center. After connecting everything, place the speakers as shown). Speaker Setup Guide 01 English Standard surround setup This is provided with a color-coded indicator on the model label...

Owner's Manual
Page 13
... values. Connecting up 02 English Receiver subwoofer Surround right (Gray) Surround left of electric shock when connecting or disconnecting the speaker cables, disconnect the power cord before touching any uninsulated parts. • Do not connect any amplifier other amplifier may be cut at a desired length. AC IN CENTER R FRONT L FM UNBAL 75 AM LOOP ANTENNA AUDIO INPUT DIGITAL DVD DTV PC/GAME (COAXIAL) (OPTICAL) (OPTICAL) ANALOG AUX 4 L R Center (Green) Front right (Red) Listening position Y-cable Center (Green...
... values. Connecting up 02 English Receiver subwoofer Surround right (Gray) Surround left of electric shock when connecting or disconnecting the speaker cables, disconnect the power cord before touching any uninsulated parts. • Do not connect any amplifier other amplifier may be cut at a desired length. AC IN CENTER R FRONT L FM UNBAL 75 AM LOOP ANTENNA AUDIO INPUT DIGITAL DVD DTV PC/GAME (COAXIAL) (OPTICAL) (OPTICAL) ANALOG AUX 4 L R Center (Green) Front right (Red) Listening position Y-cable Center (Green...
Owner's Manual
Page 14
...) (OPTICAL) ANALOG AUX L MCACC SETUP MIC CONTROL IN SYSTEM CONNECTOR CONTROL OUT SPEAKERS R SUBWOOFER R SURROUND L FM UNBAL 75 AM LOOP ANTENNA AUDIO INPUT DIGITAL DVD DTV PC/GAME (COAXIAL) (OPTICAL) (OPTICAL) ANALOG AUX L R USE ONLY WITH DISPLAY UNIT. Important • When connecting this connection. Make sure you match the left and right outputs with this system. • Do not use the AUX input jacks for this system, be sure to switch power off and disconnect the power cord from faulty assembly or installation...
...) (OPTICAL) ANALOG AUX L MCACC SETUP MIC CONTROL IN SYSTEM CONNECTOR CONTROL OUT SPEAKERS R SUBWOOFER R SURROUND L FM UNBAL 75 AM LOOP ANTENNA AUDIO INPUT DIGITAL DVD DTV PC/GAME (COAXIAL) (OPTICAL) (OPTICAL) ANALOG AUX L R USE ONLY WITH DISPLAY UNIT. Important • When connecting this connection. Make sure you match the left and right outputs with this system. • Do not use the AUX input jacks for this system, be sure to switch power off and disconnect the power cord from faulty assembly or installation...

Owner's Manual
Page 16
... the sound menu, from the speakers. Press again to select the PC/game console (PC/GAME) input. Use to select the DTV input. PC/GAME - Press to adjust the volume. 4 Input select buttons DVD - AUX - Press to mute all audio from which you can adjust bass and treble, etc. 11 TEST TONE Use to output the test tone (for speaker setup) (page 26). 12 SOUND RETRIEVER Press to restore CD quality sound to compressed stereo audio sources (page 21). 13 SURROUND Use to select a Surround mode...
... the sound menu, from the speakers. Press again to select the PC/game console (PC/GAME) input. Use to select the DTV input. PC/GAME - Press to adjust the volume. 4 Input select buttons DVD - AUX - Press to mute all audio from which you can adjust bass and treble, etc. 11 TEST TONE Use to output the test tone (for speaker setup) (page 26). 12 SOUND RETRIEVER Press to restore CD quality sound to compressed stereo audio sources (page 21). 13 SURROUND Use to select a Surround mode...

Owner's Manual
Page 18
... turn the volume down ) buttons to select DEMO from the menu, then press ENTER. 4 Use the / (cursor up the microphone provided, the system uses the information from : • DEMO ON - AC IN CENTER R FRONT L Note 1 You only need to the MCACC SETUP MIC jack on the rear panel. MCACC SETUP MIC MCACC SETUP MIC CONTROL IN SYSTEM CONNECTOR CONTROL SPEAKERS OUT SUBWOOFER R SURROUND L FM UNBAL 75 AM LOOP ANTENNA AUDIO INPUT DIGITAL DVD DTV PC/GAME (COAXIAL) (OPTICAL) (OPTICAL) ANALOG AUX L R USE ONLY WITH DISPLAY...
... turn the volume down ) buttons to select DEMO from the menu, then press ENTER. 4 Use the / (cursor up the microphone provided, the system uses the information from : • DEMO ON - AC IN CENTER R FRONT L Note 1 You only need to the MCACC SETUP MIC jack on the rear panel. MCACC SETUP MIC MCACC SETUP MIC CONTROL IN SYSTEM CONNECTOR CONTROL SPEAKERS OUT SUBWOOFER R SURROUND L FM UNBAL 75 AM LOOP ANTENNA AUDIO INPUT DIGITAL DVD DTV PC/GAME (COAXIAL) (OPTICAL) (OPTICAL) ANALOG AUX L R USE ONLY WITH DISPLAY...
Owner's Manual
Page 19
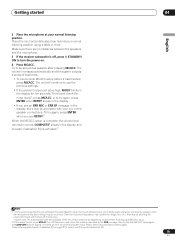
... message in the display, there may be a problem with Acoustic Calibration EQ on page 22 to be happening, switch off the TV during the setup. Make sure there are no obstacles between the speakers and the microphone. 3 If the receiver subwoofer is too high, NOISY blinks in the display for the Auto MCACC setup (too much ambient noise, echo off the power, and check the...
... message in the display, there may be a problem with Acoustic Calibration EQ on page 22 to be happening, switch off the TV during the setup. Make sure there are no obstacles between the speakers and the microphone. 3 If the receiver subwoofer is too high, NOISY blinks in the display for the Auto MCACC setup (too much ambient noise, echo off the power, and check the...

Owner's Manual
Page 21
... stereo source for stereo music sources Listening in stereo. Switches the Sound Retriever off. 21 En When playing a multichannel source, all channels are designed to provide optimum listening effect when using the Front surround speaker setup as described on page 7. Suitable for mono or stereo TV broadcasts • SPORTS - Powerful surround sound for a variety of multi-channel sources, down-mixed stereo sound) from an uneven sound image. ST SOUND SOUND RETRIEVER ST ENTER TUNE TEST TONE SURROUND ADVANCED F.S.SURR MCACC CHANNEL VOLUME TV INPUT...
... stereo source for stereo music sources Listening in stereo. Switches the Sound Retriever off. 21 En When playing a multichannel source, all channels are designed to provide optimum listening effect when using the Front surround speaker setup as described on page 7. Suitable for mono or stereo TV broadcasts • SPORTS - Powerful surround sound for a variety of multi-channel sources, down-mixed stereo sound) from an uneven sound image. ST SOUND SOUND RETRIEVER ST ENTER TUNE TEST TONE SURROUND ADVANCED F.S.SURR MCACC CHANNEL VOLUME TV INPUT...

Owner's Manual
Page 22
... off and speaker settings (channel delay and channel level) remains as it is set. • Acoustic Calibration EQ is set in Using the Auto MCACC setup for optimal surround sound on automatically after Auto MCACC setup is designed to make the dialogue stand out from other background sounds in a sound source. ENTER SETUP ST SOUND SOUND RETRIEVER CLEAR SLEEP SR TUNE ST ENTER TUNE TEST TONE SURROUND ADVANCED F.S.SURR MCACC 1 Press SOUND. 2 Use the / (cursor left /right) buttons to select TONE then press...
... off and speaker settings (channel delay and channel level) remains as it is set. • Acoustic Calibration EQ is set in Using the Auto MCACC setup for optimal surround sound on automatically after Auto MCACC setup is designed to make the dialogue stand out from other background sounds in a sound source. ENTER SETUP ST SOUND SOUND RETRIEVER CLEAR SLEEP SR TUNE ST ENTER TUNE TEST TONE SURROUND ADVANCED F.S.SURR MCACC 1 Press SOUND. 2 Use the / (cursor left /right) buttons to select TONE then press...

Owner's Manual
Page 25
... 1 FT to use the test tone method. Front right speaker • SR - Note that by further adjustment of setting the channel levels allows you will overwrite the settings you have made here. Speaker distance setting The Auto MCACC feature (see page 18) should give you the best surround sound setup. Surround right speaker • SL - Subwoofer Each speaker can be able to adjust the distance. Dynamic Range Control works only with Dolby Digital soundtracks and...
... 1 FT to use the test tone method. Front right speaker • SR - Note that by further adjustment of setting the channel levels allows you will overwrite the settings you have made here. Speaker distance setting The Auto MCACC feature (see page 18) should give you the best surround sound setup. Surround right speaker • SL - Subwoofer Each speaker can be able to adjust the distance. Dynamic Range Control works only with Dolby Digital soundtracks and...

Owner's Manual
Page 26
... (default) - Only channel 2 is playing, use the Auto MCACC feature again, it really is played • CH2 MONO - Both channels are independent of each speaker in turn . 3 While a test tone is played • CH1/CH2 - Note that you hear the test tone at higher volume) • DRC MID - The test tone is output from each speaker in Channel level setting on DVD-RW discs recorded with bilingual audio. 1 Press SETUP. 2 Use the / (cursor left/right) buttons to select DUALMONO...
... (default) - Only channel 2 is playing, use the Auto MCACC feature again, it really is played • CH2 MONO - Both channels are independent of each speaker in turn . 3 While a test tone is played • CH1/CH2 - Note that you hear the test tone at higher volume) • DRC MID - The test tone is output from each speaker in Channel level setting on DVD-RW discs recorded with bilingual audio. 1 Press SETUP. 2 Use the / (cursor left/right) buttons to select DUALMONO...

Owner's Manual
Page 27
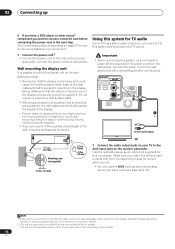
After completing all connections, connect the power cord to switch on , press STANDBY/ ON to the wall socket. AC IN CENTER R FRONT L To digital audio or output (coaxial) STANDBY/ON MUTE VOLUME DVD DTV PC/GAME AUX TUNER 1 If the system isn't already on . For an external FM antenna, use a PAL connector to hook up either indoors or outdoors. See Using this system for TV audio on the receiver subwoofer. Digital audio sources include digital satellite receivers, CD recorders, etc...
After completing all connections, connect the power cord to switch on , press STANDBY/ ON to the wall socket. AC IN CENTER R FRONT L To digital audio or output (coaxial) STANDBY/ON MUTE VOLUME DVD DTV PC/GAME AUX TUNER 1 If the system isn't already on . For an external FM antenna, use a PAL connector to hook up either indoors or outdoors. See Using this system for TV audio on the receiver subwoofer. Digital audio sources include digital satellite receivers, CD recorders, etc...

Owner's Manual
Page 28
... CONNECTOR CONTROL SPEAKERS OUT SUBWOOFER R SURROUND L FM UNBAL 75 AM LOOP ANTENNA AUDIO INPUT DIGITAL DVD DTV PC/GAME (COAXIAL) (OPTICAL) (OPTICAL) ANALOG AUX L R USE ONLY WITH DISPLAY UNIT. ENTER SETUP CLEAR SLEEP SR ST SOUND TUNE ST ENTER TUNE TEST TONE SOUND RETRIEVER SURROUND ADVANCED F.S.SURR MCACC 1 Press SR+. 2 Use the / (cursor left/right) buttons to choose SETUP, then press ENTER. 3 Use the / (cursor left/right) buttons to choose the setting you want to hear the sound from the receiver subwoofer...
... CONNECTOR CONTROL SPEAKERS OUT SUBWOOFER R SURROUND L FM UNBAL 75 AM LOOP ANTENNA AUDIO INPUT DIGITAL DVD DTV PC/GAME (COAXIAL) (OPTICAL) (OPTICAL) ANALOG AUX L R USE ONLY WITH DISPLAY UNIT. ENTER SETUP CLEAR SLEEP SR ST SOUND TUNE ST ENTER TUNE TEST TONE SOUND RETRIEVER SURROUND ADVANCED F.S.SURR MCACC 1 Press SR+. 2 Use the / (cursor left/right) buttons to choose SETUP, then press ENTER. 3 Use the / (cursor left/right) buttons to choose the setting you want to hear the sound from the receiver subwoofer...

Owner's Manual
Page 30
.... Switches off the receiver subwoofer after about it too bright.2 DTS CD setting If you play a DTS-encoded CD, you switch on, all system settings to the factory default. 1 Switch the system on. 2 Press and hold SURROUND then press the STANDBY/ON button on the display unit. Resetting the system Use this setting to hear the decoded signal. 1 Switch the system into standby. 2 Press SETUP. 3 Use the / (cursor left /right) buttons to select DIMMER...
.... Switches off the receiver subwoofer after about it too bright.2 DTS CD setting If you play a DTS-encoded CD, you switch on, all system settings to the factory default. 1 Switch the system on. 2 Press and hold SURROUND then press the STANDBY/ON button on the display unit. Resetting the system Use this setting to hear the decoded signal. 1 Switch the system into standby. 2 Press SETUP. 3 Use the / (cursor left /right) buttons to select DIMMER...

Owner's Manual
Page 32
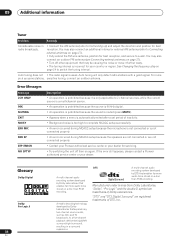
... WALTHAM 643 WATSON 607 WATT RADIO 632, 642, 649 WHITE WESTINGHOUSE 607 YOKO 607, 642, 646 ZENITH 603, 620 PIONEER 600, 631, 632, 607, 636, 642, 651 32 En 09 Additional information Preset code list Please note that there are cases where only certain functions may be controllable after assigning the proper preset code, or the codes for the manufacturer...
... WALTHAM 643 WATSON 607 WATT RADIO 632, 642, 649 WHITE WESTINGHOUSE 607 YOKO 607, 642, 646 ZENITH 603, 620 PIONEER 600, 631, 632, 607, 636, 642, 651 32 En 09 Additional information Preset code list Please note that there are cases where only certain functions may be controllable after assigning the proper preset code, or the codes for the manufacturer...

Owner's Manual
Page 33
... Problem Remedy The power does not • Leave the unit plugged in, wait for one set of analog audio cables are no loose strands of this component, check the points below , ask your nearest Pioneer authorized service center or your dealer for servicing. No sound from surround or center speakers. • Refer to Channel level setting on page 25 to turn on . Can't operate using the line input, make sure that there is output...
... Problem Remedy The power does not • Leave the unit plugged in, wait for one set of analog audio cables are no loose strands of this component, check the points below , ask your nearest Pioneer authorized service center or your dealer for servicing. No sound from surround or center speakers. • Refer to Channel level setting on page 25 to turn on . Can't operate using the line input, make sure that there is output...
Owner's Manual
Page 34
... AM antenna (refer to switch the tuning interval. Manufactured under license from Dolby Laboratories. If the error still appears, please contact a Pioneer authorized service center or your dealer for your country or region. See Changing the frequency step on page 24 to Connecting external antennas on again. Auto tuning does not • The radio signal is not connected properly. • An error occurred during MCACC setup because the microphone is not connected...
... AM antenna (refer to switch the tuning interval. Manufactured under license from Dolby Laboratories. If the error still appears, please contact a Pioneer authorized service center or your dealer for your country or region. See Changing the frequency step on page 24 to Connecting external antennas on again. Auto tuning does not • The radio signal is not connected properly. • An error occurred during MCACC setup because the microphone is not connected...


